

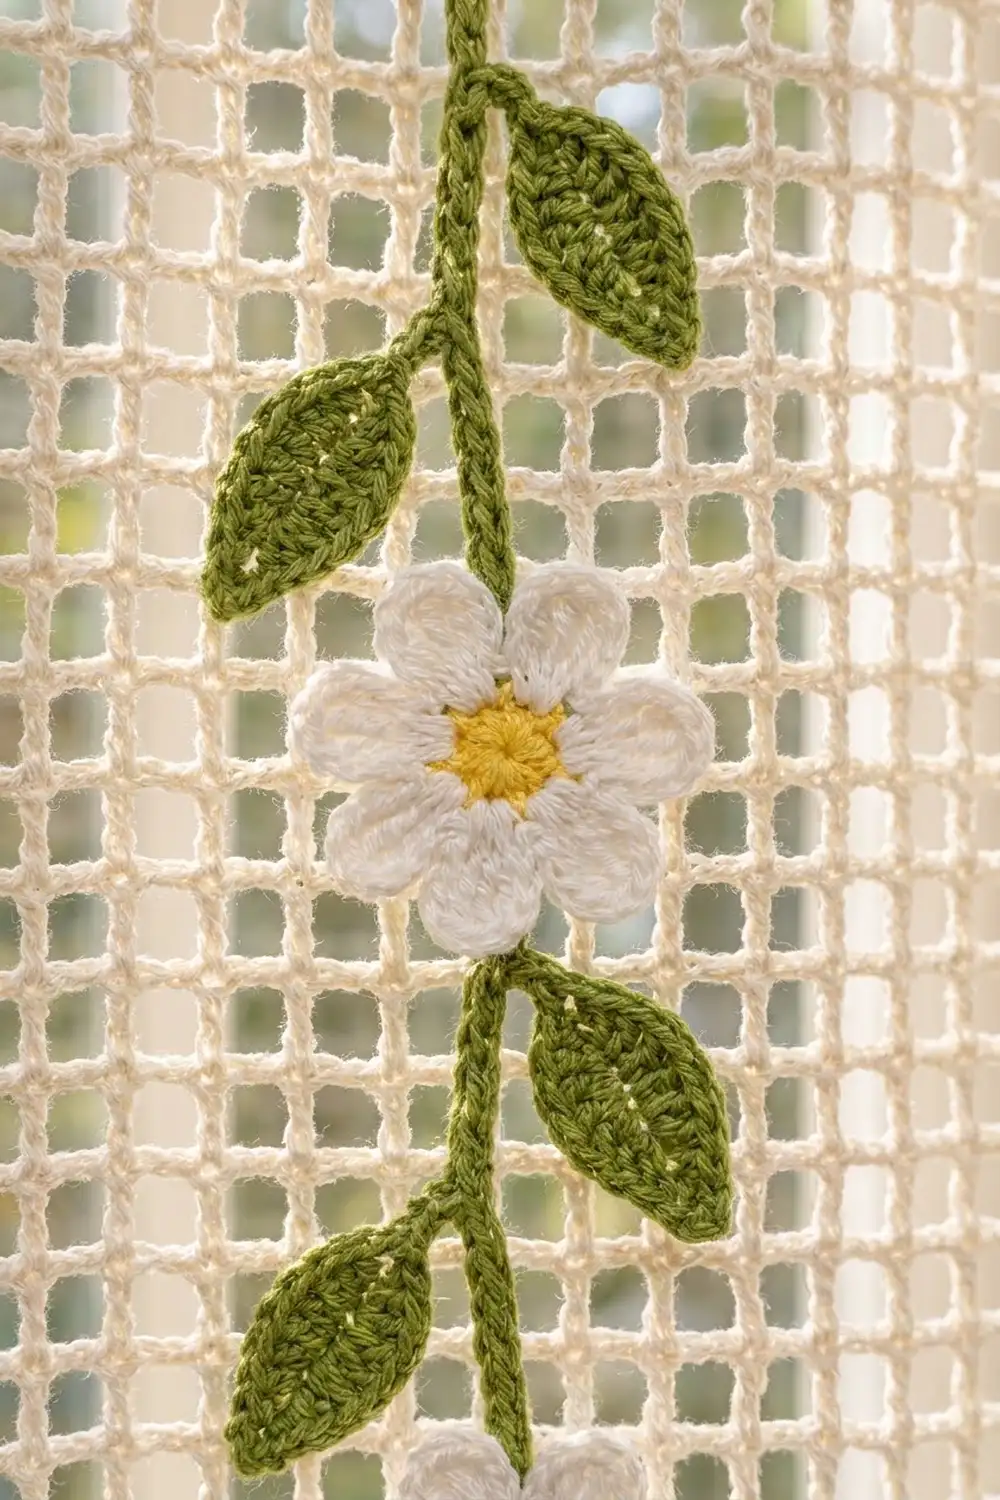
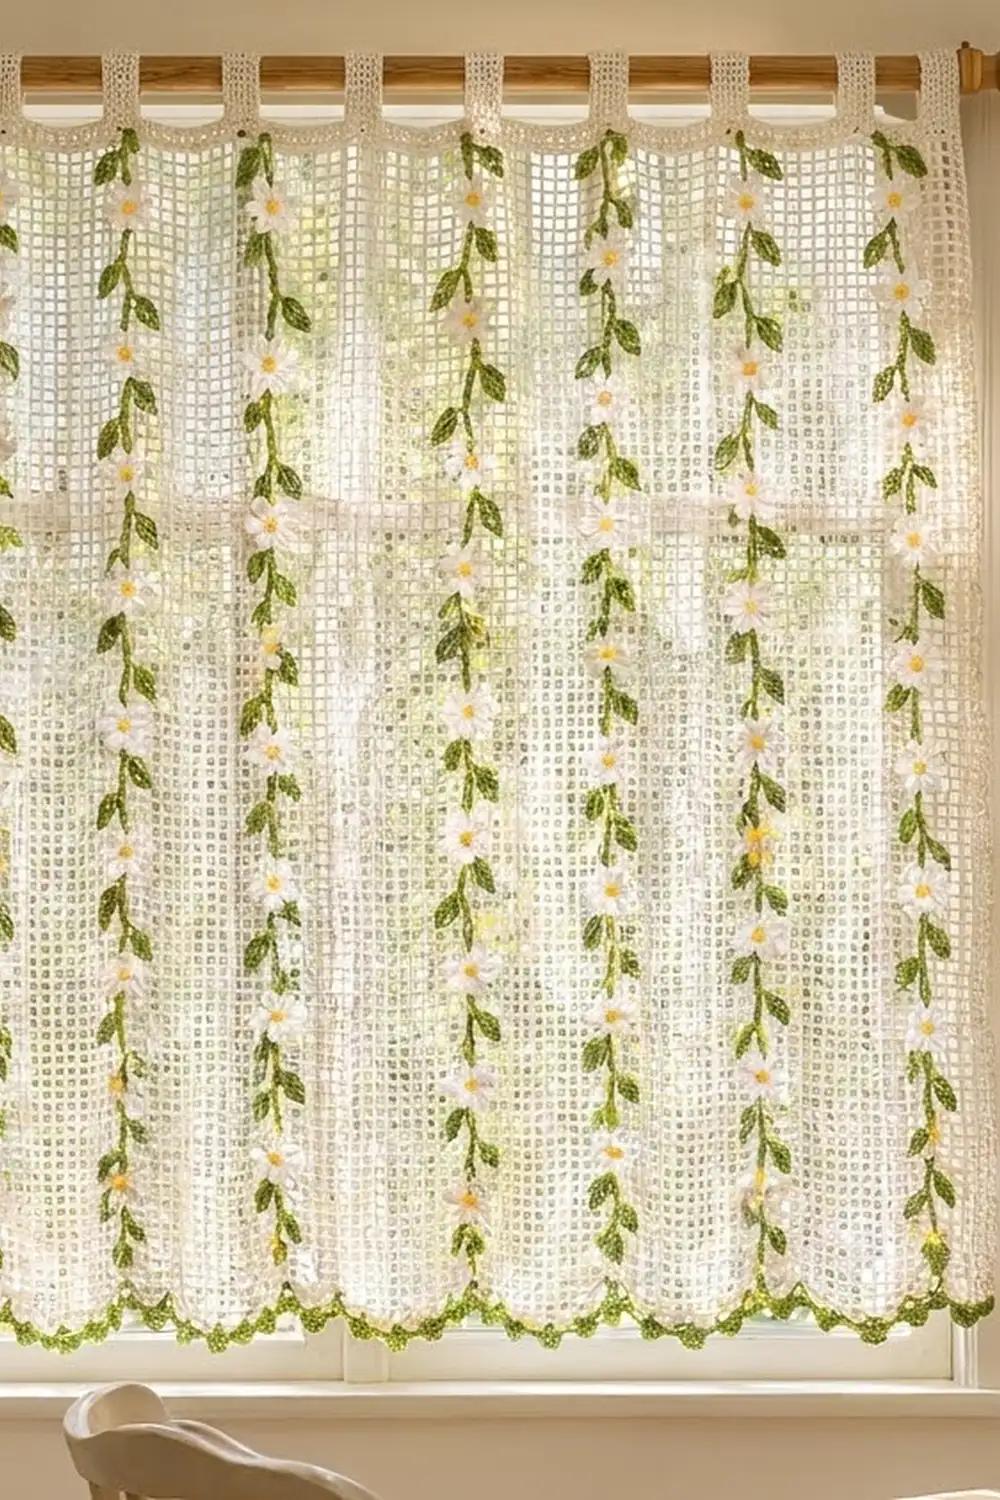
This cafe-style curtain combines a light, airy filet mesh with trailing daisy vines. Daylight comes through the open grid, and the white flowers and green leaves give it a fresh cottage look in a kitchen or breakfast nook.
There are four colors: a soft cream for the mesh, header, and tabs; bright white for the petals; sunny yellow for the flower centers; and a leafy green for the stems, leaves, and the scallop outline. The pattern uses US crochet terms throughout.
The finished curtain measures 35.7 in (90.7 cm) wide by 42.25 in (107.3 cm) long, not counting the tabs. With the tabs, it hangs about 44.75 in (113.7 cm) from the top of the rod.
You make one mesh panel from the bottom up, add a solid header, and work 11 tabs off the header. Next come the scalloped bottom edging and a plain side edging. Last, you surface-crochet eight green stems onto the mesh and sew on the daisies and leaves.
Finished Size and Construction
- Finished size: 35.7 in × 42.25 in (90.7 cm × 107.3 cm), plus about 2.5 in (6.4 cm) of tab loop above the header
- Skill level: Intermediate
- Terminology: US crochet terms
- Yarn weight: DK / light (#3) cotton
- Hook: 4.0 mm (G-6) for the panel; 3.5 mm (E-4) for the appliqués
- Number of pieces: 1 panel (single piece), plus 64 daisy and 128 leaf appliqués that are sewn on
- Layout: 88 mesh squares wide × 100 rows high, with 8 vines
- Mesh body size: 35.2 in × 40 in (89.4 cm × 101.6 cm)
- Size before border (body + header): 35.2 in × 41.25 in (89.4 cm × 104.8 cm)
- Border depth: 1 in (2.5 cm) at the bottom; about 1/4 in (0.6 cm) on each side
Materials
Use a smooth mercerized or combed cotton in DK weight, about 110 m per 50 g. Cotton holds the square shape of the mesh, keeps the daisies crisp, and washes well. Avoid fuzzy yarns, because they blur the grid.
- Cream (panel, header, tabs, edging): 325 g / 715 m
- White (petals): 45 g / 99 m
- Yellow (centers): 25 g / 55 m
- Green (stems, leaves, scallop outline): 75 g / 165 m
Tools:
- 4.0 mm (G-6) and 3.5 mm (E-4) crochet hooks
- Tapestry needle
- About 20 locking stitch markers
- Rustproof pins and a blocking surface large enough for the panel
- Tape measure
- Spray bottle
All quantities include a margin of about 15% for gauge swatches and sewing tails.
Abbreviations (US Terms)
- ch – chain
- sl st – slip stitch
- sc – single crochet
- hdc – half double crochet
- dc – double crochet
- sk – skip
- sp – space
- st(s) – stitch(es)
- RS / WS – right side / wrong side
- rep – repeat
Special stitches:
- Mesh: dc, ch 2. One mesh is one dc post plus the ch-2 space beside it.
- Surface slip stitch: Hold the yarn on the WS of the panel. Insert the hook from the RS through a mesh hole, pull up a loop, and keep it on the hook. Then insert the hook through the next hole, yarn over on the WS, and pull the loop through both the fabric and the loop on the hook.
Gauge and Checkpoints
Gauge with the 4.0 mm hook:
- 10 meshes and 10 rows = 4 in × 4 in (10.2 cm × 10.2 cm), so each mesh is 0.4 in (1.0 cm) square
- 20 sc = 4 in (10.2 cm)
- 4 sc rows = 1 in (2.5 cm)
- 3 hdc rows = 1 in (2.5 cm)
Test pieces first.
- Chain 41 and work 12 rows of mesh. This makes 12 meshes, about 4.8 in (12.2 cm) square. Measure 10 meshes in the center.
- Make one daisy and one leaf with the 3.5 mm hook. The daisy should be 1.6 in (4.1 cm) across. The leaf should be 1.4 in × 0.7 in (3.6 cm × 1.8 cm).
Checkpoints:
- After Row 10, the panel is 35.2 in (89.4 cm) wide.
- After Row 50, it is 20 in (50.8 cm) long.
- After Row 100, it is 40 in (101.6 cm) long.
- The finished header is 1.25 in (3.2 cm) deep.
If your gauge is off:
- Too big (fewer than 10 meshes per 4 in): go down a hook size.
- Too small: go up a hook size.
Mesh height matters as much as width. Squares that come out tall make the vines longer and push the top daisy into the header. If your squares are tall, try a dc with a shorter yarn-over pull.
Mesh Panel
With cream and the 4.0 mm hook, ch 269.
Row 1: Dc in 8th ch from hook. The first 7 ch count as dc, ch 2, and 2 skipped ch, so this makes 1 mesh. Ch 2, sk 2 ch, dc in next ch; rep from * across. (89 dc posts, 88 ch-2 sps = 88 meshes.)
Row 2: Ch 5 (counts as dc, ch 2), turn. Sk the first ch-2 sp and dc in the next dc. Ch 2, dc in next dc; rep from * across, working the last dc in the 3rd ch of the turning ch. (88 meshes.)
Rows 3–100: Rep Row 2. (88 meshes in every row.)
Choose the neater face as the RS and mark it. Place a marker every 10 rows so it’s easy to count later when you position the flowers. Do not fasten off.
Header
Row 1 (conversion row): Ch 1, turn. Work 1 sc in each dc and 1 sc in each ch-2 sp. (89 + 88 = 177 sc.)
Rows 2–4: Ch 2 (does not count as a st), turn, hdc in each st across. (177 hdc.)
Fasten off. The header measures 1.25 in (3.2 cm).
Tabs (make 11)
The tabs are spread across the 177 header stitches as follows: 11 tabs × 7 sts + 10 gaps × 10 sts = 77 + 100 = 177. Tab 1 uses sts 1–7. Each following tab starts 17 sts after the start of the one before it, so they start on sts 1, 18, 35, 52, 69, 86, 103, 120, 137, 154, and 171. Mark these with stitch markers.
Row 1: With the RS facing, join cream in the first marked st. Ch 1, sc in the same st and in the next 6 sts. (7 sc.)
Rows 2–24: Ch 1, turn, sc in each st. (7 sc.)
The tab is 6 in (15.2 cm) long. Fasten off, leaving a 12 in (30.5 cm) tail. Fold the tab to the WS and whipstitch its last row across the back of header Row 1. The finished loop fits a rod up to 1.25 in (3.2 cm) across.
Each tab is 1.4 in (3.6 cm) wide, and the gaps between tabs are 2 in (5.1 cm).
Daisies (make 64)
Use the 3.5 mm hook.
Rnd 1: With yellow, make a magic ring. Ch 1, work 8 sc in the ring, and sl st to the first sc. (8 sc.) Pull the ring closed tight and fasten off.
Rnd 2: Join white in any sc. In each sc, work (sl st, ch 2, 2 dc, ch 2, sl st). (8 petals; 16 dc in total.)
Fasten off, leaving a 10 in (25.4 cm) white tail for sewing. Weave in the yellow tails on the back. The daisy measures 1.6 in (4.1 cm) across.
Leaves (make 128)
Use green and the 3.5 mm hook.
Ch 8. Working into the chain:
- Sc in the 2nd ch from hook, then hdc, dc, dc, hdc, and sc in the next 5 ch. (6 sts.)
- Work (sc, ch 2, sc) in the last ch to make the pointed tip.
- Rotate the work and continue along the opposite side of the foundation ch: sc, hdc, dc, dc, hdc, sc. (6 sts.)
- Sl st in the first sc.
(14 sts and 1 ch-2 tip.)
Fasten off, leaving an 8 in (20.3 cm) tail. The leaf measures 1.4 in × 0.7 in (3.6 cm × 1.8 cm).
Border
Border gauge: The edging is worked at 5 sc per inch, the same as the header. The bottom has 177 sts across 35.2 in (89.4 cm), which is 5.03 sts per inch. Each side has 204 sts along 41.25 in (104.8 cm), which is 4.95 sts per inch. Because both edges match the panel’s own gauge, they lie flat without rippling or pulling in.
Bottom Edging
Row 1 (conversion row): With the RS facing, join cream at the right-hand corner of the foundation edge. Working into the opposite side of the foundation chain, ch 1, then work 1 sc at the base of each dc and 1 sc in each ch-2 sp. (89 + 88 = 177 sc.)
Row 2: Ch 1, turn, sc in the first sc. Sk 3 sc, 7 dc in the next sc, sk 3 sc, sc in the next sc; rep from * 21 more times. (22 scallops; 1 + 22 × 8 = 177 sts.) Fasten off.
Row 3: Join green in the last sc of Row 2. Turn so the RS faces you. Ch 1, sl st in the same sc. Sc in the next 3 dc, 2 sc in the next dc, sc in the next 3 dc, sl st in the next sc; rep from * across. (22 × 8 = 176 sc and 23 sl sts.) Fasten off.
Why the math works: A scallop repeat uses 8 sts, and there is 1 anchor sc at the start. That means the stitch count must be a multiple of 8 plus 1, and 177 = 8 × 22 + 1. Each scallop spans 1.6 in (4.1 cm), and the edging is 1 in (2.5 cm) deep.
Side Edging
With the RS facing, join cream at the bottom corner of the body, where the body meets the edging. Ch 1 and work:
- 2 sc around each dc row end (100 rows × 2 = 200 sc)
- 1 sc in each header row end (4 sc)
(204 sc per side.) Fasten off. Repeat on the opposite side, working from the top down.
Each side edging adds about 1/4 in (0.6 cm), so the total width is 35.2 + 0.25 + 0.25 = 35.7 in (90.7 cm).
Vines and Appliqué Placement
Lay the panel flat with the RS up and count mesh holes from the right edge. The vines sit in hole columns 6, 17, 28, 39, 50, 61, 72, and 83. That spaces them 11 holes apart, with 5 holes free at each edge.
Stems: With green, work surface slip stitch straight up each vine column, starting at the hole in Row 1 and ending at the hole in Row 96. (96 holes, 95 surface sl sts per vine.) Fasten off on the WS.
The daisies are stacked in two staggered patterns:
- Odd vines (columns 6, 28, 50, 72): daisy centers sit over the holes in Rows 10, 21, 32, 43, 54, 65, 76, and 87. (8 daisies per vine.)
- Even vines (columns 17, 39, 61, 83): daisy centers sit over the holes in Rows 15, 26, 37, 48, 59, 70, 81, and 92. (8 daisies per vine.)
That gives 8 vines × 8 = 64 daisies.
Leaves: Each daisy gets 2 leaves below it.
- One leaf goes to the right of the stem, 4 rows below the daisy center.
- One leaf goes to the left of the stem, 8 rows below the daisy center.
Set the base of each leaf against the stem and angle the tip upward and outward. This gives 64 × 2 = 128 leaves. The lowest leaves are in Row 2 on the odd vines and Row 7 on the even vines.
Pin every piece before you sew anything. Then:
- Sew each daisy around the yellow center with small stitches through the mesh bars, and tack each petal tip once.
- Sew each leaf along its center line only, so the edges stay lifted.
Final Blocking
- Weave in all remaining ends along the dc posts so they stay hidden in the mesh.
- Hand-wash the curtain in cool water, roll it in towels, and press out the extra water.
- Lay it flat with the RS up and pin it to 35.7 in × 42.25 in (90.7 cm × 107.3 cm).
- Run a long ruler along the mesh columns and pin every 10 rows so the squares stay square.
- Pin each scallop point along a straight line.
- Lift the daisy petals and leaf tips with your fingers so they stand out from the mesh.
- Let the curtain dry completely, which takes 24–48 hours. Spray-starching the tabs and header is optional.
Final Quality-Control Checklist
- 88 meshes in every row and 100 rows in total
- Header: 177 sts, 1.25 in (3.2 cm) deep
- 11 tabs of 7 sts, with 10-st gaps between them, each sewn securely
- 22 even scallops with a smooth green outline
- 204 sc on each side edge
- 8 straight stems that end at Row 96
- 64 daisies at staggered heights and 128 leaves
- Finished size within 1/2 in (1.3 cm) of 35.7 in × 42.25 in (90.7 cm × 107.3 cm)
Troubleshooting
- Mesh slants diagonally: You may be missing the dc in the turning chain at the end of a row. Count the posts every 10 rows: there should be 89.
- Rectangles instead of squares: Your dc is too tall. Pull the yarn-over loops up less, or go down half a hook size.
- Wavy bottom edge: Check that Row 1 of the edging has exactly 177 sc.
- Stems pucker the mesh: Your surface slip stitch is too tight. Work it more loosely, or go up one hook size for the stems only.
- Daisies cup upward: Block them flat on their own before sewing.
- Tabs twist: Line up the sewn tab edge exactly with the tab’s own stitches on the front.
Care
Hand-wash or machine-wash cool on a delicate cycle in a mesh bag. Lay the curtain flat to dry, reshaping the grid while it is damp.
Final Notes
The sizes in this pattern build on each other:
- Every mesh is 0.4 in (1.0 cm), so 88 meshes make 35.2 in (89.4 cm) and 100 rows make 40 in (101.6 cm).
- The header converts the mesh to 177 sts, which sets the tab spacing and is the same count used for the bottom scallops.
- The side edging brings the width to 35.7 in (90.7 cm).
- The scallops and header bring the length to 42.25 in (107.3 cm).
Check your gauge on the test pieces, count often, and the daisy vines will line up neatly from top to bottom.
Happy crocheting!