

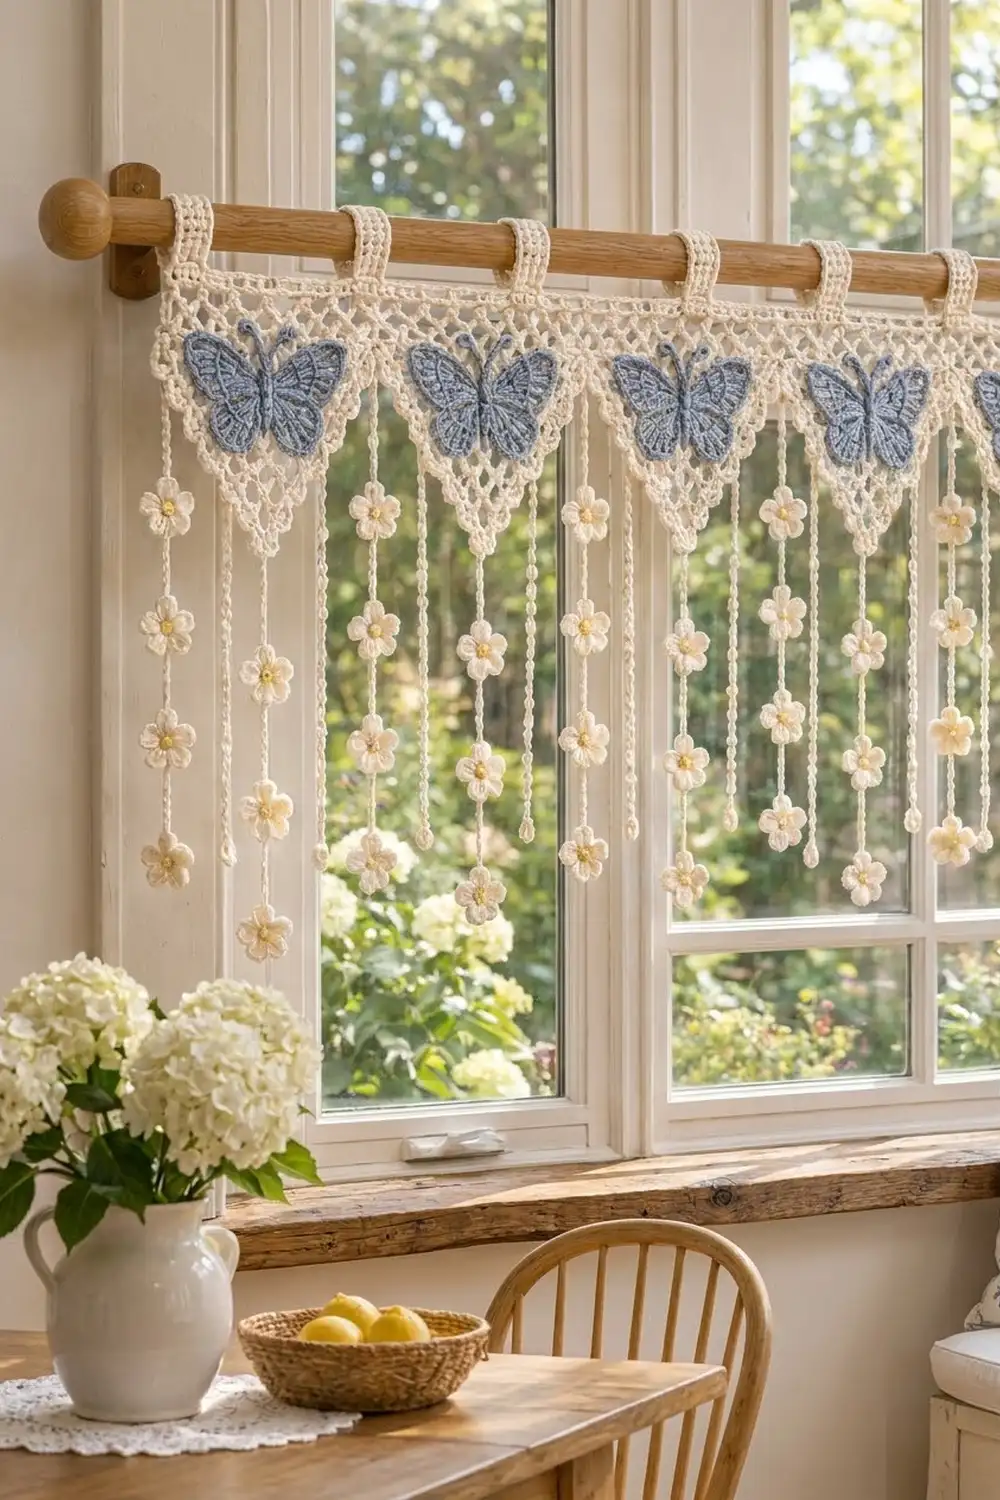
This valance brings a soft cottage feel to a window. Six cream lace triangles hang from a neat header band, and a dusty blue butterfly is sewn to each one. Corded strands of tiny cream daisies with sunny yellow centers fall below the points, so light still comes through while the window looks dressed.
The palette is calm: cream lace, denim-blue butterflies and small yellow flower centers. It reads as vintage but light, and the open mesh keeps it from looking heavy.
The pattern uses US crochet terms. Before the strands, the finished valance is 58.8 in (149.4 cm) wide and 9.5 in (24.1 cm) deep from the top of the header to the triangle points. The tab loops add about 1.5 in (3.8 cm) above the header. The longest strands hang 16 in (40.6 cm) below the points.
Here is the build in order. You make six net triangles top-down, each one decreasing to a point, then edge each with picots. Next you crochet six butterflies and seventy-eight flowers. Then you join the triangle corners, work the header across all six tops, add the tabs, sew on the butterflies, and hang the flower strands.
Finished Size and Construction
- Finished size: 58.8 in × 9.5 in (149.4 cm × 24.1 cm), not counting tabs or strands
- Skill level: Intermediate
- Terminology: US
- Yarn weight: DK / light worsted (#3) cotton
- Hook: 3.5 mm (E-4)
- Number of pieces: 6 triangles, 6 butterflies, 78 flowers, 18 strands
- Layout: 6 triangles in one row
- Piece size: 9.8 in wide × 8.75 in deep (24.9 cm × 22.2 cm) per triangle
- Size before border: 58.8 in × 8.75 in (149.4 cm × 22.2 cm)
- Border depth: a 0.75 in (1.9 cm) header band, plus tabs
Materials
Use a smooth mercerized cotton or cotton blend. It shows the mesh clearly, blocks crisply and won’t stretch much while it hangs in the sun.
- Cream: 300 g, about 720 m
- Denim blue: 50 g, about 120 m
- Soft yellow: 25 g, about 60 m
These amounts assume yarn of about 50 g per 120 m and include a margin of roughly 10–15%.
Tools:
– 3.5 mm (E-4) crochet hook
– Tapestry needle
– Stitch markers
– Measuring tape
– Blocking mats and rust-proof pins
– Spray bottle
Abbreviations (US Terms)
- ch – chain
- sl st – slip stitch
- sc – single crochet
- hdc – half double crochet
- dc – double crochet
- tr – treble crochet
- sk – skip
- st(s) – stitch(es)
- sp – space
- RS / WS – right side / wrong side
Special stitch – Edge Picot: (2 sc, ch 3, 2 sc) worked into the same edge loop.
Special stitch – Petal: (sl st, ch 2, 2 dc, ch 2, sl st) all in the same stitch.
Gauge and Checkpoints
- Dc gauge: 20 dc and 10 rows = 4 in (10.2 cm)
- Net gauge: 4 net rows = 2 in (5.1 cm), so each row is 0.5 in (1.3 cm)
- Sc gauge: 20 sc and 22 rows = 4 in (10.2 cm)
Make one complete triangle before anything else, and measure it at each of these points:
- After Row 1, the triangle is 9.8 in (24.9 cm) wide.
- After Row 9, it is about 4.4 in (11.2 cm) deep.
- After Row 17, it is about 8.4 in (21.3 cm) deep.
- After the edging, it is 8.75 in (22.2 cm) deep.
If Row 1 comes out wider than 9.8 in (24.9 cm), go down 0.25 mm in hook size. If it is narrower, go up 0.25 mm. Six triangles multiply any error: being off by 0.25 in (0.6 cm) on one triangle puts the whole valance off by 1.5 in (3.8 cm).
Lace Triangle (make 6)
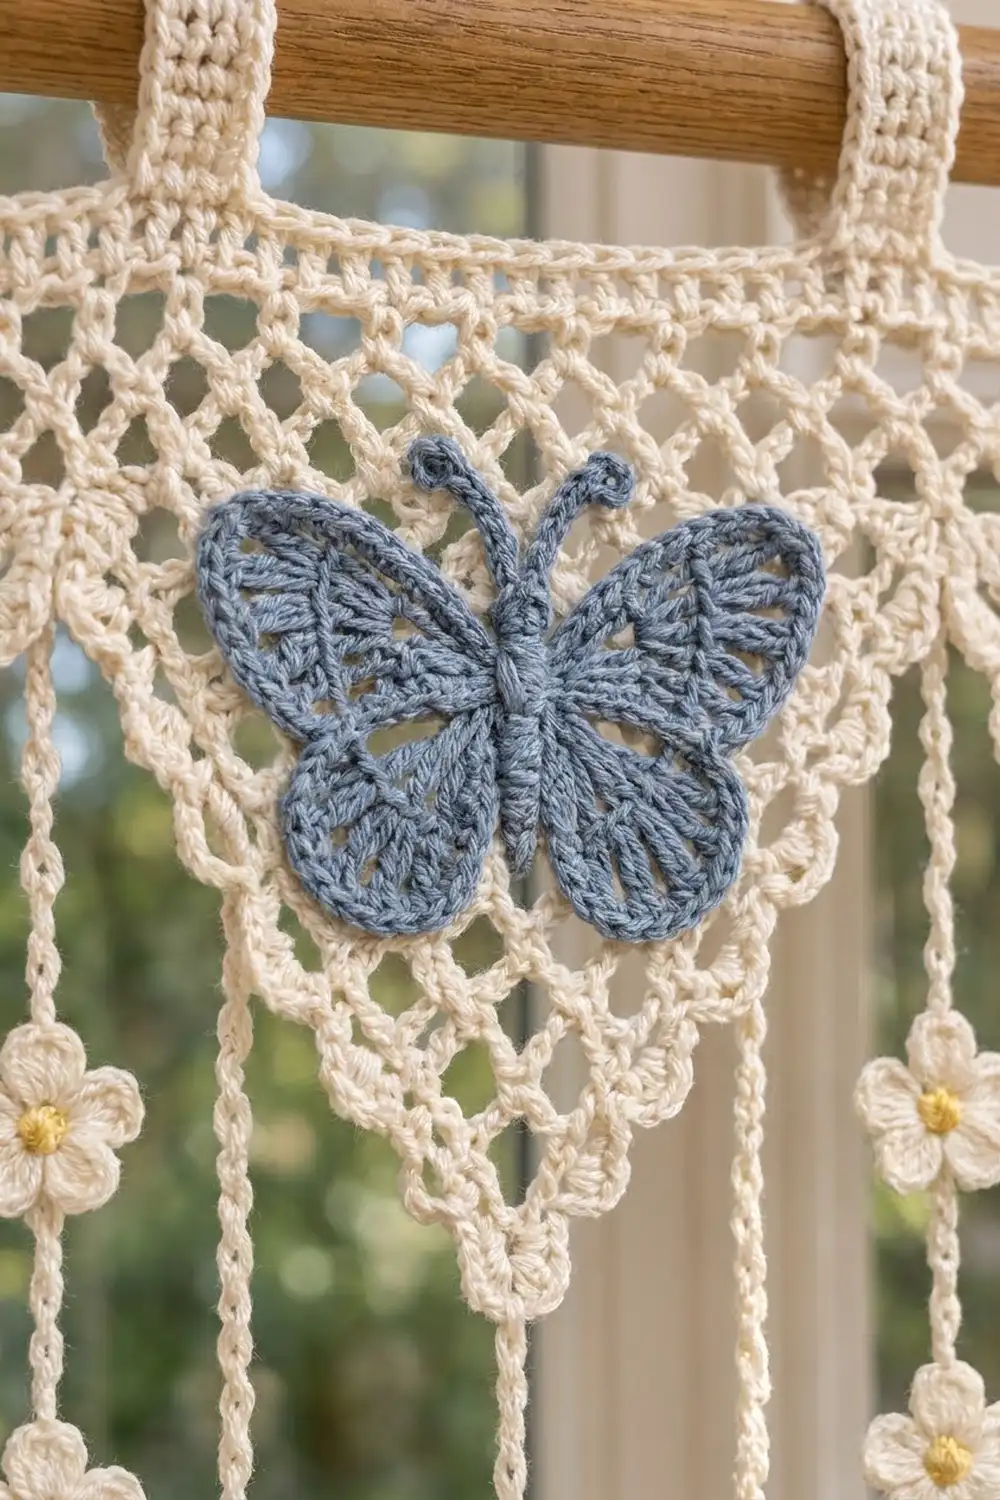
Use cream. The triangle is worked top-down in rows. The chain-5 loops stack into a diamond-shaped net, and you lose one loop in every row.
Row 1 (RS): Ch 51. Dc in 4th ch from hook and in each ch across. Turn. (49 dc; the skipped ch-3 counts as the first dc)
Row 2: Ch 1, sc in first dc. Ch 5, sk 2 dc, sc in next dc. Repeat from * across, ending with sc in the top of the turning ch. Turn. (16 ch-5 loops)
The math: 1 + (16 × 3) = 49 stitches.
Row 3: Sl st in each of the first 3 ch of the first loop. Ch 1, sc in the same loop. Ch 5, sc in next loop. Repeat from * across, ending with sc in the last loop. Turn. (15 loops)
Rows 4–17: Repeat Row 3. Each row has one fewer loop than the row before. Row n has (18 − n) loops:
- Row 4: 14 loops
- Row 5: 13 loops
- Row 6: 12 loops
- Row 7: 11 loops
- Row 8: 10 loops
- Row 9: 9 loops
- Row 10: 8 loops
- Row 11: 7 loops
- Row 12: 6 loops
- Row 13: 5 loops
- Row 14: 4 loops
- Row 15: 3 loops
- Row 16: 2 loops
- Row 17: 1 loop
Do not fasten off.
Edging (RS): Ch 1. Work down the first slanted side, around the point, and up the second side.
- Point: In the Row 17 loop, work (3 sc, ch 4, 3 sc).
- First side: Work 1 Edge Picot in each exposed half-loop on that side. Rows 16 back to 2 each leave one half-loop on the edge, so that is 15 Edge Picots. Then work 2 sc into the side of Row 1. (62 sc, 15 picots)
Sl st to the top corner and cut the yarn.
Rejoin at the opposite top corner. Work 2 sc in the side of Row 1, then 1 Edge Picot in each of the 15 half-loops down to the point. Join with a sl st to the first sc of the point group and fasten off. (62 sc and 15 picots on each side; 6 sc and 1 ch-4 picot at the point)
The top edge stays as the 49 dc of Row 1. Do not edge it.
Butterfly Appliqué (make 6)
Use denim blue.
Rnd 1: Make a magic ring. Ch 3 (counts as dc), work 11 dc in the ring, and sl st to the top of ch-3. (12 dc)
Rnd 2: Ch 1, sc in the same st. Then:
– Ch 8, sk 2, sc in next (upper wing loop).
– Ch 5, sk 2, sc in next (lower wing loop).
– Ch 5, sk 2, sc in next (lower wing loop).
– Ch 8, sk 2, sl st to the first sc (upper wing loop).
(4 sc, 2 ch-8 loops, 2 ch-5 loops)
The first sc and the 3rd sc mark the head and tail ends of the body line.
Rnd 3: In each ch-8 loop, work (sc, hdc, 2 dc, 3 tr, ch 3, 3 tr, 2 dc, hdc, sc). In each ch-5 loop, work (sc, hdc, 2 dc, ch 2, 2 dc, hdc, sc). Sl st in each sc between the loops. (14 sts per upper wing and 8 sts per lower wing, 44 sts total)
Rnd 4: Sc in each st. At each upper wing tip, work (2 sc, ch 2, 2 sc) in the ch-3. At each lower wing tip, work 3 sc in the ch-2. Sl st into each sl st between wings so the outline pinches in at the body. (18 sc per upper wing and 11 sc per lower wing, 58 sc total) Fasten off with a 12 in (30.5 cm) tail.
Body: Ch 9. Hdc in 3rd ch from hook and in each ch across. (7 hdc) This strip is about 1.75 in (4.4 cm) long.
Antennae: Join blue at the narrow head end and ch 6. Sl st in 2nd ch from hook and in the next 4 ch, then sl st into the head. Repeat once more for the second antenna and fasten off.
Sew the body down the center line, from head mark to tail mark.
The finished butterfly is 4.25 in × 3.25 in (10.8 cm × 8.3 cm).
Daisy Flower (make 78)
Center: With yellow, make a magic ring. Ch 1, work 5 sc in the ring, and sl st to the first sc. (5 sc) Fasten off.
Petals: Join cream in any sc. Work 1 Petal in each sc around. (5 petals) Sl st to the join and fasten off, leaving an 8 in (20.3 cm) tail.
Each flower is about 1.25 in (3.2 cm) across.
Make All Pieces
Cream:
– 6 triangles
– 78 flower petal rounds
– Header, tabs and 18 strands, worked after joining
Denim blue: 6 butterflies with bodies
Yellow: 78 flower centers
Layout (front view):
[ Header band + 7 tabs ]
[T1][T2][T3][T4][T5][T6]
 \/  \/  \/  \/  \/  \/
Every triangle hangs 3 strands: 1 long strand from the point and 1 short strand from each side.
Joining
Lay the six triangles RS up in a straight row. The Row 1 edges should line up as one straight top line.
Where two triangles meet, the top corners touch. Hold those corners together and whipstitch through the 2 side sc of each triangle with cream. That makes 2 stitches per corner, and only the corners are joined. Below the corners, the slanted picot sides open away from each other, which forms the V notches.
Keep the stitches snug, but not tight enough to pull the corners up.
Checkpoint: The joined row of tops measures 6 × 9.8 in = 58.8 in (149.4 cm). If it is longer, the whipstitches are spreading the corners apart. Redo them more snugly.
Border: Header Band and Tabs
The header uses the same 20 sts = 4 in (10.2 cm) gauge as Row 1, so it lies flat over the triangle tops without any easing.
Header Row 1 (RS): Join cream in the first dc of T1. Ch 1, then sc in each of the 49 Row 1 sts of every triangle. Work straight from one triangle to the next, with no stitch added at the seams. Turn. (294 sc)
The math: 6 triangles × 49 sts = 294. The whipstitched corner sc sit beside the Row 1 tops, not on them, so they are never worked into. Nothing extra gets added at a seam.
Header Row 2 (WS): Ch 3 (counts as dc), dc in each st across. Turn. (294 dc)
Header Row 3 (RS): Ch 1, sc in each st across. (294 sc) Fasten off.
The header is now 0.75 in (1.9 cm) deep.
Tabs (make 7): Each tab is 8 sts wide and is worked into Header Row 3.
- Tab 1: sts 1–8
- Tabs 2–6: centered over each seam, at sts 46–53, 95–102, 144–151, 193–200 and 242–249
- Tab 7: sts 287–294
Each seam falls between sts 49k and 49k + 1, so every seam tab has 4 sts on each side of the seam. That leaves gaps of 37 sts (7.4 in, 18.8 cm) at both ends and 41 sts (8.2 in, 20.8 cm) between seam tabs.
The check: (7 × 8) + (2 × 37) + (4 × 41) = 56 + 74 + 164 = 294.
Tab Row 1: Join cream in the first st of the tab. Ch 1, sc in the same st and in the next 7 sts. Turn. (8 sc)
Tab Rows 2–16: Ch 1, sc in each st across. Turn. (8 sc)
The unfolded tab is 2.9 in (7.4 cm) long. Fasten off with a 10 in (25.4 cm) tail. Fold the tab to the back and whipstitch its last row to the WS of Header Row 1.
The folded loops stand about 1.5 in (3.8 cm) tall and fit a rod up to 1.25 in (3.2 cm) across.
Strands and Finishing Appliqués
Butterflies: Center one butterfly on each triangle, with the top of the wings 1.25 in (3.2 cm) below Row 1. Backstitch around the outline of Rnd 4 and through the body.
Long strands (make 6): Join cream with a sl st in the ch-4 point picot and ch 96. Sl st in 2nd ch from hook and in each ch back up. (95 sl sts) Sl st into the picot and fasten off. The cord is 16 in (40.6 cm) long.
Short strands (make 12): Join in the 8th Edge Picot from the top on each slanted side and ch 72. Sl st back as for the long strands. (71 sl sts) The cord is 12 in (30.5 cm) long.
Flowers:
– Long strands: Sew 5 flowers to each, at 4, 7, 10, 13 and 16 in (10.2, 17.8, 25.4, 33.0 and 40.6 cm) below the picot.
– Short strands: Sew 4 flowers to each, at 3, 6, 9 and 12 in (7.6, 15.2, 22.9 and 30.5 cm).
On each strand, the last flower covers the cord tip.
Total: (6 × 5) + (12 × 4) = 78 flowers.
Final Blocking
- Weave in all ends except the flower tails you are still sewing with.
- Pin the valance RS up, with the header straight and 58.8 in (149.4 cm) long.
- Pin each triangle point so the triangle is 8.75 in (22.2 cm) deep from Row 1.
- Pin out every Edge Picot and open the net loops into even diamonds.
- Shape each butterfly’s wings flat and pin the wing tips.
- Mist the whole piece until it is damp, but not soaked.
- Let it dry completely, at least 12 hours, then unpin.
- Hang the strands and let gravity straighten the cords.
Final Quality-Control Checklist
- Header: 294 sts per row, 58.8 in (149.4 cm) long
- Each triangle: 9.8 in × 8.75 in (24.9 cm × 22.2 cm)
- 15 Edge Picots on each slanted side, plus the point picot
- 7 tabs, evenly placed, folded the same way
- Butterflies centered at the same height
- 18 strands: 6 long and 12 short
- 78 flowers, with matching spacing on every strand
- No visible tails on the RS
Troubleshooting
- The triangle point leans to one side: You probably skipped the sl sts at the start of a row. Every row must begin with 3 sl sts into the first loop.
- The net looks cramped: Your chains are tight. Loosen your tension or use a 4.0 mm hook for the ch-5 loops only.
- The header ripples: You added stitches at a seam. Recount to 294.
- The butterfly cups: Block it flat, and check that you have 58 sc in Rnd 4.
- The strands twist: Steam them lightly and hang them to dry.
- The tabs are too tight for the rod: Add 2 rows to each tab.
Care
Hand wash in cool water with a mild soap, press out the water in a towel, and dry flat. Re-pin the points and butterflies while the piece is damp.
Final Notes
The measurement chain runs like this:
- A 49-dc Row 1 at 9.8 in (24.9 cm)
- Six of them joined, at 58.8 in (149.4 cm)
- A 294-st header, at 58.8 in (149.4 cm) by 9.5 in (24.1 cm)
- Seven 8-st tabs, plus strands that hang 12 in and 16 in (30.5 cm and 40.6 cm)
If the first triangle matches the gauge, everything after it lines up.
Happy crocheting!