

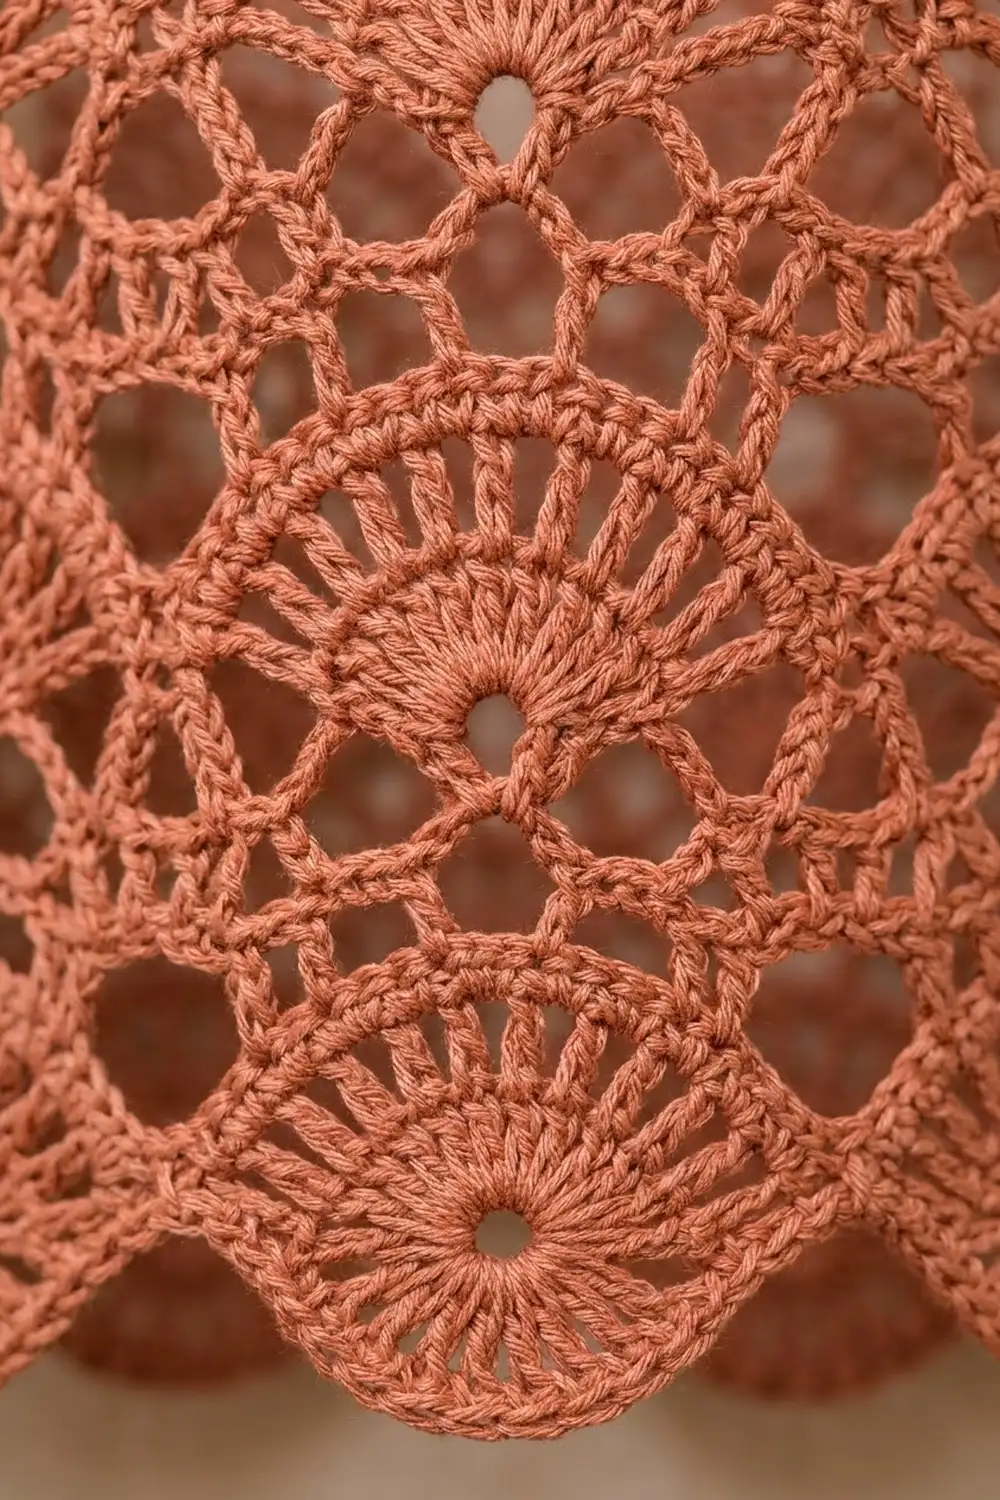
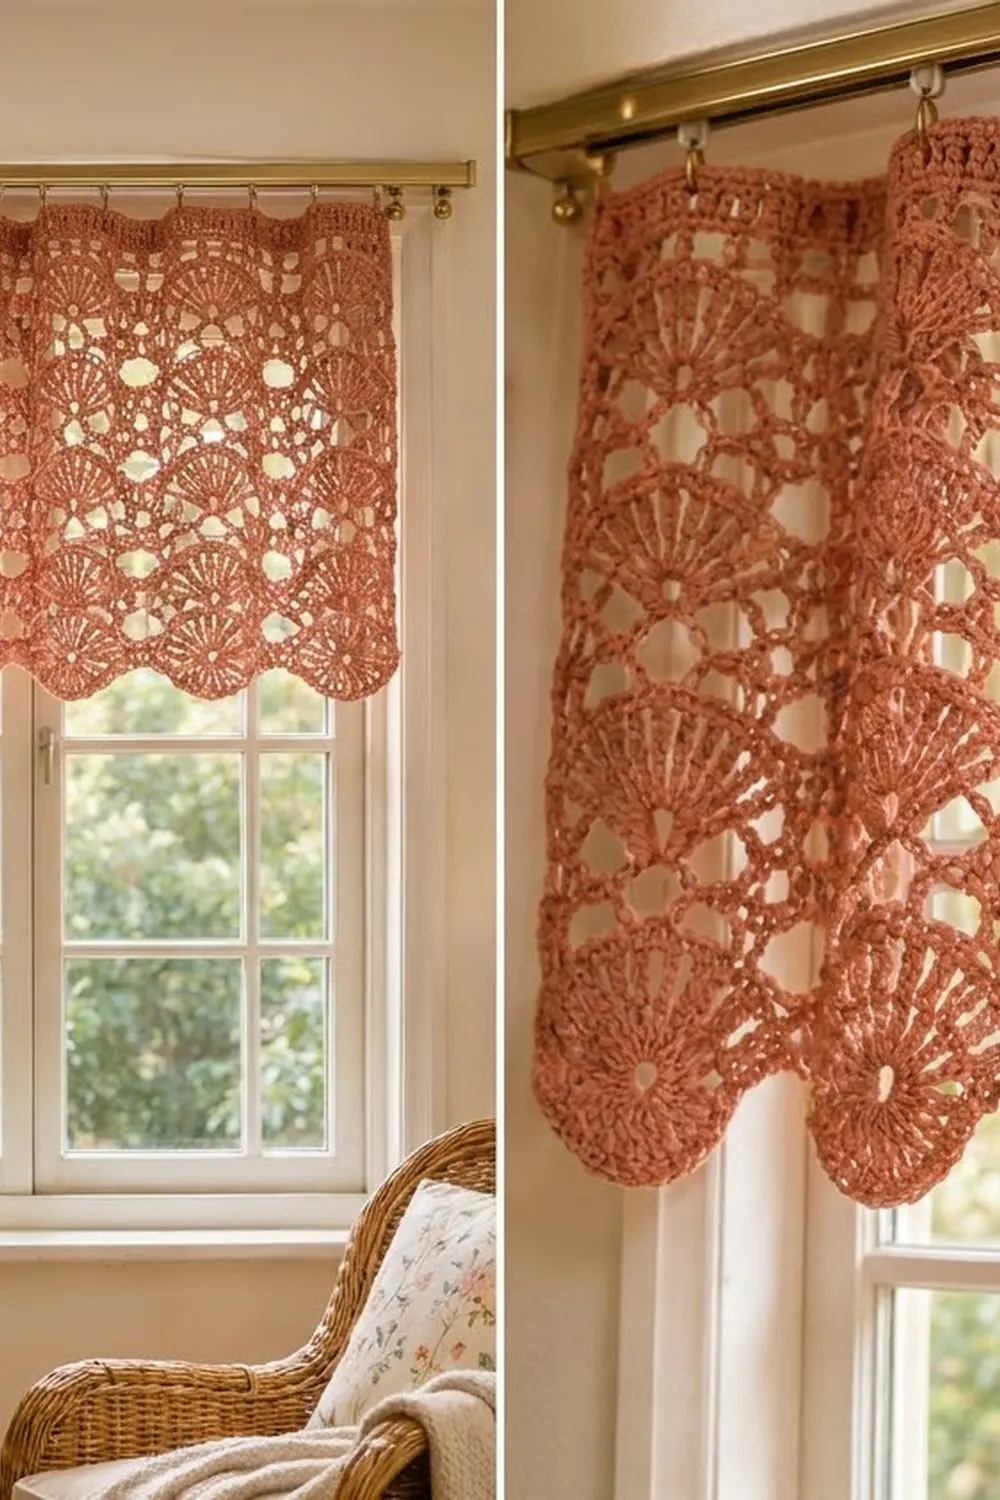
This valance brings warm, sun-filtered texture to a kitchen or bedroom window. Columns of upright fans sit stacked one above the other, framed by an airy lattice. The bottom edge finishes in a soft row of rounded scallops that line up exactly under each fan column.
The design is worked in a single terracotta (dusty clay) shade. One color keeps the focus on the lace, and the warm tone glows when light shines through it. A smooth cotton or cotton-blend yarn gives crisp stitch definition and blocks beautifully.
The pattern is written in US crochet terms. The finished valance measures 36.5 in (92.7 cm) wide and 12 in (30.5 cm) deep after blocking, including the border.
Construction is simple. You work one flat panel from the bottom up in rows, alternating a fan row with a lattice row, and a short solid header band forms the top. Then a single round of single crochet tidies all four edges, and two border rows across the bottom build the scallops. Hang it with ring clips; no rod pocket is needed.
Finished Size and Construction
- Finished size: 36.5 in (92.7 cm) wide × 12 in (30.5 cm) deep
- Skill level: Intermediate
- Terminology: US crochet terms
- Yarn weight: DK (#3), cotton or cotton blend
- Hook: 4.0 mm (US G-6)
- Number of pieces: 1
- Layout: single flat panel, worked in rows
- Piece size before border: 36 in (91.4 cm) × 10.25 in (26.0 cm)
- Border depth: 0.25 in (0.6 cm) at the top and sides; 1.5 in (3.8 cm) at the bottom scalloped edge
Materials
Yarn: Choose a smooth DK-weight cotton or cotton blend. Mercerized cotton shows the fans most clearly; a matte cotton gives a softer, rustic look. Avoid fuzzy yarns, which blur the lattice openings.
- Terracotta (dusty clay): 300 g, approx. 720 m (787 yd)
The quantity includes a margin of about 20% for your gauge swatch, blocking variation, and weaving in ends.
Tools:
- 4.0 mm (US G-6) crochet hook
- Tapestry needle
- Stitch markers (4–6)
- Measuring tape
- Rust-proof blocking pins and a blocking mat or folded towels
- Spray bottle
- 13 curtain ring clips and a rod at least 38 in (96.5 cm) long, for hanging
Abbreviations (US Terms)
- ch – chain
- sl st – slip stitch
- sc – single crochet
- hdc – half double crochet
- dc – double crochet
- tr – treble crochet
- sk – skip
- sp(s) – space(s)
- st(s) – stitch(es)
- RS / WS – right side / wrong side
- rep – repeat
Special stitch – Fan: 11 dc worked into the same stitch or space.
Stitch counts: In lattice rows, every chain counts as a stitch, so a ch-2 sp counts as 2 sts and a ch-3 sp counts as 3 sts. This makes every row total easy to check.
Gauge and Checkpoints
Pattern gauge: after blocking, one fan repeat (12 sts) = 3 in (7.6 cm) wide, and one tier (1 fan row + 1 lattice row) = 1.5 in (3.8 cm) tall.
Make a test swatch first. Ch 26. Work Rows 1–5 of the pattern below over 25 sts (2 fans per fan row). Block the swatch the same way you will block the valance.
- Swatch width: 6 in (15.2 cm)
- Swatch height after Row 5: 3.25 in (8.3 cm)
If your swatch is too big, go down 0.5 mm in hook size. If it is too small, go up 0.5 mm. Fix the width first; row height in lace adjusts slightly during blocking.
Checkpoints for the valance (lightly stretched flat):
- After Row 1: about 36 in (91.4 cm) wide
- After Row 13: 9.25 in (23.5 cm) tall
- After Row 17: 36 in (91.4 cm) × 10.25 in (26.0 cm)
- After Border Round 1: 36.5 in (92.7 cm) × 10.75 in (27.3 cm)
- After Border Row 3: 36.5 in (92.7 cm) × 12 in (30.5 cm)
Valance Body
The stitch count is a multiple of 12 sts + 1. Each 12-st repeat becomes one fan column.
Foundation: Ch 146.
Row 1 (RS): Sc in 2nd ch from hook and in each ch across. Turn. (145 sts)
Row 2 (fan row, WS): Ch 1, sc in first sc, sk 5 sc, 11 dc in next sc (fan made), sk 5 sc, sc in next sc; rep from * 11 more times. Turn. (12 fans + 13 sc = 145 sts)*
Check: the first sc sits in st 1, each fan goes in st 7 of its repeat, and each sc goes in st 13. The last sc lands in st 145.
Row 3 (lattice row, RS): Ch 5 (counts as dc + ch 2), sk first 3 dc of fan, sc in next (4th) dc, ch 3, sk next 3 dc, sc in next (8th) dc, ch 2, dc in next sc; ch 2, sk 3 dc, sc in next dc, ch 3, sk 3 dc, sc in next dc, ch 2, dc in next sc; rep from * across. Turn. (13 dc + 24 sc + 24 ch-2 sps + 12 ch-3 sps = 13 + 24 + 48 + 36 = 121 sts)*
The ch-3 sp bridges the 3 center dc of each fan. This opening becomes the eyelet at the base of the next fan.
Row 4 (fan row, WS): Ch 1, sc in first dc, sk next ch-2 sp and next sc, 11 dc in next ch-3 sp, sk next sc and next ch-2 sp, sc in next dc; rep from * across, working the last sc in 3rd ch of beginning ch-5. Turn. (12 fans + 13 sc = 145 sts)*
Each new fan sits directly above the fan below, so the fans stack in straight columns.
Rows 5–13: Rep Rows 3 and 4 alternately, ending with a Row 3 (lattice row). Row 13 is a lattice row on the RS. (121 sts)
You now have 6 tiers (Rows 2–13). Checkpoint: 9.25 in (23.5 cm) tall.
The fan rows land on the WS, but the fans look the same from both sides. The RS is simply the side facing you on Row 1.
Header Band
Row 14 (conversion row, WS): Ch 1, sc in first dc, *3 sc in next ch-2 sp, sc in next sc, 3 sc in next ch-3 sp, sc in next sc, 3 sc in next ch-2 sp, sc in next dc; rep from * across, working the last sc in 3rd ch of beginning ch-5. Turn.
Count: (121 sts worked 1 per existing st) + (24 extra sts, 1 added in each ch-2 sp) = 145 sts. Each repeat holds exactly 12 sts again.
Row 15 (RS): Ch 2 (does not count as a st), hdc in each st across. Turn. (145 sts)
Row 16 (WS): Rep Row 15. Turn. (145 sts)
Row 17 (RS): Rep Row 15. Do not turn and do not fasten off. (145 sts)
Checkpoint: 36 in (91.4 cm) × 10.25 in (26.0 cm). Rows 14–17 together measure 1 in (2.5 cm).
Border
Border gauge: 4 sc = 1 in (2.5 cm) in both directions. The top and bottom edges each hold 145 sts over 36 in (91.4 cm), and each side holds 41 sts over 10.25 in (26.0 cm). Both directions work out to about 4 sts per inch, which is why the edges lie flat without ruffling or cupping.
Border Round 1 (RS): With RS still facing, ch 1 and rotate to work down the side.
- First side: 1 sc in the end of each of Rows 17, 16, 15, and 14 (4 sc). Then, for each of the 6 tiers, work 4 sc around the end dc/turning ch of the lattice row and 2 sc in the end of the fan row (6 tiers × 6 sc = 36 sc). Finish with 1 sc in the end of Row 1. (4 + 36 + 1 = 41 sc) Ch 1 at the corner.
- Bottom: Working into the free loops of the foundation ch, sc in each ch across. (145 sc) Ch 1 at the corner.
- Second side: Work as the first side, in reverse order. (41 sc) Ch 1 at the corner.
- Top: Sc in each hdc of Row 17. (145 sc) Ch 1, sl st in first sc to join. Fasten off.
Round total: 41 + 145 + 41 + 145 = 372 sc, plus 4 corner ch-1 sps. The corner chains are spaces, not counted stitches, so no corner is counted twice.
Border Row 2 (scallops, RS): Work across the bottom only. Join yarn with a sc in the first sc of the bottom edge (the sc right after the corner ch-1 sp). Sk 5 sc, 13 tr in next sc, sk 5 sc, sc in next sc; rep from * 11 more times. Turn. (12 scallops × 13 tr + 13 sc = 156 + 13 = 169 sts)*
The bottom edge has 145 sc (12 × 12 + 1), so each scallop centers on st 7 of its repeat, directly below a fan column.
Border Row 3 (trim, WS): Ch 1, sc in first sc, *sc in each of next 6 tr, 2 sc in next (center) tr, sc in each of next 6 tr, sc in next sc; rep from * across. Fasten off.
Count: (169 sts worked 1 per existing st) + (12 extra sts, 1 at each scallop center) = 181 sts.
Checkpoint: the bottom border measures 1.5 in (3.8 cm) deep. That is 0.25 in (0.6 cm) for the sc round, 1 in (2.5 cm) for the tr row, and 0.25 in (0.6 cm) for the sc trim. Weave in all ends securely through the solid stitches.
Final Blocking
- Soak the valance in cool water with a little mild wash for 15 minutes.
- Press out the water gently; do not wring. Roll it in a towel to remove more moisture.
- Lay it flat on a blocking mat, RS up.
- Pin the top edge straight to 36.5 in (92.7 cm).
- Pin both sides straight and square to 12 in (30.5 cm), measured from the top edge to the bottom of a scallop.
- Pin the tip of each scallop, keeping every scallop 3 in (7.6 cm) wide.
- Ease each fan open with your fingers and nudge the lattice diamonds into even shapes.
- Mist lightly if needed and let it dry completely before unpinning.
- To hang, clip 13 ring clips along the top edge, one above each sc column between the fans, spaced 3 in (7.6 cm) apart.
Final Quality-Control Checklist
- 12 fan columns across, each fan with 11 dc and a visible eyelet at its base
- 6 tiers of fans, stacked in straight vertical columns
- Lattice diamonds open and evenly sized
- Header band flat and straight, 145 sts wide
- Side edges straight, with 41 sc each in Border Round 1
- 12 scallops, each centered under a fan column
- Finished size 36.5 in (92.7 cm) × 12 in (30.5 cm)
- All ends woven into solid stitches, not lattice chains
Troubleshooting
The fans don’t line up in columns. Count the skips in the lattice row: 3 dc, then sc, then 3 dc, then sc. The ch-3 sp must cover the 5th–7th dc of each fan.
The header band is narrower than the lace. Check that Row 14 has 145 sts. If the band is tight, work the header with a hook 0.5 mm larger.
The side edges wave. Recount the side sc in Border Round 1. Too many sc makes waves, and too few pulls the edge in. Keep 6 sc per tier.
The scallops curl upward. Your tr may be tight. Block firmly, or work Border Row 2 with a hook 0.5 mm larger.
The valance is too short. Add one more tier (Rows 3–4) after Row 13, ending with a lattice row before Row 14. Each tier adds 1.5 in (3.8 cm), so buy extra yarn if you add several, and add 6 sc per added tier to each side in Border Round 1.
The valance is too wide for your window. Remove one fan repeat. Working 12 fewer foundation chains removes 3 in (7.6 cm) and 1 scallop.
Care
Hand wash in cool water with a mild detergent and dry flat, reshaping the scallops while damp. Don’t hang it while wet, because the weight of the water can stretch the lace.
Final Notes
The measurement chain is easy to track. One 12-st repeat is 3 in (7.6 cm), and 12 repeats plus 1 st give 145 sts and 36 in (91.4 cm). Six 1.5 in (3.8 cm) tiers plus Row 1 reach 9.25 in (23.5 cm), and the header band brings the panel to 10.25 in (26.0 cm). Border Round 1 adds 0.25 in (0.6 cm) on every edge for a width of 36.5 in (92.7 cm). The scalloped bottom rows finish the valance at 12 in (30.5 cm) deep.
Check your swatch and count every row, and your fans will stack as neatly as the ones in the window.
Happy crocheting!