

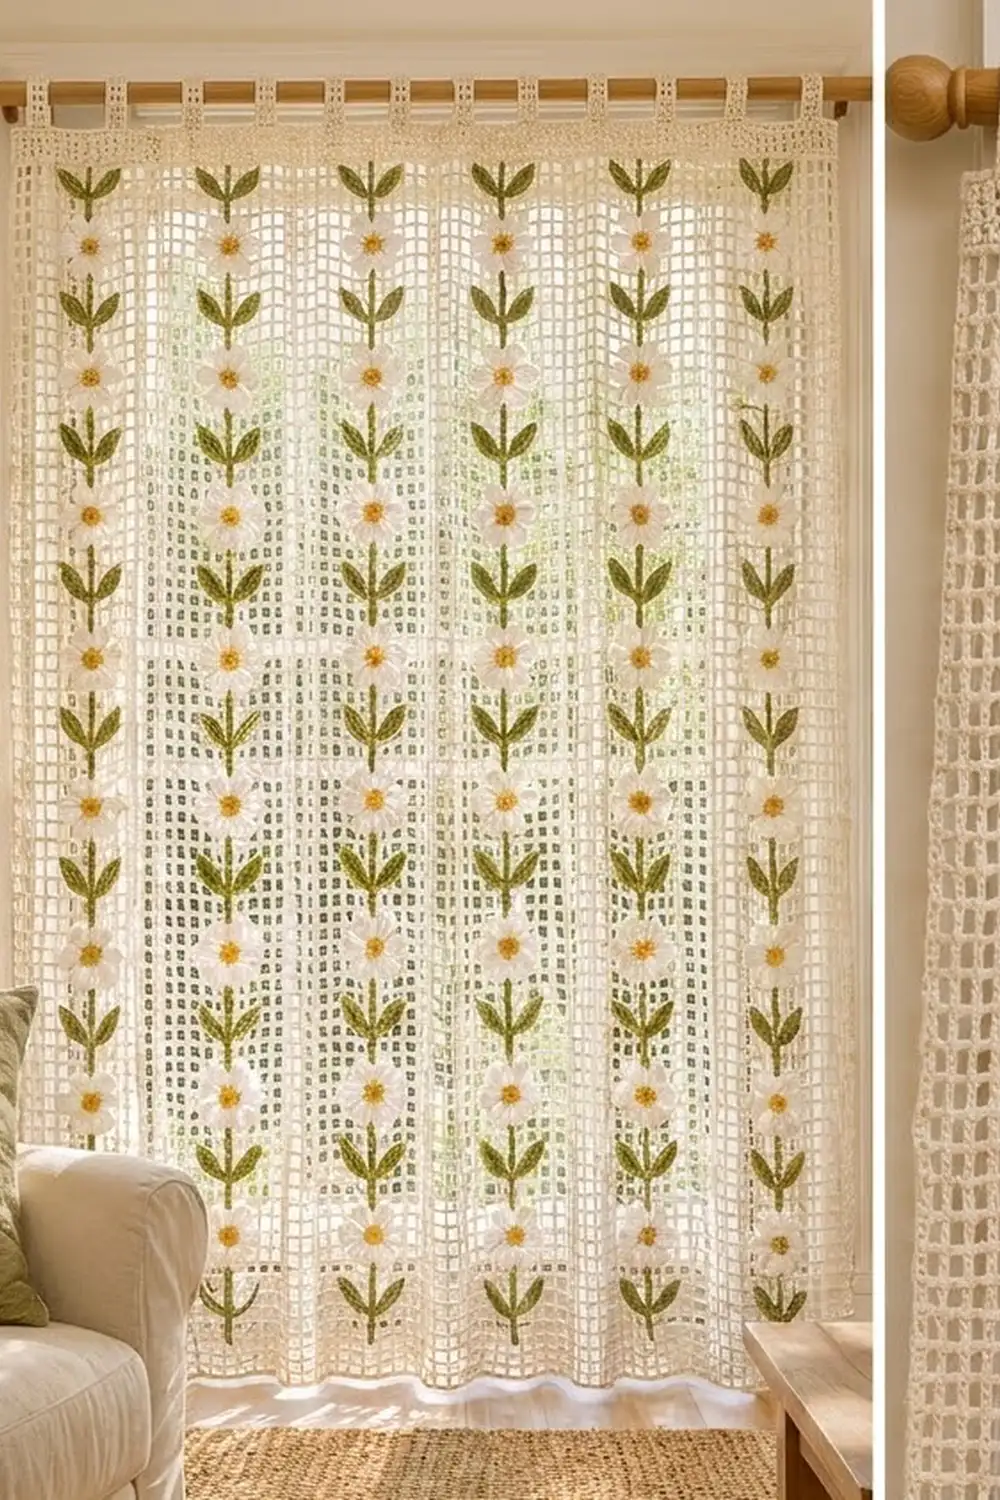
The Daisy Meadow Filet Curtain is a light, airy panel. It lets sunlight through while nine columns of daisies climb up the front. The background is a classic open filet mesh in soft cream, topped with a solid band and ten sturdy tab loops that slide straight onto a curtain rod.
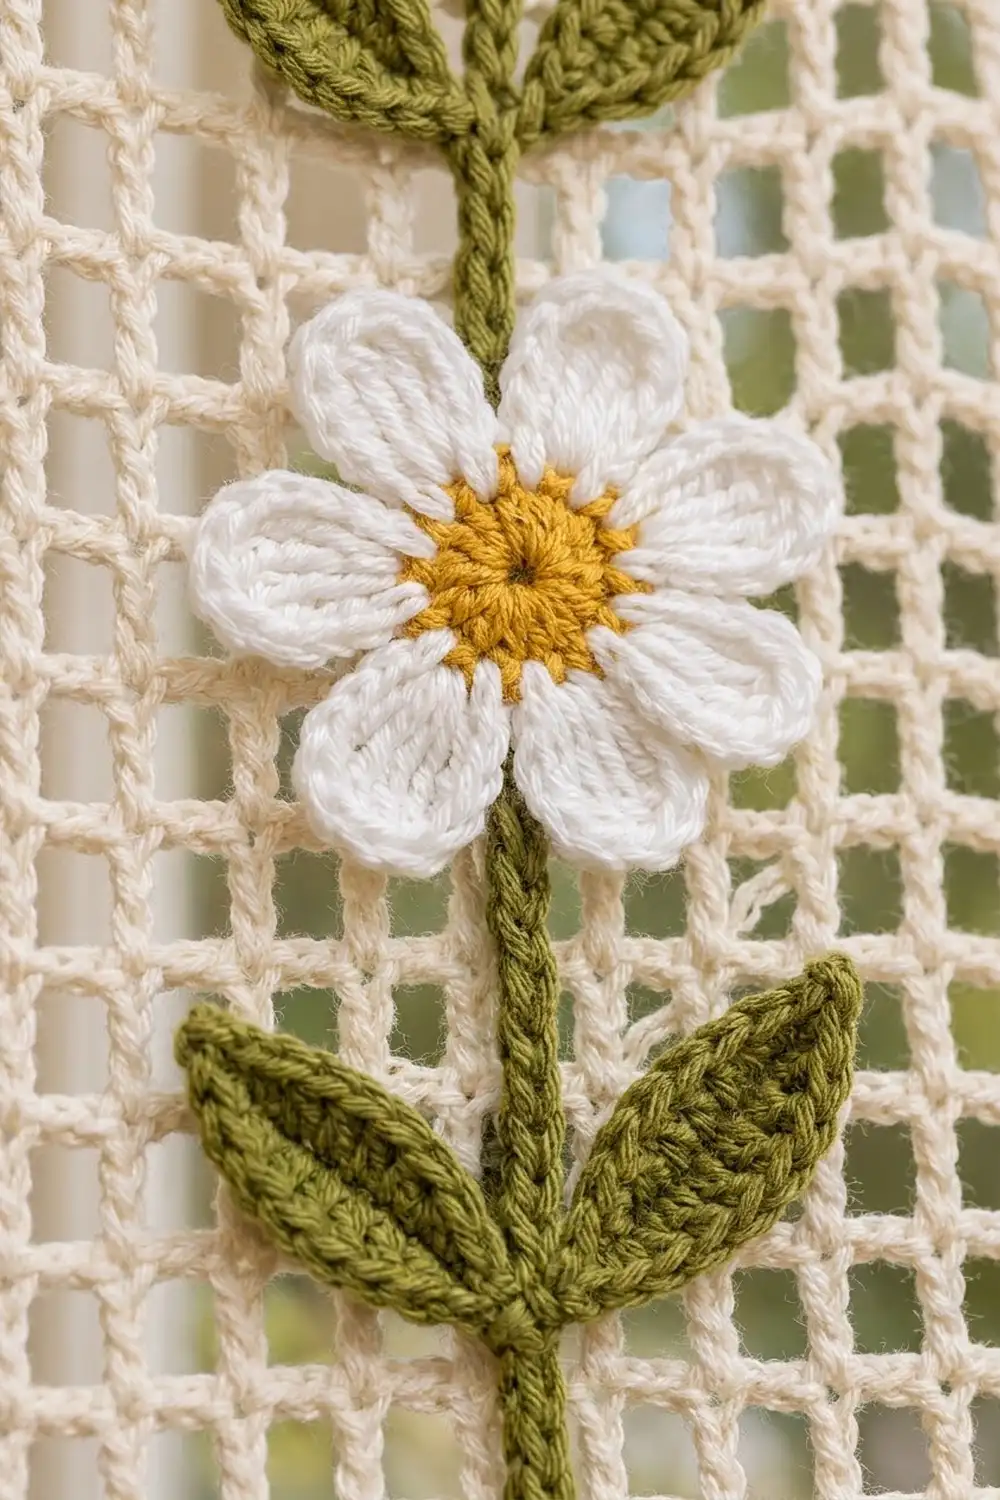
Each column is an olive-green stem worked in surface slip stitch. On the stem, pairs of pointed leaves alternate with white eight-petal daisies with golden centers. The look is cottage-style and fresh, and works well in a kitchen, sunroom or living room window.
This pattern uses US crochet terms. The finished curtain measures 41 in (104.1 cm) wide by 60.5 in (153.7 cm) long, not counting the tabs. The tabs add a loop that fits rods up to 1.5 in (3.8 cm) across.
Construction is simple and tidy:
1. Crochet the mesh panel in one piece from the bottom up.
2. Change to a solid top band.
3. Add a two-round single crochet border.
4. Work the tabs directly onto the top edge.
5. Make the daisies and leaves separately, surface-crochet the stems and sew everything in place.
Finished Size and Construction
- Finished size: 41 in x 60.5 in (104.1 cm x 153.7 cm), plus tabs
- Skill level: Intermediate (simple stitches, lots of counting)
- Terminology: US
- Yarn weight: DK / light (#3) cotton
- Hook: 4 mm (G-6)
- Number of pieces: 1 main panel, plus 63 daisy appliqués and 126 leaf appliqués; the tabs are worked onto the panel
- Layout: 9 vertical daisy columns, 7 daisies and 7 leaf pairs per column
- Mesh: 80 squares wide x 112 rows tall, each square 0.5 in (1.3 cm)
- Size before border: 40 in x 59.5 in (101.6 cm x 151.1 cm)
- Border depth: 0.5 in (1.3 cm) on each side
Materials
Use a smooth, mercerized or combed DK cotton of about 115 m per 50 g. Cotton holds the square mesh shape, washes well and doesn’t sag as much as acrylic in a sunny window.
- Cream (mesh, band, border, tabs): 1400 g / 3220 m
- White (petals): 150 g / 345 m
- Golden yellow (centers): 50 g / 115 m
- Olive green (leaves, stems): 150 g / 345 m
These quantities include a margin of about 10–15% for swatching and yarn tails. Buy all the cream from one dye lot.
Tools:
– 4 mm (G-6) crochet hook
– Tapestry needle
– Stitch markers (at least 20)
– Rust-proof pins and a large blocking surface (foam mats or a bed covered with towels)
– Spray bottle
– Tape measure and scissors
Abbreviations (US Terms)
- ch – chain
- sl st – slip stitch
- sc – single crochet
- hdc – half double crochet
- dc – double crochet
- tr – treble crochet
- sk – skip
- sp – space
- st(s) – stitch(es)
- RS – right side
Special stitch – surface slip stitch: Hold the yarn behind the work. Insert the hook from front to back through the fabric, pull up a loop, then pull it through the loop on the hook. This makes a chain-like line on the front.
Mesh square: One dc bar plus a ch-2 space, finished by the next dc bar. Each square is 3 stitches wide.
Gauge and Checkpoints
Gauge: 8 mesh squares x 8 mesh rows = 4 in x 4 in (10.2 cm x 10.2 cm). In solid dc, 12 dc = 2 in (5.1 cm).
Test swatch:
1. Ch 27.
2. Dc in the 4th ch from the hook and in each ch across (25 dc).
3. Work 8 mesh rows as in Row 2 and Row 3 below (8 squares across).
4. Measure the 8 mesh rows only. They should be 4 in (10.2 cm) wide and 4 in (10.2 cm) tall.
If your swatch is too big, go down a hook size. If it’s too small, go up a hook size. If the width is right but the rows are too tall, work your dc a little tighter by snugging the first yarn-over loop.
Checkpoints:
– After Row 1: the panel is 40 in (101.6 cm) wide, give or take 0.5 in (1.3 cm).
– After Row 17: the panel is 8.5 in (21.6 cm) tall.
– After Row 113: the panel is 56.5 in (143.5 cm) tall.
– After Row 119: the panel is 59.5 in (151.1 cm) tall.
– After the border: the panel is 41 in x 60.5 in (104.1 cm x 153.7 cm).
– Each daisy is 2.75 in (7.0 cm) across.
Main Panel
The panel is worked in rows from the bottom edge up. The turning chain counts as a stitch throughout.
Foundation: With cream, ch 243.
Row 1 (solid bottom row): Dc in the 4th ch from the hook and in each ch across. Turn. (241 dc) The skipped 3 ch count as the first dc.
Row 2 (first mesh row):
1. Ch 5 (counts as dc + ch 2).
2. Sk the next 2 dc, dc in the next dc.
3. *Ch 2, sk the next 2 dc, dc in the next dc; repeat from * across, working the last dc in the top of the turning ch.
4. Turn.
(81 dc bars + 80 ch-2 sps = 241 sts; 80 squares)
Row 3:
1. Ch 5 (counts as dc + ch 2), dc in the next dc.
2. *Ch 2, dc in the next dc; repeat from * across, working the last dc in the 3rd ch of the turning ch-5.
3. Turn.
(81 dc bars, 80 squares)
Rows 4–113: Repeat Row 3. You’ll have 112 mesh rows in total (Rows 2–113).
Check that every dc bar sits directly on top of the bar below. The vertical lines should be straight, because the stems will follow them.
Row 114 (conversion to solid band):
1. Ch 3 (counts as dc).
2. *2 dc in the next ch-2 sp, dc in the next dc; repeat from * across, working the last dc in the 3rd ch of the turning ch.
3. Turn.
(81 dc worked into existing bars + 160 dc worked into spaces = 241 dc)
Rows 115–119: Ch 3 (counts as dc), dc in each st across. Turn. (241 dc) Don’t fasten off. Continue straight into the border.
The solid band is 6 rows, or 3 in (7.6 cm), deep. It gives the tabs a firm base.
Daisy Appliqué (make 63)
Round 1: With golden yellow, make a magic ring. Ch 1, then work 8 sc in the ring. Sl st to the first sc. (8 sc)
Round 2: Ch 1, then work 2 sc in each sc around. Sl st to the first sc. (16 sc) Fasten off.
Round 3 (petals):
1. Join white in any sc.
2. *Sl st in the next sc, then work (hdc, dc, 2 tr, dc, hdc) all in the following sc; repeat from * 7 more times.
3. Sl st into the joining st.
(8 petals; 7 sts per repeat = 56 sts)
Fasten off, leaving a 12 in (30.5 cm) white tail for sewing.
Each petal fans out from a single sc, which gives the rounded, fat petal shape. The sl st between petals separates them cleanly. The daisy measures 2.75 in (7.0 cm) across.
Leaf Appliqué (make 126)
With olive green, ch 9. Number the working chains 1–8, starting with the 2nd ch from the hook.
Side A: Sc in ch 1, hdc in ch 2, dc in ch 3, ch 4 and ch 5, hdc in ch 6, sc in ch 7.
Tip: (Sc, ch 2, sc) all in ch 8.
Side B (other side of the chain): Sc in ch 7, hdc in ch 6, dc in ch 5, ch 4 and ch 3, hdc in ch 2, sc in ch 1.
Sl st to the first sc. (16 sts + ch-2 tip)
Fasten off, leaving an 8 in (20.3 cm) tail. The foundation chain makes a central vein, and the ch-2 makes a pointed tip. Each leaf is 1.75 in (4.4 cm) long and 0.75 in (1.9 cm) wide.
Border
Border gauge:
– Along the top and bottom edges: 1 sc per stitch, which matches the dc width of 6 sts per inch.
– Along the sides: 2 sc per dc row end, so 4 sc per 1 in (2.5 cm) of height.
– Each border round adds 0.25 in (0.6 cm).
Round 1: Continuing from Row 119, ch 1 and do not turn.
- Top edge: 3 sc in the first st (corner), sc in the next 239 sts, 3 sc in the last st (corner).
- Left side: 2 sc in each row end down the side. (238 sc)
- Bottom edge: Work into the unused loops of the foundation chain. Work 3 sc in the first ch (corner), sc in the next 239 ch, and 3 sc in the last ch (corner).
- Right side: 2 sc in each row end. (238 sc)
- Sl st to the first sc.
Count between corners: 239 / 238 / 239 / 238, plus 4 corner groups of 3. Total 966 sc.
Round 2:
1. Ch 1.
2. Sc in each sc around, working 3 sc in the center sc of each corner group.
3. Sl st to the first sc.
Count between corners: top 241, sides 240, bottom 241. Add 4 corner groups of 3. Total 974 sc (966 + 8).
Fasten off.
Why the math works:
– The top and bottom take one sc per dc, so the width doesn’t change.
– The sides take 2 sc per 0.5-in (1.3-cm) row, which matches the row height, so they lie flat.
– 3 sc in each corner turn a clean 90°.
– In Round 2, the outer sc of each Round 1 corner group joins its neighboring sides, adding exactly 2 sts per side.
Tabs (make 10, worked on the top edge)
There are 241 sc between the top corners. The layout is 11 skipped sts, then 10 repeats of (12 tab sts + 11 skipped sts): 11 + 10 x 23 = 241.
- With the RS facing, start at the top-right corner. Sk the first 11 sc and join cream in the 12th sc.
- Row 1: Ch 1, sc in the same st and the next 11 sc. Turn. (12 sc)
- Rows 2–28: Ch 1, sc in each sc. Turn. (12 sc)
- Fasten off, leaving a 16 in (40.6 cm) tail.
- Sk the next 11 sc, join in the following sc and make the next tab. Repeat until you have 10 tabs, ending with 11 sts skipped before the corner.
Each tab is 2 in (5.1 cm) wide and 7 in (17.8 cm) long.
Fold each tab over to the back and whipstitch its last row along the top of Row 117. That line is 1.5 in (3.8 cm) below the top edge.
Stems and Appliqué Placement
Lay the panel RS up. Number the dc bars 0–80 from left to right. The stems run up bars 4, 13, 22, 31, 40, 49, 58, 67 and 76. That’s 9 bars apart, with 4 squares of margin at each side, and bar 40 is the exact center.
Stems:
1. With olive green, start at the top of Row 1 on bar 4.
2. Surface slip stitch up the bar, working 2 sl sts per mesh row: one through the base of the dc and one through its middle.
3. Stop at the top of Row 113. (224 sl sts per stem)
4. Fasten off and weave in the ends on the WS.
5. Repeat on each of the other 8 bars.
Placement repeat: One repeat is 16 mesh rows, or 8 in (20.3 cm). There are 7 repeats per column (k = 0–6).
- Daisy: Center it on the stem bar at Row 6 + 16k.
- Leaf pair: Place the base of both leaves on the stem at Row 13 + 16k. Angle the leaves 45° upward, one to each side, to make a V.
The top leaf pair sits at Row 109, with stem showing above it to the band.
Placement map for one column (top to bottom):
Row 113  | stem
Row 109  \|/ leaf pair
Row 102  (*) daisy
Row 93   \|/
Row 86   (*)
...
Row 13   \|/
Row 6    (*)
Row 1    solid row
Sewing:
– Pin all the pieces first and step back to check the spacing.
– Sew each daisy with its white tail. Stitch around the base of each petal, between the petals and the center, catching only the mesh bars or chain behind.
– Sew each leaf along its center vein and tip.
– Keep the stitches small and slightly loose so the mesh doesn’t pucker.
Final Blocking
- Lay the curtain flat on the blocking surface, RS up.
- Pin the corners first to 41 in x 60.5 in (104.1 cm x 153.7 cm).
- Pin along each edge every 4 in (10.2 cm), keeping the edges straight.
- Run a tape measure along a few stems to make sure they’re vertical. Nudge the mesh until the squares are square.
- Spray evenly until damp, but not soaked.
- Gently flatten each daisy and press the leaf tips into points.
- Let it dry completely, usually 24 hours, before unpinning.
Final Quality-Control Checklist
- [ ] The panel is 41 in x 60.5 in (104.1 cm x 153.7 cm).
- [ ] There are 80 squares across and 112 mesh rows, with no doubled or missing bars.
- [ ] The border counts were 966 and then 974 sc, with flat corners.
- [ ] There are 10 tabs of 12 sc each, with 11 sts between them and at each end.
- [ ] All the tabs are sewn at the same height on the back.
- [ ] There are 9 stems on the correct bars, and all of them are straight.
- [ ] There are 63 daisies and 126 leaves, evenly spaced every 8 in (20.3 cm).
- [ ] All ends are woven in on the WS.
Troubleshooting
- The panel is getting narrower: You’re probably skipping the last dc into the turning chain. Count 81 bars every few rows.
- The mesh leans or slants: Check that each new dc is worked into the dc directly below it, not into the chain space.
- The side edges wave: Work 3 sc per 2 rows instead of 2 per row on Round 1, then adjust Round 2 to match.
- The petals curl: Block them flat. If they still curl, go up a hook size for Round 3.
- The mesh puckers behind the appliqués: Your sewing is too tight. Loosen the stitches or resew with fewer anchor points.
- The tabs are uneven: Count the rows on each tab. All of them should have 28 rows.
Care
Hand wash cold or machine wash on a gentle cycle in a mesh laundry bag. Then reshape it and dry it flat. Don’t hang the curtain wet, because the weight of the water will stretch the mesh.
Final Notes
Everything rests on the gauge: 8 squares = 4 in (10.2 cm).
- The 80 squares give a width of 40 in (101.6 cm).
- The bottom row plus 112 mesh rows reach 56.5 in (143.5 cm).
- The 6-row band brings the panel to 59.5 in (151.1 cm).
- The two border rounds, at 0.5 in (1.3 cm) per side, finish it at 41 in x 60.5 in (104.1 cm x 153.7 cm).
- The 10 tabs and 9 daisy columns are spaced by stitch count, so everything lines up.
Check each step as you go and the finished curtain will hang straight and even.
Happy crocheting!