

The Terracotta Tide curtain is a floor-length panel made of soft, lacy fans. Stripes of warm rust and creamy oatmeal alternate every two rows. Light comes through the open fans and casts a pattern on the floor.
The panel is worked flat in one piece, from the bottom hem up to the rod. Rows of nine-double-crochet fans alternate with half-fan rows, so the fans in each row sit between the fans of the row below. A solid rust band finishes the top, ten tabs hang the panel, and a scalloped edge finishes the hem.
The pattern uses US crochet terms. The finished panel measures 43 in wide x 84 in long (109.2 cm x 213.4 cm), not counting the tab loops above the top edge.
Construction in short: work the fan-stitch body, straighten the top with a filler row, add three single crochet rows, work the tabs, then add a two-row edging along both sides and the hem.
Finished Size and Construction
- Finished size: 43 in x 84 in (109.2 cm x 213.4 cm)
- Tab loop drop: about 3 in (7.6 cm) above the top edge
- Skill level: Easy-Intermediate
- Terminology: US
- Yarn weight: Worsted/Aran (#4), cotton or cotton blend
- Hook: 5.5 mm (I-9)
- Number of pieces: 1 (single panel worked flat)
- Layout: 14 fan repeats across, 54 fan rows tall
- Size before border: 42 in x 83 in (106.7 cm x 210.8 cm)
- Border depth: 0.5 in (1.3 cm) on each side, 1 in (2.5 cm) at the hem
Materials
A cotton or cotton-acrylic blend works best. It shows the stitch detail clearly, hangs straight, and doesn’t stretch much under its own weight. Avoid 100% acrylic for a panel this long, because it can sag over time.
- Color A (Terracotta Rust): 900 g, about 1,530 m
- Color B (Cream/Oatmeal): 750 g, about 1,275 m
These amounts assume about 170 m per 100 g and include a margin of about 10% for swatching and tension differences.
Tools:
- 5.5 mm (I-9) crochet hook
- Tapestry needle
- Stitch markers
- Measuring tape
- Blocking mats or a clean carpeted floor, plus rust-proof pins
- Spray bottle
Abbreviations (US Terms)
- ch – chain
- sl st – slip stitch
- sc – single crochet
- hdc – half double crochet
- dc – double crochet
- tr – treble crochet
- sk – skip
- st(s) – stitch(es)
- RS / WS – right side / wrong side
- rep – repeat
Special stitches:
- Fan: 9 dc in the same stitch.
- Half fan: ch 3 (counts as dc) and 4 dc in the same stitch at the start of a row, or 5 dc in the same stitch at the end of a row.
Gauge and Checkpoints
Fan gauge: 1 fan repeat (10 sts) = 3 in (7.6 cm) wide, and 2 fan rows = 3 in (7.6 cm) tall.
Sc gauge: 10 sc = 3 in (7.6 cm), and 7 sc rows = 2 in (5.1 cm).
Make a test swatch first. Ch 32 and work Rows 1–3 of the pattern with 3 fans instead of 14, then repeat Rows 2–3 until you have 6 rows. Spray-block the swatch and let it dry. It should measure 9 in x 9 in (22.9 cm x 22.9 cm).
- Swatch too big? Go down 0.5 mm.
- Swatch too small? Go up 0.5 mm.
Even a 0.25 in (0.6 cm) error per fan adds 3.5 in (8.9 cm) across the full panel, so fix the gauge before you start.
Checkpoints during the body (measure flat, unstretched):
- After Row 1: 42 in (106.7 cm) wide
- After Row 10: 15 in (38.1 cm) tall
- After Row 20: 30 in (76.2 cm) tall
- After Row 54: 81 in (205.7 cm) tall
- After Row 58: 83 in (210.8 cm) tall
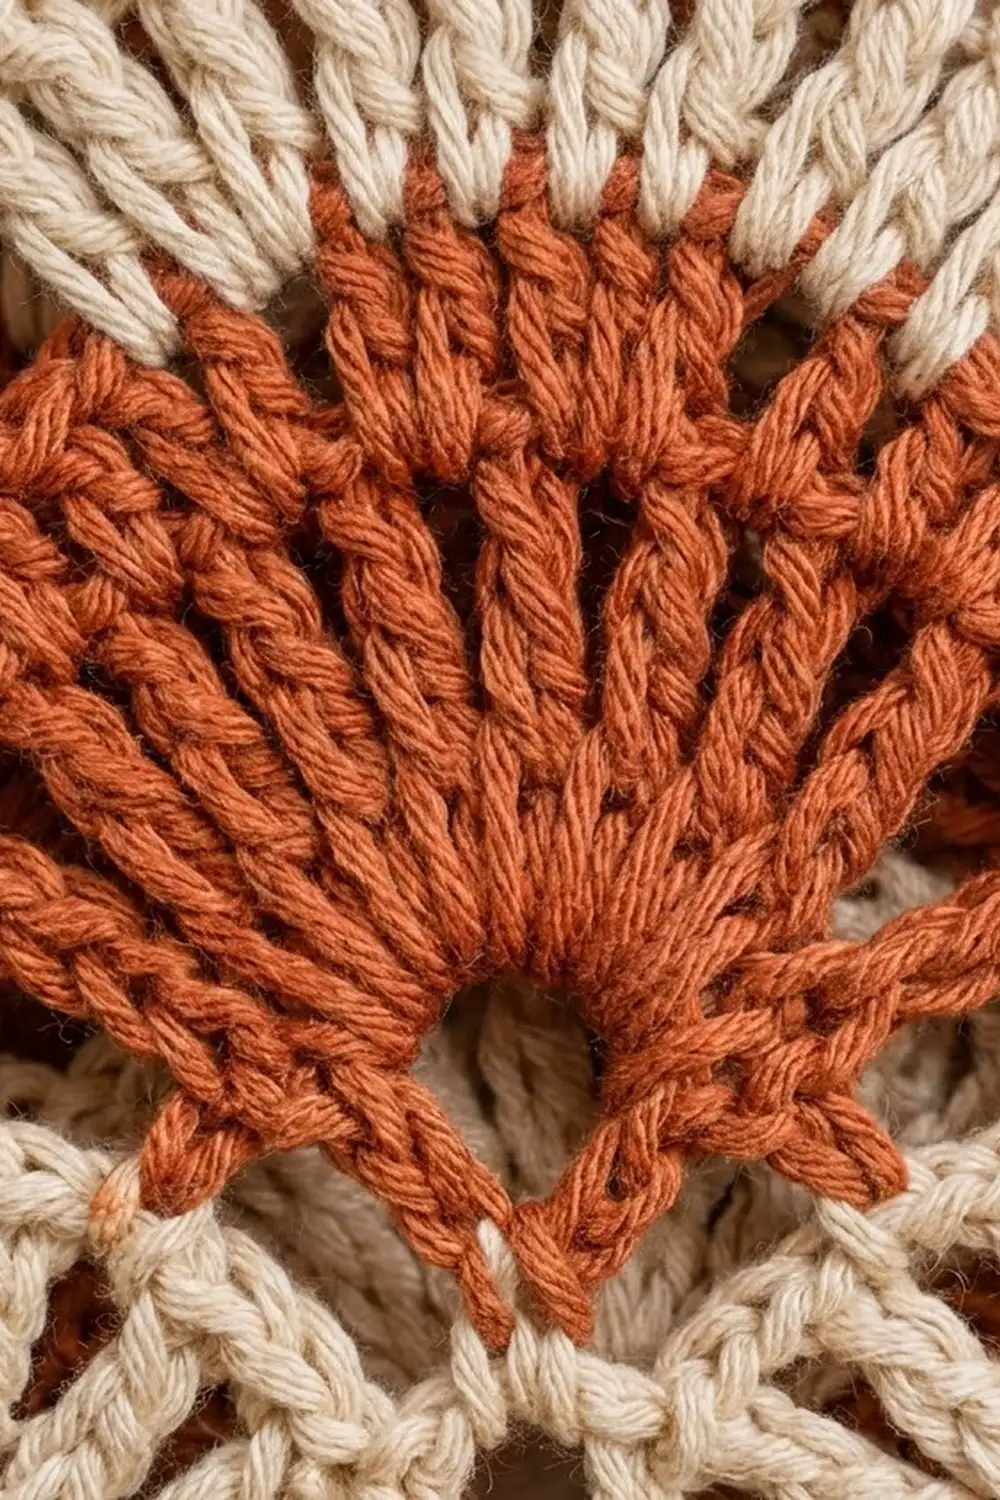
The Curtain Body
Color plan: Work Rows 1–2 in A and Rows 3–4 in B, then keep alternating every 2 rows. If you divide the row number by 4, rows with a remainder of 1 or 2 use A, and rows with a remainder of 3 or 0 use B. That gives 14 rust stripes and 13 cream stripes, with rust at both the top and bottom.
To change color, finish the last stitch of the old row by pulling through the final loops with the new color. Carry the color you’re not using loosely up the side edge. The border will cover it later.
Foundation: With A, ch 142.
Row 1 (RS, A):
- Sc in the 2nd ch from the hook.
- Sk 4 ch, Fan in the next ch, sk 4 ch, sc in the next ch. Rep from * 13 more times.
Count: 141 sts (14 Fans = 126 dc, plus 15 sc). This uses 1 + (14 x 10) = 141 chains.
Row 2 (WS, A):
- Ch 3 (counts as dc), 4 dc in the first sc. This is the starting half fan.
- Sk 4 dc, sc in the next dc (the center of the fan), sk 4 dc, Fan in the next sc. Rep from * 12 more times.
- Sk 4 dc, sc in the center dc of the last fan, sk 4 dc, 5 dc in the last sc. This is the ending half fan.
Count: 141 sts (5 + 13 x 10 + 1 + 5): 2 half fans, 13 full Fans, and 14 sc.
Row 3 (RS, B):
- Ch 1, sc in the first dc.
- Sk 4 dc, Fan in the next sc, sk 4 dc, sc in the next dc (the center of the fan). Rep from * across. Your last sc goes in the top of the turning ch-3.
Count: 141 sts (14 Fans, 15 sc). Each Fan sits on a sc point from Row 2, which offsets the fans from the row below.
Row 4 (WS, B): Rep Row 2. Count: 141 sts.
Rows 5–54: Rep Rows 3–4 twenty-five more times, following the color plan. Row 54 is a Row 2-type row in A.
Count: 141 sts on every row. Check the width at Row 10 and Row 20, and keep the side edges straight. If the edges start to curve, count the sts in the last row before you continue.
Top Band
The top of Row 54 is wavy, with high points at the fan centers and low points at the sc. Row 55 fills in the low points with taller stitches so the band starts on a straight line.
Row 55 (RS, A):
- Ch 1, sc in the first 3 sts, hdc in the next st, dc in the next st.
- Tr in the next sc, dc in the next dc, hdc in the next dc, sc in the next 5 dc, hdc in the next dc, dc in the next dc. Rep from * 12 more times.
- Tr in the next sc, dc in the next dc, hdc in the next dc, sc in the next 2 dc, sc in the top of the turning ch.
Count: 141 sts (5 + 13 x 10 + 1 + 5), including 14 tr. That is 1 new stitch for every stitch in Row 54.
Rows 56–58 (A): Ch 1, turn, sc in each st across. Count: 141 sc per row.
Checkpoint: The body now measures 42 in x 83 in (106.7 cm x 210.8 cm).
Tabs
Work 10 tabs across Row 58. Each tab is 6 sts wide, and the gaps between tabs are 9 sts. The math: 10 x 6 = 60 sts for the tabs, plus 9 x 9 = 81 sts for the gaps, equals 141 sts. Each tab is 1.8 in (4.6 cm) wide, and each gap is 2.7 in (6.9 cm). The first and last tabs sit flush with the side edges.
Place a marker in sts 1, 16, 31, 46, 61, 76, 91, 106, 121, and 136 of Row 58. Each tab starts at a marker.
Each tab (A):
- Tab Row 1: With RS facing, join A in the marked st, ch 1, sc in the same st and in the next 5 sts. Count: 6 sc.
- Tab Rows 2–21: Ch 1, turn, sc in each st across. Count: 6 sc per row.
The tab now measures 6 in (15.2 cm). Fasten off and leave a 12 in (30.5 cm) tail. Fold the tab to the WS and whipstitch its last row to Row 56, directly behind where the tab starts. This makes a loop about 3 in (7.6 cm) deep.
Border
The border runs down one side, across the hem, and up the other side. It is worked in 2 rows. The top band already gives the top a clean edge, so the border does not go across the top.
Border gauge: The border uses the same sc gauge, 10 sc = 3 in (7.6 cm).
- Each fan row is 1.5 in (3.8 cm) tall, so 5 sc per fan row-end gives 3.33 sc per inch. That matches the gauge, so the edges stay flat without ruffling or pulling in.
- The band is about 2 in (5.1 cm) tall, so it gets 6 sc: 3 in the end of Row 55 and 1 in each end of Rows 56–58.
Each side: (54 x 5) + 6 = 276 sc.
Border Row 1 (RS, A): With RS facing, join A at the top corner of the right-hand edge and ch 1.
- Side 1: Work 276 sc evenly down the edge: 6 across the band, then 5 per fan row-end.
- Hem: Working into the free loops of the foundation chain, sc in the first ch. Sk 4 ch, 7 dc in the next ch (the base of a Row 1 Fan), sk 4 ch, sc in the next ch (the base of a Row 1 sc). Rep from * 13 more times. Hem count: 15 sc + 98 dc = 113 sts, making 14 scallops.
- Side 2: Work 276 sc evenly up the other edge.
Total: 276 + 113 + 276 = 665 sts.
Border Row 2 (WS, A): Ch 1, turn.
- Side 2: Sc in each of the 276 sc.
- Hem: Sc in the first sc. Sc in the next 3 dc, 3 sc in the next dc (the center), sc in the next 3 dc, sc in the next sc. Rep from * 13 more times. Hem count: 1 + (14 x 10) = 141 sts.
- Side 1: Sc in each of the 276 sc.
Total: 276 + 141 + 276 = 693 sts. Fasten off.
Why the math works:
- Sides: Each side keeps exactly 276 sts in both rows, so the edges can’t flare or pull in. Two sc rows add 0.5 in (1.3 cm) per side, bringing the width from 42 in to 43 in (106.7 cm to 109.2 cm).
- Hem: The scallops sit under the 14 Fans of Row 1. This repeats the fan rhythm and adds 1 in (2.5 cm), bringing the length from 83 in to 84 in (210.8 cm to 213.4 cm).
- Second hem row: The 3 sc at each scallop center add the stitch needed to round the point. That brings the hem back to 141 sts, the same as the body width.
Final Blocking
- Weave in all ends along the color-change lines or inside the border, never across open lace.
- Lay the panel flat on mats or a clean floor, RS up.
- Spray the whole panel evenly until it is damp but not soaked.
- Pin the side edges straight to 43 in (109.2 cm) apart, checking at the top, middle, and bottom.
- Pin the length to 84 in (213.4 cm), from the scallop points to the top of Row 58.
- Pin each hem scallop to a gentle curve, and open each fan with your fingers.
- Straighten the tabs so they are evenly spaced and the same length.
- Let the panel dry completely, usually 24 hours, before you unpin it.
Final Quality-Control Checklist
- Every body row has 141 sts.
- There are 14 rust stripes and 13 cream stripes, with rust at the top and bottom.
- The Fans in each row are centered on the sc points of the row below.
- Row 55 has 14 tr, and the band sits level.
- All 10 tabs are 6 sts wide with 9-st gaps, and all are sewn at the same depth.
- Each side border has 276 sts, and the hem has 14 scallops.
- The blocked panel measures 43 in x 84 in (109.2 cm x 213.4 cm).
- No carried strands or ends show on the RS.
Troubleshooting
- Fans lean to one side: You’ve probably skipped 3 or 5 sts instead of 4. Count the skips on every repeat.
- Edges curve inward: You’ve probably left out the end half fan. Recheck the 141-st count.
- Panel gets wider as you go: Your tension is loosening as you work. Measure the width every 10 rows.
- Band is wavy: You may have missed a tr in a low point. Rework Row 55.
- Side border ruffles: You have too many sc per row-end. Work exactly 5 per fan row.
- Curtain stretches when hung: Your yarn is too stretchy, or the stitches are too loose. Steam-block it again, or go down a hook size on the body next time.
- Tabs twist: You probably sewn them on at an angle. Re-sew each tab straight behind its base.
Care
Hand wash or machine wash on a gentle cycle in cool water, inside a mesh laundry bag. Lay flat to dry and reshape to 43 in x 84 in (109.2 cm x 213.4 cm). Never hang the panel wet.
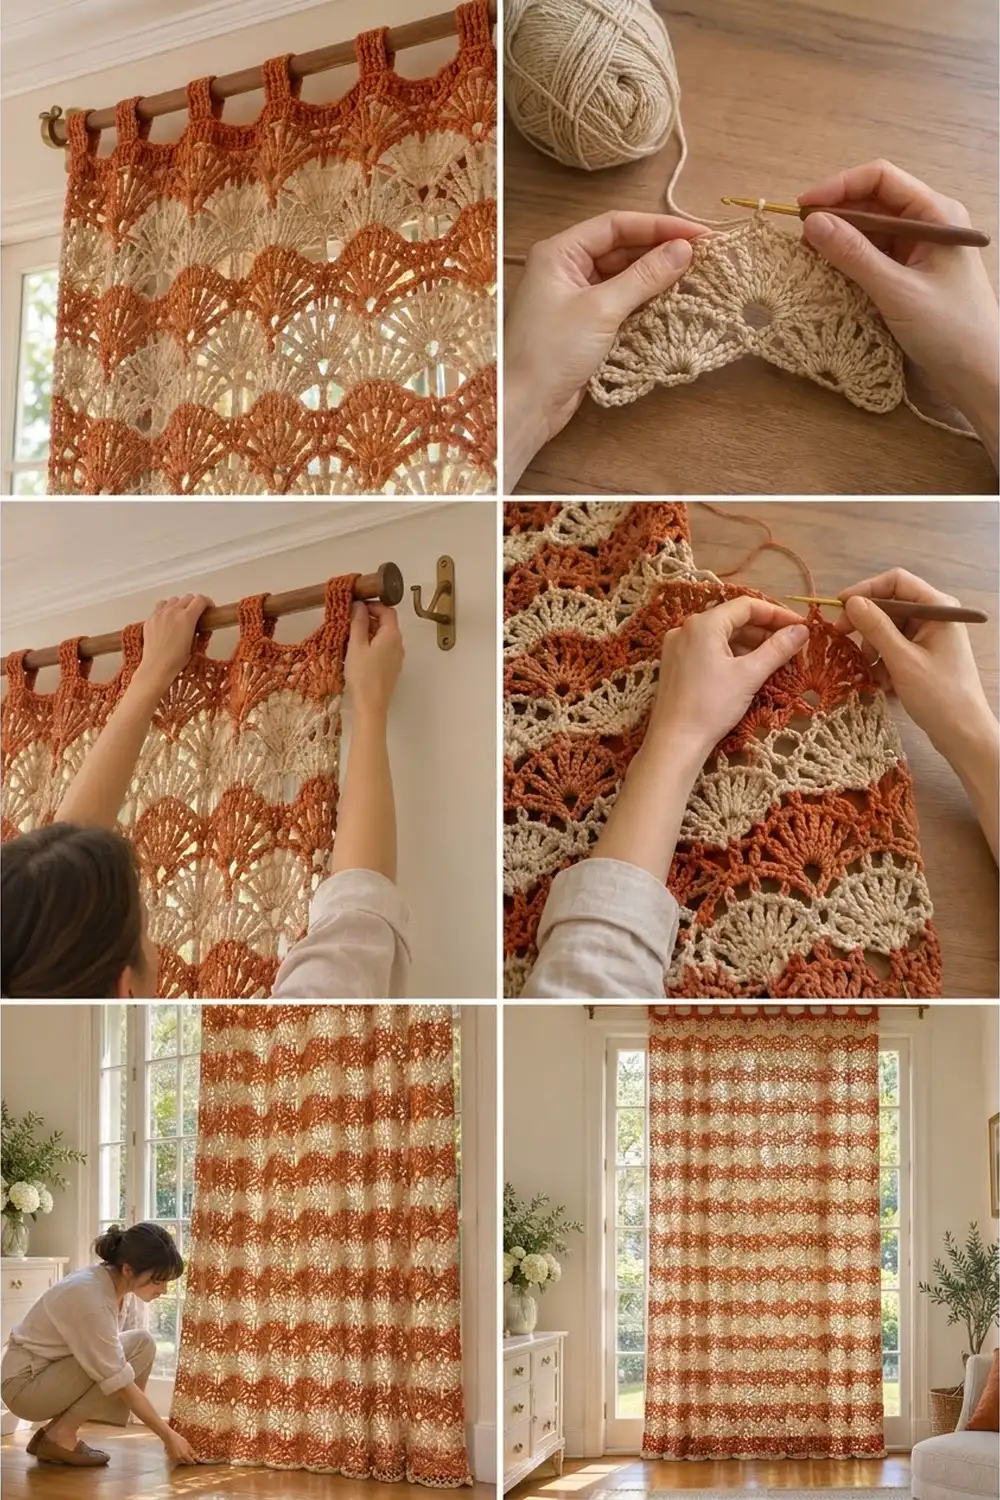
Final Notes
Here is how the measurements build up:
- One fan repeat is 3 in (7.6 cm), and 14 repeats give 42 in (106.7 cm).
- Two fan rows are 3 in (7.6 cm), and 54 rows give 81 in (205.7 cm).
- The band brings the length to 83 in (210.8 cm).
- The border adds 0.5 in (1.3 cm) per side and 1 in (2.5 cm) at the hem, for a finished 43 in x 84 in (109.2 cm x 213.4 cm).
If you keep 141 sts on every row and 276 sts on each side of the border, the panel will hang straight.
Happy crocheting!