

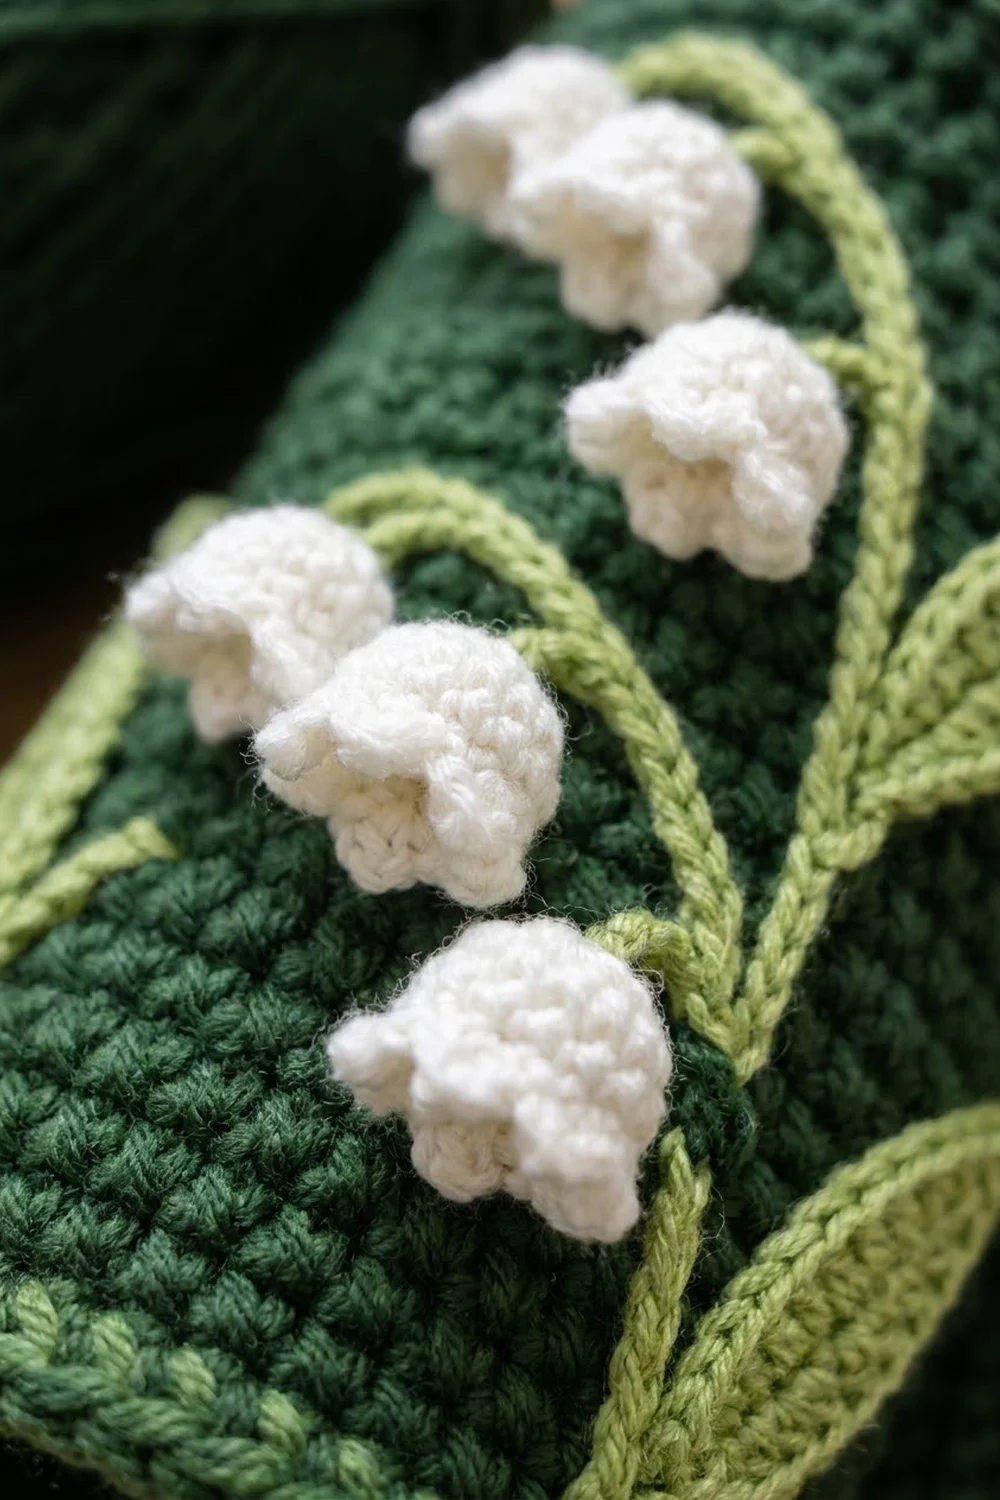
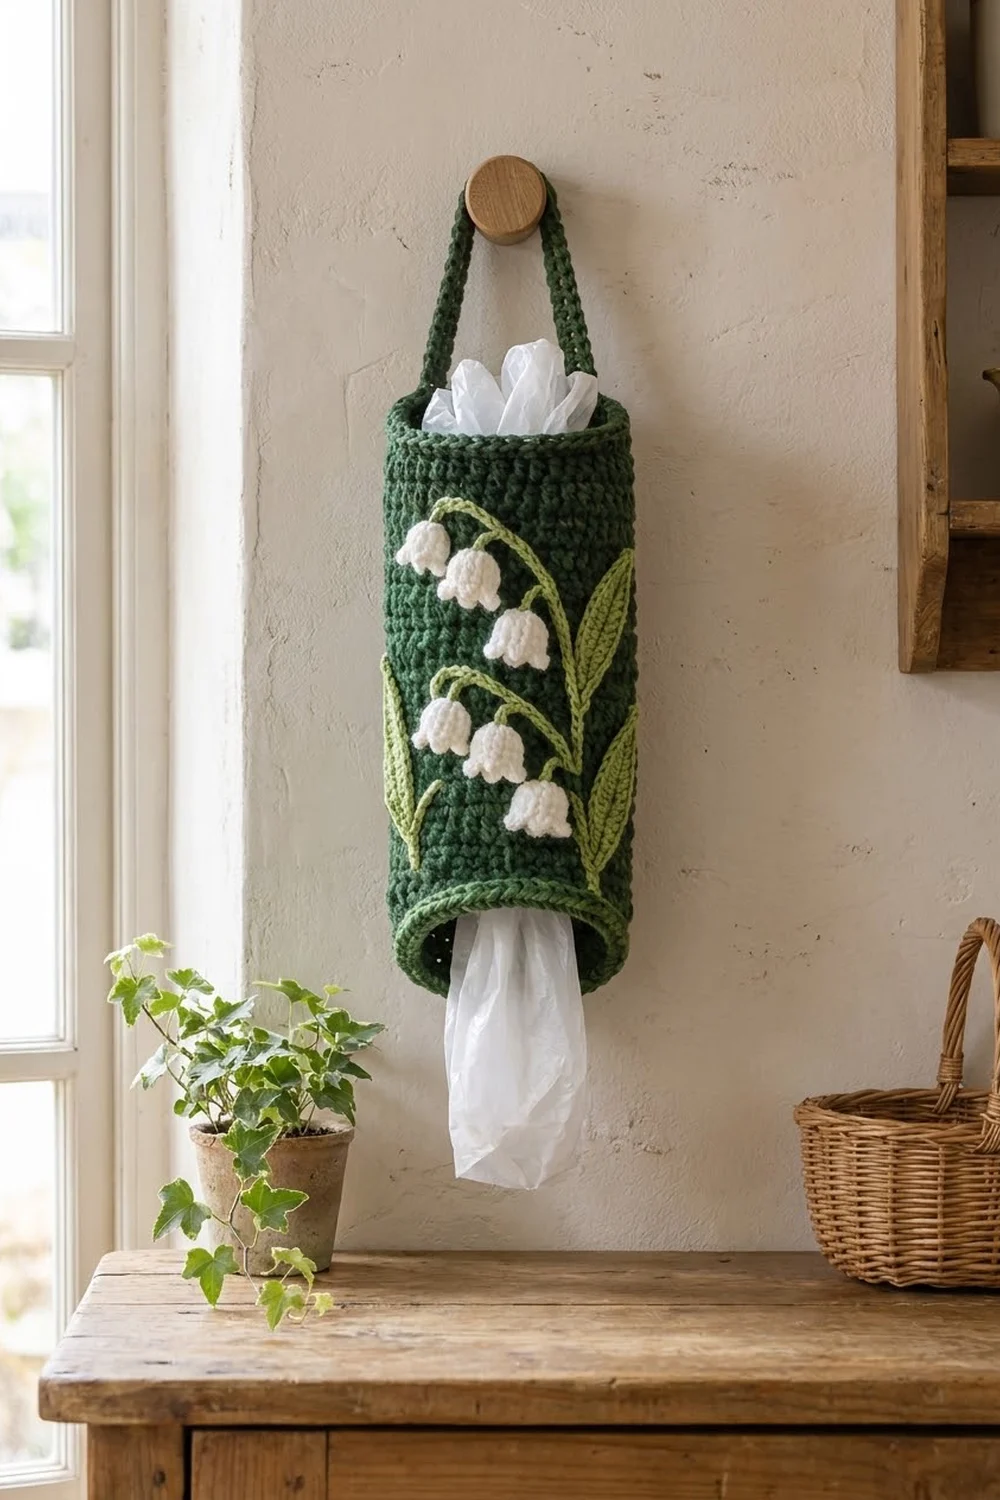
Plastic bags pile up fast, and this holder gives them a tidy place to live. The Muguet Meadow Bag Holder is a dark forest green tube with an arched strap at the top. The front is decorated with lily of the valley: white bell flowers on curved stems, with long spring green leaves on each side.
You push bags in at the top and pull them out one at a time from the bottom. The body is plain, dense single crochet, so the bags stay hidden and the flowers stand out against the green. The style is cottage-garden: simple and a little bit sweet.
The pattern uses US crochet terms. The finished holder is 12 in (30.5 cm) tall, with a circumference of 14 in (35.6 cm) and a diameter of about 4.5 in (11.4 cm). The strap adds an arch about 3 in (7.6 cm) high.
Construction is simple. You chain a ring and work 55 joined rounds of single crochet to make the tube. Then you add a two-round rim to each opening, make a strap, crochet the bells and leaves separately, and sew everything on. The stems are surface slip-stitched directly onto the body.
Finished Size and Construction
- Finished size: 12 in (30.5 cm) tall × 14 in (35.6 cm) around; 7 in (17.8 cm) wide when flattened
- Skill level: Easy-Intermediate
- Terminology: US
- Yarn weight: Worsted (#4)
- Hooks: 5.0 mm (H-8) for the body and strap; 4.0 mm (G-6) for the appliqués
- Number of pieces: 1 tube, 1 strap, 7 bells, 2 leaves
- Layout: One vertical tube with the floral motif centered on the front
- Piece size before border: 11 in (27.9 cm) tall × 14 in (35.6 cm) around
- Border depth: 0.5 in (1.3 cm) at each opening
Materials
Choose a smooth worsted cotton or acrylic. Cotton gives crisp stitches and a firm tube. Acrylic is lighter and easier to wash. Avoid fuzzy yarn, because it hides the bell shapes. The amounts below assume about 200 m per 100 g.
- Dark forest green (MC): 70 g / 140 m
- White (A): 10 g / 20 m
- Light spring green (B): 10 g / 20 m
All quantities include a margin of about 15%.
Tools:
– 5.0 mm (H-8) and 4.0 mm (G-6) hooks
– Tapestry needle
– 4 stitch markers
– Scissors
– Rustproof pins
– Tape measure
– Spray bottle
– A rolled towel or cardboard tube about 4.5 in (11.4 cm) across, for blocking
Abbreviations (US Terms)
- ch – chain
- sl st – slip stitch
- sc – single crochet
- hdc – half double crochet
- dc – double crochet
- st(s) – stitch(es)
- MR – magic ring
- rnd(s) – round(s)
- rev sc – reverse single crochet (crab stitch)
Special stitch – rev sc: Work from left to right (right-handed). Insert the hook into the next stitch to the right, yarn over, and pull up a loop. Yarn over and pull through both loops on the hook. This makes the rope-like edge on both rims.
Surface sl st: Hold the yarn behind the fabric. Insert the hook from front to back between stitches, pull up a loop, and draw it through the loop already on the hook. Repeat along the drawn line.
Gauge and Checkpoints
Gauge: 16 sc and 20 rnds = 4 in (10.2 cm) in joined sc rounds with the 5.0 mm hook.
Test with the piece itself. Work the ring and the first 10 rounds, then check:
- Foundation ring: 14 in (35.6 cm) around, without stretching.
- After Rnd 10: 2 in (5.1 cm) tall; 7 in (17.8 cm) wide when flattened.
- After Rnd 30: 6 in (15.2 cm) tall.
- After Rnd 55: 11 in (27.9 cm) tall.
- After both rims: 12 in (30.5 cm) tall.
If the tube is wider than 7 in (17.8 cm) flat, go down half a hook size. If it is narrower, go up half a size. If the width is right but the height runs short, add rounds; never add stitches. Each round adds 0.2 in (0.5 cm).
Body
The body is worked in joined rounds without turning. The join sits at the side, where the strap end will later hide it.
Foundation: With the 5.0 mm hook and MC, ch 56. Check that the chain isn’t twisted, then sl st into the first ch to form a ring. If your chains run tight, make them with a hook half a size larger.
Rnd 1: Ch 1, then sc in each ch around. Sl st to the first sc. (56 sc)
Place a marker in the first stitch. Place a second marker in st 29, which is directly opposite it. These two stitches mark the sides where the strap will go. The front of the holder is the 28 stitches from st 1 through st 28, centered on st 15.
Rnds 2–55: Ch 1, sc in each st around, then sl st to the first sc. (56 sc in every round)
Move the side markers up every 10 rounds or so. After Rnd 55, the tube measures 11 in (27.9 cm). Fasten off and weave in the end.
Strap
With the 5.0 mm hook and MC: Ch 4.
Row 1: Sc in the 2nd ch from the hook and in the next 2 ch. (3 sc)
Rows 2–40: Ch 1, turn, sc in each st. (3 sc)
The strap should measure 8 in (20.3 cm) long and 0.75 in (1.9 cm) wide. For the rounded, cord-like look, sl st loosely along each long edge, working 1 sl st per row end. Fasten off and leave a 12 in (30.5 cm) tail. Join a separate 12 in (30.5 cm) tail of MC to the starting end. The strap is sewn on after the rims are done.
Bell Flowers (Make 7)
With the 4.0 mm hook and A:
Rnd 1: 6 sc in a MR. Pull the ring closed. (6 sc)
Rnd 2: (Sc in next st, 2 sc in next st) 3 times. (9 sc)
Rnd 3: Sc in each st. (9 sc)
Rnd 4: (Sc in next 2 sts, 2 sc in next st) 3 times. (12 sc)
Rnd 5 (scallop trim): Sl st in next st, then (sc, hdc, sc) all in the next st. Repeat from * 6 times, then sl st to the first sl st. The count is 6 sl st + 18 scallop stitches, for 24 sts and 6 scallops.
Each bell is about 0.9 in (2.3 cm) long and wide. Don’t stuff it; the closed top and wide scallops keep the cup shape. Leave a 6 in (15.2 cm) tail at the top for sewing. Push the bell out from the inside with your finger so it cups.
Leaves (Make 1 Large and 1 Small)
Each leaf is worked around both sides of a foundation chain. The center chain forms the visible vein ridge.
Large leaf (4.0 mm hook, B): Ch 21.
- Side 1: Starting in the 2nd ch from the hook, work into the next 19 ch: sl st 1, sc 2, hdc 3, dc 7, hdc 3, sc 3. (19 sts)
- Base: Work 3 sc in the last ch. (3 sts)
- Side 2: Working along the opposite side of the chain, into the same 19 ch: sc 3, hdc 3, dc 7, hdc 3, sc 2, sl st 1. (19 sts)
- Tip: Ch 2, then sl st into the 2nd ch from the hook to make a point.
Total: 41 sts plus the tip. The large leaf measures about 4.4 in (11.2 cm) × 1.1 in (2.8 cm).
Small leaf: Ch 16.
- Side 1: Starting in the 2nd ch from the hook, work into the next 14 ch: sl st 1, sc 2, hdc 2, dc 5, hdc 2, sc 2. (14 sts)
- Base: Work 3 sc in the last ch. (3 sts)
- Side 2: Working into the opposite side of the same 14 ch: sc 2, hdc 2, dc 5, hdc 2, sc 2, sl st 1. (14 sts)
- Tip: Ch 2, then sl st into the 2nd ch from the hook.
Total: 31 sts plus the tip. The small leaf measures about 3.3 in (8.4 cm) × 0.8 in (2.0 cm).
Leave a 10 in (25.4 cm) tail on each leaf.
Appliqué Placement and Stems
Lay the tube flat with the front facing you. The front runs from st 1 to st 28, so it is 7 in (17.8 cm) wide. Count rounds up from Rnd 1. Mark each position with pins before you sew anything.
- Large leaf: Place the base at Rnd 8, about st 20. Point the tip up and slightly inward so it ends near Rnd 30. Curve the leaf gently toward the center.
- Small leaf: Place the base at Rnd 8, about st 8. Angle the tip up and outward so it ends near Rnd 24.
- Lower stem: With B and the 4.0 mm hook, surface sl st a curved line about 5 in (12.7 cm) long. Start at Rnd 8 between the two leaf bases, rise to Rnd 30, and arch over to the left so the line ends near Rnd 26.
- Upper stem: Surface sl st a second line about 6 in (15.2 cm) long. Start on the lower stem at Rnd 20, climb to Rnd 50, and arch left so the line ends near Rnd 46.
- Bells: Hang 4 bells under the lower stem’s arch, spaced 0.6 in (1.5 cm) apart. Hang 3 bells under the upper arch. For each bell, use its white tail to stitch a short pedicel about 0.4 in (1.0 cm) long from the stem down to the bell top. Then whipstitch around the bell’s Rnd 2 only. This leaves the scallops free so the bells puff outward.
- Leaves: Whipstitch each leaf around its outer edge with the B tail. Make a few extra stitches through the center vein so the leaf doesn’t gape.
Keep all motif stitching within Rnds 8–52. The rims then frame the motif without crowding it.
Border (Top and Bottom Rims)
Border gauge: 1 sc or 1 rev sc into each stitch. Two rim rounds add 0.5 in (1.3 cm) of height.
Top rim (5.0 mm hook, MC): Join the yarn in st 1 of Rnd 55.
- Rnd 1: Ch 1, sc in each st, then sl st to join. (56 sc: 28 front, 28 back)
- Rnd 2: Ch 1, rev sc in each st, then sl st to join. (56 rev sc: 28 front, 28 back)
Bottom rim: Turn the tube upside down. Join MC in the free loop of the foundation chain directly below st 1.
- Rnd 1: Ch 1, sc in each of the 56 free chain loops, then sl st to join. (56 sc: 28 front, 28 back)
- Rnd 2: Ch 1, rev sc in each st, then sl st to join. (56 rev sc)
Why the math works: Every round of the tube has 56 stitches, and both rims work exactly 1 stitch into each of them. So the rims keep the 14 in (35.6 cm) circumference without flaring or pulling in. The foundation chain also has 56 loops, so the bottom matches the top exactly.
The height adds up as 11 in (27.9 cm) of body plus 0.5 in (1.3 cm) for each rim, which gives 12 in (30.5 cm).
Attach the strap: Tuck 0.75 in (1.9 cm) of one strap end inside the tube at the st 1 marker, just below the rim. Whipstitch all 4 edges of the overlap through the body. Repeat with the other end at the st 29 marker, making sure the strap isn’t twisted. The arch that shows is 6.5 in (16.5 cm) long.
Final Blocking
- Weave in all ends inside the tube. Run each one back on itself for at least 1 in (2.5 cm).
- Slide the rolled towel or cardboard tube inside the holder.
- Mist the holder evenly until it is damp, not soaked.
- Ease the body to 12 in (30.5 cm) tall and 14 in (35.6 cm) around.
- Fluff each bell’s scallops outward with your fingertip.
- Shape the leaf tips to a point and press the stems flat.
- Let it dry completely, then remove the form.
Final Quality-Control Checklist
- Every body round has 56 stitches.
- The tube measures 7 in (17.8 cm) wide when flattened.
- The height is 12 in (30.5 cm) including both rims.
- Both rims lie flat with no ruffling.
- The strap is centered over the sides and not twisted.
- All 7 bells hang open-side down with free scallops.
- The leaves are stitched securely along their full length.
- No ends show on the outside.
Troubleshooting
- The tube spirals or leans: The joins are drifting. Always start the round in the same stitch as the sl st join.
- The foundation edge is tight: Redo the chain with a larger hook, or work the bottom rim more loosely.
- The bells look flat: You sewed through the scallops. Remove the stitching and sew around Rnd 2 only.
- The leaves curl: Steam-block them flat before sewing them on.
- The rim ruffles: Your rev sc is too loose. Go down half a hook size for the rims only.
- Bags fall through the bottom: Work one extra round of sc before the bottom rev sc round, making 2 sc together twice. That round has 54 sts, and the rev sc round then also has 54.
Care
Hand wash in cool water and lay the holder flat or over a form to dry. Don’t wring it, because that can crush the bells.
Final Notes
The measurements build on each other in a simple chain. Gauge is 16 sc = 4 in (10.2 cm), so 56 sc gives a 14 in (35.6 cm) circumference and a 7 in (17.8 cm) flat width. The 55 body rounds make 11 in (27.9 cm), and the two rims add 0.5 in (1.3 cm) each, for 12 in (30.5 cm) total. The 8 in (20.3 cm) strap leaves a 6.5 in (16.5 cm) arch for hanging. If the gauge checks out early, every later measurement will too.
Happy crocheting!