

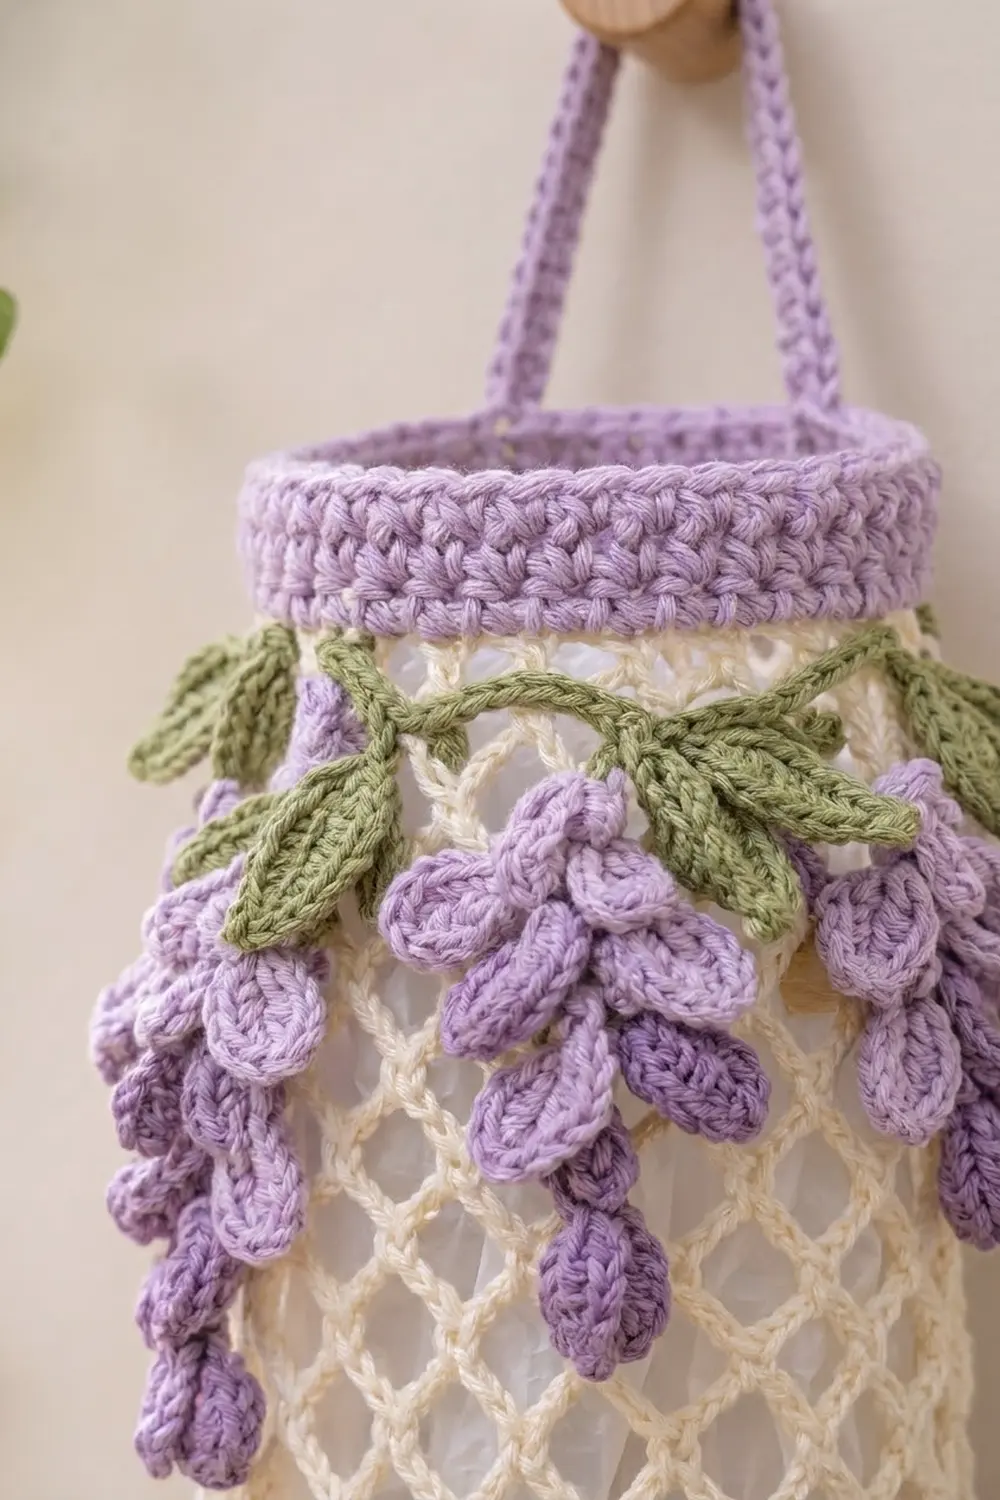
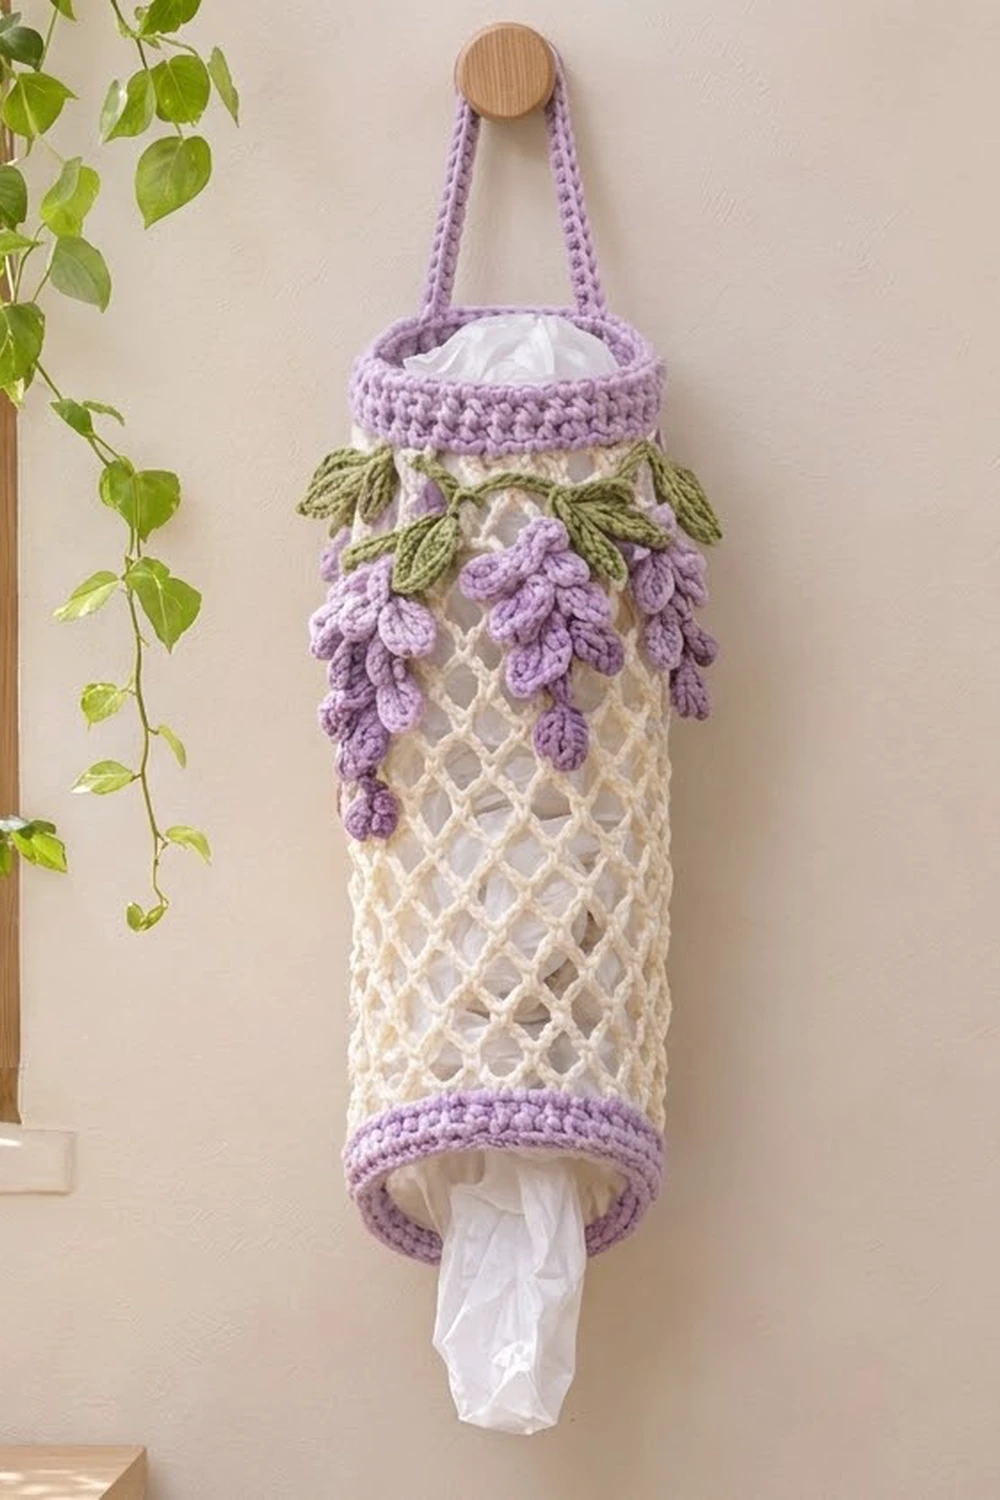
This hanging bag holder is a tall, open tube of cream diamond mesh, finished with a solid lavender band at the top and bottom and a slim lavender strap for hanging. Around the top, seven clusters of lavender wisteria hang down over the mesh, and a ring of sage green leaves sits above them.
The palette is soft and fresh: cream, lavender, and sage. The mesh lets you see how many bags are left, and the solid bands keep both openings firm so you can stuff bags in at the top and pull them out at the bottom.
The pattern uses US crochet terms. The finished tube measures 16 in (40.6 cm) around, about 8 in (20.3 cm) wide laid flat, and 17.2 in (43.7 cm) tall, not counting the strap. The strap rises about 6 in (15.2 cm) above the rim.
The body is one piece worked in joined rounds from the bottom up: a lavender hdc band, then cream ch-5 mesh, then a lavender top band. The strap is worked straight off the top band and sewn to the opposite side. Last, you make small wisteria clusters and leaves separately and sew them on below the top band.
Finished Size and Construction
- Finished size: 16 in (40.6 cm) around x 17.2 in (43.7 cm) tall, plus strap
- Skill level: Easy-intermediate
- Terminology: US
- Yarn weight: Worsted (#4) cotton or cotton blend
- Hook: 5 mm (H-8)
- Number of pieces: 1 body with strap, plus 7 wisteria clusters and 14 leaves sewn on
- Layout: Single vertical tube, open at both ends
- Body circumference: 56 stitches = 16 in (40.6 cm)
- Size before border: 15.1 in (38.4 cm) tall (bottom band plus mesh)
- Border depth: top band 1.85 in (4.7 cm); bottom edge round 0.25 in (0.6 cm)
Materials
Use a smooth worsted-weight cotton. Cotton holds its shape, keeps the mesh crisp, and doesn’t stretch out much with the weight of the bags. The amounts below assume a yarn of about 85 m per 50 g.
- Color A, Lavender: 100 g / 170 m (bands, strap, wisteria clusters)
- Color B, Cream: 60 g / 102 m (mesh body)
- Color C, Sage Green: 20 g / 34 m (leaves)
These amounts include a margin of about 15%, so you won’t run short while swatching or if you need to redo a round.
Tools:
- 5 mm (H-8) crochet hook
- Tapestry needle
- Scissors
- Stitch markers
- Measuring tape
- Rust-proof pins and a blocking mat or towel
- Optional: a tall jar or rolled towel about 5 in (12.7 cm) across, to block the tube on
Abbreviations (US Terms)
- ch – chain
- sl st – slip stitch
- sc – single crochet
- sc2tog – single crochet 2 together
- hdc – half double crochet
- dc – double crochet
- sk – skip
- sp – space
- st(s) – stitch(es)
- rnd(s) – round(s)
Special stitches:
- Small petal: (ch 1, 2 hdc, ch 1, sl st) all in the same stitch.
- Large petal: (ch 2, 3 dc, ch 2, sl st) all in the same stitch.
Gauge and Checkpoints
Solid gauge: 14 hdc and 10 rnds = 4 in (10.2 cm). Single crochet in rows: 14 sts and 16 rows = 4 in (10.2 cm).
Mesh gauge: 3.5 ch-5 loops = 4 in (10.2 cm) wide and 4 mesh rnds = 3 in (7.6 cm) tall, measured hanging without stretching.
Test on the real piece. Work the bottom band (Rnds 1–4) first, then measure before you go on.
Checkpoints:
- After Rnd 1: The ring measures 16 in (40.6 cm) around, or about 8 in (20.3 cm) flat.
- After Rnd 4: The band is 1.6 in (4.1 cm) tall.
- After Rnd 8 (4 mesh rnds): The mesh section is about 3 in (7.6 cm) tall when the piece hangs.
- After Rnd 22: The body is 15.1 in (38.4 cm) tall.
- After the border: The tube is 17.2 in (43.7 cm) tall.
If your ring is too big, go down to a 4.5 mm hook. If it’s too small, go up to a 5.5 mm hook. Don’t change the stitch count. The mesh repeat needs 56 stitches, and the top band math depends on it. If only the mesh is too long or short, take out or add mesh rounds two at a time. Each pair changes the height by 1.5 in (3.8 cm).
Part 1: Bottom Band (Color A)
Foundation: With A, ch 56. Join with a sl st to the first ch to form a ring, taking care not to twist the chain.
Rnd 1: Ch 2 (doesn’t count as a st here or in any rnd). Hdc in the same ch as the join and in each ch around. Join with a sl st to the first hdc. (56 hdc)
Rnds 2–4: Ch 2, hdc in each st around, join. (56 hdc per rnd)
Fasten off A. The band measures 1.6 in (4.1 cm) tall and 16 in (40.6 cm) around.
Part 2: Mesh Body (Color B)
The mesh uses 4 stitches per loop: 56 ÷ 4 = 14 loops around.
Rnd 5 (set-up): Join B with a sl st in any hdc. Ch 1, sc in the same st. Ch 5, sk 3 sts, sc in next st. Repeat from * 12 more times. Ch 5, sk the last 3 sts, join with a sl st to the first sc. (14 ch-5 loops; 14 sc)
Check: 14 sc + (14 x 3 skipped) = 56 stitches used.
Rnd 6: Sl st in each of the first 3 ch to reach the center of the first loop. Ch 1, sc in the same loop. Ch 5, sc in next ch-5 loop. Repeat from * 12 more times. Ch 5, join with a sl st to the first sc. (14 ch-5 loops)
Rnds 7–22: Repeat Rnd 6. (14 ch-5 loops per rnd)
Each sc sits at the center of the loop below, and that offset is what makes the diamond net. Fasten off B after Rnd 22.
Checkpoint: The 18 mesh rounds (Rnds 5–22) measure 13.5 in (34.3 cm) when the piece hangs. With the bottom band, the body is now 15.1 in (38.4 cm) tall. The loops will look loose when the piece lies flat. Measure it hanging or gently pinned at its natural length.
Part 3: Wisteria Clusters (Color A, make 7)
Each cluster is a tapered spike of petals worked around both sides of a chain. The small petals bunch at the tip and the large petals fill out the top, so you get a drooping wisteria shape.
Foundation: Leaving a 10 in (25.4 cm) tail, ch 11.
Side 1: Sl st in the 2nd ch from the hook. This is the tip. Small petal in the same ch. Sl st in next ch, small petal in the same ch. Repeat from * 2 more times (4 small petals). Sl st in next ch, large petal in the same ch. Repeat from * 5 more times (6 large petals). (10 petals)
Side 2: Rotate to work in the bottom loops of the chain, back toward the tip. Sl st in next ch, large petal in the same ch. Repeat from * 5 more times. Sl st in next ch, small petal in the same ch. Repeat from * 3 more times. Sl st in the tip ch. (10 petals; 20 petals total)
Fasten off and weave in this end. Keep the starting tail for sewing. Each cluster measures about 3 in (7.6 cm) long and 1.5 in (3.8 cm) wide at the top.
Part 4: Leaves (Color C, make 14)
Foundation: Leaving an 8 in (20.3 cm) tail, ch 7.
Side 1: Starting in the 2nd ch from the hook, work sl st, sc, hdc, dc, hdc, sc. (6 sts)
Tip: Ch 1. Rotate to work in the bottom loops.
Side 2: Work sc, hdc, dc, hdc, sc, sl st in the last ch. (6 sts; 12 sts total)
Fasten off. Each leaf measures about 1.75 in (4.4 cm) long.
Border: Top Band, Strap, and Bottom Edge
Border Gauge
The border uses the solid gauge: 14 hdc = 4 in (10.2 cm), and 4 hdc rnds = 1.6 in (4.1 cm). The top band has to match the bottom band at 56 stitches, so both openings are the same 16 in (40.6 cm).
Top Band (Color A)
Rnd 23 (conversion): Join A with a sl st in any sc of Rnd 22. Ch 1, sc in the same sc. 3 sc in the next ch-5 loop. Sc in next sc, 3 sc in next ch-5 loop. Repeat from * around. Join with a sl st to the first sc. (14 sc worked 1 per existing sc + 42 sc added in the loops = 56 sc)
Rnds 24–27: Ch 2, hdc in each st around, join. (56 hdc per rnd)
Don’t fasten off.
Why the math works: Each loop plus its sc is one 4-stitch unit: 3 + 1 = 4. Fourteen units give 14 x 4 = 56, which matches the bottom band and the 56-stitch gauge for 16 in (40.6 cm). The top band is 1 sc rnd (0.25 in / 0.6 cm) plus 4 hdc rnds (1.6 in / 4.1 cm), so it’s 1.85 in (4.7 cm) deep.
Strap (Color A)
Place markers in sts 1–3 and sts 29–31 of Rnd 27. These two groups sit directly opposite each other, 28 sts apart on each side.
Row 1: Ch 1, sc in each of sts 1–3. Turn. (3 sc)
Rows 2–56: Ch 1, sc in each st across. Turn. (3 sc per row)
The strap measures 14 in (35.6 cm) long and about 0.85 in (2.2 cm) wide. Leave a 12 in (30.5 cm) tail. Make sure the strap isn’t twisted, then whipstitch the last row to sts 29–31 on the inside of the band. Sew through both loops and go around twice for strength. The strap forms an arch about 6 in (15.2 cm) high.
Bottom Edge (Color A)
Edge Rnd: Hold the tube upside down. Join A in any free loop of the foundation chain. Ch 1, sc in each foundation loop around, join. (56 sc)
This round covers the chain edge and adds 0.25 in (0.6 cm). The full bottom band is now 1.85 in (4.7 cm), the same as the top band, and the tube is 17.2 in (43.7 cm) tall.
Attaching the Appliqués
Divide Rnd 23 into 7 sections of 8 sts each (56 ÷ 7 = 8). Mark sts 4, 12, 20, 28, 36, 44, and 52. Each one is the center of a section, which also centers it over every second mesh loop.
- Clusters: Pin the top of each cluster just under Rnd 23 at a marked stitch, tip pointing down. Sew the top 0.75 in (1.9 cm) of the chain spine to the mesh and band. Leave the lower part free so it hangs and moves.
- Leaves: Sew 2 leaves above each cluster in a V. The base of each leaf meets at the cluster top, and the tips point left and right along the seam between the band and the mesh. Fourteen leaves at 1.75 in (4.4 cm) each add up to 24.5 in (62.2 cm), more than the 16 in (40.6 cm) circumference. That means neighboring leaves overlap a little and make a continuous garland.
- Tack each leaf at its base and its tip only. That keeps it lifted and three-dimensional.
Final Blocking
- Weave in all ends securely. Run each tail through at least 2 in (5.1 cm) of solid stitches.
- Spray the whole piece lightly with water until damp, not soaked.
- Slide the tube over a tall jar or a rolled towel about 5 in (12.7 cm) across.
- Ease the mesh lengthwise until the body measures 17.2 in (43.7 cm) from edge to edge. Space the diamonds evenly.
- Smooth both bands so they sit straight and level at 16 in (40.6 cm) around.
- Shape the petals with your fingers and pin the leaves flat with the tips pointed.
- Let it dry completely, then hang the strap on a wall peg or hook.
Final Quality-Control Checklist
- Both bands have 56 stitches and measure 16 in (40.6 cm) around.
- The mesh has 14 loops in every round with no extra or missing loops.
- The body is 17.2 in (43.7 cm) tall, and each band is 1.85 in (4.7 cm) deep.
- The strap is 56 rows long, untwisted, and sewn to sts 29–31, directly opposite its start.
- There are 7 clusters with 20 petals each, evenly spaced 8 sts apart.
- There are 14 leaves, 2 per cluster, forming an even garland.
- All ends are woven in, and no tails show through the mesh.
- A bag pulls out easily through the bottom opening.
Troubleshooting
The mesh spirals. Start each round at the center of a loop with exactly 3 sl sts, and join to the first sc every time.
The loop count drifts. Count 14 loops after each round. Placing a marker in the first loop helps.
The top band ruffles or pulls in. Make sure you work exactly 3 sc per loop and 1 sc per sc in Rnd 23, for 56 total.
The tube is too short. Add mesh rounds in pairs. Each pair adds 1.5 in (3.8 cm).
The strap stretches. Use a smaller hook for the strap, or add a second whipstitched round at both attachment points.
The clusters look flat. Pinch each large petal upward while blocking, and only sew down the top 0.75 in (1.9 cm).
Bags slide out too easily. Work one more sc rnd at the bottom edge with sc2tog evenly 4 times (52 sc) to make the opening a little smaller.
Care
Hand wash in cool water with mild soap, press out the water in a towel, and dry flat on a jar form. Don’t tumble dry, because the 3D petals can mat.
Final Notes
The measurement chain is short and easy to check. Start with 56 hdc = 16 in (40.6 cm). The bottom band is 4 rnds = 1.6 in (4.1 cm). Then 56 ÷ 4 = 14 mesh loops, and 18 mesh rnds = 13.5 in (34.3 cm), so the body is 15.1 in (38.4 cm). The top band converts 14 loops x 4 = 56 sts and adds 1.85 in (4.7 cm). The bottom edge adds 0.25 in (0.6 cm), for a final height of 17.2 in (43.7 cm). Finally, 7 clusters spaced 8 sts apart add up to the same 56. If each stage matches its checkpoint, the finished holder will come out right.
Happy crocheting!