

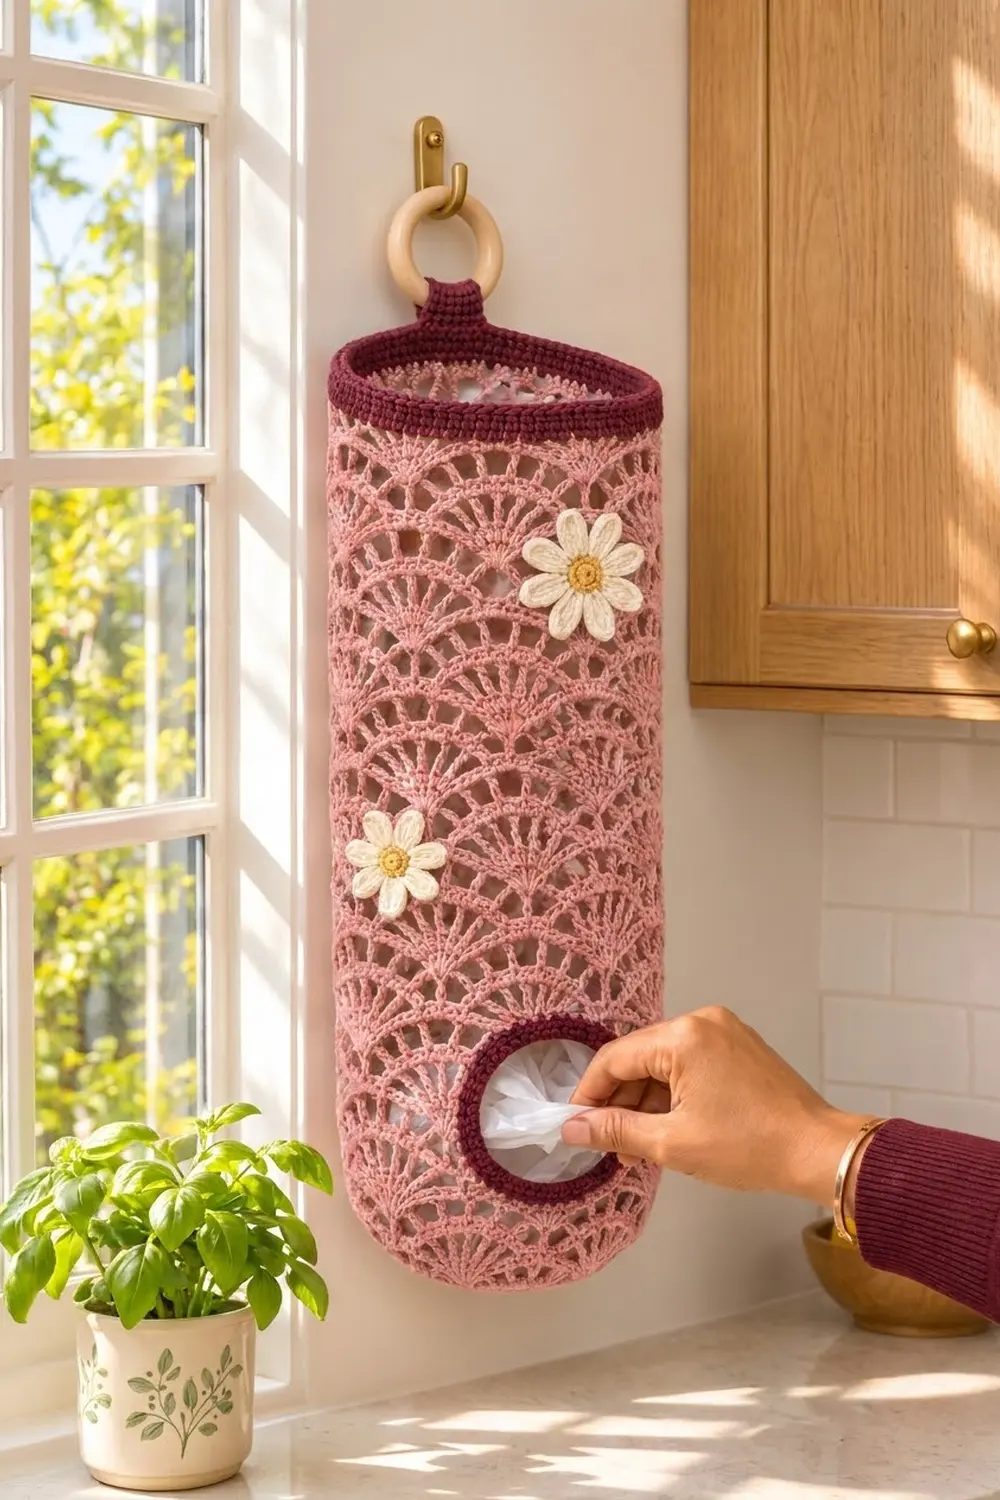
This hanging bag holder is one tall tube of dusty rose fan lace. It has a closed, rounded base, a solid burgundy rim and a round window near the bottom, edged in burgundy, for pulling bags out. A short burgundy strap wraps around a wooden ring so you can hang it on any wall hook.
Two cream daisies with mustard centers are sewn to the front for a cottage-kitchen look. The fan lace shows how many bags are left, and the solid rim and window edge give the soft lace a firm frame.
The pattern uses US crochet terms. The finished holder measures 14 in (35.6 cm) around and 7 in (17.8 cm) wide when flat. It is 18 in (45.7 cm) tall from the base edge to the top of the rim, and the base is 4.5 in (11.4 cm) across.
You work the base in rounds, then build the fan lace upward in the round. For three rows you work back and forth to leave the window, then chain across it and go back to working in rounds. Then you add a leveling round, the burgundy rim band, the strap, the window edging and the daisies.
Finished Size and Construction
- Finished size: 14 in (35.6 cm) around; 7 in (17.8 cm) flat width; 18 in (45.7 cm) tall
- Skill level: Intermediate
- Terminology: US
- Yarn weight: Worsted (#4), cotton or cotton blend
- Hook: 5.0 mm (H-8) for the body; 4.0 mm (G-6) for the daisies
- Number of pieces: 1 body (base and tube made in one piece), plus 2 daisy appliqués sewn on
- Layout: Vertical tube with the window centered on the front and the strap centered on the back
- Base: 4.5 in (11.4 cm) across, 48 dc around the edge
- Size before rim band: 16.5 in (41.9 cm) tall after the leveling round
- Rim band depth: 1.5 in (3.8 cm), 6 rounds of sc
- Window: 3.5 in (8.9 cm) wide x 3 in (7.6 cm) tall before edging; about 3 in (7.6 cm) clear opening after edging
Materials
Use a smooth worsted cotton or cotton blend. Cotton holds the fan shapes well and stretches little when the holder is full. The amounts below assume about 170 m per 100 g.
- Dusty rose (main color): 150 g, about 255 m
- Burgundy (rim, strap, window edge): 40 g, about 68 m
- Cream (daisy petals): 10 g, about 17 m
- Mustard (daisy centers): 5 g, about 9 m
All quantities include a safety margin of about 15%.
Tools:
- 5.0 mm (H-8) and 4.0 mm (G-6) crochet hooks
- 1 wooden ring, 2 in (5.1 cm) across
- Stitch markers (at least 4)
- Tapestry needle
- Scissors
- Measuring tape
- Rust-proof pins and a towel for blocking
Abbreviations (US Terms)
- ch – chain
- sl st – slip stitch
- sc – single crochet
- hdc – half double crochet
- dc – double crochet
- tr – treble crochet
- sc2tog – single crochet 2 together
- sp – space
- st(s) – stitch(es)
- RS / WS – right side / wrong side
Special stitches:
- Fan: (dc, ch 1) 4 times, dc, all in the same stitch. That makes 5 dc and 4 ch-1 sps.
- Half fan: (dc, ch 1, dc, ch 1, dc) in the same stitch. That makes 3 dc and 2 ch-1 sps. When a half fan starts a row, ch 4 counts as the first dc and ch 1.
Gauge and Checkpoints
Base gauge (5.0 mm hook): 12 dc = 3.5 in (8.9 cm) along the base edge. The 4-round base is 4.5 in (11.4 cm) across.
Fan gauge: 2 fan repeats = 3.5 in (8.9 cm) wide; 2 fan rounds = 2 in (5.1 cm) tall.
Band gauge: 12 sc x 14 rounds = 3.5 in (8.9 cm) square.
Make the base first (Rounds 1–4) and use it as your test piece. It sets the circumference for the whole tube.
Checkpoints:
- After Round 2: about 2.25 in (5.7 cm) across
- After Round 3: about 3.4 in (8.6 cm) across
- After Round 4: 4.5 in (11.4 cm) across, 14 in (35.6 cm) around the edge
- After Round 7: fan section 3 in (7.6 cm) tall
- After Row 10: fan section 6 in (15.2 cm) tall
- After Round 20: fan section 16 in (40.6 cm) tall
- After Round 21: 16.5 in (41.9 cm) tall
- After Round 27: 18 in (45.7 cm) tall
If your base is too big, go down a hook size and start again. If it is too small, go up a hook size. Do not add or remove stitches, because the fan pattern needs exactly 48 stitches (8 repeats of 6).
If each fan round comes out taller than 1 in (2.5 cm), the holder will be longer but still works. To keep the 18 in (45.7 cm) height, leave out plain Fan Rounds from Rounds 12–20 in pairs, so the last fan round is still an even round.

Base
With dusty rose and the 5.0 mm hook, make a magic ring.
Round 1: Ch 3 (counts as dc), 11 dc in ring, sl st to top of ch-3. (12 dc)
Round 2: Ch 3, dc in same st, 2 dc in each st around, sl st to top of ch-3. (24 dc)
Round 3: Ch 3, 2 dc in next st, dc in next st, 2 dc in next st; repeat from * around, sl st to top of ch-3. (36 dc)
Round 4: Ch 3, dc in next st, 2 dc in next st, dc in next 2 sts, 2 dc in next st; repeat from * around, sl st to top of ch-3. (48 dc)
Check: the base should be 4.5 in (11.4 cm) across and lie flat with no ruffling.
Fan Lace Tube
Each repeat is 6 stitches wide. In odd rounds the fans sit in the “F” columns; in even rounds they sit in the “S” columns.
Round 5 (set-up): Ch 1, sc in first st, skip 2 sts, fan in next st, skip 2 sts, sc in next st; repeat from * 6 more times, skip 2 sts, fan in next st, skip 2 sts, sl st to first sc. (8 sc, 8 fans)
Starting from the join, the sc in this round are columns S1–S8 and the fans are columns F1–F8.
Round 6: Sl st in each dc and ch-1 sp up to the center dc of the first fan. Ch 1, sc in same dc, ch 2, fan in next sc, ch 2, sc in center dc of next fan; repeat from * around, ending with ch 2, fan in last sc, ch 2, sl st to first sc. (8 sc, 8 fans, 16 ch-2 sps)
From now on, “Fan Round” means: sl st across to the center dc of the first fan, then work as Round 6.
Round 7: Fan Round. (8 sc, 8 fans)
The fans are back in columns F1–F8. The window will go over repeats 7, 8 and 1, which becomes the front.
Window Rows
Work back and forth over 6 repeats, leaving 2 repeats open.
Row 8 (RS): Sl st across to the center dc of fan F1. Ch 1, sc in same dc, ch 2, fan in next sc, ch 2, sc in center dc of next fan; repeat from * 5 more times, ending with sc in center dc of F7. Turn. (7 sc, 6 fans)
Leave the rest of Round 7 unworked. The gap from F7 to F1 is 2 repeats, or 3.5 in (8.9 cm).
Row 9 (WS): Ch 4 (counts as dc and ch-1), (dc, ch 1, dc) in first sc to complete a half fan, ch 2, sc in center dc of next fan, ch 2, fan in next sc; repeat from * 4 more times, ch 2, sc in center dc of last fan, ch 2, half fan in last sc. Turn. (2 half fans, 5 fans, 6 sc)
Row 10 (RS): Ch 1, sc in first dc, ch 2, fan in next sc, ch 2, sc in center dc of next fan; repeat from * 4 more times, ch 2, fan in next sc, ch 2, sc in 3rd ch of turning ch. Do not turn. (7 sc, 6 fans)
Bridge: Ch 11, sl st to first sc of Row 10. The 11 chains fill the 12 stitch widths between columns F7 and F1.
Back to Rounds
Round 11: Sl st in next ch-2 sp, then sl st across to the center dc of the next fan. Ch 1, sc in same dc, ch 2, fan in next sc, ch 2, sc in center dc of next fan; repeat from * until you have worked a fan in the last sc of Row 10 (F7). Ch 2, sc in 3rd bridge ch, ch 2, fan in 6th bridge ch, ch 2, sc in 9th bridge ch, ch 2, fan in first sc of Row 10 (F1), ch 2, sl st to first sc. (8 sc, 8 fans)
The bridge now carries fan F8 and the sc in columns S7 and S8, so the round is complete again.
Rounds 12–20: Fan Round. (8 sc, 8 fans each round)
Check: fan section 16 in (40.6 cm) tall and 14 in (35.6 cm) around.
Leveling Round
Round 20 ends with fans in the S columns and sc in the low points between them. This round fills those low points so the rim sits flat.
Round 21 (conversion round): Sl st in next ch-2 sp, sl st in first dc of next fan. Ch 1, sc in same dc, sc in each of next 4 dc of the fan (skip the ch-1 sps), skip ch-2 sp, tr in next sc, skip ch-2 sp, sc in each of the 5 dc of next fan; repeat from * 6 more times, skip ch-2 sp, tr in last sc, skip ch-2 sp, sl st to first sc. Fasten off dusty rose.
Count: 40 sc (1 in each fan dc) + 8 tr (1 in each sc) = 48 stitches worked 1 per existing stitch, + 0 extra = 48 sts.
Each tr is about as tall as a dc and an sc together, so the low points come up level with the fan tops.
Check: 16.5 in (41.9 cm) tall.
Rim Band
Lay the tube flat with the window centered on the front. Mark the center stitch at the back of the top edge.
Round 22: Join burgundy in any st. Ch 1, sc in each st around, sl st to first sc. (48 sc)
Rounds 23–27: Ch 1, sc in each st around, sl st to first sc. (48 sc each round) Fasten off.
Check: band 1.5 in (3.8 cm) deep; total height 18 in (45.7 cm).
Hanging Strap
Row 1: Join burgundy in Round 27, 2 sts to the right of the marked back stitch. Ch 1, sc in same st and next 4 sts, so the marked stitch is the middle one. Turn. (5 sc)
Rows 2–16: Ch 1, sc in each st across, turn. (5 sc each row)
The strap is 1.5 in (3.8 cm) wide and 4 in (10.2 cm) long. Pass it through the wooden ring from front to back and fold the end down inside the band. Whipstitch Row 16 to the inside of Round 27. The ring sits about 1.5 in (3.8 cm) above the rim.
Border: Window Edging
On this piece, the window edging is the border. Use burgundy and the 5.0 mm hook. Edging gauge matches the band: 12 sc = 3.5 in (8.9 cm). Work 3 sc along the end of each fan row, which is 1 in (2.5 cm) tall.
Round 1: Join burgundy in the last ch-1 sp of fan F7 on Round 7, at the bottom corner of the window.
- Bottom edge (12 sc): Work in order across Round 7: sc in that ch-1 sp, then 1 sc in each of the 4 ch-2 sps, 1 sc in each of the 2 sc (S7, S8), 1 sc in each of the 1st, 2nd, 4th and 5th dc of fan F8, and 1 sc in the first ch-1 sp of fan F1.
- F1 side (9 sc): 3 sc in the end of each of Rows 8, 9 and 10.
- Top edge (11 sc): 1 sc in the underside loop of each of the 11 bridge chains.
- F7 side (9 sc): 3 sc in the end of each of Rows 10, 9 and 8.
Sl st to first sc. Total: 12 + 9 + 11 + 9 = 41 sc.
Round 2: Ch 1, sc in each sc around, working sc2tog at each of the 4 corners where a side meets the top or bottom edge. Sl st to first sc. Count: 33 sc + 4 sc2tog = 37 sts.
Round 3: Ch 1, sc in each st around, sl st to first sc. (37 sc) Fasten off.
Why the math works: The window is 3.5 in (8.9 cm) wide and 3 in (7.6 cm) tall, so the rectangle’s edge is 13 in (33.0 cm) all the way around. Top and bottom take about 3.4 sc per inch, matching band gauge. The sides take 3 sc per row because each row is 1 in (2.5 cm) tall. The 4 corner decreases bring 41 sc down to 37 sts, about 10.8 in (27.4 cm). That shorter edge pulls in the corners, so the window becomes round, with an opening about 3 in (7.6 cm) across inside the burgundy rim.
Daisies (Make 2)
Use the 4.0 mm hook.
Center (make 2): With mustard, make a magic ring. Ch 1, 10 sc in ring, sl st to first sc. (10 sc) Fasten off.
Large daisy petals: Join cream in any sc of one center. Ch 6, sc in 2nd ch from hook, hdc in next ch, dc in next 2 ch, hdc in last ch, sl st in next sc of center; repeat from * 9 more times. (10 petals) Fasten off, leaving a 10 in (25.4 cm) tail. Size: about 2.25 in (5.7 cm) across.
Small daisy petals: Join cream in any sc of the second center. Ch 5, sc in 2nd ch from hook, hdc in next ch, dc in next ch, hdc in last ch, sl st in next sc of center; repeat from * 9 more times. (10 petals) Fasten off, leaving a 10 in (25.4 cm) tail. Size: about 1.75 in (4.4 cm) across.
Placement: Sew the large daisy 4 in (10.2 cm) below the rim, right of center. Sew the small daisy 9 in (22.9 cm) below the rim, left of center, above the window. Stitch through the center and each petal tip so the daisies lie flat on the lace.
Final Blocking
- Weave in all ends, following the solid stitches so they stay hidden.
- Soak the holder in cool water for 10 minutes, then roll it in a towel and press out the water. Do not wring it.
- Stuff the tube loosely with a rolled towel so it holds a round shape 14 in (35.6 cm) around.
- Lay it flat to 7 in (17.8 cm) wide and 18 in (45.7 cm) tall.
- Pin the window into a circle about 3 in (7.6 cm) across inside the rim.
- Shape the base gently into a rounded cup.
- Pin the daisy petals flat and let everything dry fully.
Final Quality-Control Checklist
- Base is 4.5 in (11.4 cm) across with 48 dc around
- Every fan round has 8 fans and 8 sc
- Window is centered on the front with no loose chain loops
- Window edging has 37 sts and lies round, not wavy
- Round 21 has 48 sts and the top edge is level
- Rim band is 6 rounds of 48 sc, 1.5 in (3.8 cm) deep
- Strap is centered on the back and firmly sewn inside
- Daisies lie flat and are tacked down at the petal tips
- Finished size is 14 in (35.6 cm) around and 18 in (45.7 cm) tall
Troubleshooting
Base cups or ruffles: If it cups, your hook is too small; if it ruffles, it is too big. Change hook size and restart.
Fans drift into a spiral: You may be missing the center dc. Count to the 3rd dc of each fan every time.
Window edge is wavy: There are too many sc. Rework Round 1 with exactly 41 sc.
Window looks square: Work the corner sc2tog firmly in Round 2, and block the opening into a circle.
Top edge is wavy: Check that Round 21 has exactly 48 sts and that each tr sits in an sc between fans.
Strap stretches: Crochet the strap more tightly, or sew its end through two rounds of the band.
Care
Hand wash in cool water and lay flat to dry, reshaping the window and base. Do not tumble dry, because heat and tumbling can stretch the strap and the fan lace.
Final Notes
The base sets 48 stitches, 14 in (35.6 cm) around. Each fan round or row adds 1 in (2.5 cm), so the 16 fan rounds and rows add up to 16 in (40.6 cm). The leveling round brings the tube to 16.5 in (41.9 cm), and the 6-round rim band finishes it at 18 in (45.7 cm). The window edging starts with 41 sc and decreases to 37 sts, turning a 3.5 in by 3 in (8.9 cm by 7.6 cm) gap into a round opening.
Check each number as you go, and your holder will hang straight and neat.
Happy crocheting!