

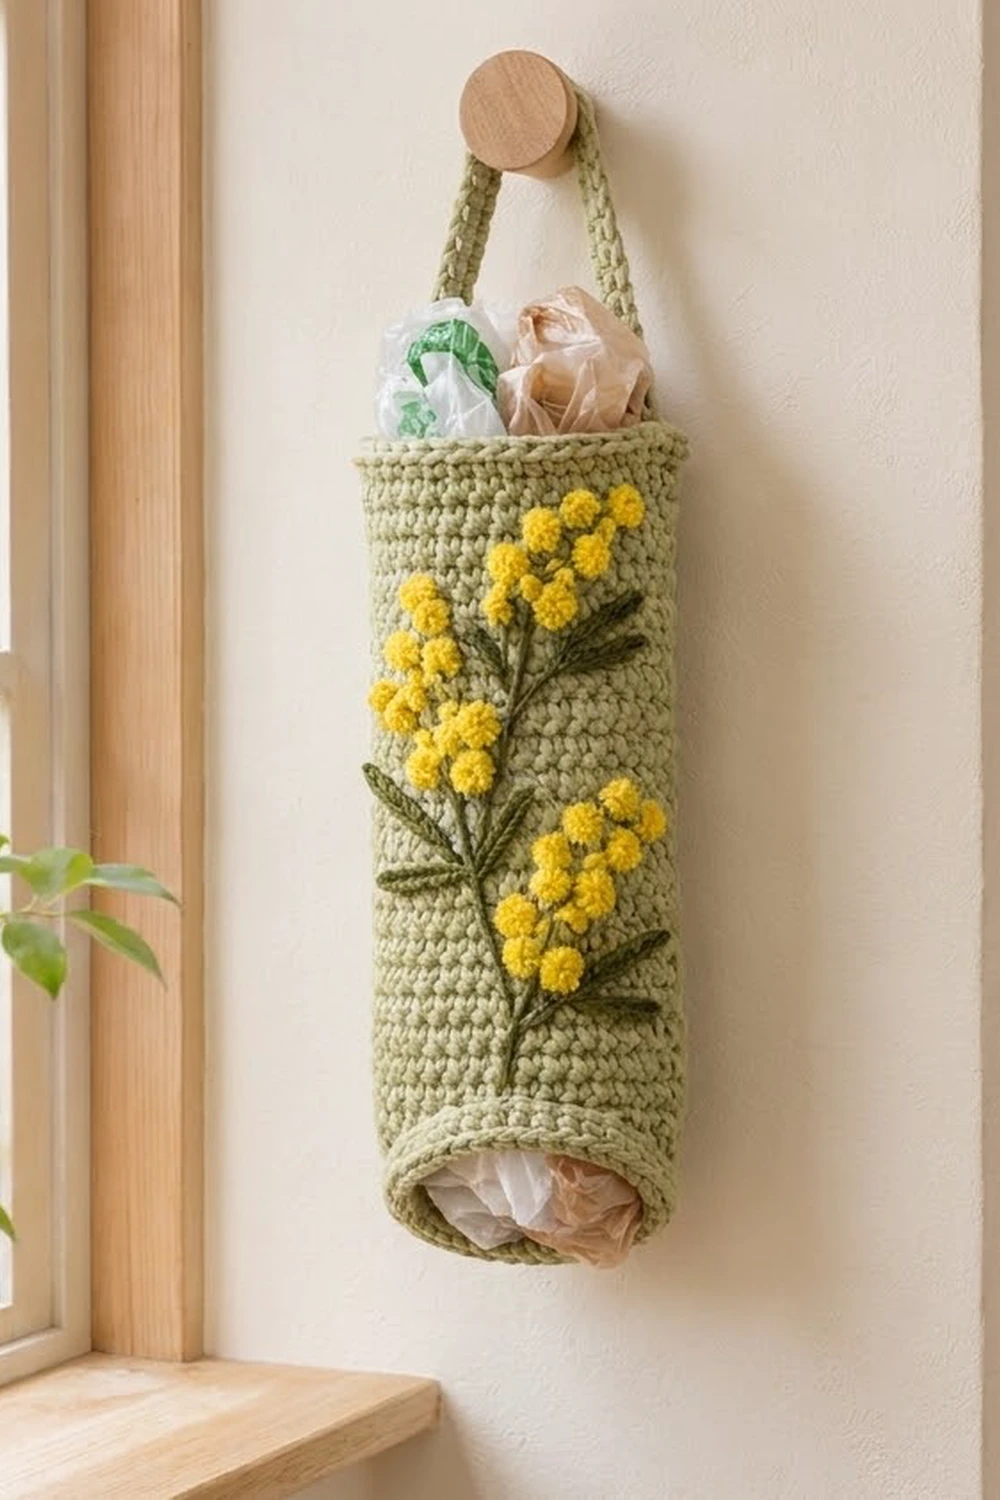
This bag holder brings a bit of early-spring color to the kitchen. It is a soft sage-green tube that hangs from a single strap. You push plastic bags in at the top and pull them out one at a time from the bottom.
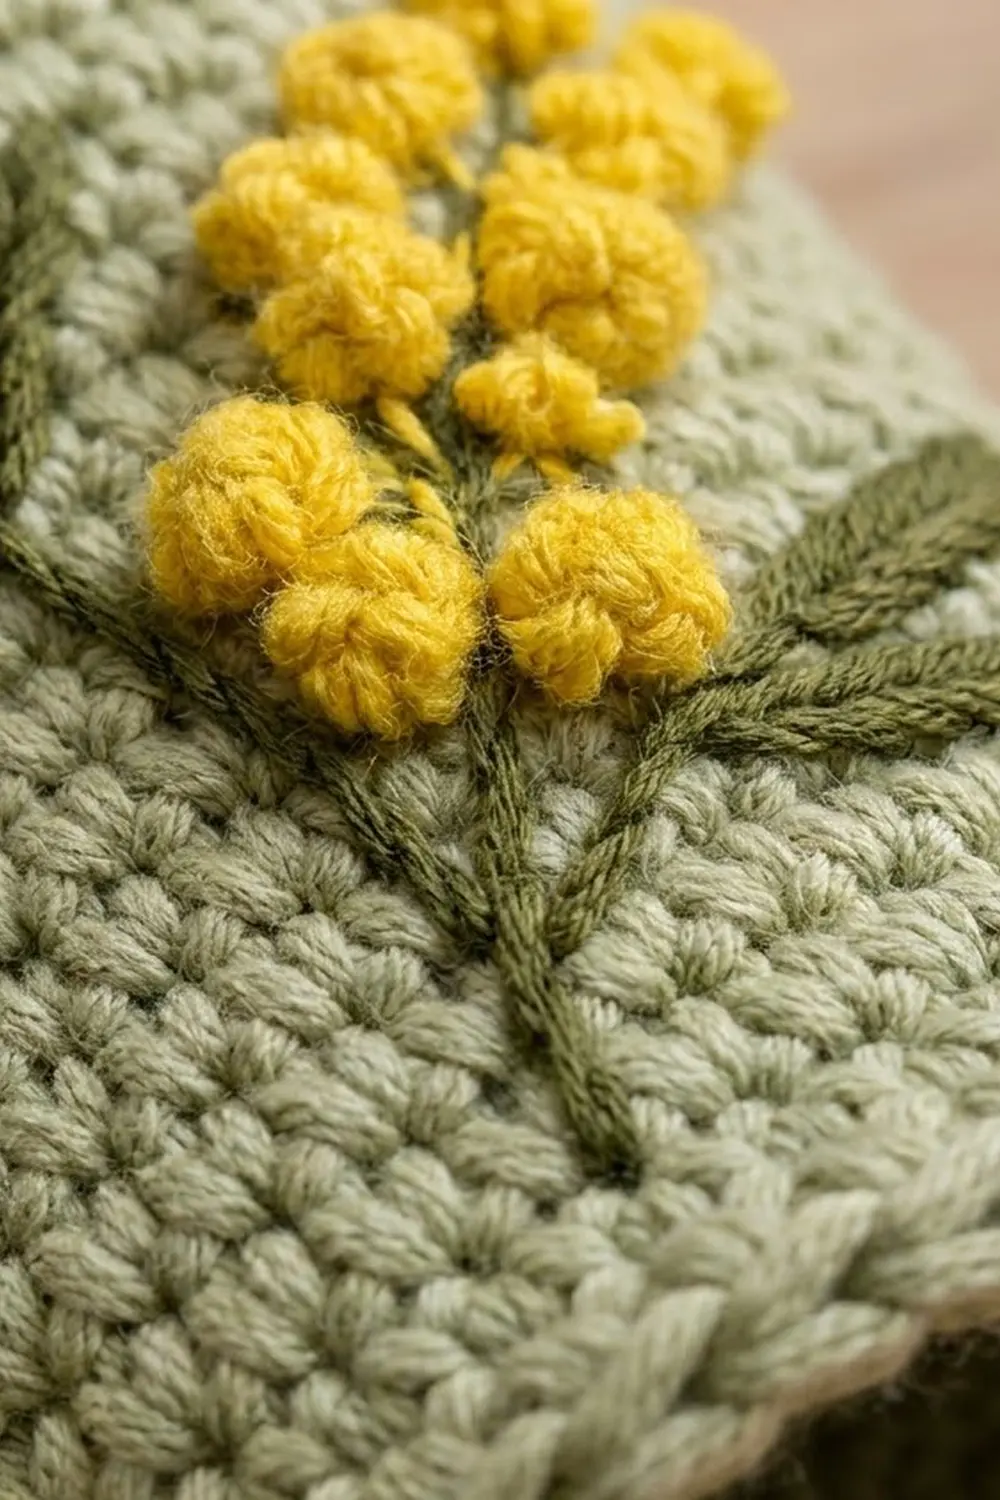
The front has an embroidered mimosa sprig: forest-green stems, slim leaves, and two clusters of fluffy mustard-yellow puffs. The tube itself is plain, dense single crochet. It holds its shape well and gives the embroidery a firm, even surface to sit on.
The pattern uses US crochet terms. The finished holder measures 16 in (40.6 cm) around, which is 8 in (20.3 cm) wide when laid flat. It is 14.5 in (36.8 cm) tall including the rims, and the strap adds a 10 in (25.4 cm) hanging loop.
Construction is simple. You chain a ring, work joined rounds of single crochet into a straight tube, and finish both openings with a crab-stitch rim. Then you crochet a separate strap, sew it inside the top edge, and embroider the mimosa last.
Finished Size and Construction
- Finished size: 8 in (20.3 cm) wide flat × 14.5 in (36.8 cm) tall; 16 in (40.6 cm) around
- Skill level: Easy (crochet), Easy+ (embroidery)
- Terminology: US
- Yarn weight: Worsted (#4), cotton or cotton blend
- Hook: 5.0 mm (H-8)
- Number of pieces: 1 tube + 1 strap, finished as one item
- Layout: Single vertical tube, open at both ends
- Tube size before rims: 8 in (20.3 cm) flat × 14 in (35.6 cm) tall
- Rim depth: about 0.25 in (0.6 cm) at each end
- Strap: 0.75 in (1.9 cm) wide × 12 in (30.5 cm) long before attaching
Materials
Use a smooth, firm cotton or cotton-acrylic blend in worsted weight. Cotton holds its shape when the tube is full of bags, and it shows the texture of the crab stitch clearly. Very fuzzy yarn will blur the embroidery.
- Color A, Sage Green (tube, rims, strap): 150 g / about 270 m
- Color B, Mustard Yellow (mimosa puffs): 15 g / about 27 m
- Color C, Forest Green (stems and leaves): 10 g / about 18 m
Tools:
– 5.0 mm (H-8) crochet hook
– Tapestry needle with a blunt tip
– Sharp embroidery needle with a large eye (optional, for the knots)
– 2 locking stitch markers
– Scissors and a tape measure
– Pins and a rolled towel for blocking
All quantities include a margin of about 10–15% for your swatch and the embroidery tails.
Abbreviations (US Terms)
- ch – chain
- sc – single crochet
- sl st – slip stitch
- st(s) – stitch(es)
- rnd(s) – round(s)
- rev sc – reverse single crochet (crab stitch)
Special stitch – Reverse single crochet (rev sc): Work from left to right (right-handed). Insert the hook into the next stitch to the right, yarn over, and pull up a loop. Yarn over and pull through both loops on the hook. This makes a twisted, rope-like edge.
Gauge and Checkpoints
Gauge: 16 sc and 18 rnds = 4 in (10.2 cm) in joined rounds of sc.
Make a small test tube before you start the full piece. Chain 32, join, and work 10 rounds. Lay it flat. It should measure 4 in (10.2 cm) across and a little over 2 in (5.1 cm) tall.
Checkpoints on the full tube:
– After Rnd 1: The ring measures 16 in (40.6 cm) around, or 8 in (20.3 cm) flat.
– After Rnd 9: 2 in (5.1 cm) tall.
– After Rnd 27: 6 in (15.2 cm) tall.
– After Rnd 45: 10 in (25.4 cm) tall.
– After Rnd 63: 14 in (35.6 cm) tall.
If the piece is too big (fewer than 16 sts per 4 in), go down to a 4.5 mm hook. If it is too small (more than 16 sts per 4 in), go up to a 5.5 mm hook. Measure height at Rnd 27 too. If you are off by more than half an inch, change the number of rounds rather than the hook, at 4.5 rnds per inch.
Tube
Use Color A. The tube is worked in joined rounds, not a spiral, so the stitch count stays easy to check. The join seam will sit at one side, hidden under a strap end.
Foundation: Ch 64. Without twisting the chain, sl st into the first ch to form a ring.
Rnd 1: Ch 1 (does not count as a st). Sc in the same ch as the join and in each ch around. Sl st to the first sc to join. (64 sts)
Place a marker in the first sc of the round. This is st 1. Number the rest of the round from it. Sts 1 and 33 are the two sides, and st 17 is the center front.
Rnds 2–63: Ch 1. Sc in the same st as the join and in each st around. Sl st to the first sc to join. (64 sts in each round)
Do not increase or decrease anywhere. The tube must stay perfectly straight. Check your count every 10 rounds. A tube that gains or loses even 1 st per round will flare or narrow.
After Rnd 63, the tube measures 8 in (20.3 cm) flat × 14 in (35.6 cm) tall. Do not fasten off; go straight on to the top rim.
Strap
Use Color A. Leave a 12 in (30.5 cm) tail at the start for sewing.
Foundation: Ch 4.
Row 1: Sc in the 2nd ch from the hook and in the next 2 ch. Turn. (3 sts)
Rows 2–54: Ch 1. Sc in each st across. Turn. (3 sts in each row)
The strap measures 0.75 in (1.9 cm) wide × 12 in (30.5 cm) long. Fasten off and leave another 12 in (30.5 cm) tail.
Optional cord finish: To get the rounded cord look, sl st loosely along both long edges, 1 sl st in each row end. That is 54 sl sts per side. This also stops the strap from stretching.
Border (Top and Bottom Rims)
Border gauge: You work one rev sc into each sc, so the rim keeps the same 16 sts per 4 in (10.2 cm) as the body. Each rim adds about 0.25 in (0.6 cm) of height.
Top Rim
Rnd 64: With Color A still attached, ch 1. Work 1 rev sc in each st around, moving to the right. Sl st to the first rev sc to join. (64 rev sc: 64 worked 1-per-existing-stitch + 0 added)
Fasten off and weave in the end.
Bottom Rim
Turn the tube upside down. The foundation chain is now at the top. Join Color A with a sl st in the free loop of the chain at st 1.
Bottom Rnd: Ch 1. Work 1 rev sc into each free foundation loop around. Sl st to the first rev sc to join. (64 rev sc: 64 worked 1-per-existing-stitch + 0 added)
Fasten off and weave in the end.
Why the math works: The tube has no corners and no sides, so there is nothing to add at turning points. The 64 sts become 64 rev sc at each end. Rev sc is slightly wider than plain sc, so it holds the opening at 16 in (40.6 cm) and does not pull it in. If your rim ruffles, use a hook one size smaller for the rim only. If it pulls in, go one size larger.
The tube now measures 8 in (20.3 cm) flat × 14.5 in (36.8 cm) tall.
Attaching the Strap
Lay the tube flat with the join seam at the left edge, so st 1 is on the left fold and st 33 is on the right fold.
- Put one strap end inside the tube, centered over sts 64, 1, and 2. Overlap the tube by 1 in (2.5 cm), which is about 4–5 strap rows, measured down from the top of the rim.
- Whipstitch the end of the strap and both of its sides to the inside wall with the tail. Go through only the back of the tube stitches so nothing shows on the front.
- Without twisting the strap, attach the other end the same way over sts 32, 33, and 34.
- Check the loop. It should stand 10 in (25.4 cm) above the rim at its center when you hold it up.
Mimosa Embroidery
Work on the front panel, centered on st 17. The design fills Rnds 10–55, about 10 in (25.4 cm) tall and 3.5 in (8.9 cm) wide, from about st 10 to st 25. Put a folded towel inside the tube so you only stitch through the front layer.
Stems (Color C, single strand, backstitch):
– Main stem: Start at Rnd 10, st 19. Backstitch upward with each stitch over 1 round, drifting gradually left. End at Rnd 54, st 14.
– Side branch: Start on the main stem at Rnd 26. Backstitch up and to the right, ending at Rnd 38, st 22.
– Small twigs: Add 4–5 short backstitch twigs, each 2–3 rounds long, fanning out from the stem tips into the flower areas.
Leaves (Color C, lazy daisy, 8 total):
Make each leaf a long lazy-daisy loop about 1 in (2.5 cm) long, which covers 4–5 rounds. Anchor the tip with a small straight stitch so it stays slim and pointed.
– 2 leaves at the base of the main stem, around Rnds 14–18, one on each side
– 2 leaves where the side branch starts, around Rnds 24–28
– 2 leaves along the side branch, around Rnds 32–36
– 2 leaves just below the upper cluster, around Rnds 40–44
Mimosa puffs (Color B, doubled strand, French knots):
Wrap the doubled yarn 3 times around the needle for each knot. Each puff should be about 0.3 in (0.8 cm) across. Leave one sc between knots so they stay round and don’t merge.
– Upper cluster: 14 knots, grouped loosely around Rnds 44–56 and sts 11–19, at the top of the main stem.
– Lower cluster: 12 knots, grouped around Rnds 30–40 and sts 18–24, at the tip of the side branch.
Total: 26 puffs.
Secure every tail on the inside with two small stitches through the back loops, then trim to 0.5 in (1.3 cm).
Final Blocking
- Fill a basin with cool water and soak the holder for 10 minutes.
- Press out the water gently. Roll it in a towel to remove more. Do not wring it.
- Slide a rolled towel or a 5 in (12.7 cm) wide bottle wrapped in a towel into the tube.
- Shape it into a straight cylinder 16 in (40.6 cm) around and 14.5 in (36.8 cm) tall.
- Lay the strap flat beside it at 0.75 in (1.9 cm) wide.
- Fluff each French knot with your fingertip so the puffs stand up.
- Let it dry completely, standing upright, for at least 24 hours.
Final Quality-Control Checklist
- Every round has 64 sts, and the tube does not flare or narrow.
- Flat width is 8 in (20.3 cm) at the top, middle, and bottom.
- Height is 14.5 in (36.8 cm) with both rims.
- Both rims have 64 rev sc and lie flat with no ruffling.
- The join seam is hidden under a strap end.
- The strap is untwisted, with its ends attached at sts 1 and 33 and a 10 in (25.4 cm) loop.
- The embroidery is centered on st 17, with no stitches through the back layer.
- There are 26 puffs and 8 leaves, and all tails are secured inside.
Troubleshooting
The tube spirals or leans. Joined rounds tend to slant. Make sure you sc into the same stitch as the join each round, not the next one. A firm blocking over a form also straightens a mild lean.
The chain ring twisted. If it’s caught by Rnd 1, undo and rejoin. If it’s found later, start over, because a twisted ring cannot be fixed.
The rims ruffle. Rework them with a hook 0.5 mm smaller.
The strap stretches when the holder is full. Add the sl st edging on both long sides. Or, before sewing, thread a length of cotton tape through the center of the strap.
The puffs look flat. Use a doubled strand and 3 wraps, and don’t pull the knot tight against the fabric.
Leaves pucker the fabric. Your stitches are too tight. Keep the needle on top of the stitches and leave a little slack.
Care
Hand wash cool and lay flat or stand upright to dry. Do not tumble dry, because the French knots can loosen and fuzz.
Final Notes
The whole design depends on one chain of measurements. A gauge of 16 sts per 4 in (10.2 cm) gives 64 sts, which makes a 16 in (40.6 cm) circumference and an 8 in (20.3 cm) flat width. At 4.5 rnds per inch, 63 rounds give 14 in (35.6 cm). Two rev sc rims bring the height to 14.5 in (36.8 cm). A 54-row strap of 12 in (30.5 cm), with 1 in (2.5 cm) overlapping inside at each end, leaves a 10 in (25.4 cm) hanging loop. If you check these numbers at each stage, your tube will match the finished holder in the photo.
Happy crocheting!