

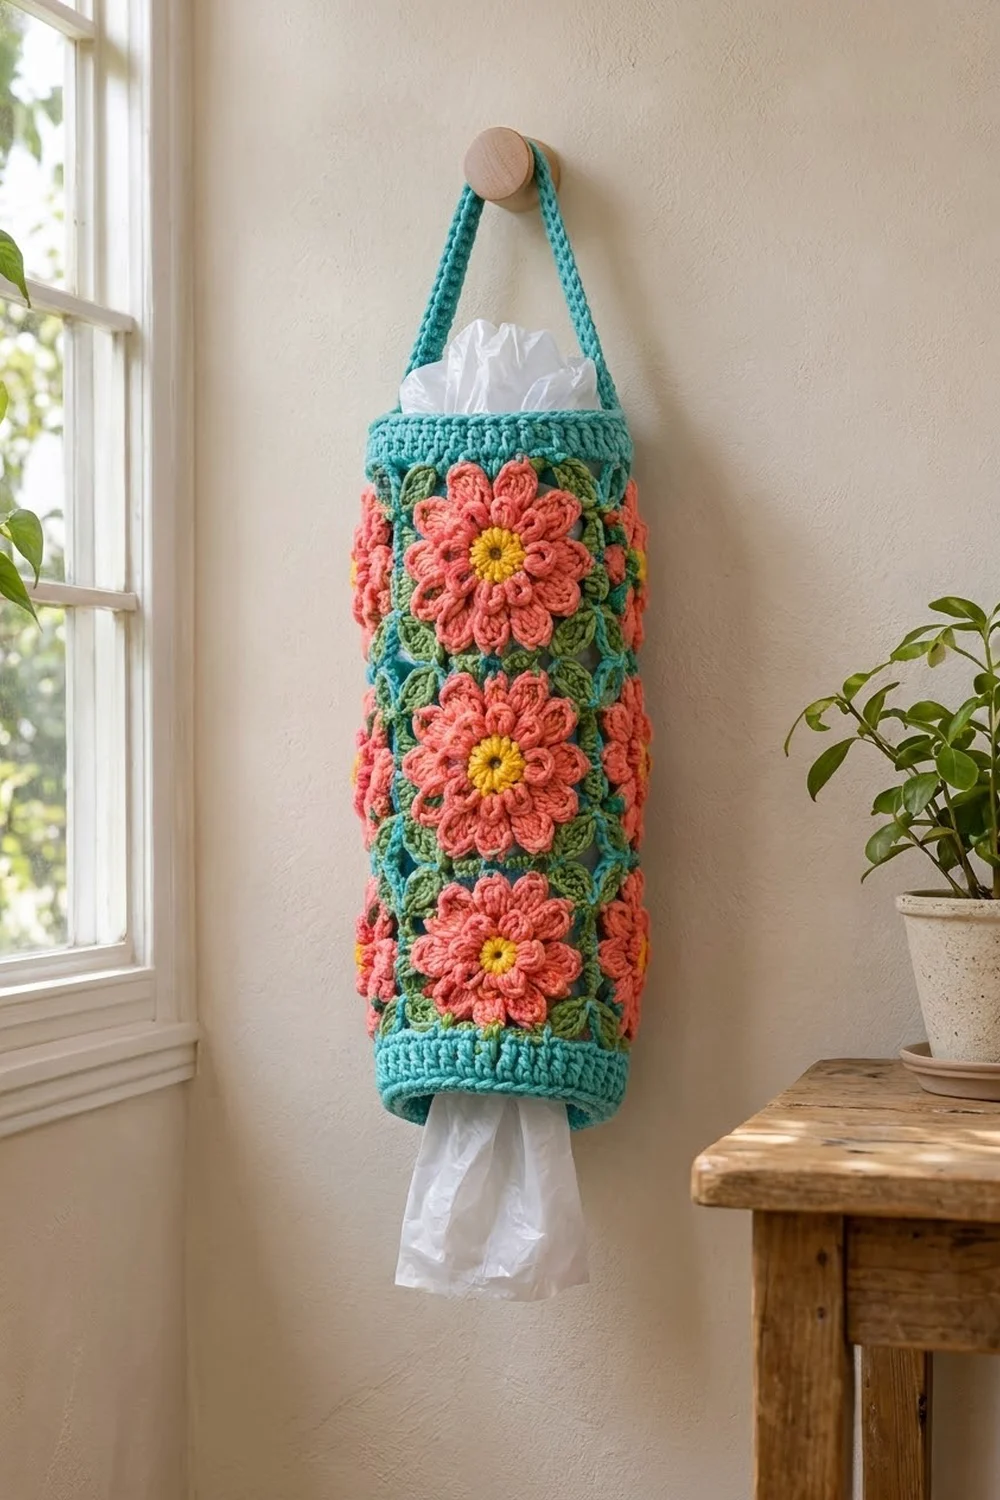
Keep your plastic bags tidy with a holder that looks like a column of garden flowers. The Coral Bloom bag holder is made from twelve flower granny squares joined into a tube. It has a ribbed teal band at each end and a teal strap for hanging it on a hook or peg.
Each square has a yellow center, two layers of coral petals, green corner leaves and a teal outline. When the squares are joined, the teal outlines make a clean grid around each bloom. The look is cheerful and cottage-style, and the design works well in a kitchen, laundry room or pantry.
This pattern uses US crochet terms. The finished holder is about 14 in (35.6 cm) around, 4.5 in (11.4 cm) across and 13 in (33.0 cm) tall, not counting the strap. The strap loop hangs about 8.5 in (21.6 cm) above the top edge.
Construction is simple. You make twelve identical squares and join them into a flat panel 4 squares wide and 3 squares high, then close the panel into a tube. Next you work a ribbed band around the top and bottom openings and sew on a separate strap. Stuff bags in at the top and pull them out through the bottom.
Finished Size and Construction
- Finished size: 14 in (35.6 cm) around × 13 in (33.0 cm) tall
- Skill level: Intermediate (layered petals, post stitches)
- Terminology: US
- Yarn weight: Worsted (#4), cotton or cotton blend
- Hook: 4.0 mm (G/6)
- Number of pieces: 12 flower squares + 1 strap
- Layout: 4 squares around × 3 squares high, joined into a tube
- Square size: 3.5 in (8.9 cm)
- Size before bands: 14 in (35.6 cm) around × 10.5 in (26.7 cm) tall
- Band depth: 1.25 in (3.2 cm) each, top and bottom
Materials
Use a smooth worsted-weight cotton. Cotton holds its shape and shows off the petal layers, and the bands won’t stretch out when the holder is full. Acrylic also works but gives a softer, floppier tube.
- Yellow: 10 g / 20 m (centers)
- Coral: 60 g / 120 m (petals)
- Green: 35 g / 70 m (leaves)
- Teal: 90 g / 180 m (square outlines, bands, strap)
All quantities include a margin of about 15% for gauge differences and swatching.
Tools:
– 4.0 mm (G/6) crochet hook
– Tapestry needle
– Stitch markers
– Scissors
– Measuring tape
– Blocking mat and rust-proof pins
– Spray bottle
Abbreviations (US Terms)
- ch – chain
- sl st – slip stitch
- sc – single crochet
- hdc – half double crochet
- dc – double crochet
- tr – treble crochet
- sp – space
- st(s) – stitch(es)
- FPdc – front post double crochet
- BPdc – back post double crochet
- RS – right side
Special stitch – Back petal anchor: Fold the front petals toward you. Insert the hook from back to front around the sc between two petals (from the round below) and work a sl st. This anchors the chain loops behind the front petals so the second petal layer sits underneath.
Gauge and Checkpoints
Gauge: 17 sc = 3.5 in (8.9 cm). One finished square = 3.5 in (8.9 cm) square.
Make one complete square before anything else, then block it lightly and measure. Check it at these points:
- After Round 1: about 0.75 in (1.9 cm) across
- After Round 5 (both petal layers): about 2.5 in (6.4 cm) across
- After Round 7 (green square): about 3 in (7.6 cm) side to side
- After Round 9 (teal): 3.5 in (8.9 cm) side to side
If your square is too big, go down a hook size. If it’s too small, go up a hook size. A difference of 0.25 in (0.6 cm) per square adds up to 1 in (2.5 cm) around the tube, so get this right before making all twelve.
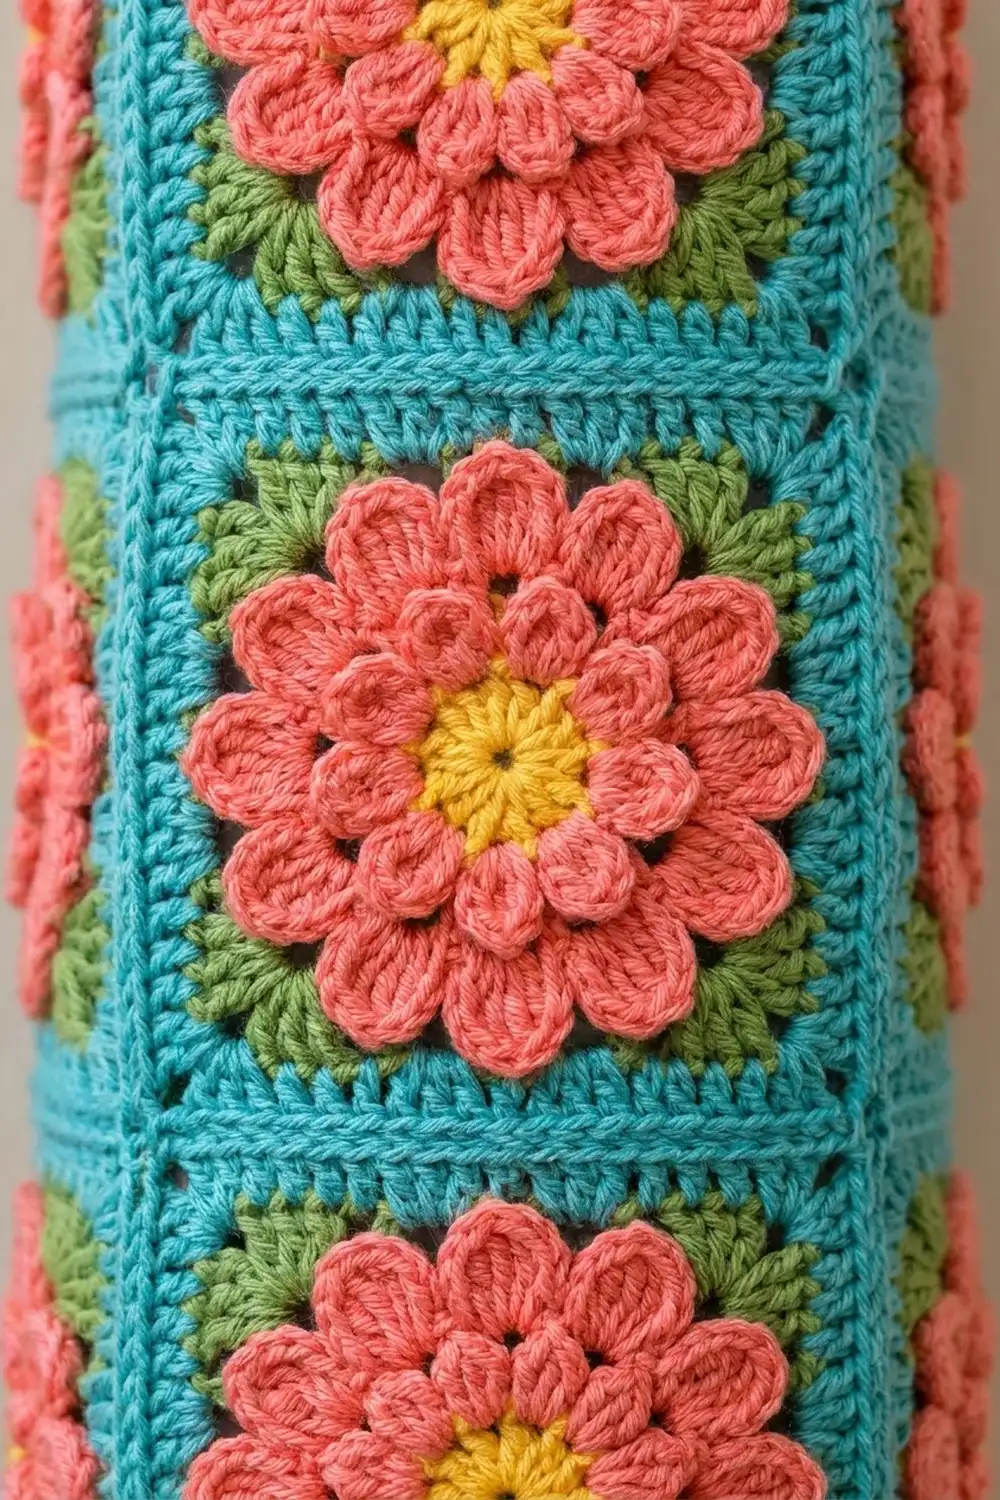
Flower Square (make 12)
Round 1 (yellow)
Magic ring, ch 1, 8 sc in the ring. Join with sl st to the first sc. Pull the ring closed. (8 sts)
Fasten off yellow.
Round 2 (coral)
Join coral in any sc. Ch 3 (counts as dc), dc in the same st, 2 dc in each sc around. Join to the top of the ch-3. (16 dc)
Round 3 (coral – front petals)
Ch 1. Sc in the next st, (hdc, 2 dc, hdc) in the next st. Repeat from * 7 more times. Join to the first sc. (8 petals; 40 sts)
Each petal has 4 sts, and 1 sc sits between each pair of petals.
Round 4 (coral – back loops)
Fold the petals forward. Ch 4, work a back petal anchor around the next separating sc of Round 3. Repeat from * 7 more times, placing the last anchor on the starting sc. (8 ch-4 loops)
Round 5 (coral – back petals)
In each ch-4 loop work (sc, hdc, 3 dc, hdc, sc). Join to the first sc. (8 back petals; 56 sts)
The larger back petals sit between the front petals and stick out past them, which creates the layered bloom. Fasten off coral.
Round 6 (green – leaf loops)
Working behind the back petals, join green with a sl st around the post of any Round 4 anchor. Ch 5, sl st around the next anchor. Repeat from * around. (8 ch-5 loops)
Round 7 (green – leaves and squaring)
Sl st into the first ch-5 loop.
In this loop work (sc, hdc, dc, tr, ch 2, tr, dc, hdc, sc) for a corner leaf. In the next loop work 5 sc for the side. Repeat from * 3 more times. Join. (52 sts + 4 corner ch-2 sps)
Count per side, between corner ch-2 sps: 4 leaf sts + 5 side sc + 4 leaf sts = 13 sts. Multiply by 4 sides: 4 × 13 = 52. ✓
Fasten off green.
Round 8 (teal)
Join teal in any corner ch-2 sp. Ch 1, (sc, ch 2, sc) in the same sp. Sc in each of the next 13 sts, (sc, ch 2, sc) in the next corner sp. Repeat from * around, leaving out the last corner. Sc in each of the last 13 sts and join. (60 sts + 4 corner ch-2 sps)
This is a trim round: 52 sts worked 1-per-st + 8 corner sts = 60. That gives 15 sts per side, including the 2 corner sc.
Round 9 (teal)
Sl st into the corner sp. Ch 1, (sc, ch 2, sc) in the same sp. Sc in each of the next 15 sts, (sc, ch 2, sc) in the next corner sp. Repeat from * around, leaving out the last corner. Sc in each of the last 15 sts and join. (68 sts + 4 corner ch-2 sps)
This is also a trim round: 60 sts worked 1-per-st + 8 corner sts = 68. That gives 17 sts per side, including the 2 corner sc.
Fasten off, leaving a 24 in (61.0 cm) tail on 7 of the squares for joining. Weave in all other ends.
Make All Pieces
Make 12 squares in total. Each square uses all four colors in the same order.
- Yellow: 12 centers
- Coral: 12 double-layer blooms
- Green: 12 leaf rounds
- Teal: 12 outlines (Rounds 8–9)
Block every square to 3.5 in (8.9 cm) before joining. See Final Blocking for the method.
Layout (RS facing, before closing the tube):
[ A1 ][ B1 ][ C1 ][ D1 ]   ← top
[ A2 ][ B2 ][ C2 ][ D2 ]
[ A3 ][ B3 ][ C3 ][ D3 ]   ← bottom
  ↑ column D is joined back to column A to close the tube
Joining
Method: Flat whipstitch in teal, worked through the back loops only.
Hold two squares RS up, side by side, with their edges touching. Line up the corner ch-2 sp with the corner ch-2 sp, then match the 17 sts on one side to the 17 sts on the other, 1 to 1. Whipstitch through the back loop of each matching pair. Also work through the corner ch-2 sps at each end. The front loops stay on top, so you get a flat teal line that looks like part of the grid.
Order:
1. Join A1–A2–A3 into a vertical strip (2 seams). Repeat for columns B, C and D.
2. Join strip A to strip B, B to C, and C to D (3 long seams of 51 sts each: 3 squares × 17).
3. Size checkpoint: The flat panel should measure 14 in (35.6 cm) wide × 10.5 in (26.7 cm) tall. Fix any difference now.
4. Fold the panel RS out and join strip D to strip A to close the tube (51 sts).
Tension: Pull each stitch until the edges just meet. Don’t pull hard enough to pucker. If you pull too tight, the tube gets narrower at the seams. If you stitch too loosely, you’ll see gaps between the teal outlines.
Border: Top and Bottom Bands
Border gauge: 17 sts = 3.5 in (8.9 cm), the same as the square edge. Each band is 5 rounds, which is 1.25 in (3.2 cm) deep.
Round 1 (teal)
With RS facing, join teal at a seam on the top edge. Ch 1 and sc in each of the 17 sts of each square around. Do not work into the corner ch-2 sps; they lie flat inside the seams. Join. (68 sts)
This works because 4 squares × 17 sts per square = 68. No stitches are added at the seams.
Round 2 (ribbing)
Ch 2 (does not count). FPdc around the next st, BPdc around the next st. Repeat from * 33 more times. Join to the first FPdc. (68 sts: 34 FPdc + 34 BPdc)
The pattern repeats over 2 sts, and 68 is even, so the ribbing lines up at the join.
Rounds 3–4
Ch 2 (does not count). Work FPdc around each FPdc and BPdc around each BPdc. Join. (68 sts each round)
Round 5
Ch 1, sc in each st around. Join. (68 sts)
Fasten off and weave in the ends.
Bottom band: Turn the tube over and repeat Rounds 1–5 on the bottom edge. Join at a seam that lines up with the top band’s starting seam.
Why the math works: Each band has 68 sts at 17 sts per 3.5 in (8.9 cm), which comes to exactly 14 in (35.6 cm). That matches the joined tube, so the bands won’t flare or pull in.
Strap
With teal, ch 6.
Row 1: Sc in the 2nd ch from the hook and in each ch across. Turn. (5 sts)
Row 2: Ch 1, sc in each st across. Turn. (5 sts)
Repeat Row 2 until the strap measures 10 in (25.4 cm), about 50 rows. Fasten off, leaving a 12 in (30.5 cm) tail. The strap is about 1 in (2.5 cm) wide.
Attaching: Place one end of the strap inside the top band over the A/B seam. Place the other end over the C/D seam, which is 34 sts (2 squares) away on the opposite side. Overlap each end 0.75 in (1.9 cm) down inside the band and whipstitch it in place around all four edges. This leaves an 8.5 in (21.6 cm) loop.
Final Blocking
- Weave in all remaining ends, inside the tube where possible.
- Spritz the whole holder until it’s damp, not dripping.
- Roll a towel into a firm cylinder about 4.5 in (11.4 cm) across and slide the holder over it.
- Gently shape each square so the teal lines run straight, both vertically and horizontally.
- Fluff the front petals forward and the back petals out so the layers separate.
- Smooth the ribbed bands so the ridges run straight up and down.
- Lay the strap flat, pinning it to 1 in (2.5 cm) wide if needed.
- Let it dry completely before you hang it up.
Final Quality-Control Checklist
- Each square measures 3.5 in (8.9 cm) and has 17 sts per side, including corners.
- All 8 front petals and 8 back petals are clearly layered.
- Green leaves sit at all 4 corners of each square.
- The flat panel measured 14 in × 10.5 in (35.6 × 26.7 cm) before closing.
- Both bands have 68 sts in each round.
- The ribbing columns line up in Rounds 2–4.
- The strap ends are sewn on opposite sides, 34 sts apart.
- The total height is 13 in (33.0 cm).
- No loose ends show on the outside.
Troubleshooting
Petals look flat or crowded: Make sure the Round 4 anchors go around the separating sc from behind and not through the petals.
Square isn’t square: Recount Round 7. Each side needs 13 sts between the corner ch-2 sps.
Band ruffles: You probably added sts at the seams. Rip back and work only the 17 sts per square.
Band pulls in: Your post stitches are too tight. Go up 0.5 mm for Rounds 2–4 only.
Strap stretches: Use cotton yarn, or work a row of sl sts along both long edges of the strap.
Bags fall out of the bottom: Work one extra round of sc decreases (sc2tog every 4th st) on the bottom band, which brings it down to 51 sts.
Care
Hand wash in cool water and lay flat over a rolled towel to dry. Don’t wring it out or tumble dry it.
Final Notes
The measurements all build on each other. Each square is 3.5 in (8.9 cm) with 17 sts per side. Four squares around make 68 sts and 14 in (35.6 cm). Three squares high make 10.5 in (26.7 cm). Two 1.25 in (3.2 cm) bands bring the total to 13 in (33.0 cm). If your first square meets gauge, every later step will fit. Hang it up, fill it with bags, and enjoy the flowers.
Happy crocheting!