

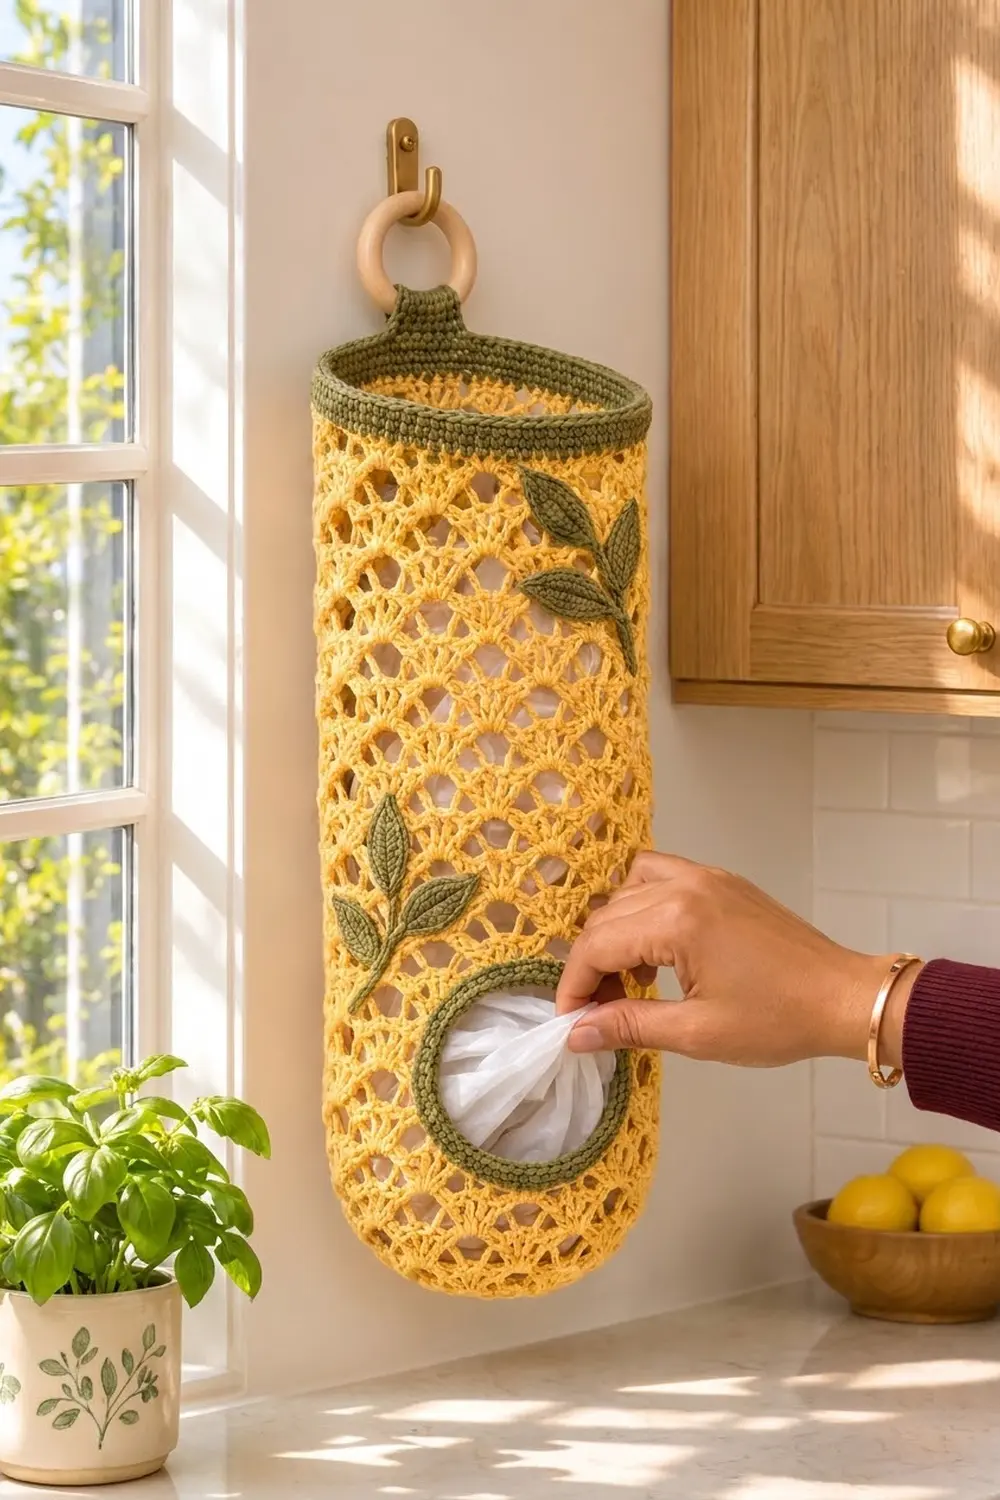
This bag holder brings some sunshine to the kitchen wall. A tall tube of mustard-yellow shell mesh holds a week’s worth of plastic bags. You push bags in at the top and pull them out of a neat round opening near the bottom.
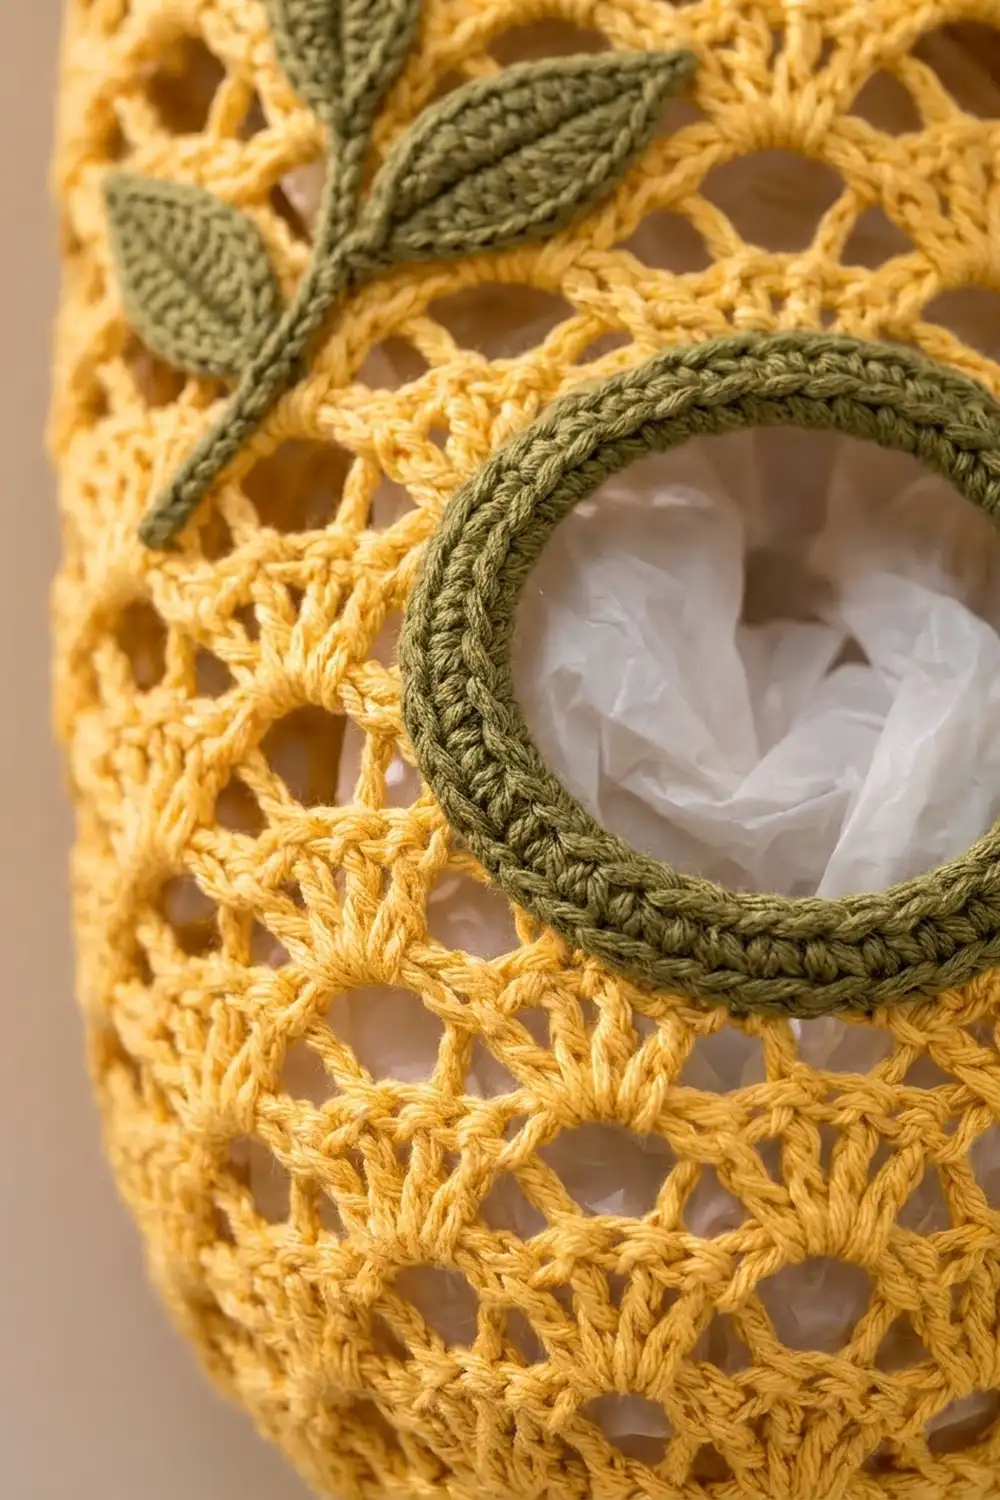
Olive green accents give it a garden feel: a solid rim band, a hanging strap, a raised ring around the opening, and two leafy sprigs on the front. The open mesh lets you see how full the holder is, and it dries quickly in a damp kitchen.
The pattern uses US crochet terms. The finished holder measures 6 in (15.2 cm) wide when flat and 20.5 in (52.1 cm) tall, not counting the strap. The strap loop rises about 2 in (5.1 cm) above the rim.
How it’s made: you start with a circular single-crochet base, then work the shell mesh body in joined rounds. Four rows are worked back and forth to leave a window for the dispenser opening. Next you add the olive top band and strap, edge the opening, and finally sew on two separately made leaf sprigs.
Finished Size and Construction
- Finished size: 6 in (15.2 cm) wide flat × 20.5 in (52.1 cm) tall
- Skill level: Intermediate
- Terminology: US
- Yarn weight: Worsted (#4) cotton
- Hook: 5.0 mm (H-8)
- Number of pieces: 1 body + 2 leaf sprigs (each sprig has 1 stem and 5 leaves)
- Layout: a single tube, with the opening on the lower front and the strap at the center back of the rim
- Body circumference: 48 sts, which is 12 in (30.5 cm)
- Size before border: 6 in (15.2 cm) × 19.5 in (49.5 cm)
- Border depth: 1 in (2.5 cm) top band. The opening ring is 0.75 in (1.9 cm) wide.
Materials
Use a smooth worsted-weight cotton or cotton blend. Cotton holds its shape, doesn’t stretch out under the weight of bags, and is easy to wash.
- Color A (mustard yellow): 130 g / about 247 m
- Color B (olive green): 50 g / about 95 m
These quantities include a margin of about 15%.
Tools:
– 5.0 mm (H-8) crochet hook
– Tapestry needle
– 4 stitch markers
– Scissors
– Pins
– 2 in (5.1 cm) wooden ring (optional, for hanging)
Abbreviations (US Terms)
- ch – chain
- sl st – slip stitch
- sc – single crochet
- hdc – half double crochet
- dc – double crochet
- sc2tog – single crochet 2 together
- sp – space
- st(s) – stitch(es)
- RS / WS – right side / wrong side
Shell: 5 dc worked into the same stitch or space. The center dc of a shell is the 3rd of its 5 dc.
Half shell: 2 dc worked into the same space, at the edge of a row.
Gauge and Checkpoints
- Single crochet gauge: 16 sc and 16 rounds = 4 in (10.2 cm).
- Mesh gauge: 1 repeat (shell + sc, 6 sts) = 1.5 in (3.8 cm) wide. One arch round plus one shell round = 1.25 in (3.2 cm) tall.
Work the base (Rnds 1–8) first and treat it as your gauge test. Measure flat, without stretching:
- After Rnd 6: the base is about 3.75 in (9.5 cm) across.
- After Rnd 8: the tube measures 6 in (15.2 cm) across when flattened and about 2 in (5.1 cm) tall from the bottom fold.
- After Rnd 14: about 5.75 in (14.6 cm) tall. The window is about 3 in (7.6 cm) wide × 2.5 in (6.4 cm) tall.
- After Rnd 36: 19.5 in (49.5 cm) tall.
- Finished: 20.5 in (52.1 cm) tall.
If your base is too big, go down half a hook size. If it’s too small, go up half a size. If only the height is off, add or remove arch/shell round pairs between Rnds 15 and 36. Each pair changes the height by 1.25 in (3.2 cm). Always remove or add full pairs so that you still finish on a shell round.
Body
Work with Color A. Unless the pattern says to turn, don’t turn; work every round with the RS facing.
Rnd 1: Make a magic ring. Ch 1 and work 8 sc in the ring. Sl st to the first sc. (8 sts)
Rnd 2: Ch 1, then 2 sc in each st around. Sl st to the first sc. (16 sts)
Rnd 3: Ch 1, sc in next st, 2 sc in next st; repeat from * around. Sl st to join. (24 sts)
Rnd 4: Ch 1, sc in next 2 sts, 2 sc in next st; repeat around. Join. (32 sts)
Rnd 5: Ch 1, sc in next 3 sts, 2 sc in next st; repeat around. Join. (40 sts)
Rnd 6: Ch 1, sc in next 4 sts, 2 sc in next st; repeat around. Join. (48 sts)
Rnd 7: Ch 1, then sc in each st around. Join. (48 sts) With no increases, the sides turn upward and the base becomes a rounded cup.
Rnd 8 (first shell round): Ch 1 and sc in the first st. Skip 2 sts, work a shell in the next st, skip 2 sts, sc in the next st. Repeat from * 6 more times. Then skip 2 sts, work a shell in the next st, skip 2 sts, and sl st to the first sc. (8 shells and 8 sc = 48 sts)
Number the shells H1 to H8, starting from the beginning of the round. Mark the center dc of H1 and the center dc of H7.
Window Rows (worked flat)
Row 9 (RS, arch row): Sl st in the next 3 sts to reach the center dc of H1. Ch 1 and sc in the same st. Ch 5, sc in the center dc of the next shell. Repeat from * 5 more times, ending at H7. Turn. (7 sc, 6 ch-5 arches)
The arches from H7 to H8 and from H8 back to H1 are left unworked. This leaves a gap 2 repeats wide.
Row 10 (WS, shell row): Ch 1 and sc in the first sc. Work a shell in the next ch-5 sp, sc in the next sc. Repeat from * 5 more times. Turn. (6 shells, 7 sc)
Row 11 (RS): Ch 1 and sc in the first sc. Ch 2, sc in the center dc of the next shell. Ch 5, sc in the center dc of the next shell. Repeat from * 4 more times. Ch 2, sc in the last sc. Turn. (8 sc, 5 ch-5 arches, 2 ch-2 sps)
Row 12 (WS): Ch 1 and sc in the first sc. Work 2 dc in the ch-2 sp, then sc in the next sc. Work a shell in the next ch-5 sp, sc in the next sc. Repeat from * 4 more times. Work 2 dc in the last ch-2 sp and sc in the last sc. Turn. (5 shells, 2 half shells, 8 sc)
Closing the Window
Rnd 13 (RS, arch round): Ch 1 and sc in the first sc. Ch 5, skip the half shell, and sc in the center dc of the next full shell. Continue across so that you sc in the center dc of all 5 full shells. Then ch 5 and sc in the last sc. (7 sc and 6 arches so far)
Now ch 11 and sl st to the first sc. This chain bridges the window. It takes the place of the usual “ch 5, sc, ch 5”, which uses the same 11 sts. (7 sc + 30 ch + 11 ch = 48 sts)
Rnd 14 (shell round): Ch 1 and sc in the first sc. Work a shell in the next ch-5 sp, sc in the next sc. Repeat from * 5 more times. Then work across the ch-11: skip 2 ch, shell in the next ch, skip 2 ch, sc in the next ch, skip 2 ch, shell in the next ch, skip 2 ch. Sl st to the first sc. (8 shells, 8 sc = 48 sts)
The full repeat is back in place, and the window is now closed on all four sides.
Mesh Body
Rnd 15 (arch round): Sl st in the next 3 sts to reach the first center dc. Ch 1 and sc in the same st. Ch 5, sc in the center dc of the next shell. Repeat from * 6 more times. Ch 5 and sl st to the first sc. (8 sc, 8 arches = 48 sts)
Rnd 16 (shell round): Ch 1 and sc in the first sc. Work a shell in the next ch-5 sp, sc in the next sc. Repeat from * 6 more times. Work a shell in the last sp and sl st to the first sc. (8 shells, 8 sc = 48 sts)
Each shell round sits half a repeat over from the one before it, which is what creates the honeycomb.
Rnds 17–36: Repeat Rnds 15–16 ten more times, ending with a shell round. Fasten off Color A.
Checkpoint: 19.5 in (49.5 cm) tall and 6 in (15.2 cm) wide flat.
Leaf Sprigs (make 2)
Work with Color B.
Leaf (make 5 per sprig, 10 total):
1. Ch 8. Sc in the 2nd ch from the hook, hdc in the next ch, dc in the next 3 ch, hdc in the next ch, and 3 sc in the last ch.
2. Rotate and work along the underside of the chain: hdc, dc in the next 3 ch, hdc, sc in the last ch. Sl st to the first sc. (15 sts)
3. For the pointed tip: ch 2 and sl st in the 2nd ch from the hook.
4. Fasten off, leaving a 6 in (15.2 cm) tail.
Each leaf is about 1.75 in (4.4 cm) long. The starting chain forms a raised center vein.
Stem: Ch 21. Sl st in the 2nd ch from the hook and in each ch across. (20 sl st) The stem is about 5 in (12.7 cm) long.
Assembly: Sew 1 leaf to the tip of the stem. Sew the other 4 leaves in alternating pairs along the upper two-thirds of the stem, angled upward.
Border
Use Color B. Border gauge: 4 sc per inch (2.5 cm).
Top Band
Rnd 37 (conversion round): Join Color B in any sc of Rnd 36. Ch 1, then sc in each sc and in each dc around. Sl st to join. That is 48 stitches worked one per existing stitch, plus 0 added, for 48 sts total. This gives 24 sc on each side when the tube is flat.
Rnds 38–40: Ch 1, sc in each st around. Join. (48 sts)
Don’t fasten off yet. The band is 4 rounds deep, which measures 1 in (2.5 cm).
Why the math works: Rnd 36 has 8 repeats of 6 sts, which is 48 sts. At the border gauge, 48 sc measure 12 in (30.5 cm) around, or 6 in (15.2 cm) per flat side. That matches the mesh width, so the rim neither flares nor gathers.
Strap
- Flatten the holder with the window centered on the front.
- Mark the 6 center stitches of the back on Rnd 40.
- Join Color B in the first marked stitch, or continue from the band if your round ended there.
- Row 1: Ch 1, sc in each of the 6 marked sts. Turn. (6 sts)
- Rows 2–20: Ch 1, sc in each st across. Turn. (6 sts)
The strap is 5 in (12.7 cm) long. Pass it through the wooden ring, fold it to the inside of the rim, and overlap the last 4 rows, which is 1 in (2.5 cm). Sew it down securely. The finished loop rises about 2 in (5.1 cm) above the rim.
Opening Ring
Rnd 1: With the RS facing, join Color B at a bottom corner of the window. Work 40 sc around the window as follows:
– 1 sc in each of the 11 unworked Rnd 8 sts along the bottom
– 9 sc up the side (2 sc per row end, plus 1 in the corner)
– 11 sc in the free loops of the ch-11 across the top
– 9 sc down the other side
Sl st to join. (40 sts)
Rnd 2: Ch 1, sc in the next 3 sts, sc2tog; repeat around. Join. (32 sts)
Rnd 3: Ch 1, sc in each st around. Join and fasten off. (32 sts)
The ring is 0.75 in (1.9 cm) wide. The 32-sc inner edge pulls the window into a circle about 2.5 in (6.4 cm) across.
Final Blocking
- Weave in all ends, working along the solid sc sections where possible.
- Wet the holder thoroughly and press out the water in a towel. Don’t wring it.
- Slip a rolled towel or a 4 in (10.2 cm) wide cardboard tube inside to support the shape.
- Lay it flat. Pin it to 6 in (15.2 cm) × 19.5 in (49.5 cm) for the yellow section, with the band measuring 1 in (2.5 cm).
- Open each shell gently with your fingertips so the honeycomb looks even.
- Pin the opening ring into a circle.
- Block the sprigs flat, pinning the leaf tips to points.
- Let everything dry completely.
- Pin the sprigs in place: one on the upper right front, about 4 in (10.2 cm) below the band, and one on the left front, just above the opening. Sew them on through the leaf centers and along the stems.
Final Quality-Control Checklist
- The tube measures 6 in (15.2 cm) wide flat and 20.5 in (52.1 cm) tall.
- All 8 shell columns line up evenly, with no skipped arches.
- The window sits on the front, and the strap is directly opposite at the back.
- The opening ring lies flat and round, about 2.5 in (6.4 cm) across.
- The top band has 48 sc, with no flaring or puckering.
- The strap is sewn securely enough to hold a full load.
- Each sprig has 5 leaves, and all leaf tips point upward.
- All ends are woven in and secure.
Troubleshooting
- Shells stack in straight columns instead of offsetting: In the arch rounds, the sc must go in the center dc of each shell. In the shell rounds, the shells go into the arches.
- The window looks crooked: Check that Rows 9–12 start and end at the H1 and H7 center stitches.
- Rnd 14 doesn’t add up to 8 shells: Recount the ch-11. Your shells should land in chains 3 and 9, and the sc in chain 6.
- The top band flares: Work Rnds 38–40 with a hook half a size smaller.
- The top band puckers: You worked the conversion round too tightly. Redo Rnd 37 more loosely.
- The opening ring ruffles: Your Rnd 1 has too many stitches. Recount to 40.
- The leaves curl: Steam them flat before sewing them on.
Care
Hand wash or machine wash on a gentle cycle in cool water, then reshape and lay flat to dry. Don’t hang it to dry while wet, because the cotton will stretch.
Final Notes
The whole design depends on one measurement chain:
– 48 sts per round equals 8 repeats of 1.5 in (3.8 cm), or 12 in (30.5 cm) around.
– That gives 6 in (15.2 cm) per flat side.
– The base and first shell round measure 2 in (5.1 cm). Fourteen arch/shell pairs at 1.25 in (3.2 cm) each add 17.5 in (44.5 cm), for 19.5 in (49.5 cm) of yellow.
– A 1 in (2.5 cm) olive band brings the total to 20.5 in (52.1 cm).
– The window is 3 in (7.6 cm) × 2.5 in (6.4 cm), framed by a 0.75 in (1.9 cm) ring.
Check each stage against these numbers and the holder will come out right.
Happy crocheting!