

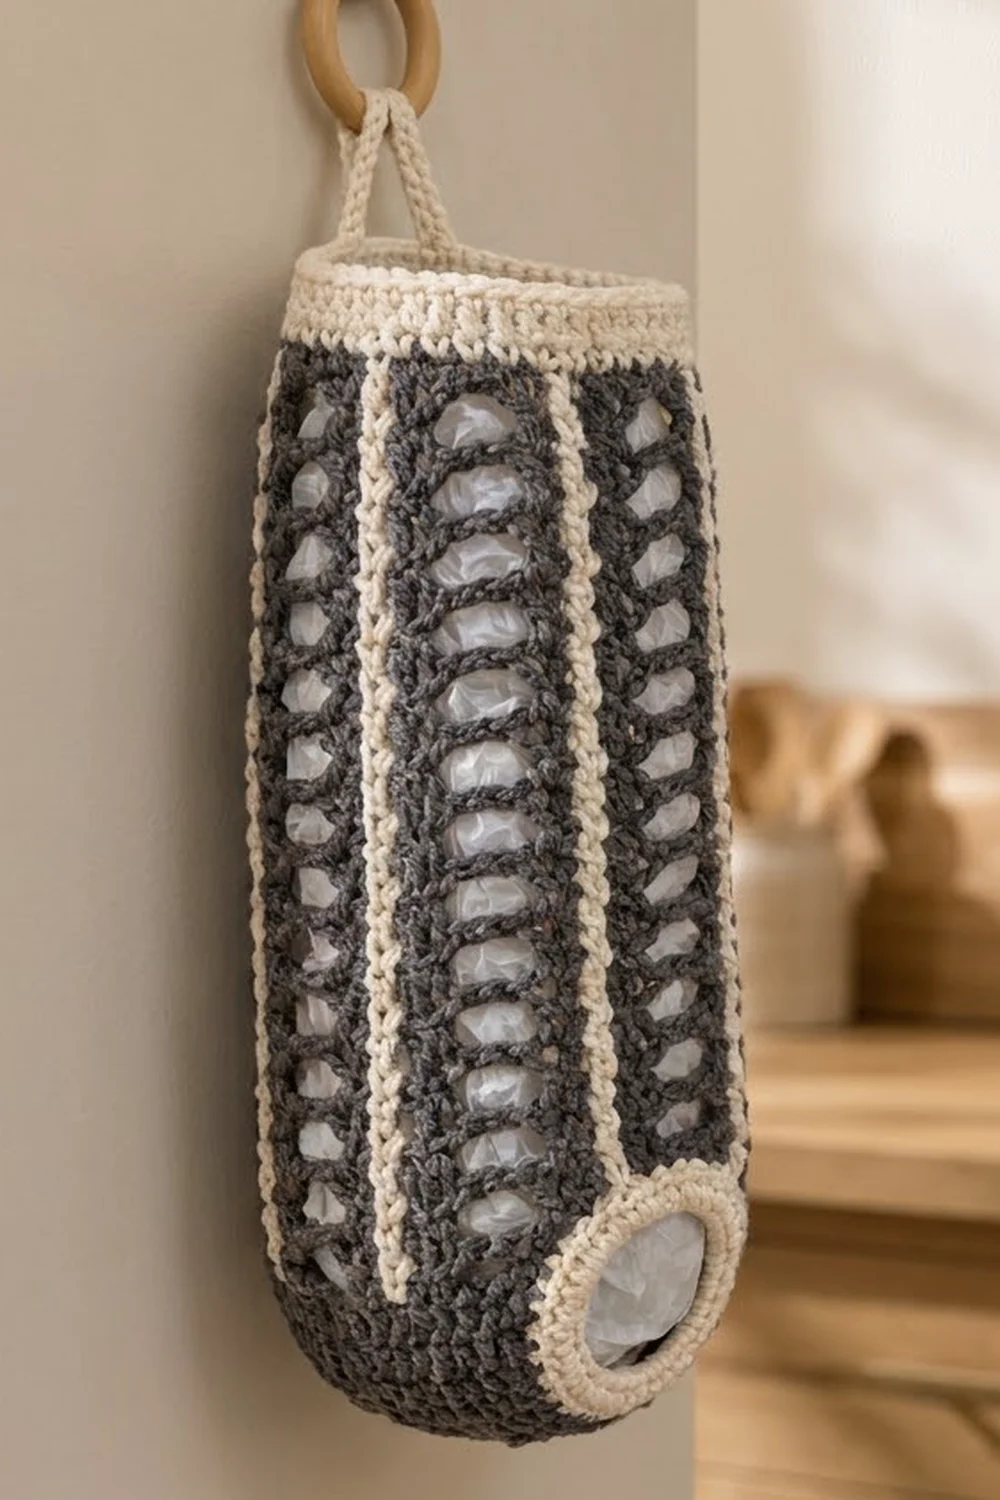
The Pantry Ladder Bag Holder is a tall, soft tube that keeps loose grocery bags in one place. You push bags in at the top and pull them out one at a time through a round hole at the bottom. Open ladder mesh lets you see how many bags are left, and the solid stitch columns keep the tube upright on the wall.
The design uses two colors. The body is charcoal gray, and raised cream stripes run up each solid column. A cream band finishes the top, a flat cream collar frames the dispensing hole, and a narrow cream strap hangs the holder from a wooden ring or hook. The look is calm and modern, and it suits a kitchen, laundry room, or pantry door.
This pattern uses US crochet terms. The finished holder is a single piece, 12 in (30.5 cm) around (6 in / 15.2 cm wide when flat) and 15.5 in (39.4 cm) tall. The strap adds a hanging loop of about 3.5 in (8.9 cm).
You work from the bottom up. First you crochet the cream collar around a foundation-chain ring and grow it into a domed gray base. Then you work 27 rounds of ladder mesh and finish with a cream single-crochet band. The strap is worked in rows straight off the band. Finally, you add surface slip stitch stripes and a neat edging round at the opening.
Finished Size and Construction
- Finished size: 6 in (15.2 cm) wide flat × 15.5 in (39.4 cm) tall; 12 in (30.5 cm) circumference
- Skill level: Easy / Advanced Beginner
- Terminology: US crochet terms
- Yarn weight: Worsted (#4), cotton or cotton blend
- Hook: 5.0 mm (H-8)
- Number of pieces: 1, worked in one piece with the strap attached
- Layout: One vertical tube, with the opening at the base and the strap at the top back
- Piece size: 48 stitches around; 42 rounds tall plus the strap
- Size before border: Body through Rnd 36 measures 14 in (35.6 cm) tall
- Border depth: Top band 1.5 in (3.8 cm); the opening edging is a single round that lies on the collar edge and adds no length
Materials
Choose a smooth worsted-weight cotton or cotton blend. Cotton holds its shape, takes the weight of a stuffed bag supply without sagging much, and washes well. Avoid very splitty yarns, because the surface slip stitch stripes are easier to work in a tightly plied yarn.
- Charcoal gray (Color A): 110 g, about 175 m (191 yd)
- Cream (Color B): 60 g, about 95 m (104 yd)
These quantities include a margin of about 15% for swatching and small tension differences.
Tools:
– 5.0 mm (H-8) crochet hook
– Stitch markers (at least 2)
– Tapestry needle
– Scissors
– Measuring tape
– Wooden ring, 3 in (7.6 cm) across, or a wall hook (optional)
– A bottle or rolled towel for blocking
Abbreviations (US Terms)
- ch – chain
- sc – single crochet
- dc – double crochet
- sl st – slip stitch
- sk – skip
- sp – space
- st(s) – stitch(es)
- rep – repeat
- rnd(s) – round(s)
- 2 sc in next – increase: work 2 sc into the same stitch
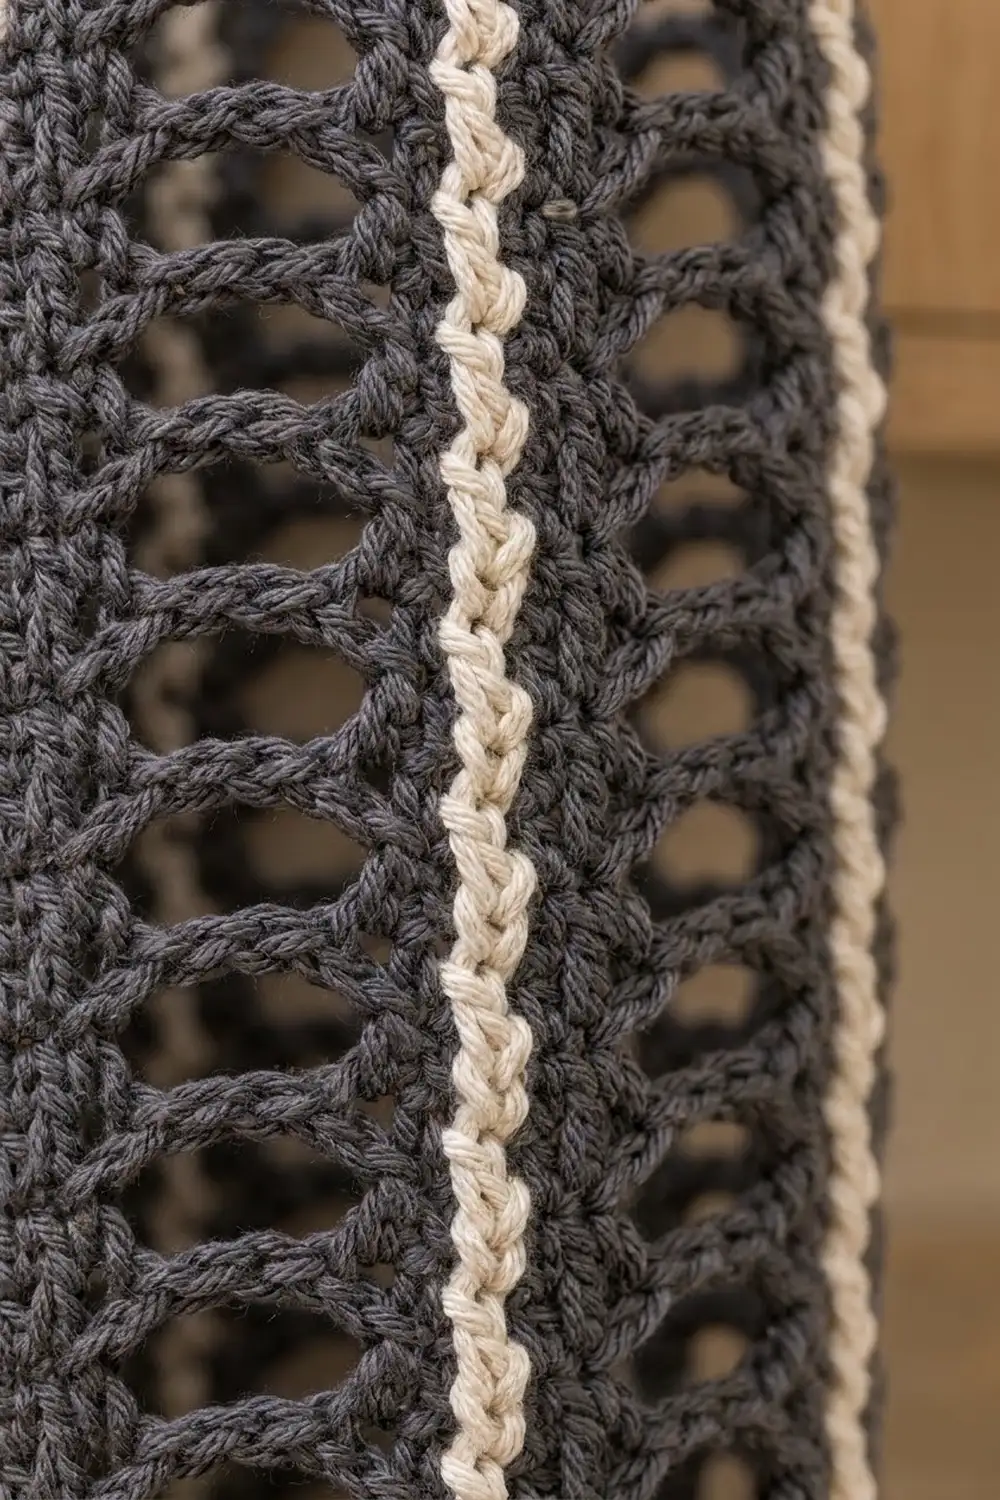
Special stitch – Surface slip stitch (surf sl st): Hold the yarn behind the fabric. Insert the hook from front to back through the fabric, yarn over at the back, and pull up a loop through the fabric and through the loop on the hook. Each surface slip stitch leaves a small “V” on the front, and a line of them looks like a raised chain.
Gauge and Checkpoints
Gauge:
– 16 sc × 16 rnds = 4 in (10.2 cm)
– 16 dc × 9 rnds = 4 in (10.2 cm)
Since this holder is one piece, use the base as your test. Work Rnds 1–6, then check your size before you go on.
Checkpoints:
– After Rnd 1: The ring is 28 sc around, which is 7 in (17.8 cm) in circumference. The opening is 2.2 in (5.6 cm) across.
– After Rnd 3: The cream collar is about 0.75 in (1.9 cm) wide. Its outer edge is 9 in (22.9 cm) around, which is 2.9 in (7.4 cm) across.
– After Rnd 6: The base is 48 sts, and its outer edge is 12 in (30.5 cm) around. Measured gently across, it is about 3.8 in (9.7 cm).
– After Rnd 18: Nine mesh rounds measure 4 in (10.2 cm) tall.
– After Rnd 36: The body measures 14 in (35.6 cm) tall.
If your piece is too big, go down half a hook size (4.5 mm). If it is too small, go up half a size (5.5 mm). Keep all stitch counts the same, because every round depends on the 48-stitch repeat.
Pattern
Base and Opening Collar
With Color B (cream):
Foundation: Ch 28 and join with a sl st to the first ch to make a ring. Make sure the chain is not twisted.
Rnd 1: Ch 1, sc in each ch around, join with a sl st to the first sc. (28 sc)
Rnd 2: Ch 1, sc in next 6 sts, 2 sc in next; rep from * 3 more times, join. (32 sc)*
Rnd 3: Ch 1, sc in next 7 sts, 2 sc in next; rep from * 3 more times. Change to Color A on the last yarn over of the joining sl st. Fasten off Color B. (36 sc)*
Each round adds only 4 increases, which is fewer than a flat circle needs. As a result, the collar cups slightly, and this cupping starts the rounded bottom.
With Color A (gray):
Rnd 4: Ch 1, sc in next 8 sts, 2 sc in next; rep from * 3 more times, join. (40 sc)*
Rnd 5: Ch 1, sc in next 9 sts, 2 sc in next; rep from * 3 more times, join. (44 sc)*
Rnd 6: Ch 1, sc in next 10 sts, 2 sc in next; rep from * 3 more times, join. (48 sc)*
Rnds 7–8: Ch 1, sc in each st around, join. (48 sc)
With no more increases, the sides start to rise and the base becomes a shallow dome.
Rnd 9 (setup): Ch 3 (counts as dc), dc in each st around, join with a sl st to the top of the ch-3. (48 dc)
Checkpoint: From the opening edge to the top of Rnd 9, measured along the side, the base is about 2 in (5.1 cm).
Ladder Mesh Body
The mesh repeat is 6 sts: 3 dc for the solid column and 3 ch for the opening. There are 8 repeats around, and 8 × 6 = 48.
Rnd 10: Ch 3 (counts as dc), dc in next 2 sts, ch 3, sk next 3 sts, dc in next 3 sts; rep from * 6 more times, ch 3, sk last 3 sts, join to the top of the ch-3. (24 dc + 8 ch-3 sps = 48 sts)*
Rnd 11: Ch 3 (counts as dc), dc in next 2 dc, ch 3, sk the ch-3 sp, dc in next 3 dc; rep from * 6 more times, ch 3, sk the last ch-3 sp, join. (24 dc + 8 ch-3 sps = 48 sts)*
Rnds 12–36: Rep Rnd 11 for 25 more rounds. (48 sts each round)
Each ch-3 sits directly above the one before it. Because you skip the space instead of working into it, the chains form stacked horizontal bars with oval openings between them. These are the ladder columns. The 3-dc columns stack straight up between the ladders.
You now have 27 mesh rounds (Rnds 10–36). At 9 rounds per 4 in (10.2 cm), they measure 12 in (30.5 cm).
Checkpoint: The body through Rnd 36 measures 14 in (35.6 cm) tall: 2 in (5.1 cm) for the base and 12 in (30.5 cm) for the mesh. Change to Color B on the last yarn over of the Rnd 36 join. Fasten off Color A.
Border
The border has four parts: the top band, the strap, the stripes, and the opening edging.
Border gauge: 16 sc = 4 in (10.2 cm) around, and 4 sc rnds = 1 in (2.5 cm) tall. The band keeps the body’s 48 stitches, so it stays the same width as the mesh and does not flare or pucker.
Top Band (Color B)
Rnd 37 (conversion): Ch 1, sc in each of next 3 dc, 3 sc in next ch-3 sp; rep from * 7 more times, join. (24 sc worked 1-per-dc + 24 sc worked into the 8 ch-3 sps = 48 sc)*
Rnds 38–42: Ch 1, sc in each st around, join. (48 sc)
The band has 6 rounds and measures 1.5 in (3.8 cm) tall. At 4 sc per inch, 48 sts make 12 in (30.5 cm) around. That matches the mesh exactly, so the band sits straight with no ruffling.
Lay the holder flat with the joining seam at the center back, and place a marker in the 2 center-back sts.
Hanging Strap (Color B)
Work in rows on the 4 center-back sts of Rnd 42, with the 2 marked sts in the middle.
Row 1: Join Color B (or continue from the band) in the first of the 4 sts, ch 1, sc in the same st and the next 3 sts, turn. (4 sc)
Rows 2–32: Ch 1, sc in each st across, turn. (4 sc)
The strap is 1 in (2.5 cm) wide and 8 in (20.3 cm) long. Fasten off, leaving a 12 in (30.5 cm) tail.
If you are using a ring, pass the strap through it. Fold the strap down inside the back of the band. Sew the last row flat against the inside of the band, 1 in (2.5 cm) below the top edge. This leaves a loop about 3.5 in (8.9 cm) tall above the rim, so the total hanging length is about 19 in (48.3 cm).
Cream Stripes (Color B)
Each stripe runs up the center dc of one 3-dc column, so there are 8 stripes in total.
- Hold the holder upright with the opening down. Find the center dc of one column at Rnd 9.
- Make a slip knot and keep it behind the fabric. Insert the hook from the front between Rnd 8 and Rnd 9, at the base of that center dc, and pull up a loop.
- Work 2 surf sl sts per dc round: one at the base of the dc and one halfway up its post. Work straight up through Rnd 36. (28 dc rnds × 2 = 56 surf sl sts per stripe)
- Pull the last loop to the back under Rnd 37 and fasten off.
- Repeat for all 8 columns. (8 stripes × 56 = 448 surf sl sts)
Keep your tension relaxed. A stripe pulled too tight will shorten that column and twist the tube.
Opening Edging (Color B)
Edging Rnd: With the opening facing you, join Color B in any free loop of the foundation chain. Ch 1, sc in each free loop around, join. (28 sc)
This round matches Rnd 1 one-for-one: both have 28 sts on the same 28 chains. That covers the bare foundation chain and firms up the hole so it doesn’t stretch out as bags are pulled through. Fasten off.
Final Blocking
- Weave in all ends along the dc columns, never across the openings.
- Soak the holder in cool water for 10 minutes, then press the water out gently. Do not wring it.
- Roll it in a towel to remove the extra water.
- Slide a bottle or a firmly rolled towel about 3.8 in (9.7 cm) across into the tube to hold it round.
- Shape the domed base by hand and center the cream collar around the hole.
- Straighten each cream stripe so it runs straight up, and adjust the band so the top edge is level.
- Measure the holder. It should be 6 in (15.2 cm) wide flat and 15.5 in (39.4 cm) tall.
- Lay the strap flat so it dries straight.
- Let it dry completely before you hang it.
Final Quality-Control Checklist
- Rnd 1 and the opening edging both have 28 sc.
- Rnds 6–9 and every mesh round have 48 sts.
- There are 8 ladder columns and 8 cream stripes, evenly spaced.
- All 27 mesh rounds (Rnds 10–36) have ch-3 bars stacked straight.
- Rnd 37 has 48 sc, with 3 sc in each ch-3 space.
- The top band has 6 rounds and measures 1.5 in (3.8 cm).
- The strap is 4 sts wide and 32 rows long, and is sewn securely inside the band.
- The body measures 14 in (35.6 cm) through Rnd 36 and 15.5 in (39.4 cm) overall.
- All ends are woven in along solid columns.
Troubleshooting
The tube spirals or leans. Make sure each round ends with a join and that the ch-3 counts as a dc. Starting with the ch-3 directly above the previous round’s ch-3 keeps the columns straight.
The base is flat instead of domed. You probably added extra increases. Recount Rnds 4–6 and check you have exactly 40, 44, and 48 sts.
The base ruffles. Your tension may be loose in the sc rounds. Go down half a hook size for Rnds 1–8 only.
The top band flares. You worked more than 3 sc into some spaces. Rnd 37 must end with 48 sts.
The stripes pucker the fabric. They are too tight. Pull them out and rework them more loosely, or use a hook one size larger for the stripes.
The opening stretches too wide. Make sure the edging round has exactly 28 sc. A second edging round of 28 sc will firm it up more.
The strap stretches. Sew it down across all 4 sts and up both sides. For extra strength, you can work a row of sl sts along each long edge.
Care
Hand wash or machine wash on a gentle cycle in cool water, then reshape and dry flat over a bottle. Do not tumble dry, because the strap can stretch and the cotton may shrink.
Final Notes
Each stage builds on the measurement before it:
- The opening is 28 sts, 7 in (17.8 cm) around and 2.2 in (5.6 cm) across.
- The base grows to 48 sts, 12 in (30.5 cm) around, and measures 2 in (5.1 cm) along the side.
- The 27 mesh rounds add 12 in (30.5 cm), for a body of 14 in (35.6 cm).
- The 6-round band adds 1.5 in (3.8 cm), for a total of 15.5 in (39.4 cm).
- The strap loop adds 3.5 in (8.9 cm), for a hanging length of 19 in (48.3 cm).
If your gauge matches at the base, the rest of the holder will match too. Fill it with bags, hang it up, and pull a fresh bag from the bottom whenever you need one.
Happy crocheting!