

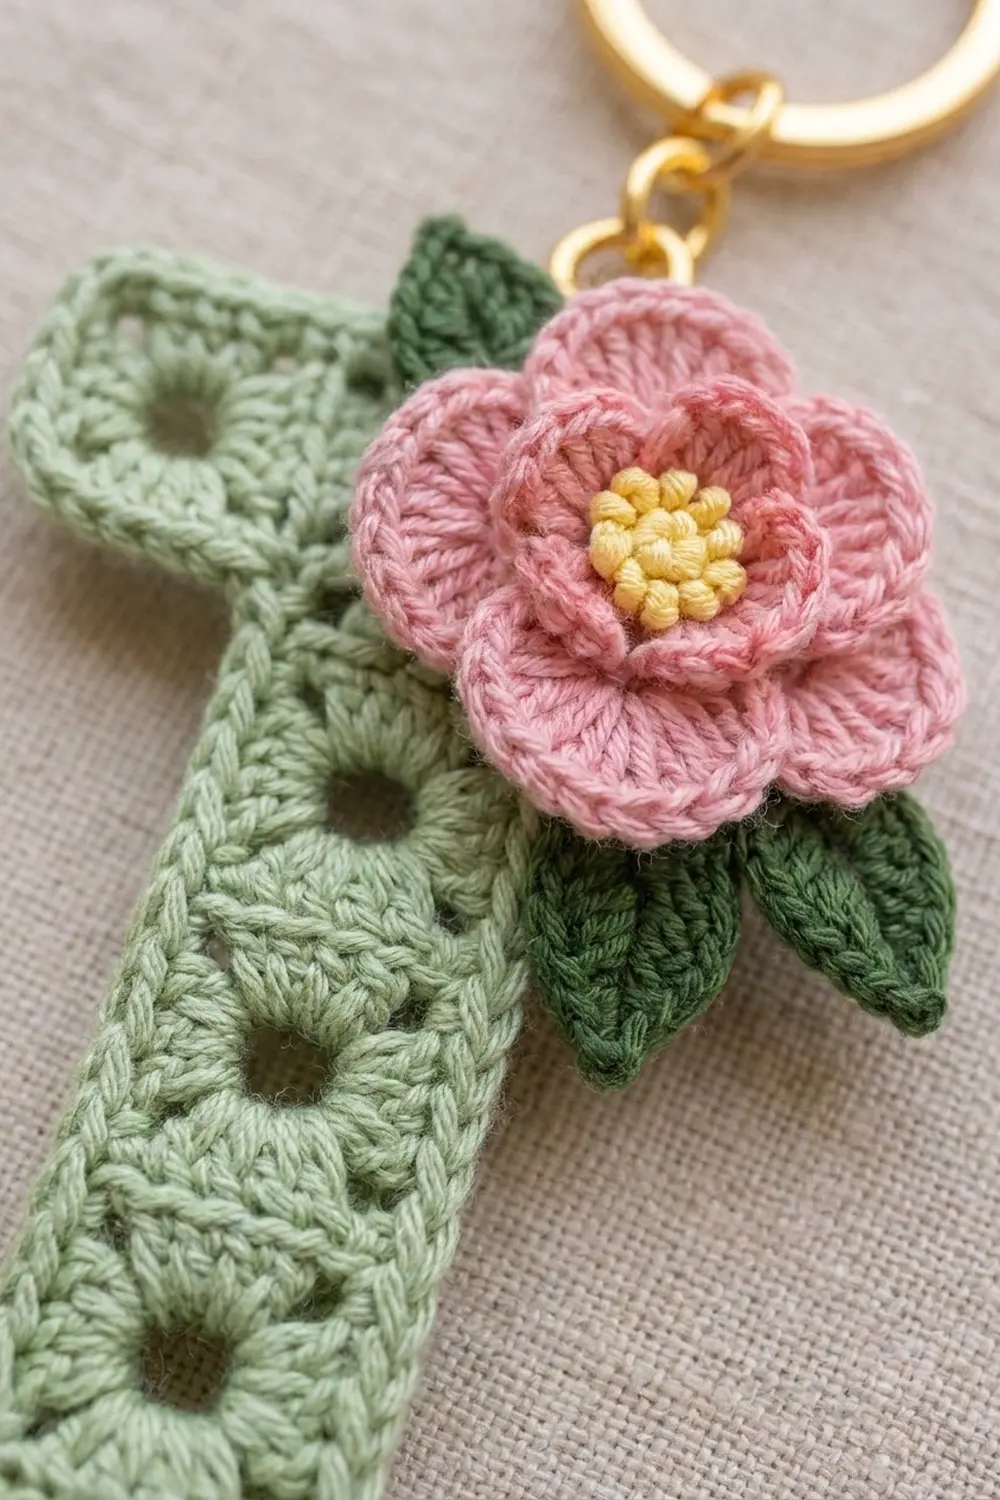
This little letter J is made from nine tiny sage-green squares, each with an open center that gives the letter a light, lattice look. A soft two-round border pulls the squares together into one clean shape. A layered pink camellia with a yellow center and two dark green leaves sits at the top right corner, and a small rolled pink rosebud with its own leaf finishes the curl at the bottom left.
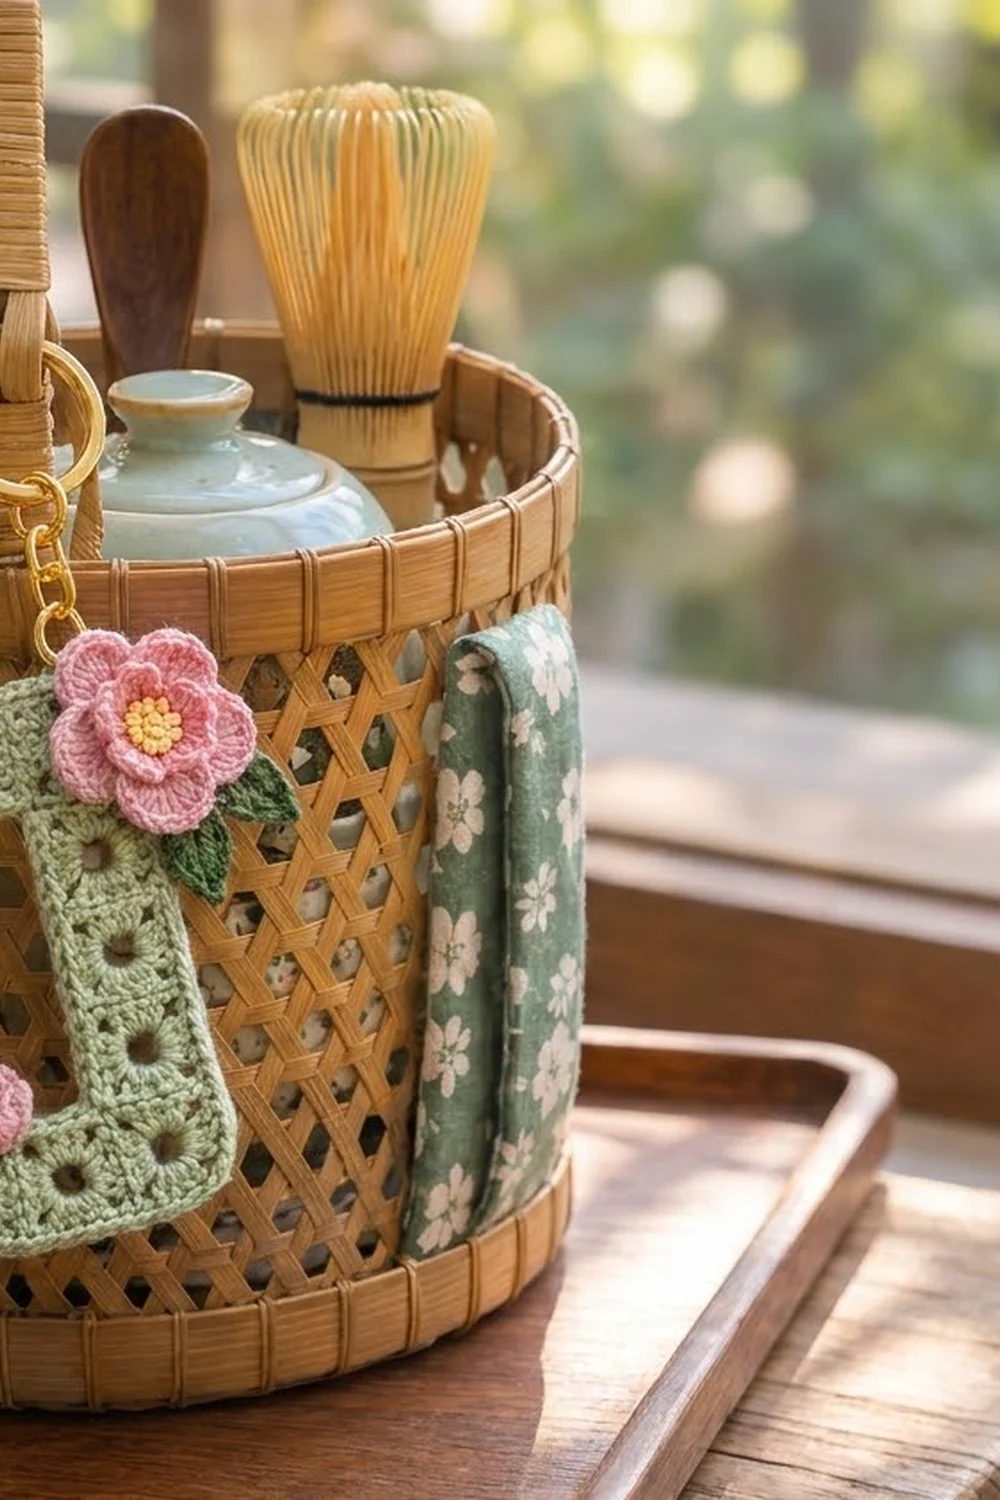
The colors are calm and garden-inspired: sage green for the letter, rose pink for the flower and bud, dark leaf green for the leaves, and a little butter yellow in the flower center. A gold keyring with a short chain attaches at the top edge, so the J works as a keychain, a bag charm, or a basket tag.
This pattern uses US crochet terms. The finished letter, including the border, measures 3.6 in (9.1 cm) wide and 4.4 in (11.2 cm) tall. The camellia measures about 1.6 in (4.1 cm) across.
Construction is simple and modular. You make nine identical two-round mini squares and join them into a J with slip stitch seams. Then you work two rounds of single crochet around the whole outline and sew on the camellia, the bud, and three leaves. The keyring goes on last.
Finished Size and Construction
- Finished size: 3.6 in (9.1 cm) wide x 4.4 in (11.2 cm) tall, not counting the keyring
- Skill level: Easy to intermediate (small pieces, careful counting)
- Terminology: US crochet terms
- Yarn weight: Sport weight (#2 fine) cotton
- Hook: 2.25 mm (B-1)
- Number of pieces: 9 mini squares, 1 camellia, 1 rosebud, 3 leaves
- Layout: a grid 4 columns wide x 5 rows tall, with 9 cells filled in a J shape
- Mini square size: 0.8 in (2.0 cm) square
- Size before border: 3.2 in (8.1 cm) wide x 4.0 in (10.2 cm) tall
- Border depth: 0.2 in (0.5 cm) on every edge (2 rounds)
Materials
Choose a smooth, tightly plied mercerized cotton. It shows each stitch clearly, keeps the open centers crisp, and won’t get fuzzy on a keychain that gets handled every day.
- Sage green (letter): 10 g, about 30 m
- Rose pink (camellia and bud): 4 g, about 12 m
- Dark leaf green (leaves): 2 g, about 6 m
- Butter yellow (flower center): 1 g, about 3 m
These amounts include extra for a test square and for weaving in ends.
Tools:
- 2.25 mm (B-1) crochet hook
- Tapestry needle with a slightly sharp tip for sewing on the flowers
- Stitch markers (4 or more)
- Rust-proof pins and a blocking board or folded towel
- Spray bottle
- Gold split keyring, 1 in (2.5 cm), with a short chain and one jump ring
- Small flat-nose pliers
- Scissors and a ruler
Abbreviations (US Terms)
- ch – chain
- sl st – slip stitch
- sc – single crochet
- hdc – half double crochet
- dc – double crochet
- tr – treble crochet
- sp – space
- st(s) – stitch(es)
- BLO / FLO – back loop only / front loop only
- MR – magic ring
- RS / WS – right side / wrong side
Special stitches:
- sc2tog: insert hook in next st, pull up a loop, insert hook in following st, pull up a loop, yarn over and pull through all 3 loops.
- sc3tog: pull up a loop in each of the next 3 sts, yarn over and pull through all 4 loops.
Gauge and Checkpoints
Make one test square before anything else. Because the pieces are so small, gauge here is the size of the square, not a stitch count over 4 in.
- After square Round 1: 0.55 in (1.4 cm) across, with a clear open center hole.
- After square Round 2: 0.8 in (2.0 cm) square, lying flat.
- Border gauge: 7 sc = 0.8 in (2.0 cm), which matches one square side.
If your square is larger than 0.8 in (2.0 cm), go down a hook size or tighten your dc. If it is smaller, go up to a 2.5 mm hook. Being off by just 0.05 in (0.1 cm) per square adds up to 0.25 in (0.6 cm) over the 5-row height, so measure carefully.
Mini Square (make 9)
Use sage green.
Round 1: Ch 5, sl st to first ch to form a ring. Ch 3 (counts as first dc), 2 dc in ring, ch 2, 3 dc in ring, ch 2; repeat from * 2 more times. Join with sl st to top of beginning ch-3. (12 dc, 4 ch-2 sps)*
The ch-5 ring leaves the open center that defines this design. Don’t pull it closed.
Round 2: Ch 1, sc in same st as join and in next 2 dc, 3 sc in next ch-2 sp, sc in next 3 dc; repeat from * 2 more times, 3 sc in last ch-2 sp. Join with sl st to first sc. (24 sc)*
That is 12 sc over the dc plus 12 sc in the four corners. The middle sc of each 3-sc corner group is the corner stitch. So each side has 7 sts, counting its 2 corner sts (corner, 5 side sts, corner).
Fasten off, leaving a 4 in (10.2 cm) tail. Weave in the starting tail now.
Checkpoint: 0.8 in (2.0 cm) square, 24 sts, open center.
Camellia
Round 1: With yellow, 5 sc in MR. Join. (5 sc) Fasten off.
Round 2: Join pink in any st. Ch 1, 2 sc in each st around. Join. (10 sc)
Round 3 (front petals, FLO of Round 2): (hdc, 2 dc, hdc) in next st, sl st in next st; repeat from * 4 more times. (5 small petals)*
Round 4 (back petals, BLO of Round 2): (hdc, dc, tr) in next st, (tr, dc, hdc) in next st; repeat from * 4 more times. Join. (5 large petals, 30 sts)*
The back petals sit behind and between the front petals, which gives the layered camellia look. With yellow, add 5 French knots over the center. Size: about 1.6 in (4.1 cm) across.
Leaves (make 3)
With dark leaf green, ch 7. Sc in 2nd ch from hook, hdc in next ch, dc in next 2 ch, hdc in next ch, (sc, ch 2, sc) in last ch. Working along the other side of the chain, hdc in next ch, dc in next 2 ch, hdc in next ch, sc in last ch. Sl st to first sc. Fasten off. Size: about 0.8 in (2.0 cm) long.
Rosebud
With pink, ch 9. (Sc, hdc) in 2nd ch from hook, 2 hdc in each of the next 7 ch. (16 sts) Fasten off with a 6 in (15.2 cm) tail. Roll the strip into a tight spiral and sew through the base to hold it. Size: about 0.5 in (1.3 cm) across.
Make All Pieces
You need 9 sage green mini squares in total, plus 1 pink camellia, 1 pink rosebud, and 3 dark green leaves. Label the grid columns A to D (left to right) and rows 1 to 5 (top to bottom):
      A    B    C    D
1    [ ]  [X]  [X]  [X]
2    [ ]  [ ]  [X]  [ ]
3    [ ]  [ ]  [X]  [ ]
4    [ ]  [ ]  [X]  [ ]
5    [X]  [X]  [X]  [ ]
- Top bar: B1, C1, D1 (3 squares)
- Stem: C2, C3, C4, C5 (4 squares)
- Hook of the J: A5, B5 (2 squares)
Lay them out RS up before joining.
Joining
Method: Hold two squares RS together. With sage green, sl st through the back loops of both squares, lining up corner st with corner st. Each seam uses exactly 7 sts on each square: corner, 5 side sts, corner. The seam ridge sits on the WS, and the front shows a fine flat line between squares.
Order (8 seams):
- Join B1 to C1, then C1 to D1 (top bar strip).
- Join C2 to C3, C3 to C4, C4 to C5 (stem strip).
- Join A5 to B5 (hook strip).
- Join the right side of B5 to the left side of C5.
- Join the top of C2 to the bottom of C1.
Tension: Keep each sl st as loose as a normal sc. Tight seams pucker the open centers and shorten the letter. If your seams pull in, use a hook one size larger for joining only.
Checkpoint: The joined J lies flat and measures 3.2 in (8.1 cm) wide x 4.0 in (10.2 cm) tall.
Border
Border gauge: 7 sc = 0.8 in (2.0 cm), the same as one square side. Each round adds about 0.1 in (0.3 cm) to every edge.
Starting count. The outline of the J has 20 square sides around the outside: top 3, top-right end 1, under the bar on the right 1, stem right 4, bottom 3, hook end 1, top of hook 2, stem left 3, under the bar on the left 1, and top-left end 1. At 7 sts per side that makes 140. But at each of the 7 outer (convex) corners, two edges share one corner st, so the real starting count is 140 − 7 = 133 sts. At the 3 inner (concave) corners, the two edges end in two separate corner sts, one from each square, so nothing is subtracted there.
The 7 convex corners are: B1 top-left, D1 top-right, D1 bottom-right, C5 bottom-right, A5 bottom-left, A5 top-left, and B1 bottom-left. The 3 concave corners are where D1 meets C2, where B5 meets C4, and where B1 meets C2.
Round 1: With RS facing, join sage green in the corner st at B1 top-left. Ch 1, 3 sc in that corner st. Work clockwise around the outline: sc in each st along each edge, 3 sc in each convex corner st, and sc2tog over the 2 corner sts at each concave corner. Join to first sc.
Sts on each edge between the corner groups:
- Top: 19
- D1 right end: 5
- Under bar, right: 5
- Stem right: 26
- Bottom: 19
- Hook end: 5
- Top of hook: 12
- Stem left: 19
- Under bar, left: 5
- B1 left end: 5
That is 120 edge sts + 21 corner sc + 3 sc2tog.
Round 1 total: 144 sts (133 sts worked 1 per st, + 14 added at the 7 convex corners, − 3 at the concave corners).
Round 2: Ch 1, sc in each st around. Work 3 sc in the middle sc of each convex corner group. At each concave corner, sc3tog over the last st of the edge, the sc2tog, and the first st of the next edge. Join to first sc.
Sts on each edge between the corner groups:
- Top: 21
- D1 right end: 7
- Under bar, right: 5
- Stem right: 26
- Bottom: 21
- Hook end: 7
- Top of hook: 12
- Stem left: 17
- Under bar, left: 5
- B1 left end: 7
That is 128 edge sts + 21 corner sc + 3 sc3tog.
Round 2 total: 152 sts (144 sts worked 1 per st, + 14 added at convex corners, − 6 at concave corners).
Fasten off and weave in.
Why the math works: Each convex corner gains 2 sts per round, which keeps the outside corners square and flat. Each concave corner loses 1 st in Round 1 and 2 sts in Round 2, so the inner corners don’t ruffle. An edge only gains sts where it meets a convex corner, so the straight edges stay at 7 sts per 0.8 in.
Checkpoint: 3.6 in (9.1 cm) wide x 4.4 in (11.2 cm) tall.
Assembly: Sew two leaves to the WS of the camellia so they peek out to the lower right. Sew the camellia over the top right of the letter, centered over the C1/D1 seam and slightly overlapping the top edge. Sew the bud onto A5 near the left end, with the third leaf tucked under it and pointing down-left. Catch only the back loops of the letter as you sew so nothing shows on the WS.
Keyring: Open the jump ring and pass it through 2 border sts directly above the C1/D1 seam. Attach the chain and keyring, then close the jump ring firmly with pliers.
Final Blocking
- Take the keyring off for now.
- Lay the J WS up on a blocking board.
- Pin the 7 convex corners first, to 3.6 in (9.1 cm) wide and 4.4 in (11.2 cm) tall.
- Pin each concave corner so it forms a crisp right angle.
- Mist lightly and press the open centers square with a fingertip.
- Let it dry completely, then flip it RS up and fluff the petals with your fingers.
- Put the keyring back on.
Final Quality-Control Checklist
- All 9 squares are 0.8 in (2.0 cm) with open centers.
- Every seam uses 7 sts per side, corner to corner.
- The joined letter measures 3.2 in (8.1 cm) x 4.0 in (10.2 cm).
- Border Round 1 has 144 sts and Round 2 has 152 sts.
- The finished letter measures 3.6 in (9.1 cm) x 4.4 in (11.2 cm).
- Inner corners lie flat and outer corners are square.
- The flower, bud, and leaves are secure, with no stitching showing on the back.
- The jump ring is fully closed.
Troubleshooting
- Center holes close up: Your ch-5 ring is too tight. Chain more loosely or try ch 6.
- Squares curl: Round 2 is too tight. Go up half a hook size for that round.
- Seams pucker: Loosen your sl sts or use a larger hook for joining.
- Inner corners ruffle: Check that you worked sc2tog and sc3tog there, not plain sc.
- Outer corners pull in: Check that you worked 3 sc in each convex corner st on both rounds.
- Flower cups forward: Block it face down, with a pin in each back petal.
Care
Hand wash in cool water with mild soap, roll it in a towel to press out the water, and dry flat. Take the metal keyring off before washing.
Final Notes
The measurements build in three easy checks: one square at 0.8 in (2.0 cm), the joined J at 3.2 in (8.1 cm) x 4.0 in (10.2 cm), and the bordered letter at 3.6 in (9.1 cm) x 4.4 in (11.2 cm). Get the square size right and keep every seam at 7 sts, and the border counts of 133, 144, and 152 will fall into place.
Happy crocheting!