

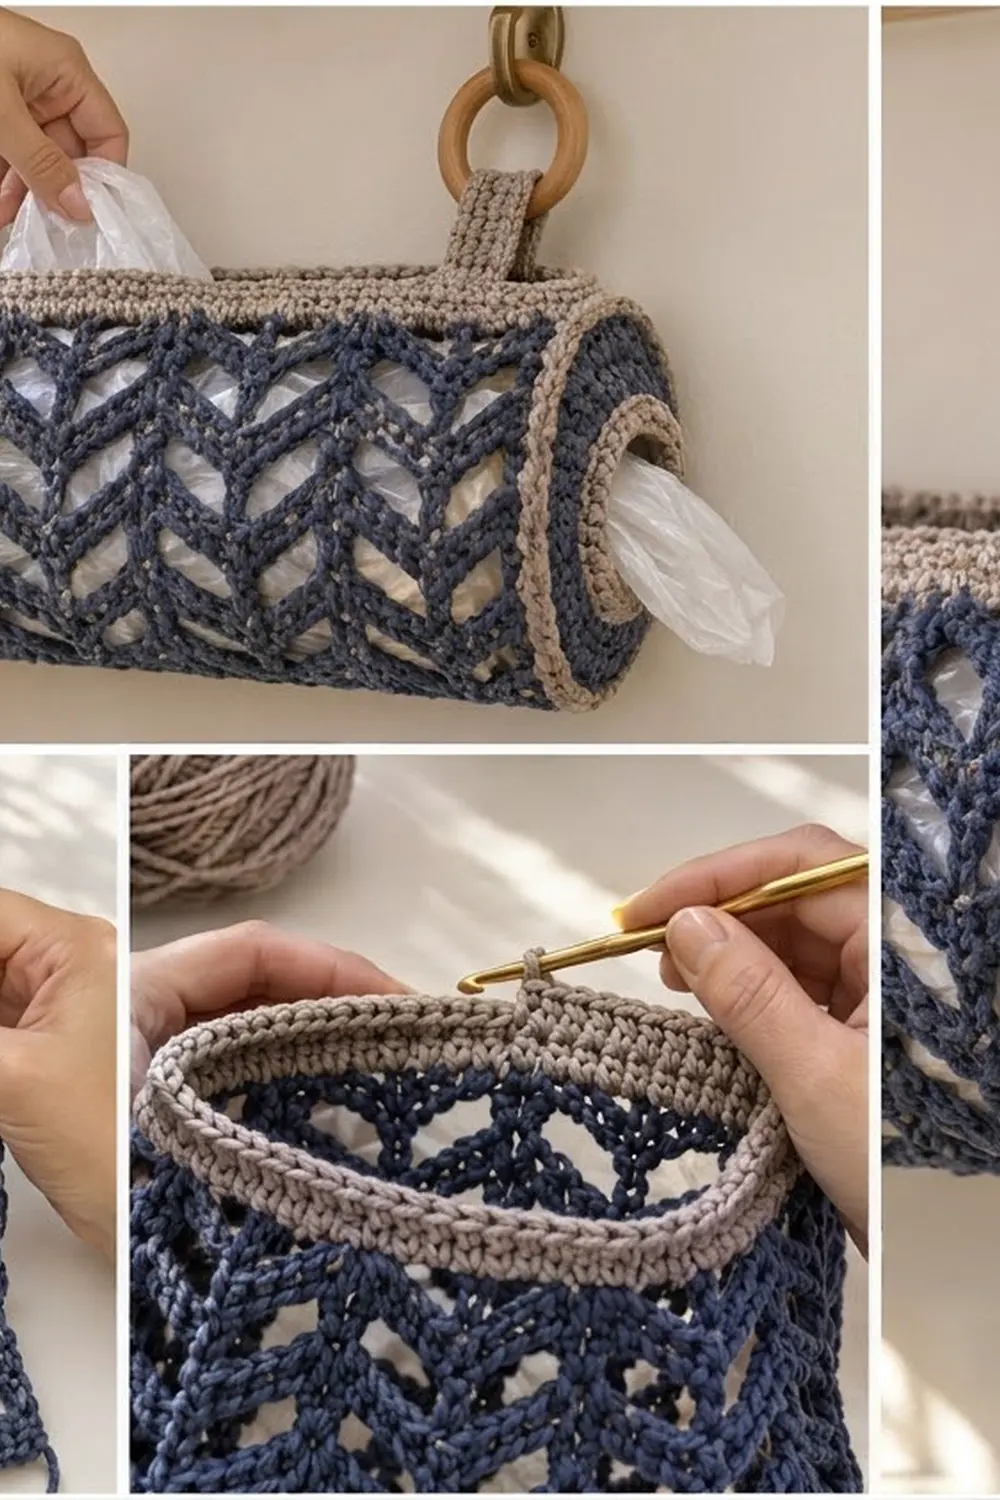
This hanging grocery bag holder is a long, sturdy cylinder made from an openwork navy chevron lattice. It is trimmed in warm taupe and hangs from two wooden rings. You push bags in through the open slot along the top and pull them out one at a time through a ringed hole in the end cap.
The palette is just two colors. Deep navy is used for the chevron body and the cap disks. Soft taupe is used for the slot rims, the cap edges, the dispenser ring, and the straps. The style is modern farmhouse: graphic, tidy, and practical.
The pattern uses US crochet terms. The finished holder measures 15 in (38.1 cm) long and about 4.75 in (12.1 cm) across. With the cap seams it is about 15.5 in (39.4 cm) long overall.
Here’s how it’s built. You work the body flat as a rectangle of chevron rows, then add a taupe leveling rim to each long edge so the slot edges come out straight. You make two round end caps and sew them on with a taupe seam, then add two straps looped through wooden rings.
Finished Size and Construction
- Finished size: 15 in (38.1 cm) body × 4.75 in (12.1 cm) diameter; about 15.5 in (39.4 cm) overall
- Skill level: Intermediate
- Terminology: US crochet terms
- Yarn weight: Worsted (#4) cotton or cotton blend
- Hook: 4.5 mm (US 7)
- Number of pieces: 5 (1 body, 2 end caps, 2 straps)
- Layout: The body is rolled into a tube with both rims meeting at the top, a cap closes each end, and the straps sit on the back rim
- Body panel size: 15 in (38.1 cm) × 15 in (38.1 cm), flat
- Size before border: 15 in (38.1 cm) × 13.5 in (34.3 cm)
- Border depth: 0.75 in (1.9 cm) taupe rim on each long edge
Materials
Pick a firm worsted cotton or a cotton blend. Cotton holds its shape when the holder is stuffed full. A plied, slightly twisted yarn gives the rope-like chevron lines. The amounts below assume about 170 m per 100 g.
- Navy (Color A): 130 g, about 221 m
- Taupe (Color B): 50 g, about 85 m
These quantities include a margin of about 15–20% for your swatch and differences in tension.
Tools:
- 4.5 mm (US 7) hook
- 2 wooden rings, 2.5 in (6.4 cm) across
- Tapestry needle
- Stitch markers (at least 6)
- Measuring tape
- Blocking mat and rust-proof pins
- Scissors
- 2 wall hooks
Abbreviations (US Terms)
- ch – chain
- sc – single crochet
- hdc – half double crochet
- dc – double crochet
- tr – treble crochet
- sk – skip
- sp – space
- st(s) – stitch(es)
- sl st – slip stitch
- inc – 2 sc in the same st
- RS / WS – right side / wrong side
Special stitch – dc3tog (double crochet 3 together): *Yarn over, insert hook in next st, pull up a loop, yarn over, pull through 2 loops; repeat from * twice more, then yarn over and pull through all 4 loops. This uses 3 sts and makes 1 st, which forms each chevron valley.
Counting rule: Every ch-1 in a mesh row counts as 1 st. On the next row, work into each ch-1 sp as if it were a stitch.
Gauge and Checkpoints
Body gauge: One 12-st chevron repeat = 2.5 in (6.4 cm) wide, and 2 rows = 1 in (2.5 cm) tall, measured in pattern.
Cap gauge: 16 sc × 16 rounds = 4 in (10.2 cm).
Test swatch: Ch 28. Work Rows 1–8 of the body over 25 sts, using 1 full repeat before the end sequence. The swatch should measure 5 in (12.7 cm) wide × 4 in (10.2 cm) tall. Then work Rounds 1–4 of the solid cap; it should be 2 in (5.1 cm) across.
Checkpoints:
- Row 1: 73 sts, 15 in (38.1 cm) wide
- After Row 9: 4.5 in (11.4 cm) tall
- After Row 27: 13.5 in (34.3 cm) tall
- After both rims: 15 in (38.1 cm) tall
- Each cap: 60 sts and 4.75 in (12.1 cm) across
Too big? Go down to a 4 mm hook. Too small? Go up to a 5 mm hook. Change the hook, not the stitch counts, because every count below locks the pieces together.
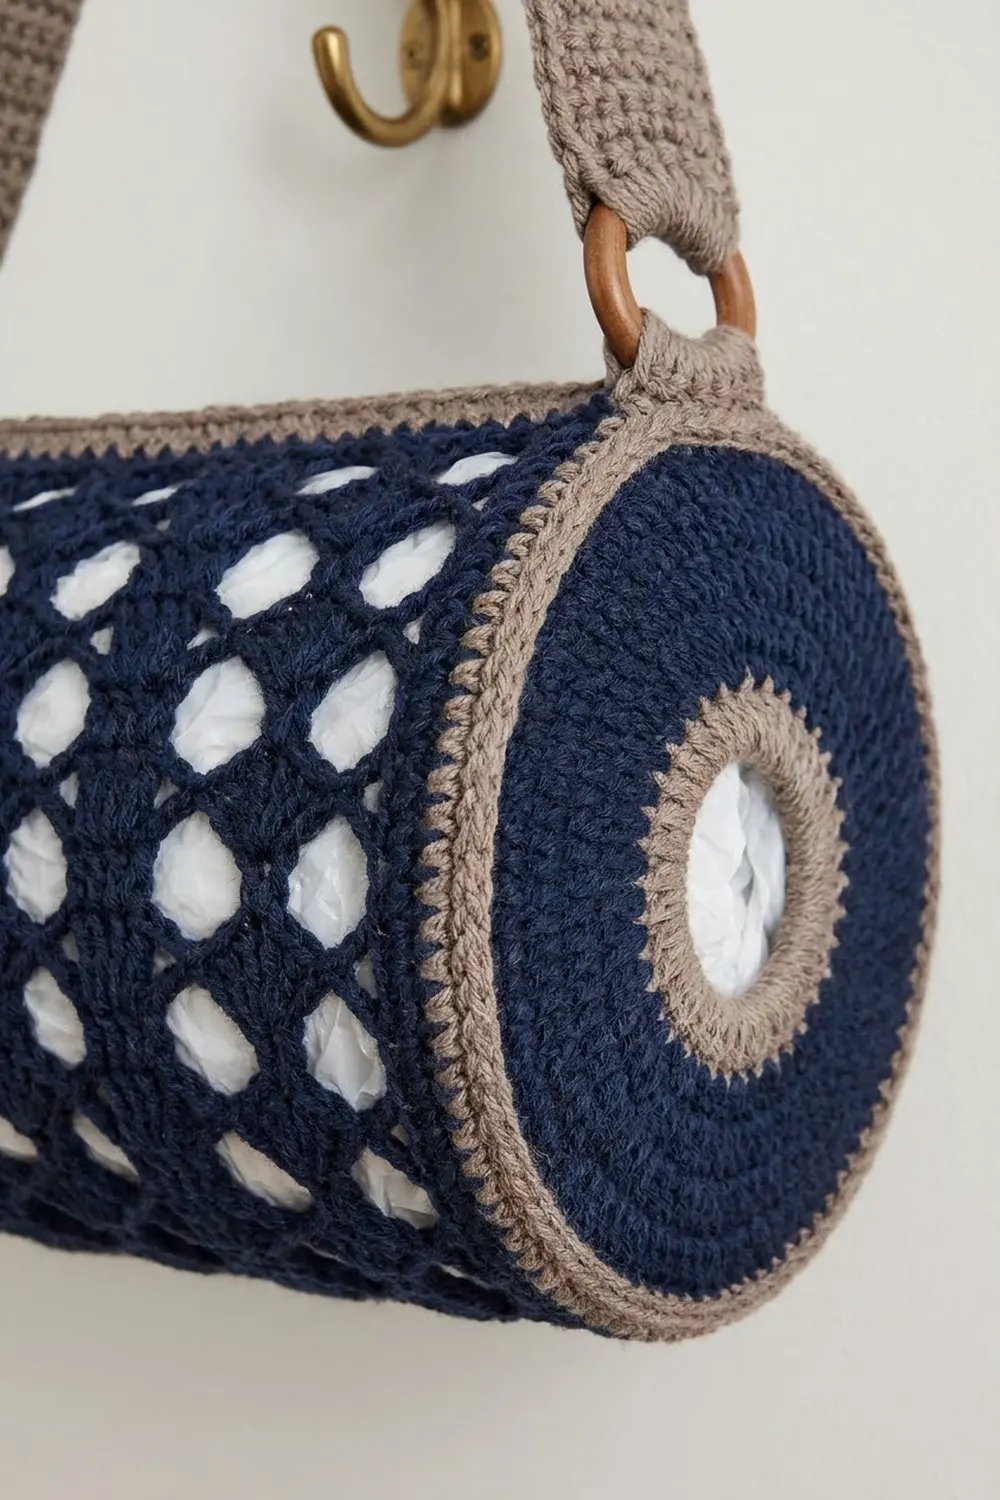
Body (Make 1)
The body is worked flat in rows. Peaks and valleys stay in the same place on every row, so the valleys stack into V-shaped columns. Odd rows are solid and form the rope-like lines. Even rows are mesh and open up the diamond windows.
With Navy, ch 76.
Row 1 (RS, solid): Dc in 4th ch from hook; the skipped ch-3 and this dc form a half peak. Dc in next 4 ch, dc3tog over next 3 ch, dc in next 4 ch, 3 dc in next ch; repeat from * 4 more times. Dc in next 4 ch, dc3tog, dc in next 4 ch, 2 dc in last ch. Turn. (73 sts)*
Check: 2 + (5 × 12) + 11 = 73. The valleys fall on sts 7, 19, 31, 43, 55, and 67. The peaks are centered on sts 13, 25, 37, 49, and 61.
Row 2 (WS, mesh): Ch 3 (counts as dc), dc in first st. [Ch 1, sk next st, dc in next st] twice, dc3tog, [dc in next st, ch 1, sk next st] twice, 3 dc in next st; repeat from * 4 more times. [Ch 1, sk next st, dc in next st] twice, dc3tog, [dc in next st, ch 1, sk next st] twice, 2 dc in top of turning ch. Turn. (73 sts, ch-1s included)*
Row 3 (solid): Ch 3 (counts as dc), dc in first st. Dc in next 4 sts, dc3tog, dc in next 4 sts, 3 dc in next st; repeat from * 4 more times. Dc in next 4 sts, dc3tog, dc in next 4 sts, 2 dc in top of turning ch. Turn. (73 sts)*
Rows 4–27: Repeat Rows 2–3 twelve more times. (73 sts in every row)
Row 27 is a solid row. The panel now measures 15 in (38.1 cm) × 13.5 in (34.3 cm). Fasten off.
Make All Pieces
| Piece | Qty | Colors |
|---|---|---|
| Body | 1 | Navy, with Taupe rims |
| Dispenser cap | 1 | Taupe Rounds 1–2 and 8, Navy Rounds 3–7 |
| Solid cap | 1 | Navy Rounds 1–9, Taupe Round 10 |
| Strap | 2 | Taupe |
Layout (front view, hanging):
      [ring]                     [ring]
       strap                      strap
  ===== back rim (taupe) =====================
  (cap)  ~ ~ open slot along the top ~ ~  (cap)
  ===== front rim (taupe) ====================
  solid    navy chevron body, rolled   dispenser
   cap                                    cap
Dispenser Cap (Make 1)
With Taupe, ch 18 and join with sl st to form a ring. This ring becomes the dispensing hole, 1.4 in (3.6 cm) across.
Round 1: Ch 1, 18 sc in ring, join with sl st. (18 sts)
Round 2: Ch 1, sc in next 2, inc; repeat from * around, join. (24 sts) Change to Navy.
Round 3: Ch 1, sc in next 3, inc; repeat around, join. (30 sts)
Round 4: Ch 1, sc in next 4, inc; repeat around, join. (36 sts)
Round 5: Ch 1, sc in next 5, inc; repeat around, join. (42 sts)
Round 6: Ch 1, sc in next 6, inc; repeat around, join. (48 sts)
Round 7: Ch 1, sc in next 7, inc; repeat around, join. (54 sts) Change to Taupe.
Round 8: Ch 1, sc in next 8, inc; repeat around, join. (60 sts)* Fasten off.
Solid Cap (Make 1)
The left end doesn’t show in the photo. This pattern closes it with a solid cap.
With Navy, make a magic ring.
Round 1: 6 sc in ring, join. (6 sts)
Round 2: Ch 1, inc in each st, join. (12 sts)
Rounds 3–9: Ch 1, sc in next st(s), inc; repeat around, join. Work 1 sc before each inc in Round 3, and 1 more sc before each inc in every round after that. (18, 24, 30, 36, 42, 48, 54 sts) Change to Taupe.
Round 10: Ch 1, sc in next 8, inc; repeat around, join. (60 sts) Fasten off.
Straps (Make 2)
With Taupe, ch 5.
Row 1: Sc in 2nd ch from hook and in each ch across. Turn. (4 sts)
Rows 2–24: Ch 1, sc across. Turn. (4 sts)
Each strap is 1 in (2.5 cm) wide × 6 in (15.2 cm) long. Leave a long tail for sewing.
Joining
Work the Border section first. Then roll the body into a tube with the RS outside, so the two taupe rims meet along the top. Leave the rims unjoined: the gap between them is the bag slot.
End seam math: Each end of the body is a column of row-ends. Count 2 sts per navy dc row-end (27 × 2 = 54) and 1 st per taupe rim row-end (6 × 1 = 6), for 54 + 6 = 60 sts. That exactly matches the 60 sts in the last round of each cap, so the seam is worked 1 to 1.
Method: Hold a cap against one end of the tube, WS together. With Taupe, sc through a rim row-end and a cap st together. Continue all the way around, putting each sc through the next cap st: 2 sc in each navy row-end and 1 sc in each rim row-end. Join. (60 sc) This makes the raised taupe ridge around each cap. The dispenser cap goes on the right end and the solid cap on the left.
Tension: Match the seam stitches to your cap stitches. If you work too tightly, the end puckers; if you work too loosely, the cap ripples. Place markers every 15 sts on both pieces so the ease stays even.
Checkpoint: The tube should be 15 in (38.1 cm) long between seams, with a round 4.75 in (12.1 cm) profile at both ends.
Straps: Slide each strap through a ring and fold it in half. Sew one end to the outside and one end to the inside of the back rim, 2 in (5.1 cm) in from each cap seam. The loop stands about 2 in (5.1 cm) above the rim.
Border
The taupe rims are the border. Work them on the long edges of the flat body before you join anything.
Border gauge: 73 sts across 15 in (38.1 cm); 3 rows = 0.75 in (1.9 cm).
Top rim, Row 1 (leveling): With RS facing, join Taupe in the first st of Row 27. Ch 1, sc in first 2 sts, hdc in next 2, dc in next 2. Tr in next st (valley), dc in next 2, hdc in next 2, sc in next 3 (peak), hdc in next 2, dc in next 2; repeat from * 4 more times. Tr in next st, dc in next 2, hdc in next 2, sc in last 2. Turn. (73 sts: 6 + 60 + 7)*
Top rim, Rows 2–3: Ch 1, sc across. Turn. (73 sts) Fasten off.
Bottom rim, Row 1 (leveling): With RS facing, join Taupe in the first of the 73 free loops on the foundation chain. Ch 4 (counts as tr), dc in next 2, hdc in next 2. Sc in next 3 (valley), hdc in next 2, dc in next 2, tr in next (peak), dc in next 2, hdc in next 2; repeat from * 4 more times. Sc in next 3, hdc in next 2, dc in next 2, tr in last. Turn. (73 sts: 5 + 60 + 8)*
Bottom rim, Rows 2–3: Ch 1, sc across. Turn. (73 sts) Fasten off.
Why the math works: Each leveling row works exactly 1 st into each of the 73 sts, so the count never changes; only the stitch heights do. Trebles fill the low dips and sc sit on the high points. On the top edge, the dips are the valleys. On the foundation edge, the dips are the peaks. Both rims come out straight, so the slot edges meet cleanly. There are no corner stitches, because the rims are open edges, not a closed border.
Final Blocking
- Weave in all ends through same-color solid rows.
- Spray the holder until it’s evenly damp.
- Stuff it firmly with a rolled towel to round out the tube.
- Check that it’s 15 in (38.1 cm) long between the cap seams.
- Shape each cap into a flat circle 4.75 in (12.1 cm) across.
- Smooth the chevron columns so the V shapes run straight.
- Let it dry completely, then remove the towel.
Final Quality-Control Checklist
- Every body row has 73 sts, and the valleys stack in straight columns
- Both rims are straight, 73 sts long, and 0.75 in (1.9 cm) deep
- Each cap and each seam has 60 sts
- The dispenser hole is round and 1.4 in (3.6 cm) across
- The straps are 2 in (5.1 cm) in from each end
- The tube measures 15 in (38.1 cm) × 4.75 in (12.1 cm)
- All ends are secured and hidden
Troubleshooting
Chevrons drifting: Count back to the last valley. There should be 4 sts on each side of every dc3tog.
Mesh windows closing: Check that you’re working into each ch-1 sp; each one counts as 1 st.
Wavy rims: Make sure the trebles land in the dips and the sc land on the high points.
Cap cupping: Your rounds are too tight. Go up half a hook size for the caps.
Cap ruffling: Your rounds are too loose, or you have extra increases. Recount each round.
Bags slipping out: Hang the holder from the back rim so the slot tilts toward the wall.
Care
Hand wash in cool water, or machine wash gently inside a laundry bag. Reshape and dry flat over a rolled towel.
Final Notes
The measurement chain is simple. Each chevron repeat is 2.5 in (6.4 cm), so 73 sts make a 15 in (38.1 cm) body. Twenty-seven rows give 13.5 in (34.3 cm), and two 0.75 in (1.9 cm) rims bring the panel to 15 in (38.1 cm). Each end edge gives 54 + 6 = 60 sts, which matches the 60-st caps at 4.75 in (12.1 cm). Check your gauge at every stage and the pieces will fit together without any fudging.
Happy crocheting!