

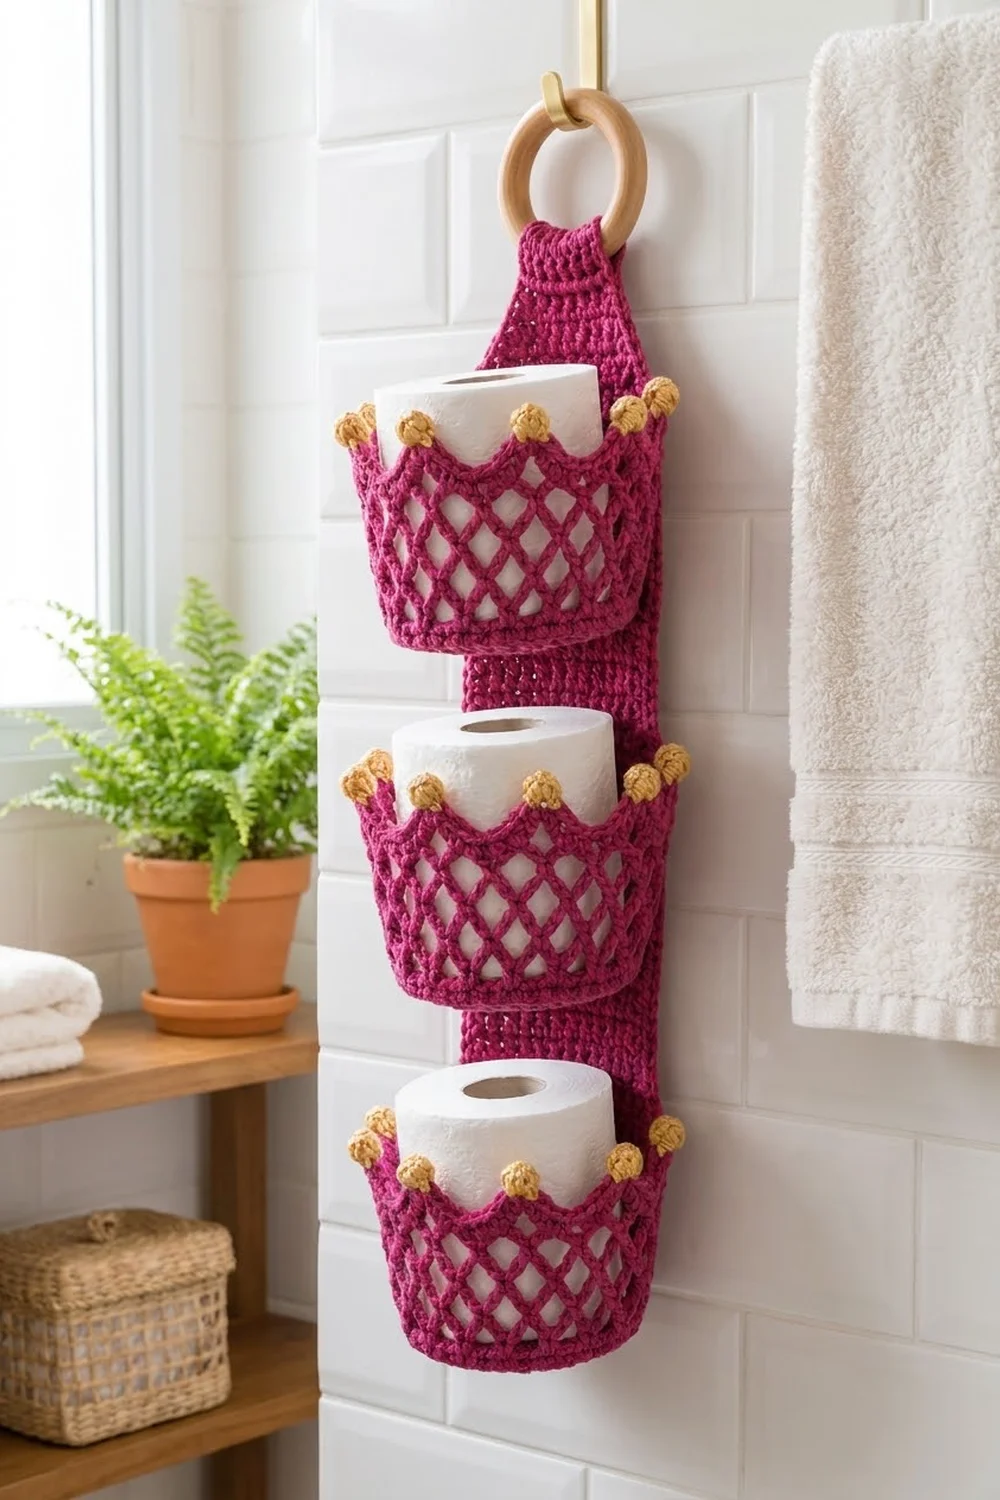
This hanging holder stores three spare rolls in a tidy vertical stack. Each roll sits in its own little basket shaped like a crown, with an open diamond mesh, a scalloped rim with 10 points, and a round gold bead on every point.
The main color is a rich magenta. Gold is used only for the beads and a thin outline along the scallops, so the crowns stand out without looking busy. The style is playful but neat, and it suits a bathroom wall, the back of a door, or a towel hook.
The pattern uses US crochet terms. The finished holder is 4 1/2 in (11.4 cm) wide at the panel and about 19 3/4 in (50.2 cm) long from the bottom edge to the ring fold. Each basket has a base about 4 3/4 in (12.1 cm) across and stands about 4 1/4 in (10.8 cm) tall to the crown points.
Construction is simple. You work one flat back panel in rows of single crochet, then three baskets in the round from the base up. The baskets are sewn onto the panel, a single round of border finishes the panel edges, and the top tab folds over a wooden ring.
Finished Size and Construction
- Finished size: 4 1/2 in (11.4 cm) wide x 21 1/2 in (54.6 cm) long before folding the tab; about 19 3/4 in (50.2 cm) long once hung
- Skill level: Easy intermediate
- Terminology: US
- Yarn weight: Worsted (#4), cotton
- Hook: 5.0 mm (H-8)
- Number of pieces: 4 crocheted pieces (1 back panel + 3 baskets) plus 1 wooden ring
- Layout: 1 column of 3 baskets stacked on the panel
- Piece size: panel 4 in (10.2 cm) x 21 in (53.3 cm); each basket base 4 3/4 in (12.1 cm) across, 4 1/4 in (10.8 cm) tall to the points
- Size before border: 4 in (10.2 cm) x 21 in (53.3 cm)
- Border depth: 1/4 in (0.6 cm), 1 round of single crochet
Materials
Choose a smooth worsted-weight cotton or cotton blend. Cotton holds the basket shape well, handles bathroom humidity, and shows the mesh clearly. Acrylic works too, but the baskets will be softer.
- Main color (MC), magenta: 250 g, about 425 m (100 g = 170 m)
- Contrast color (CC), gold: 25 g, about 43 m
Quantities include a margin of roughly 25% so you can swatch and still finish comfortably.
Tools:
- 5.0 mm (H-8) crochet hook
- 1 wooden ring, 2 3/4 in (7.0 cm) across
- Tapestry needle
- 4 locking stitch markers
- Straight pins
- Measuring tape
- Scissors
Abbreviations (US Terms)
- ch – chain
- sl st – slip stitch
- sc – single crochet
- hdc – half double crochet
- dc – double crochet
- tr – treble crochet
- inc – 2 sc in the same stitch
- sc2tog – single crochet 2 together
- BLO – back loop only
- sp – space
- st(s) – stitch(es)
- rep – repeat
- MC / CC – main color / contrast color
Special stitches
- 5-dc bobble: (Yarn over, insert hook in the indicated stitch, yarn over and pull up a loop, yarn over and pull through 2 loops) 5 times in the same stitch; yarn over and pull through all 6 loops on hook.
- Crown Bead (CB): Ch 3, work a 5-dc bobble in the 3rd ch from hook, then sl st into the same ch-2 sp you started from. This makes a small round ball about 1/2 in (1.3 cm) across sitting on top of the crown point.
Gauge and Checkpoints
Gauge: 16 sc and 16 rows = 4 in (10.2 cm) in firmly worked sc with a 5.0 mm hook.
Make one basket first and measure it before starting the panel. The basket uses every stitch type in the pattern, so it is the best real-world swatch.
Checkpoints:
- Basket base after Round 10: 4 3/4 in (12.1 cm) across
- Basket after Round 14 (solid wall): 1 in (2.5 cm) of wall height
- Basket after Round 20 (band): 3 1/2 in (8.9 cm) tall from the base
- Basket after Round 21 (crown): 4 1/4 in (10.8 cm) tall to the points
- Panel after Row 64: 4 in (10.2 cm) wide x 16 in (40.6 cm) long
- Panel after Row 84: 21 in (53.3 cm) long
If your base is too big, a roll will slide around and the crown will flare open; go down to a 4.5 mm hook. If it is too small (under 4 1/2 in / 11.4 cm), a roll will not fit; go up to a 5.5 mm hook. Do not change the stitch counts, because the mesh and crown repeats depend on 60 stitches.
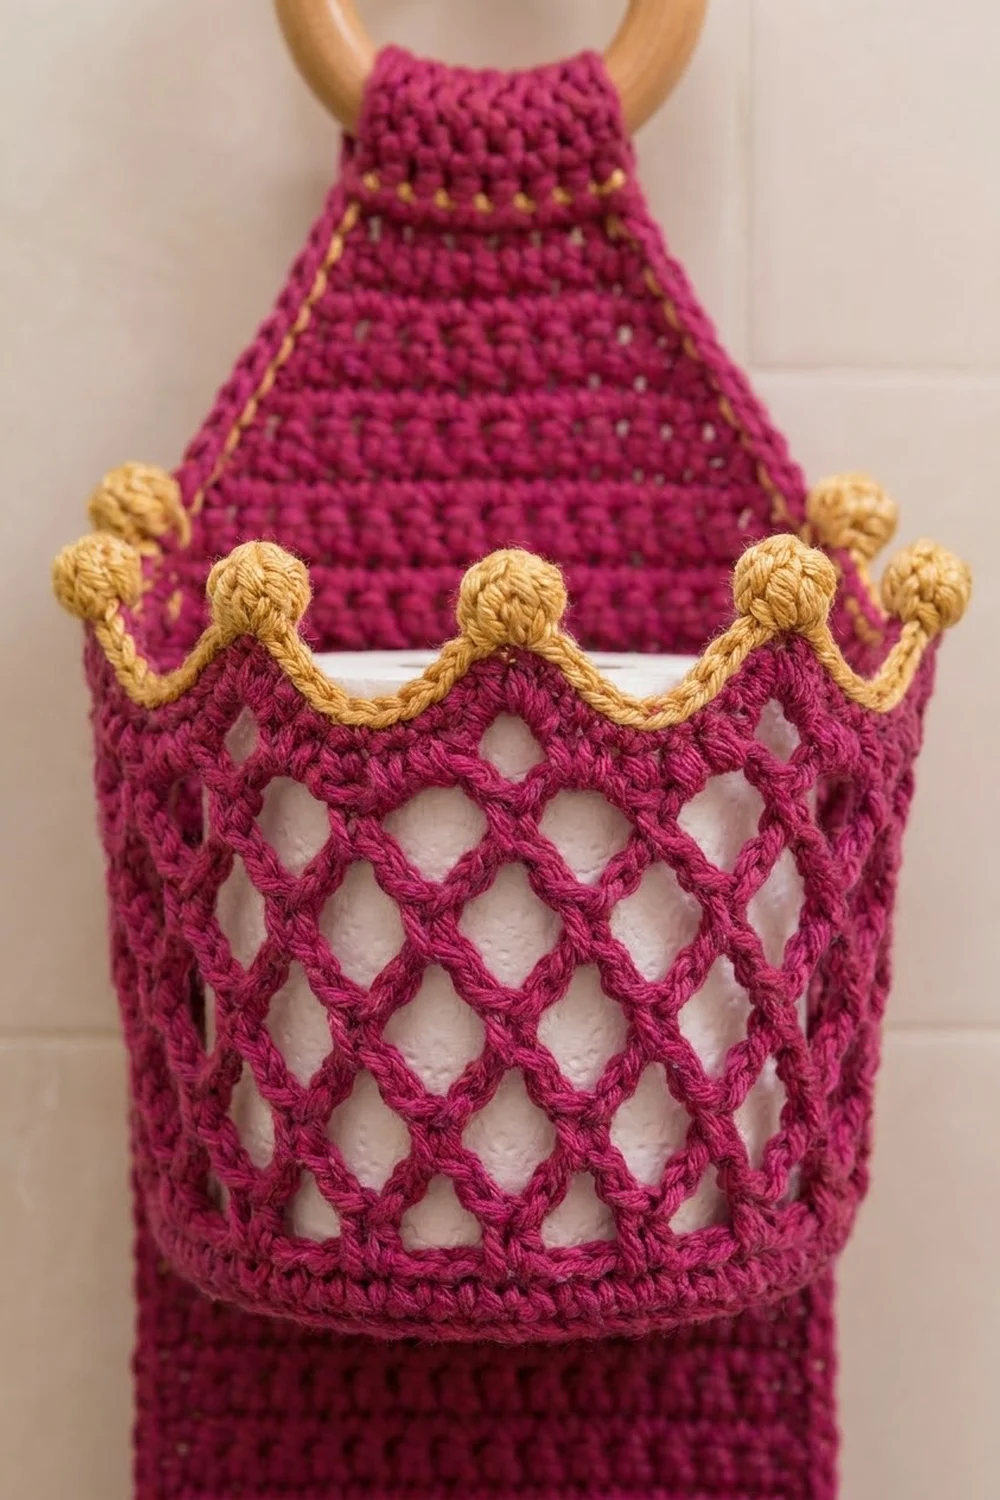
Basket (Make 3)
Work in continuous rounds for the base, then join each round from Round 11 on. Use MC unless stated.
Base
Round 1: Make a magic ring, 6 sc in ring. (6 sts)
Round 2: Inc in each st around. (12 sts)
Round 3: (Sc 1, inc) 6 times. (18 sts)
Round 4: (Sc 2, inc) 6 times. (24 sts)
Round 5: (Sc 3, inc) 6 times. (30 sts)
Round 6: (Sc 4, inc) 6 times. (36 sts)
Round 7: (Sc 5, inc) 6 times. (42 sts)
Round 8: (Sc 6, inc) 6 times. (48 sts)
Round 9: (Sc 7, inc) 6 times. (54 sts)
Round 10: (Sc 8, inc) 6 times, sl st to first sc. (60 sts)
Checkpoint: the base should lie flat and measure 4 3/4 in (12.1 cm) across.
Solid Wall
Round 11: Ch 1, working in BLO, sc in each st around, sl st to first sc. (60 sts) This turns the wall up and leaves a ridge of front loops around the base edge.
Rounds 12–14: Ch 1, sc in each st around, sl st to first sc. (60 sts)
Checkpoint: the wall is 1 in (2.5 cm) tall.
Diamond Mesh
Round 15 (mesh set-up): Ch 1, sc in first st, *ch 5, skip 2 sts, sc in next st; rep from * 18 more times, ch 2, skip last 2 sts, dc in first sc. (20 sc, 20 ch-5 loops, counting the ch-2 + dc as the last loop)
The ch-2 + dc closes the round and leaves your hook in the middle of the last loop, ready for the next round.
Rounds 16–19: Ch 1, sc around the post of the joining dc, *ch 5, sc in next ch-5 sp; rep from * 18 more times, ch 2, dc in first sc. (20 loops per round)
Each sc lands in the center of a loop below, so the loops offset and form the diamond net. Gently pull the mesh upward after each round to open it.
Top Band
Round 20: Ch 1, 2 sc around the post of the joining dc, 3 sc in each of the next 19 ch-5 sps, 1 sc in the first sp (the ch-2 + dc sp), sl st to first sc. (20 sps x 3 sc = 60 sts)
Checkpoint: the basket measures 3 1/2 in (8.9 cm) from base to band, and the count is back to 60.
Crown Rim
Round 21: Ch 1, *sl st in next st, hdc in next st, dc in next st, (tr, ch 2, tr) in next st, dc in next st, hdc in next st; rep from * 9 more times, join with sl st to first sl st. Fasten off MC.
Count: each 6-stitch repeat becomes 7 sts plus 1 ch-2 sp, so you have 10 points, 70 sts and 10 ch-2 sps. The sl sts form the low valleys, and the tr pairs form the peaks.
Checkpoint: 4 1/4 in (10.8 cm) tall at the points.
Gold Outline and Beads
Round 22: Join CC with a sl st in any valley sl st. *Sl st in each of next 3 sts (hdc, dc, tr), CB in the ch-2 sp, sl st in each of next 3 sts (tr, dc, hdc), sl st in the valley sl st; rep from * around, ending the last repeat by joining to the first sl st instead of working the final valley sl st. Fasten off.
Count: 70 sl sts and 10 Crown Beads. Keep the sl sts loose enough that the rim does not pull in; the crown should still match the 60-st band below.
Weave in all ends on the inside of the basket.
Back Panel
Use MC. Work in rows.
Main Section
Foundation: Ch 17.
Row 1: Sc in 2nd ch from hook and in each ch across. (16 sts)
Rows 2–64: Ch 1, turn, sc in each st across. (16 sts)
Checkpoint: 4 in (10.2 cm) wide x 16 in (40.6 cm) long.
Taper
Row 65: Ch 1, turn, sc2tog, sc in next 12 sts, sc2tog. (14 sts)
Row 66: Ch 1, turn, sc in each st across. (14 sts)
Row 67: Ch 1, turn, sc2tog, sc in next 10 sts, sc2tog. (12 sts)
Row 68: Ch 1, turn, sc in each st across. (12 sts)
Row 69: Ch 1, turn, sc2tog, sc in next 8 sts, sc2tog. (10 sts)
Row 70: Ch 1, turn, sc in each st across. (10 sts)
Row 71: Ch 1, turn, sc2tog, sc in next 6 sts, sc2tog. (8 sts)
Row 72: Ch 1, turn, sc in each st across. (8 sts)
The taper adds 2 in (5.1 cm).
Hanging Tab
Rows 73–84: Ch 1, turn, sc in each st across. (8 sts) Do not fasten off; you will use this loop for the border later, so place it on a stitch marker.
Checkpoint: the panel is 21 in (53.3 cm) long, with a tab 3 in (7.6 cm) long.
Make All Pieces
- MC: 1 back panel (Rows 1–84) and 3 baskets (Rounds 1–21)
- CC: Round 22 on all 3 baskets (30 Crown Beads in total)
Layout (front view, top to bottom):
        [ wooden ring ]
          [ tab  R73–84 ]
         [ taper R65–72 ]
   +----------------------+
   | Basket 3: R45 to R59 |
   +----------------------+
   | Basket 2: R24 to R38 |
   +----------------------+
   | Basket 1: R3 to R17  |
   +----------------------+
        panel bottom (R1)
Each basket covers 15 rows of the panel, and the baskets are spaced 21 rows apart, which is 5 1/4 in (13.3 cm) base to base.
Joining
Attach the baskets with whipstitch in MC, working from the bottom basket up. Lay the panel flat, right side up, and count rows from the bottom.
Base seam: Find the center back of a basket and mark 12 of the front loops left from Round 11 (6 on each side of center). Pin those 12 loops to panel sts 3–14 of the row given in the layout (Row 3, Row 24 or Row 45). Sew 1 basket loop to 1 panel st, so 12 sts meet 12 sts. Panel sts 1–2 and 15–16 stay free on each side.
Band seam: Mark the 12 sts of Round 20 directly above the base seam. Pin them to panel sts 3–14 of the row 14 rows higher (Row 17, Row 38 or Row 59). Sew 1 to 1 again.
Tension: Pull each stitch snug but not tight. The panel should stay flat, with no puckering between the seams. Weave the tail through the solid wall rounds at the back to tie the two seams together.
Checkpoint: After all three baskets are sewn on, the panel is still 4 in (10.2 cm) wide and 21 in (53.3 cm) long, and the crown beads of each lower basket clear the base of the basket above.
Border
Border gauge: 4 sc per inch along the stitch edges and 4 sc per inch along the row ends. This matches the square gauge of 16 sc x 16 rows per 4 in (10.2 cm).
Round 1: Pick up the live loop at the top of the tab. Ch 1, then work around the whole panel:
- Tab top: 3 sc in the first st, sc in next 6 sts, 3 sc in last st. (8 sts + 4 extra = 12 sc)
- Side 1: 1 sc in each row end, from Row 84 down to Row 1. (84 sc)
- Bottom: working into the foundation ch, 3 sc in the first st, sc in next 14 sts, 3 sc in last st. (16 sts + 4 extra = 20 sc)
- Side 2: 1 sc in each row end, from Row 1 up to Row 84. (84 sc)
Sl st to first sc and fasten off.
Total: (8 + 16 sts + 84 + 84 row ends, worked 1 per st or row end = 192) + 8 corner extras = 200 sc.
Why the math works: The panel has exactly 84 rows, so each side gets exactly 84 sc. The tab and bottom edges get 1 sc per existing st, and the 2 extra sc at each of the 4 corners let the corners turn flat. The corner sts are already counted in the 8 and 16, so they are not added twice. Because the border gauge matches the fabric gauge, the edges neither ruffle nor pull in. The border adds 1 st to each side, bringing the width to 18 sts, or 4 1/2 in (11.4 cm), and the length to 21 1/2 in (54.6 cm).
Ring: Fold the tab over the wooden ring toward the back so that the top edge meets Row 72. Whipstitch across the 8 tab sts plus the border, then weave in all ends.
Final Blocking
- Lightly spray the whole holder with water until damp, not soaked.
- Lay the panel flat on a blocking mat and pin it to 4 1/2 in (11.4 cm) x 21 1/2 in (54.6 cm).
- Stuff each basket with a toilet roll, or a towel rolled to the same size, to round out the shape.
- Pinch each crown point upward and roll each gold bead between your fingers to make it round.
- Pull the mesh gently upward so the diamonds open evenly.
- Let everything dry completely, about 24 hours, before hanging.
Final Quality-Control Checklist
- Each basket base is 4 3/4 in (12.1 cm) across and lies flat
- Each mesh round has 20 loops
- Each band has 60 sts
- Each crown has 10 points, each with 1 gold bead
- Each basket is sewn on with 12 sts meeting 12 sts at both the base seam and the band seam
- The border has 200 sc with even, flat corners
- The panel measures 4 1/2 in (11.4 cm) x 21 1/2 in (54.6 cm) before folding
- The ring seam is secure and the tab hangs straight
- All ends are woven in on the back or inside
Troubleshooting
- The base cups or ruffles: check that each round adds exactly 6 sts. If it cups, use a larger hook; if it ruffles, use a smaller one.
- The mesh slants or spirals: make sure each sc goes into the center of the loop, not into the sc below.
- The crown leans inward: the gold sl sts are too tight. Work Round 22 with a hook one size larger.
- The beads look flat: keep all 5 dc of the bobble the same height, and push the bead to the outside before you sl st.
- The basket sags forward: add a third seam of 6 sts at the back of Round 14.
- The panel edges wave: your row gauge is looser than your stitch gauge. Redo the border with a smaller hook.
Care
Hand wash in cool water, press out the water in a towel, and reshape the baskets while damp. Dry flat and do not tumble dry.
Final Notes
Everything in this pattern follows one measurement chain. The 60-st base sets the 4 3/4 in (12.1 cm) basket, which divides into 20 mesh loops, 60 band sts and 10 crown points. The 16-st panel gives 4 in (10.2 cm), and 84 rows give 21 in (53.3 cm). Seams of 12 sts to 12 sts hold the baskets 21 rows apart, and a 200-sc border brings the panel to 4 1/2 in (11.4 cm) x 21 1/2 in (54.6 cm). Check each link as you go, and your crown holder will hang straight and hold its shape.
Happy crocheting!