

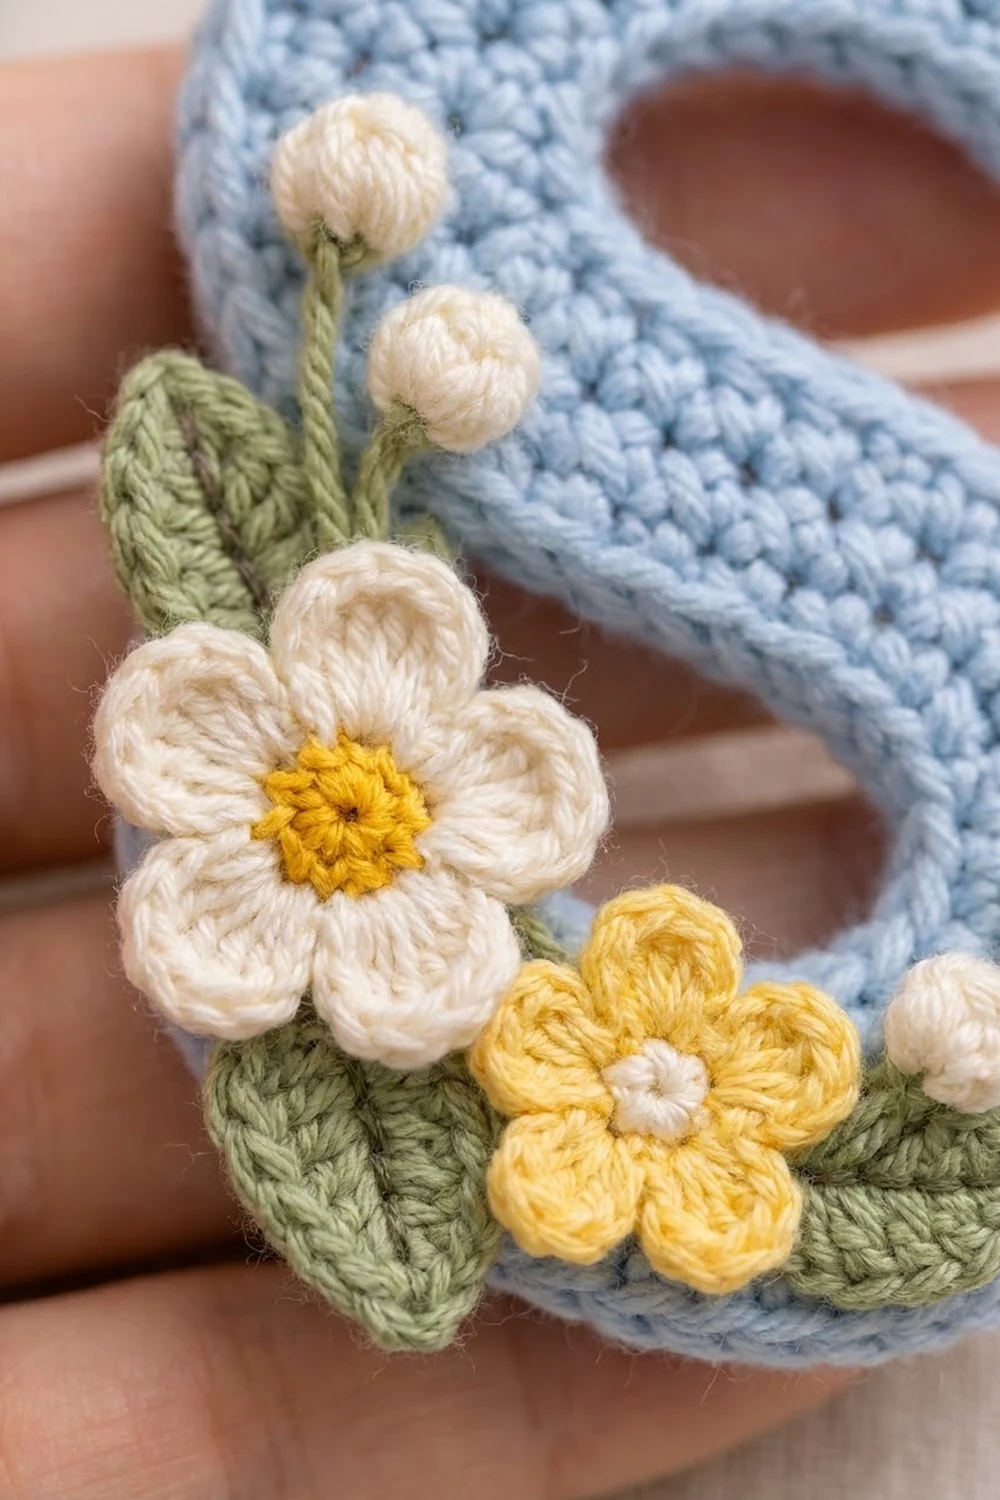
This letter S keychain is a small, flat initial worked in soft light blue cotton and decorated with a tiny spring bouquet. A cream daisy with a sunny yellow center, a smaller yellow blossom, three round cream buds, and three sage green leaves cluster on the lower curve of the letter. The whole charm hangs from a gold split ring on a short gold chain.
The style is clean and sweet. Dense single crochet gives a firm, smooth surface, a crisp outline runs around the edge, and the appliqués sit slightly raised so the flowers catch the light. It makes a quick personalized gift and looks lovely clipped to a handbag handle.
This pattern uses US crochet terms. The finished letter measures about 4 in (10.2 cm) tall and 3 in (7.6 cm) wide, with a letter stroke about 1 in (2.5 cm) wide.
Construction is simple. You crochet a foundation chain that follows the center line of the S, then work rounds of single crochet around both sides of that chain. Increases on the outer curves and decreases on the inner curves bend the strip into an S. A single crochet border and a slip stitch outline finish the edge. The flowers, buds, and leaves are made separately and sewn on.
Finished Size and Construction
- Finished size: 4 in (10.2 cm) tall x 3 in (7.6 cm) wide
- Skill level: Easy-intermediate
- Terminology: US crochet terms
- Yarn weight: DK (#3) cotton
- Hook: 3.0 mm (C/2-D/3)
- Number of pieces: 1 main letter piece, plus 8 small sewn-on appliqués (2 flowers, 3 buds, 3 leaves)
- Layout: Single piece, no joining grid
- Stroke width: 1 in (2.5 cm) after the border
- Size before border: 3 3/4 in (9.5 cm) tall x 2 3/4 in (7.0 cm) wide
- Border depth: about 1/8 in (0.3 cm) on every edge
Materials
Choose a smooth mercerized or combed DK cotton. Cotton holds the letter shape well after blocking and shows clear stitch definition. Avoid fuzzy or very stretchy yarns, which blur the outline.
Yarn:
- Light blue (main letter): 6 g, about 13 m
- Cream (large flower petals, buds, small flower center): 2 g, about 4 m
- Yellow (large flower center, small flower): 1 g, about 2 m
- Sage green (leaves, bud stems): 2 g, about 4 m
These quantities include a margin for your test piece and for weaving in ends.
Tools:
- 3.0 mm (C/2-D/3) crochet hook
- Tapestry needle
- Sharp sewing needle and matching thread (optional, for invisible appliqué)
- 4 stitch markers
- Blocking mat and rust-proof pins
- Spray bottle with water
- 1 in (2.5 cm) gold split key ring
- 3/4 in (1.9 cm) length of gold chain
- 2 gold jump rings, 1/4 in (0.6 cm)
- 2 flat-nose pliers
- Scissors
Abbreviations (US Terms)
- ch: chain
- sl st: slip stitch
- sc: single crochet
- hdc: half double crochet
- dc: double crochet
- sc2tog: single crochet 2 together
- st(s): stitch(es)
- rnd(s): round(s)
- rep: repeat
Special stitch: Popcorn bud (pc): Work 5 dc in the indicated st. Take the hook out of the loop and insert it from front to back in the first dc of the group. Pick up the dropped loop and pull it through. Ch 1 to close.
sc2tog: Insert hook in the next st, yarn over, and pull up a loop. Insert hook in the following st, yarn over, and pull up a loop. Yarn over and pull through all 3 loops on the hook.
Gauge and Checkpoints
Gauge: 22 sc and 32 rows = 4 in (10.2 cm) in sc worked flat with a 3.0 mm hook.
Before you use your good yarn, make one full test letter. It takes very little yarn and tells you more than a swatch, because the curves depend on your tension around the foundation chain.
Checkpoints:
- Foundation chain: 39 ch measures about 7 in (17.8 cm) unstretched.
- After Rnd 1: a straight strip about 7 1/4 in (18.4 cm) long and 1/2 in (1.3 cm) wide.
- After Rnd 2: the strip is about 3/4 in (1.9 cm) wide and curls into an S on its own. Pinned, it measures 3 3/4 in (9.5 cm) x 2 3/4 in (7.0 cm).
- After the border: 4 in (10.2 cm) x 3 in (7.6 cm), with a 1 in (2.5 cm) stroke.
If your piece is too big: go down to a 2.75 mm hook, or work your chain more tightly. A chain longer than 7 1/2 in (19.1 cm) will make the S tall and loose.
If your piece is too small: go up to a 3.25 mm hook. Do not add chains, because that changes the stitch math in Rnd 2.
Letter S
Each sc round adds about 1/8 in (0.3 cm) to each long edge of the strip. The strip has two long sides:
- Side A becomes the outside of the top curve and the inside of the bottom curve.
- Side B becomes the inside of the top curve and the outside of the bottom curve.
With light blue, ch 39.
Rnd 1: Sc in 2nd ch from hook, sc in next 36 ch, 3 sc in last ch. Rotate the work. Working along the opposite side of the foundation chain, sc in next 36 ch, 2 sc in last ch (the same ch as the first sc). Sl st to first sc. (78 sts)
Stitch breakdown for Rnd 1:
- Start cap: 3 sts (the first sc plus the final 2 sc)
- Side A: 36 sts
- End cap: 3 sts
- Side B: 36 sts
Place a marker in the first sc of Side A and another in the first sc of Side B, so you can count segments in Rnd 2.
Rnd 2 (shaping round): Ch 1, then work as follows:
- 2 sc in first st (2 sts, start cap part 1)
- Side A top, outer curve: (sc in next 2 sts, 2 sc in next st) 6 times (24 sts)
- Side A bottom, inner curve: (sc in next st, sc2tog) 6 times (12 sts)
- End cap: 2 sc in each of next 3 sts (6 sts)
- Side B bottom, outer curve: (sc in next 2 sts, 2 sc in next st) 6 times (24 sts)
- Side B top, inner curve: (sc in next st, sc2tog) 6 times (12 sts)
- 2 sc in each of last 2 sts (4 sts, start cap part 2)
Sl st to first sc. (84 sts)
Check: you use 1 + 18 + 18 + 3 + 18 + 18 + 2 = 78 sts from Rnd 1 and make 2 + 24 + 12 + 6 + 24 + 12 + 4 = 84 sts.
Lay the strip flat. The longer outer segments push it into two opposite curves. Gently shape it into an S, with Side A arching over the top. If your S reads backward, turn the piece over. The back is just as neat and becomes your right side.
Do not fasten off. Go straight on to the border.
Border
Border gauge: the same as the body, 22 sc = 4 in (10.2 cm). Each sc border round adds about 1/8 in (0.3 cm) all the way around the outline. The slip stitch outline adds almost no depth.
For reference, the Rnd 2 segments are:
- Start cap: sts 1–2 and 81–84 (6 sts total)
- Side A top: sts 3–26 (24)
- Side A bottom: sts 27–38 (12)
- End cap: sts 39–44 (6)
- Side B bottom: sts 45–68 (24)
- Side B top: sts 69–80 (12)
Rnd 3 (border, conversion round): Ch 1, then work as follows:
- Start cap part 1: sc in first st, 2 sc in next st (3 sts = 2 worked 1-per-st + 1 added)
- Side A top: (sc in next 3 sts, 2 sc in next st) 6 times (30 sts = 24 worked 1-per-st + 6 added)
- Side A bottom: (sc in next st, sc2tog) 4 times (8 sts = 12 existing sts, 4 sc2tog)
- End cap: (sc in next st, 2 sc in next st) 3 times (9 sts = 6 worked 1-per-st + 3 added)
- Side B bottom: (sc in next 3 sts, 2 sc in next st) 6 times (30 sts = 24 worked 1-per-st + 6 added)
- Side B top: (sc in next st, sc2tog) 4 times (8 sts = 12 existing sts, 4 sc2tog)
- Start cap part 2: (sc in next st, 2 sc in next st) 2 times (6 sts = 4 worked 1-per-st + 2 added)
Sl st to first sc. (94 sts)
Check: 3 + 30 + 8 + 9 + 30 + 8 + 6 = 94. The start cap totals 3 + 6 = 9 sts, the same as the end cap.
Rnd 4 (outline): Ch 1, sl st loosely in each st around. (94 sl sts = 94 worked 1-per-st + 0 added) Join to first sl st and fasten off, leaving a 6 in (15.2 cm) tail to weave in.
This slip stitch round makes the crisp, slightly raised edge that frames the letter.
Why the math works: each round moves the edge about 1/8 in (0.3 cm) outward. On an outer curve the edge gets longer, so it needs extra stitches. On an inner curve the edge gets shorter, so it needs fewer.
- In Rnd 2, the outer segments grow from 18 to 24 sts (1 added per 3) and the inner segments shrink from 18 to 12 (1 removed per 3).
- In Rnd 3, growth slows to 1 added per 4 sts, because the curves are now wider and change less from round to round.
- The caps grow like a half circle: 3, then 6, then 9 sts.
Side A and Side B always have matching totals (24 + 12 in Rnd 2, 30 + 8 in Rnd 3). This keeps the two curves balanced so the S does not twist.
Large Cream Flower (make 1)
Center: With yellow, make a magic ring and work 10 sc in the ring. Pull the ring closed and sl st to first sc. (10 sts) Fasten off yellow.
Petals: Join cream in any st. (Hdc, 2 dc, hdc) in next st, sl st in next st; rep from * 4 more times, working the last sl st in the joining st. (5 petals, 25 sts)* Fasten off, leaving an 8 in (20.3 cm) tail for sewing.
The flower measures about 1 in (2.5 cm) across.
Small Yellow Flower (make 1)
With yellow, make a magic ring. (Ch 2, 2 dc, ch 2, sl st) in the ring 5 times. Pull the ring closed. (5 petals) Fasten off, leaving an 8 in (20.3 cm) tail.
With cream, embroider one French knot in the center. The flower measures about 3/4 in (1.9 cm) across.
Cream Buds (make 3)
With cream, ch 2. Work a pc in 2nd ch from hook. Fasten off, leaving a 6 in (15.2 cm) tail, and use the tail to draw the bud into a tight ball. Each bud is about 1/4 in (0.6 cm) across.
Leaves (make 3)
With sage green, ch 7.
Rnd 1: In 2nd ch from hook work 1 sc, then hdc in next ch, dc in next 2 ch, hdc in next ch, and (sc, ch 2, sc) in last ch for the tip. Working along the opposite side of the chain, hdc in next ch, dc in next 2 ch, hdc in next ch, sc in last ch. Sl st to first sc. (12 sts plus ch-2 tip)
The foundation chain forms the visible center vein. Fasten off, leaving an 8 in (20.3 cm) tail. Each leaf is about 1 in (2.5 cm) long and 3/8 in (1.0 cm) wide.
Assembly
Block the letter first (see below), then add the appliqués.
- Lay the letter right side up. All the decoration goes on the lower left of the bottom curve, near the lower end of the letter.
- Place the leaves first, as the bottom layer. Point one up and to the left along the side of the lower curve, one down below the large flower, and one to the right below the yellow flower. Let each leaf tip extend about 1/4 in (0.6 cm) past the border.
- Place the large cream flower over the leaf bases so it overlaps the left edge of the letter by about 1/4 in (0.6 cm).
- Place the yellow flower to the right of the large flower, touching its petals.
- Place one bud above the large flower, one beside the yellow flower, and one at the right end of the cluster.
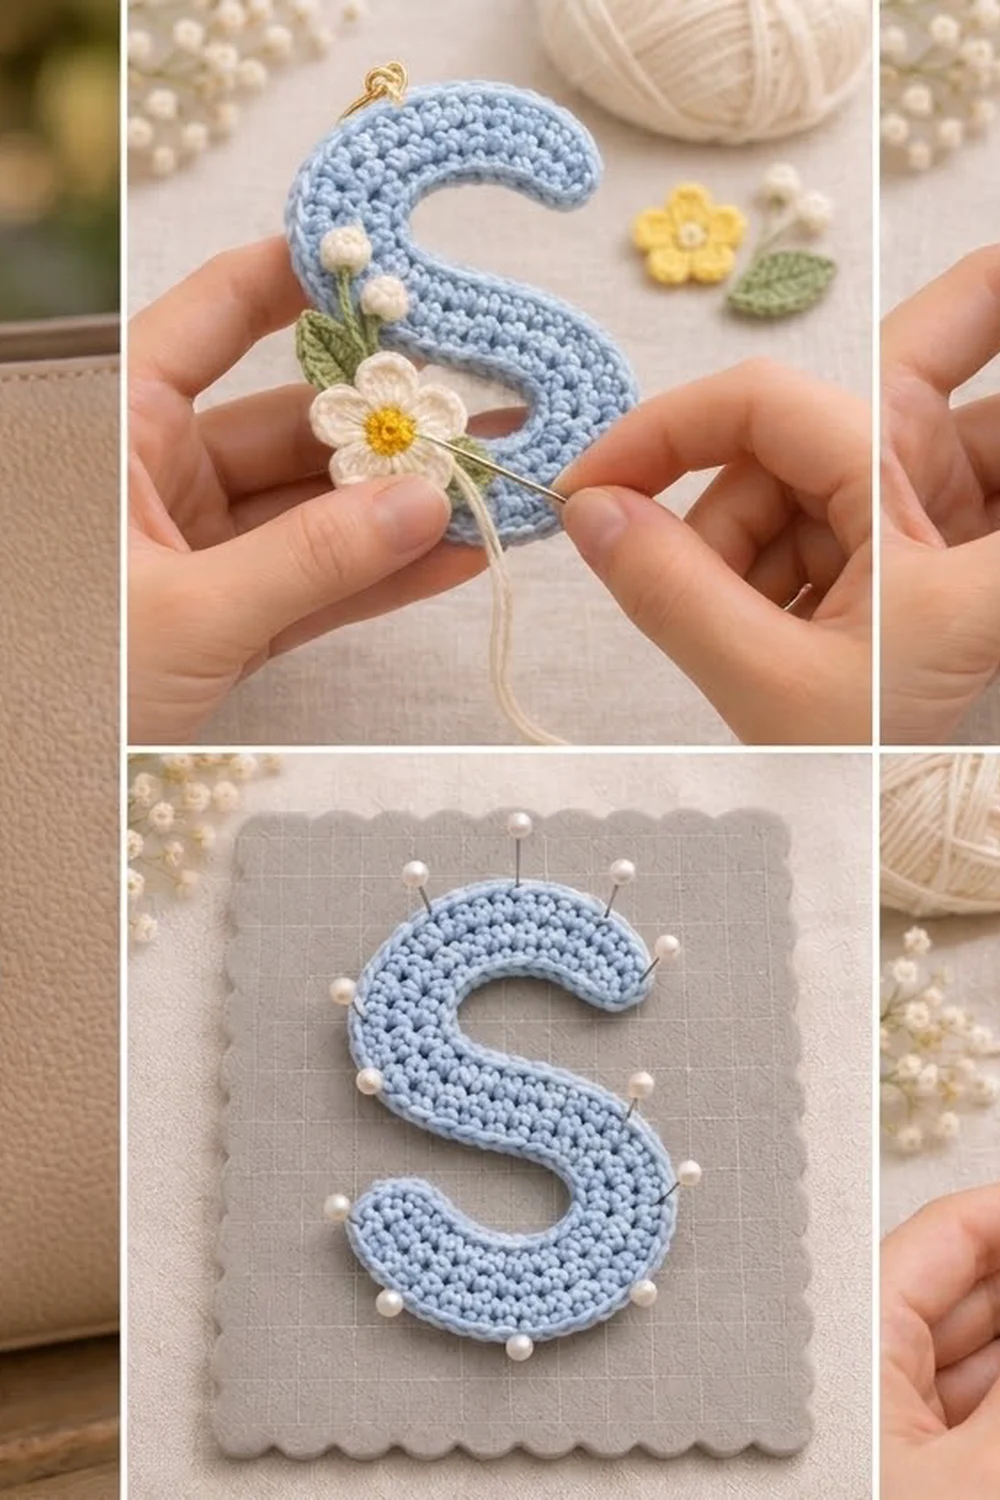
- Pin everything in place. Sew on each piece with its own tail, using small stitches through the back loops of the letter so nothing shows on the back. Sew the leaves first, then the flowers, then the buds.
- With green, embroider a straight stitch about 1/4 in (0.6 cm) long under each bud as a stem.
- Open a jump ring with the two pliers. Pass it through 2 border sts at the highest point of the top curve, add the chain, and close the ring. Attach the split ring to the top of the chain with the second jump ring.
Final Blocking
- Wet the letter before adding the appliqués, or mist it until it is damp all the way through.
- Roll it in a towel to press out the extra water.
- Lay it right side up on the blocking mat.
- Pin the outline to 4 in (10.2 cm) x 3 in (7.6 cm), using about 10 pins around the outer curves.
- Push the inner curves into smooth arcs with your fingers. Only pin them if they pucker.
- Check that the stroke is 1 in (2.5 cm) wide everywhere.
- Let the piece dry completely, at least 6 hours, before you remove the pins.
- After sewing on the appliqués, mist them lightly and pat them flat by hand.
Final Quality-Control Checklist
- The letter measures 4 in (10.2 cm) x 3 in (7.6 cm).
- The stroke is an even 1 in (2.5 cm) wide.
- Rnd 2 has 84 sts and Rnd 3 has 94 sts.
- The outline round is smooth, with no gaps at the caps.
- The S reads correctly from the front.
- Each flower has five even petals.
- Leaves, flowers, and buds are sewn on firmly and do not flip up.
- No stitches show on the back.
- Both jump rings are fully closed with no gap.
- All ends are woven in and trimmed.
Troubleshooting
The S stays straight: the Rnd 2 increases and decreases may have ended up on the same side. Recount the segments from your markers.
The curves ruffle: your tension is too loose on the outer segments. Go down half a hook size, or work the increases more tightly.
The inner curves pucker: block with more water and press each inner arc open. If the puckering is severe, rework Rnd 3 one hook size larger.
The ends look pointed: check that each cap has 3 sts in Rnd 1, 6 sts in Rnd 2, and 9 sts in Rnd 3.
The flower center gapes: pull the magic ring tighter and secure the tail before you add the petals.
The keychain tilts when it hangs: move the jump ring a stitch or two toward the balance point.
Care
Hand wash in cool water with mild soap and lay flat to dry, reshaping the letter while it is damp. Dry the gold hardware with a cloth to keep it bright.
Final Notes
Here is the measurement chain. A 39-ch foundation of about 7 in (17.8 cm) becomes a 78-st strip. Rnd 2 turns it into an 84-st S measuring 3 3/4 in (9.5 cm) x 2 3/4 in (7.0 cm). The border finishes it as a 94-st letter measuring 4 in (10.2 cm) x 3 in (7.6 cm). Check your measurements at each stage, block the letter before you sew, and build the bouquet in layers: leaves first, then flowers, then buds.
Happy crocheting!