

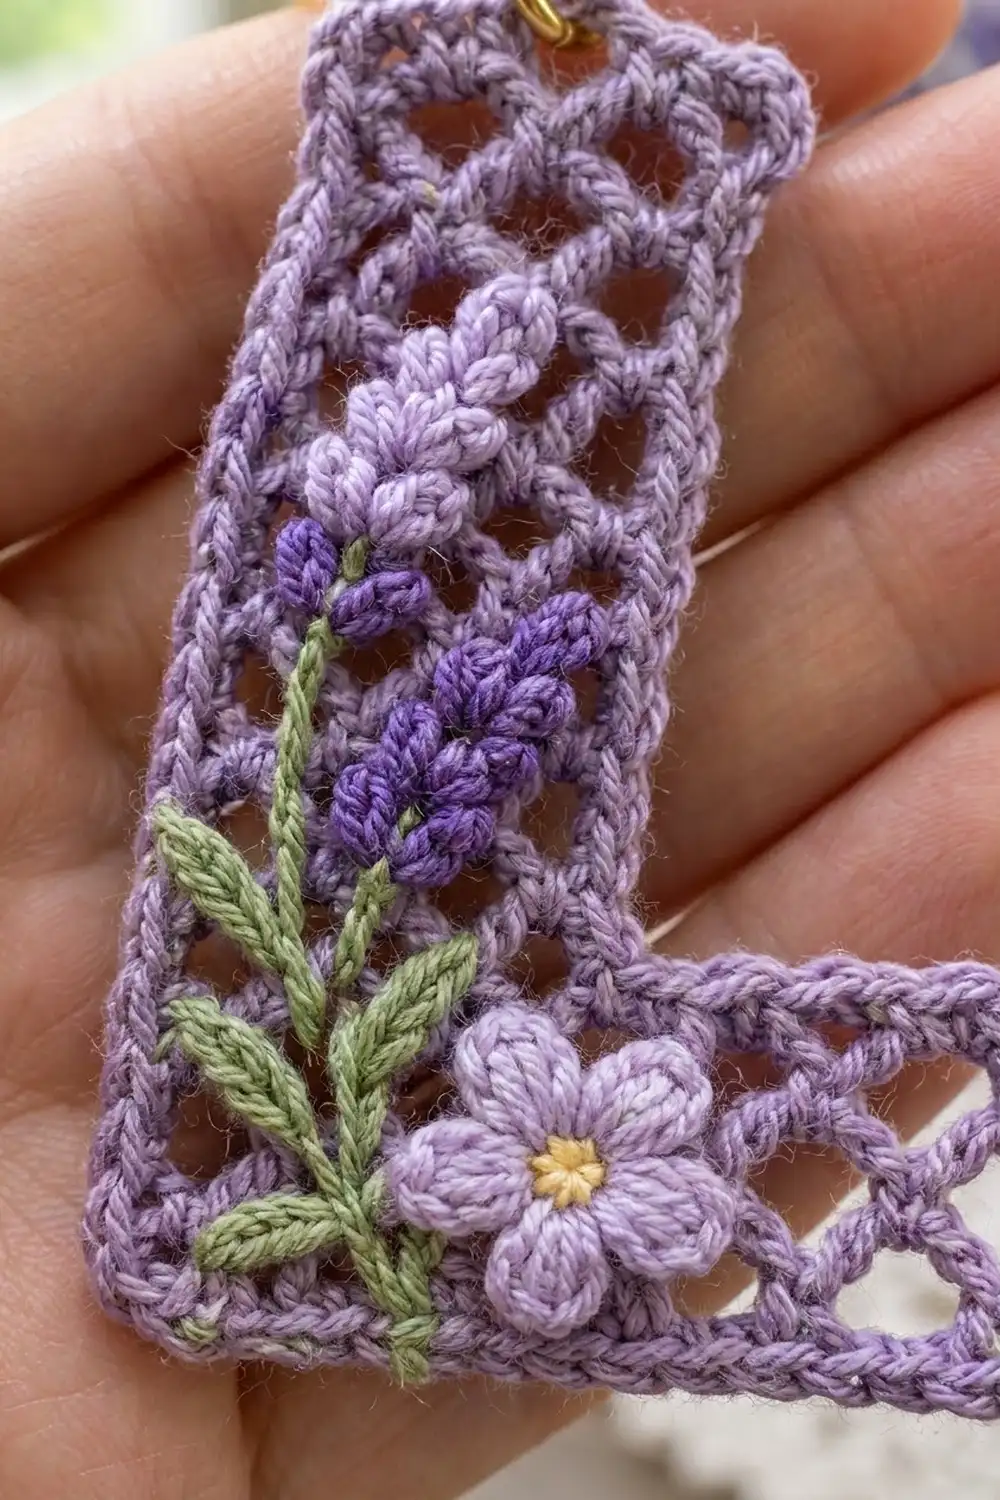
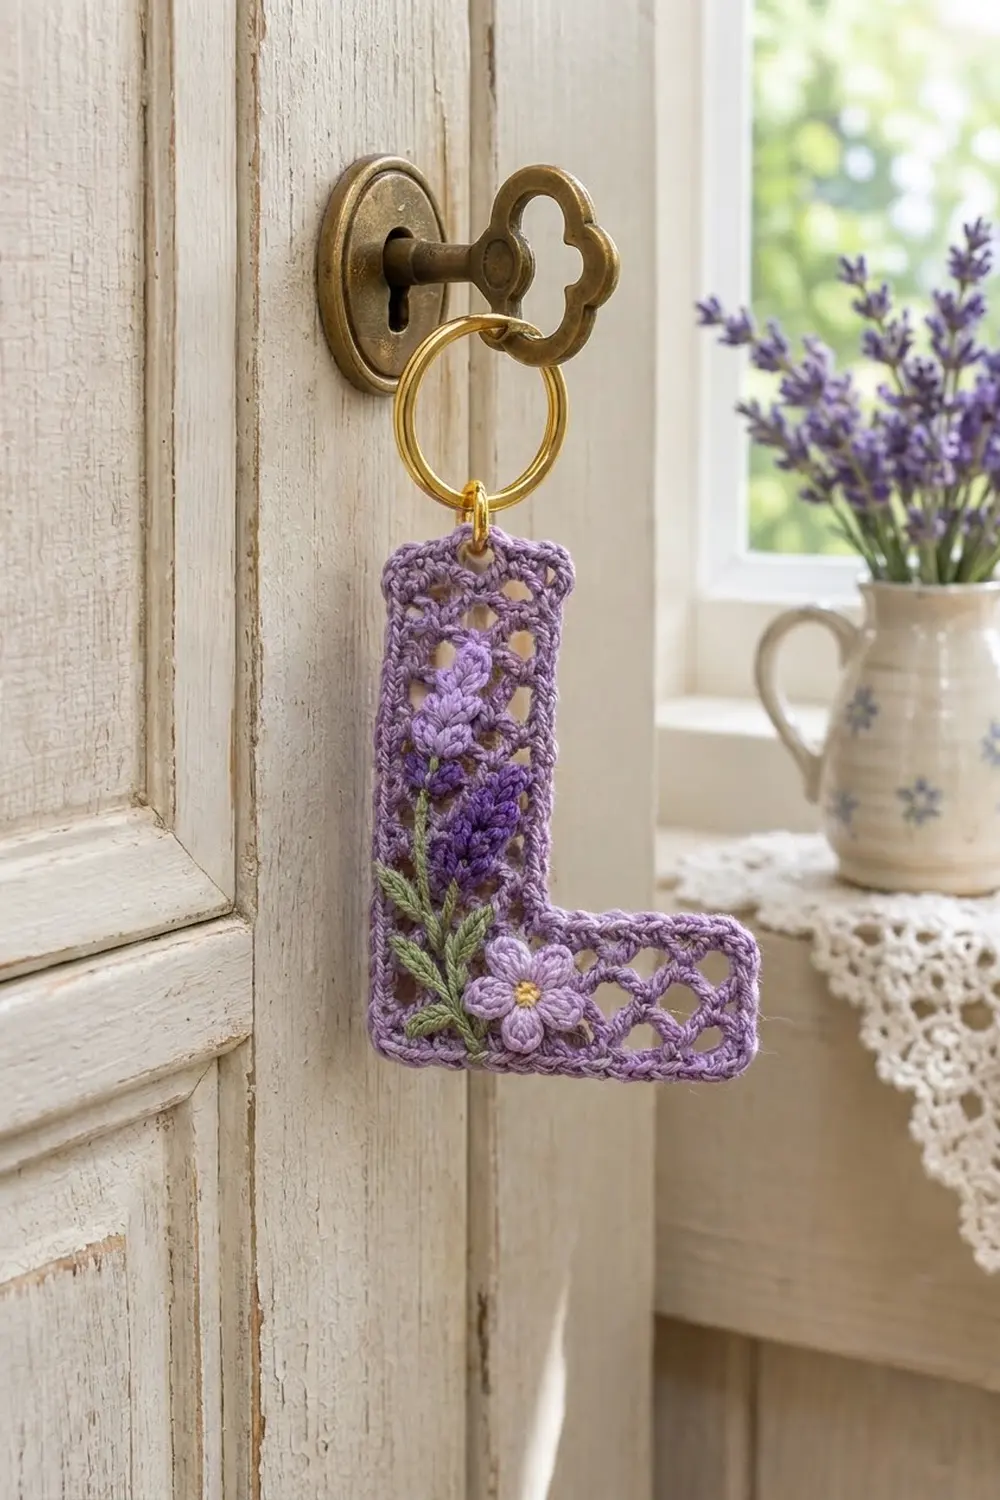
This little letter L keychain is crocheted as one flat piece of open diamond mesh in soft lavender cotton. A neat two-round single crochet border frames the letter. A small cluster of lavender sits on the lower part of the upright. The lattice keeps the keychain light, and the solid border keeps it firm enough to hang from a key ring.
The colors are calm and floral. Lavender is used for the mesh and border. Light lilac and deep violet make two embroidered lavender sprigs, and sage green makes the stems and leaves. A tiny lilac five-petal flower with a soft yellow center sits where the two strokes of the letter meet. A gold jump ring and split ring finish the piece. It makes a sweet initial gift, a bag charm or a zipper pull.
The pattern uses US crochet terms. The finished keychain is 3.5 in (8.9 cm) tall and 2.5 in (6.4 cm) wide. Both strokes of the L are 1.3 in (3.3 cm) thick.
You will crochet the foot of the L in rows, then keep going straight up over part of the stitches to make the upright. Next you add a single crochet border all the way around. Finally you embroider the sprigs and sew on the flower. There is no seaming, because the letter is one continuous piece.
Finished Size and Construction
- Finished size: 3.5 in (8.9 cm) tall x 2.5 in (6.4 cm) wide
- Skill level: Easy-intermediate
- Terminology: US crochet terms
- Yarn weight: Fine (#2, sport) cotton
- Hook: 2.75 mm (US C-2)
- Number of pieces: 1 mesh letter, plus 1 tiny flower appliqué
- Layout: A single L shape, with the upright on the left and the foot extending to the right
- Piece size: 3.5 in (8.9 cm) x 2.5 in (6.4 cm); each stroke 1.3 in (3.3 cm) thick
- Size before border: 3.0 in (7.6 cm) tall x 2.0 in (5.1 cm) wide; upright 0.8 in (2.0 cm) wide; foot 0.8 in (2.0 cm) tall
- Border depth: 0.25 in (0.6 cm) on every edge (2 rounds)
Materials
Use a smooth mercerized or combed cotton in sport weight. Cotton shows the lattice clearly, stays crisp on a key ring and survives being handled. Avoid fuzzy or brushed yarns, because they blur the diamonds. Choose a mid-tone lavender for the mesh so that both the light lilac and the deep violet buds stand out against it.
- Lavender (main): 6 g / 18 m
- Light lilac: 2 g / 6 m (upper sprig and flower)
- Deep violet: 1 g / 3 m (lower sprig)
- Sage green: 1 g / 3 m (stems and leaves)
- Soft yellow: under 1 g / 1 m (flower center)
These quantities include a comfortable margin, so leftover scraps from other projects work well.
Tools:
- 2.75 mm (US C-2) crochet hook
- Tapestry needle and a sharp embroidery needle
- 1 gold jump ring, 0.3 in (0.8 cm)
- 1 gold split key ring, 1 in (2.5 cm)
- 2 pairs of flat-nose pliers
- Rustproof pins and a blocking mat with a grid
- Scissors and 1 stitch marker
Abbreviations (US Terms)
- ch – chain
- sl st – slip stitch
- sc – single crochet
- dc – double crochet
- sc2tog – single crochet 2 stitches together
- sc3tog – single crochet 3 stitches together
- sp – space
- tch – turning chain
- st(s) – stitch(es)
- rep – repeat
Special stitch – ch-3 loop: Ch 3, skip the stated chains or loop, then sc in the next stated place. In this pattern, one ch-3 loop plus its sc makes one mesh repeat, which is 0.4 in (1.0 cm) wide.
Gauge and Checkpoints
Mesh gauge: 5 mesh repeats = 2.0 in (5.1 cm) wide; 5 rows = 1.0 in (2.5 cm) tall.
Border gauge: 10 sc = 1.0 in (2.5 cm); 2 rounds of sc = 0.25 in (0.6 cm) deep.
The keychain is small, so the foot works as your gauge test. Measure it laid flat, gently squared, and not stretched. Mesh can grow if you pull on it, so let it rest for a minute before measuring.
- Checkpoint 1 (after Row 4): The foot is 2.0 in (5.1 cm) wide x 0.8 in (2.0 cm) tall.
- Checkpoint 2 (after Row 15): The mesh is 3.0 in (7.6 cm) tall in total, and the upright is 0.8 in (2.0 cm) wide.
- Checkpoint 3 (after the border): The keychain is 3.5 in (8.9 cm) x 2.5 in (6.4 cm).
If your foot is wider than 2.0 in (5.1 cm), switch to a 2.5 mm hook. If it is narrower, switch to a 3.0 mm hook. Either way, rip it out and start again. A difference of just 0.1 in (0.3 cm) per repeat adds up to 0.5 in (1.3 cm) across 5 repeats.
If the width is right but the height is off, make your chains a little looser or tighter. Don’t change the row count.
Mesh Body
The mesh alternates two kinds of rows:
- Full-loop rows (odd rows) start and end with an sc.
- Half-loop rows (even rows) start with ch 4 and end with a dc, which keeps the side edges straight.
Each sc sits in the center of a loop from the row below, and that is what forms the diamonds.
The mesh looks the same on both sides. Follow the rows as written, then pick the front at the end so the upright is on the left.
Tip for neat mesh: Make every ch-3 the same size. When you work into a loop, put your hook under the whole loop, not into a chain, so the diamonds stay soft and even.
Foot
With lavender, ch 22.
Row 1: Sc in 2nd ch from hook, *ch 3, skip 3 ch, sc in next ch; rep from * 4 more times, turn. (6 sc, 5 ch-3 loops)
Row 2: Ch 4 (counts as dc + ch 1), sc in first ch-3 loop, *ch 3, sc in next ch-3 loop; rep from * 3 more times, ch 1, dc in last sc, turn. (2 dc including tch, 5 sc, 4 ch-3 loops, 2 ch-1 sps)
Row 3: Ch 1, sc in first dc, *ch 3, sc in next ch-3 loop; rep from * 3 more times, ch 3, sc in 3rd ch of tch, turn. (6 sc, 5 ch-3 loops)
Row 4: Rep Row 2. (2 dc including tch, 5 sc, 4 ch-3 loops, 2 ch-1 sps)
Check Checkpoint 1. You are now at the end of the foot where the upright will rise. This end becomes the outer left edge of the letter.
Upright
Work the upright over the first 2 mesh repeats only.
Row 5: Ch 1, sc in first dc, ch 3, sc in next ch-3 loop (skip the ch-1 sp), ch 3, sc in next ch-3 loop, turn. Leave the rest of the row unworked. (3 sc, 2 ch-3 loops)
Row 6: Ch 4 (counts as dc + ch 1), sc in first ch-3 loop, ch 3, sc in next ch-3 loop, ch 1, dc in last sc, turn. (2 dc including tch, 2 sc, 1 ch-3 loop, 2 ch-1 sps)
Row 7: Ch 1, sc in first dc, ch 3, sc in next ch-3 loop, ch 3, sc in 3rd ch of tch, turn. (3 sc, 2 ch-3 loops)
Rows 8–15: Rep Rows 6–7 four more times. (Row 15: 3 sc, 2 ch-3 loops)
Fasten off and weave in the ends. Check Checkpoint 2: 15 rows x 0.2 in (0.5 cm) = 3.0 in (7.6 cm).
Lay the piece with the upright on the left and the foot running to the right. The side facing you is now the front.
Border
Border gauge: 10 sc = 1.0 in (2.5 cm). Each row is 0.2 in (0.5 cm) tall, so 2 sc per row end along the sides gives 10 sc per inch. Along the top and bottom, each mesh repeat gets 4 sc, which is also 10 sc per inch. Because the rate is the same on every edge, the border lies flat.
The side counts below are the stitches between corner groups. Each outer corner is its own 3-sc group.
Round 1: With the front facing, join lavender in the bottom-left foundation ch (the base of the first sc of Row 1).
- Bottom edge: 3 sc in the first foundation ch (corner), 1 sc in each of the next 19 ch, 3 sc in the last ch (corner).
- Right edge of foot: 2 sc in each of the row ends of Rows 1–3. (6 sc)
- Foot top-right corner: 3 sc in the 3rd ch of the Row 4 tch.
- Top of foot: 1 sc in ch-1 sp, [1 sc in sc, 3 sc in ch-3 loop] twice, 1 sc in next sc. (10 sc)
- Inner corner: Sc2tog, inserting first into the uncovered part of the shared ch-3 loop and then into the row end of Row 5. (1 st)
- Inner edge of upright: 1 sc in the same Row 5 row end, then 2 sc in each row end of Rows 6–14. (19 sc)
- Upright top-right corner: 3 sc in the last sc of Row 15.
- Top of upright: 3 sc in ch-3 loop, 1 sc in center sc, 3 sc in ch-3 loop. (7 sc)
- Upright top-left corner: 3 sc in the first sc of Row 15.
- Left edge: 2 sc in each row end, from Row 14 down to Row 1. (28 sc)
Sl st to the first sc. (90 side sts + 5 corner groups x 3 sc = 105 sts)
Round 2: Ch 1. Sc in each st around, with these exceptions:
- Work 3 sc in the center sc of each corner group.
- At the inner corner, sc3tog over 3 sts: the st before the sc2tog, the sc2tog and the st after it.
Sl st to the first sc.
This is a trim round. Its count is 97 sts worked 1 per stitch + 15 corner sts (5 groups of 3 sc, worked into the 5 corner centers) + 1 sc3tog (worked over 3 sts) = 113 sts.
Round 2 side counts (between corner groups) are:
- Bottom: 21
- Right of foot: 8
- Top of foot: 10
- Inner corner: 1 (the sc3tog)
- Inner edge of upright: 19
- Top of upright: 9
- Left edge: 30
That makes 98 side sts + 15 corner sts = 113.
Fasten off, leaving a 6 in (15.2 cm) tail to secure the jump ring later.
Why the math works: In Round 1, one stitch goes into each of the 21 foundation ch. Together they span 20 ch widths, or 2.0 in (5.1 cm), which is 10 sc per inch. The left side has 15 rows, covered by 2 sc per row end plus the corner, over 3.0 in (7.6 cm), which is the same rate. Each border round adds 0.125 in (0.3 cm) per edge:
- Width: 2.0 + 0.5 = 2.5 in (6.4 cm)
- Height: 3.0 + 0.5 = 3.5 in (8.9 cm)
- Each stroke: 0.8 + 0.5 = 1.3 in (3.3 cm)
Flower Appliqué
With light lilac, make a magic ring.
Round 1: Ch 1, 5 sc in ring, sl st to first sc. Pull the ring tightly closed. (5 sc)
Round 2: *(Sl st, ch 2, 2 dc, ch 2, sl st) in next sc; rep from * 4 more times. (5 petals)
Fasten off, leaving a 6 in (15.2 cm) tail. The flower is about 0.6 in (1.5 cm) across. With soft yellow, work 1 French knot with 2 wraps in the center.
Embroidery and Assembly
The mesh is open, so anchor every stitch into an sc, a dc post or a ch strand, never into an empty hole. Keep the tension relaxed so the diamonds don’t pull out of shape.
- Stems: With sage green, work stem stitch starting at the inner bottom of the upright, just above the Round 1 border, and go up and slightly left. Make one stem 1.25 in (3.2 cm) long and a second stem beside it 1.0 in (2.5 cm) long.
- Leaves: Work 4–5 small lazy daisy leaves along the left side of the stems, angled upward.
- Upper sprig: With light lilac, work 7–8 small lazy daisy buds in pairs up the top 0.6 in (1.5 cm) of the longer stem, ending with 1 bud at the tip.
- Lower sprig: With deep violet, work 6–7 buds the same way on the shorter stem. Its tip should sit just below the light lilac sprig and overlap it slightly.
- Flower: Place the flower over the stem bases at the inner corner, where the upright meets the foot, about 0.4 in (1.0 cm) above the bottom edge. Whipstitch the tip of each petal to the mesh.
- Ends: Weave all ends into the border on the back.
Final Blocking
- Mist the keychain with water until it is just damp.
- Lay it face down on a towel over a gridded blocking mat, so the embroidery isn’t flattened.
- Pin the five outer corners first: 2.5 in (6.4 cm) across the bottom and 3.5 in (8.9 cm) up the left side.
- Pin the inner corner so both strokes measure 1.3 in (3.3 cm) thick.
- Use a fingertip to ease each diamond into an even shape.
- Leave it to dry completely, about 2–3 hours.
- Open the jump ring by twisting it sideways with the two pliers. Pass it through the 5th (center) st of the 9 top sts of the upright, add the split ring and twist the jump ring fully closed.
- Wrap the border tail around the base of the jump ring twice, then weave it in for strength.
Final Quality-Control Checklist
- The finished size is 3.5 in (8.9 cm) x 2.5 in (6.4 cm).
- Both strokes measure 1.3 in (3.3 cm).
- The foot has 5 diamonds across and the upright has 2.
- Round 1 has 105 sts and Round 2 has 113 sts.
- All five outer corners are square and the inner corner lies flat.
- The embroidery is anchored and doesn’t pucker the mesh.
- Every petal tip of the flower is tacked down.
- The jump ring is fully closed with no gap.
Troubleshooting
- Edges ripple or flare: There are too many border sts. Check that you worked 2 sc per row end, not 3.
- Border pulls the mesh tight: Your sc is too firm. Work the border only with a hook 0.25 mm larger.
- Inner corner puckers: Check that you worked the sc2tog in Round 1 and the sc3tog in Round 2.
- Upright is on the wrong side: Row 5 must start at the dc end of Row 4. If it didn’t, simply flip the piece and use the other side as the front.
- Diamonds look uneven: Keep every ch-3 the same size, work under the whole loop and block again.
- Embroidery sinks into holes: Re-anchor the stitches into solid strands.
- Keychain feels floppy: Use a mercerized cotton and block it fully dry before you add the rings.
Care
Hand wash in cool water with a mild soap, press the water out in a towel and dry flat. Remove the metal rings before washing if they aren’t tarnish-resistant.
Final Notes
Here is the measurement chain from start to finish:
- 5 repeats x 0.4 in (1.0 cm) = 2.0 in (5.1 cm) of foot
- 2 repeats = 0.8 in (2.0 cm) of upright
- 15 rows x 0.2 in (0.5 cm) = 3.0 in (7.6 cm) of height
- The two border rounds add 0.25 in (0.6 cm) on every edge, for a final size of 3.5 in (8.9 cm) x 2.5 in (6.4 cm).
Check each stage against its checkpoint, and your letter will come out crisp and even every time.
Happy crocheting!