

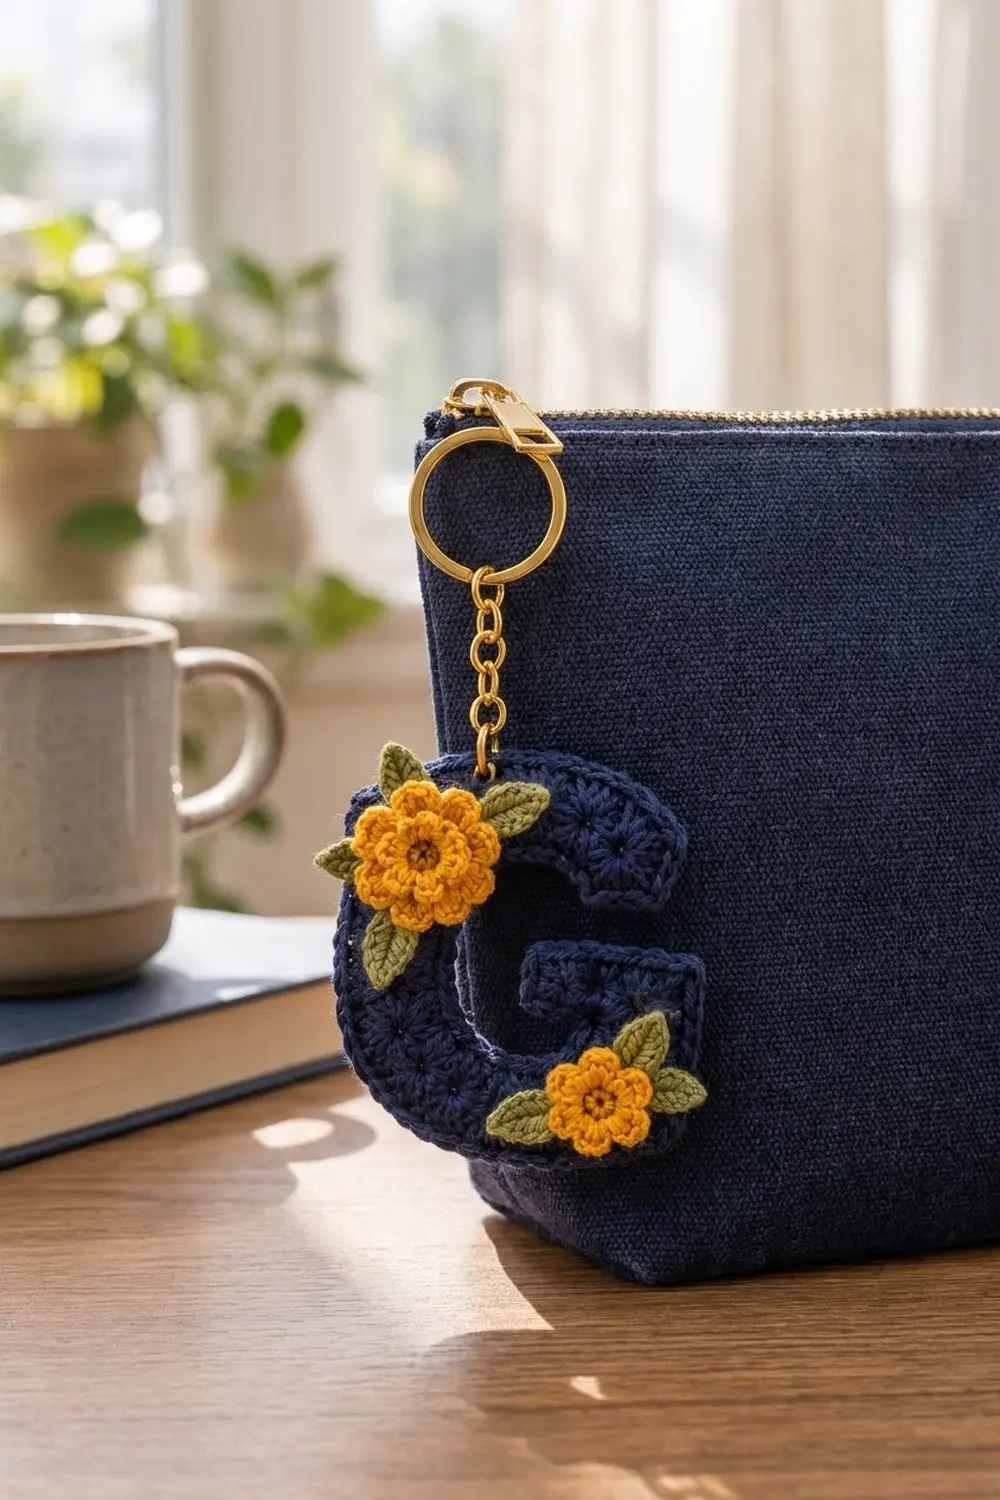
This little keychain is a navy capital G with a bumpy, star-studded surface and a smooth corded rim. Two bright marigold flowers with olive-green leaves sit on top. It looks sharp clipped to a bag, pouch or set of keys, and it makes a thoughtful personalized gift.
The palette is simple: deep navy for the letter, warm marigold yellow for the flowers and soft olive for the leaves. A gold keyring finishes it. The style is cottage-meets-classic: tidy geometry softened with a few flowers.
This pattern uses US crochet terms. The finished keychain measures 3.25 in (8.3 cm) wide by 3.75 in (9.5 cm) tall, not counting the keyring.
The letter is worked flat in rows, from the bottom bar up. You split into two sections for the left stem and the right stem with its crossbar, then join back into one row for the top bar. A two-round border outlines the whole G. Last, you make one large flower, one small flower and five leaves and sew them on.
Finished Size and Construction
- Finished size: 3.25 in (8.3 cm) wide x 3.75 in (9.5 cm) tall
- Skill level: Easy-Intermediate
- Terminology: US crochet terms
- Yarn weight: DK (#3), cotton or cotton blend
- Hook: 3.5 mm (E-4)
- Number of pieces: 1 letter, plus 2 flowers and 5 leaves sewn on
- Layout: single standalone motif
- Letter size before border: 3 in (7.6 cm) wide x 3.5 in (8.9 cm) tall
- Border depth: 0.125 in (0.3 cm) per side, 2 rounds
- Stroke width: 1 in (2.5 cm), which is 5 stitches
Materials
Use a smooth, matte DK cotton or cotton blend. Cotton holds the clusters crisply and handles a keychain’s daily wear well. Avoid fuzzy yarns, because they hide the texture.
- Navy (MC): 10 g / 22 m
- Marigold yellow (CC1): 4 g / 9 m
- Olive green (CC2): 2 g / 5 m
All quantities include a margin for your gauge swatch and sewing tails.
Tools:
– 3.5 mm (E-4) crochet hook
– Tapestry needle
– Gold split keyring, 1 in (2.5 cm), with a short chain and jump ring
– Small flat-nose pliers
– 2 stitch markers
– Blocking mat and rustproof pins
– Scissors
Abbreviations (US Terms)
- ch – chain
- sl st – slip stitch
- sc – single crochet
- hdc – half double crochet
- dc – double crochet
- tr – treble crochet
- sc2tog – single crochet 2 together
- rev sc – reverse single crochet (crab stitch)
- FLO / BLO – front loop only / back loop only
- RS / WS – right side / wrong side
- st(s) – stitch(es)
Special stitch – Cluster (cl): *Yarn over, insert hook in the stitch, pull up a loop, yarn over, draw through 2 loops; repeat from * 2 more times in the same stitch (4 loops on hook). Yarn over and draw through all 4 loops. A cl counts as 1 stitch. Clusters are always worked on WS rows, so they pop out toward the RS.
Gauge and Checkpoints
Gauge: 5 sts and 6 rows = 1 in (2.5 cm) in cluster pattern (alternating sc rows and cluster rows).
Test first: Work Rows 1–6 of the letter as your swatch. Each full row is 15 sts and should measure 3 in (7.6 cm) wide. Six rows should measure 1 in (2.5 cm) tall. If the swatch matches, keep going and it becomes your letter.
Checkpoints:
– After Row 5: 3 in (7.6 cm) wide x 0.8 in (2.0 cm) tall
– After Row 13 (right section done): about 2.2 in (5.6 cm) tall at the right edge, with a crossbar 1.8 in (4.6 cm) long
– After Row 16 (left stem done): about 2.7 in (6.9 cm) tall at the left edge
– After Row 21: 3 in (7.6 cm) x 3.5 in (8.9 cm)
– After the border: 3.25 in (8.3 cm) x 3.75 in (9.5 cm)
Too big? Go down to a 3.25 mm hook. Too small? Go up to a 3.75 mm hook. Height matters more than width here. If your rows run tall, try pulling the clusters a little tighter before you change hooks.
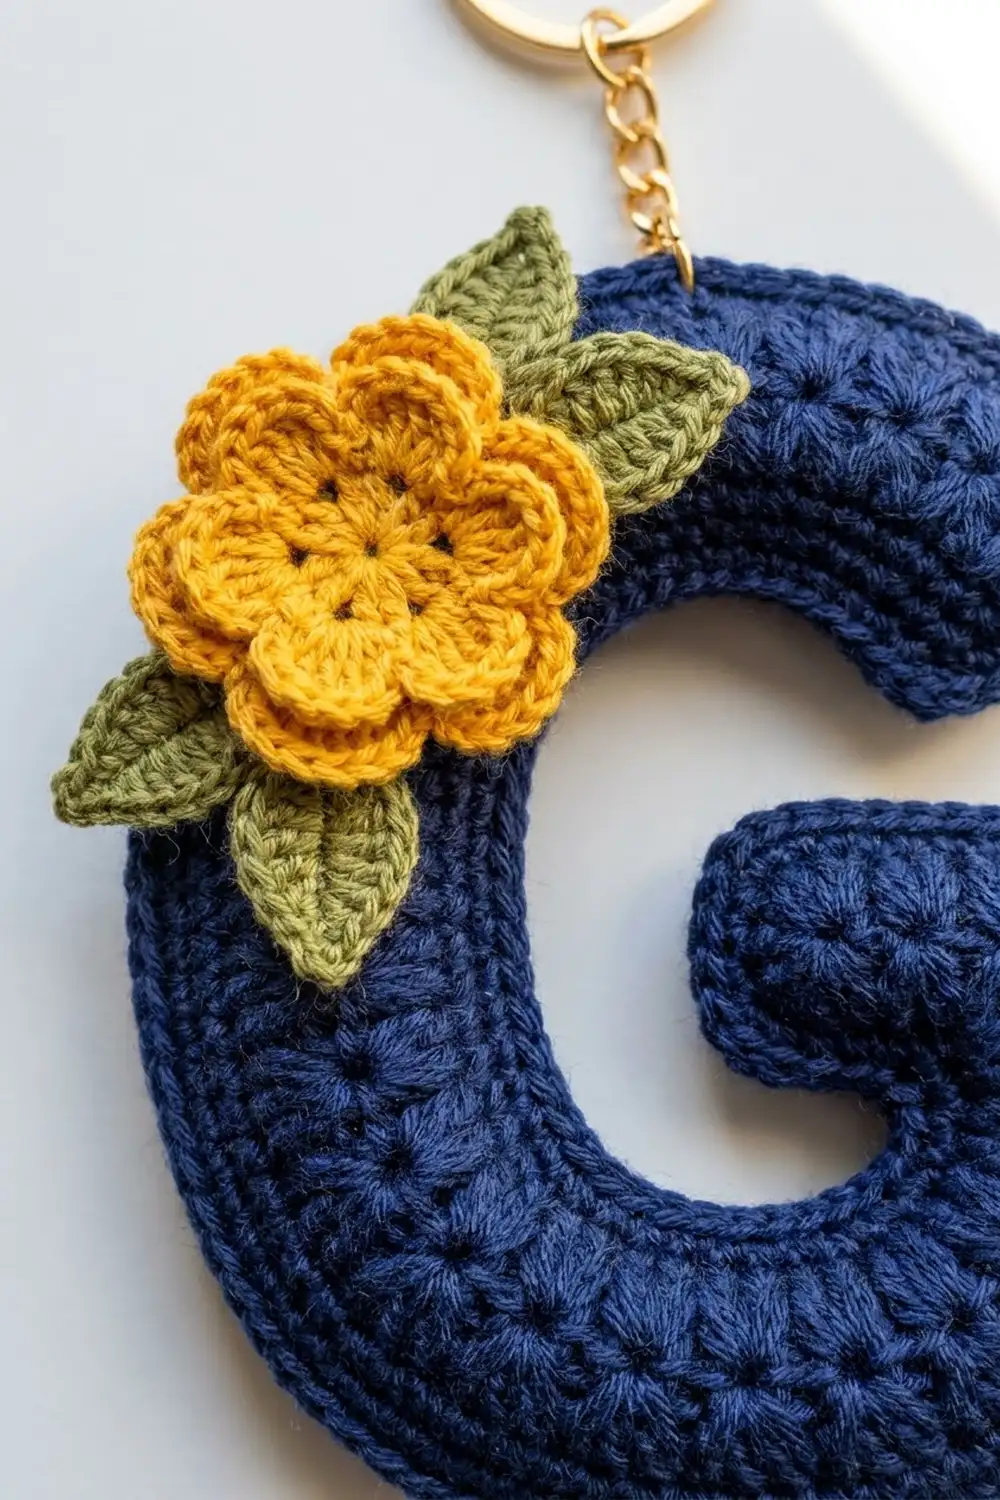
Letter G
The column numbers below describe the shape as seen from the RS, numbered 1 to 15 from left to right. RS rows travel right to left and WS rows travel left to right.
Bottom Bar
Row 1 (RS): With MC, ch 14. Sc in 2nd ch from hook and in each ch across. Turn. (13 sts, columns 2–14)
Row 2 (WS): Ch 1. (Sc, cl) in first st, (sc, cl) in each of the next 5 sts, sc in next st, (cl, sc) in last st. Turn. (15 sts: 8 sc, 7 cl)
Check the order of stitches against this: sc, cl, sc, cl, ending with sc. Clusters sit in the even columns.
Row 3 (RS): Ch 1, sc in each st across. Turn. (15 sts)
Row 4 (WS): Ch 1, sc in first st, (cl in next st, sc in next st) 7 times. Turn. (15 sts: 8 sc, 7 cl)
Row 5 (RS): Ch 1, sc in each st across. Turn. (15 sts)
Checkpoint: 3 in (7.6 cm) x 0.8 in (2.0 cm).
Left Stem (columns 1–5)
Row 6 (WS): Ch 1, sc in first st, cl in next, sc in next, cl in next, sc in next. Turn, leaving the remaining 10 sts unworked. (5 sts: 3 sc, 2 cl)
Rows 7–15: Repeat Row 5 on odd rows (5 sc) and Row 6 on even rows (sc, cl, sc, cl, sc). Every row has 5 sts.
Row 16 (WS): Work as Row 6. (5 sts) Don’t fasten off. Place a marker in the live loop and set it aside.
Checkpoint: about 2.7 in (6.9 cm) tall at the left edge.
Right Stem and Crossbar (columns 11–15, then 7–15)
Count 5 unworked sts in from the right on Row 5. These are columns 11–15. Columns 6–10 stay unworked; they form the floor of the G’s center opening.
Row 6 (WS): With WS facing, join MC in column 11. Ch 1, then work sc, cl, sc, cl, sc. Turn. (5 sts)
Row 7 (RS): Ch 1, sc in each st. Turn. (5 sts)
Row 8 (WS): As Row 6. (5 sts)
Row 9 (RS): Ch 1, sc in each st. You finish at column 11, the inner edge. Ch 5 and turn. (5 sts + 5 ch)
Row 10 (WS): Sc in 2nd ch from hook, cl in next ch, sc in next ch, cl in last ch, then (sc, cl, sc, cl, sc) across the 5 stem sts. Turn. (9 sts: 5 sc, 4 cl)
The new chain stitches become columns 7–10. This crossbar sticks out into the center of the G.
Row 11 (RS): Ch 1, sc in each st. Turn. (9 sts)
Row 12 (WS): Ch 1, sc in first st, (cl, sc) 4 times. Turn. (9 sts: 5 sc, 4 cl)
Row 13 (RS): Ch 1, sc in each st. (9 sts) Fasten off, leaving a 6 in (15.2 cm) tail.
Checkpoint: the crossbar is 1.8 in (4.6 cm) long. The open space between the crossbar and the top bar is what makes this letter read as a G rather than an O.
Top Bar
Return to the left stem’s live loop at the end of Row 16. You are at column 5.
Row 16 extension: Ch 11 and turn.
Row 17 (RS): Sc in 2nd ch from hook and in each of the next 9 ch (10 sc, columns 15–6), then sc in each of the 5 stem sts. Turn. (15 sts)
Row 18 (WS): As Row 4. (15 sts: 8 sc, 7 cl)
Row 19 (RS): As Row 5. (15 sts)
Row 20 (WS): As Row 4. (15 sts)
Row 21 (RS): Ch 1, sc2tog, sc in next 11 sts, sc2tog. (13 sts) Don’t fasten off.
Checkpoint: 3 in (7.6 cm) wide x 3.5 in (8.9 cm) tall. The sc2tog stitches soften the two top corners, just as Row 1’s 13 sts soften the bottom.
Flowers and Leaves
Large Flower (make 1, CC1)
Rnd 1: Magic ring, 6 sc in ring. Pull the ring tight and sl st to the first sc. (6 sts)
Rnd 2: Ch 1, 2 sc in each st, sl st to first sc. (12 sts)
Rnd 3 (front petals, FLO): Sl st in next st, (hdc, dc, hdc) in next st; repeat from * 5 more times. (6 petals, 24 sts)*
Rnd 4 (back petals, BLO of Rnd 2): Fold the front petals forward. Sl st in next back loop, (dc, tr, tr, dc) in next back loop; repeat from * 5 more times. Sl st to the first sl st. (6 petals, 30 sts)*
Fasten off and leave an 8 in (20.3 cm) tail. The flower should measure about 1.25 in (3.2 cm) across. Each larger back petal should peek out between two front petals.
Small Flower (make 1, CC1)
Work Rnds 1–3 of the Large Flower. (6 petals, 24 sts) Sl st to the first sl st and fasten off with an 8 in (20.3 cm) tail. It should measure about 1 in (2.5 cm) across.
Leaves (make 5, CC2)
Ch 6. Sc in 2nd ch from hook, hdc in next ch, dc in next ch, hdc in next ch, 3 sc in last ch. Working along the other side of the chain: hdc, dc, hdc, sc. (11 sts) Sl st in the first sc, ch 2, sl st in 2nd ch from hook to make a pointed tip. Fasten off with a 6 in (15.2 cm) tail.
Each leaf is about 1 in (2.5 cm) long.
Border
Border gauge: Work 1 sc per stitch along stitch edges (5 sc per inch) and 1 sc per row end along side edges (6 sc per inch). Every edge is matched to its own gauge, so the outline lies flat without cupping or ruffling.
At each outer (convex) corner, work 2 sc in the last stitch of the edge. Using 2 sc instead of the usual 3 gives a rounded corner. At each inner (concave) corner, sc2tog over the last stitch of one edge and the first stitch of the next.
Rnd 1 (RS): Continue from Row 21. Ch 1 and work around the whole G as follows:
| Edge | Base | Stitches worked |
|---|---|---|
| Top edge (Row 21), right to left | 13 sts | 12 sc, 2 sc in last = 14 |
| Left outer side | 21 row ends | 20 sc, 2 sc in last = 22 |
| Bottom (foundation chain) | 13 ch | 12 sc, 2 sc in last = 14 |
| Right outer side, Rows 1–13 | 13 row ends | 12 sc, 2 sc in last = 14 |
| Top of crossbar (Row 13) | 9 sts | 8 sc, 2 sc in last = 10 |
| Crossbar end, Rows 13–10 | 4 row ends | 3 sc, 2 sc in last = 5 |
| Underside of crossbar | 4 ch | 3 sc, sc2tog with next edge = 4 |
| Inner side of right stem | 4 row ends (1 used) | 2 sc, sc2tog with next edge = 3 |
| Row 5, columns 10–6 | 5 sts (1 used) | 3 sc, sc2tog with next edge = 4 |
| Inner side of left stem | 11 row ends (1 used) | 9 sc, sc2tog with next edge = 10 |
| Underside of top bar | 10 ch (1 used) | 8 sc, 2 sc in last = 10 |
| End of top bar, Rows 17–21 | 5 row ends | 4 sc, 2 sc in last = 6 |
Sl st to the first sc. (116 sts)
Why the math works: There are 112 base positions around the edge (13 + 21 + 13 + 13 + 9 + 4 + 4 + 4 + 5 + 11 + 10 + 5). The 8 outer corners add 1 each and the 4 inner corners remove 1 each, so 112 + 8 − 4 = 116. Any flat shape with only right-angle corners has exactly 4 more outer corners than inner ones, so this balance always holds.
Rnd 2: Ch 1, rev sc in each st around. (116 sts) Sl st to join and fasten off.
The rev sc makes the raised, corded rim. Each border round adds about 0.0625 in to each side, for a total border depth of 0.125 in (0.3 cm) per side. The final size is 3.25 in (8.3 cm) x 3.75 in (9.5 cm).
Final Blocking
- Weave in all MC ends, including the crossbar tail. Leave the flower and leaf tails for sewing.
- Lightly mist the letter with water until it’s damp but not soaked.
- Pin it RS up on the mat at 3.25 in (8.3 cm) x 3.75 in (9.5 cm). Place one pin at each of the 8 outer corners.
- Push the inner corners gently into crisp right angles with your fingertips. Don’t stretch the clusters flat.
- Let it dry completely, which takes about 2 hours.
- Arrange 3 leaves at the top-left corner, fanned out to the upper left, the left and the lower right. Sew each leaf down at its base.
- Place the large flower over the leaf bases, where the top bar meets the left stem. Sew around the edge of Rnd 2 so the petals stay free.
- Arrange 2 leaves at the bottom-right corner, pointing upper right and lower left. Sew the small flower over them, where the bottom bar meets the right stem.
- Open the jump ring with pliers and slip it through the border at the center of the top edge, near column 8. Close it securely.
Final Quality-Control Checklist
- Letter measures 3.25 in (8.3 cm) x 3.75 in (9.5 cm)
- Border Rnd 1 count is 116
- Clusters line up in vertical columns
- The center opening is clearly open above the crossbar
- All outer corners are rounded and all inner corners are crisp
- Both flowers are sewn flat with free petals
- Leaf tips point outward and none are flipped
- Jump ring is fully closed with no gap
- No loose ends show on the RS
Troubleshooting
Clusters lean or sit unevenly: Keep your yarn-overs the same tension and pull the final loop snug.
Letter is taller than 3.5 in (8.9 cm) before border: Your rows are tall. Tighten the clusters or go down a hook size.
Border ruffles at the sides: You probably worked 2 sc into some row ends. Work exactly 1 per row end.
Border cups at the inner corners: You skipped the sc2tog. Rework those corners.
Crossbar droops: Block it with a pin at each of its corners.
Back petals hide behind the front ones: Check that Rnd 4 went into the back loops of Rnd 2 and that each petal includes 2 tr.
Care
Hand wash in cool water and lay flat to dry, reshaping the petals while damp. Don’t put the metal keyring in a dryer.
Final Notes
Here is the measurement chain to check against. Gauge is 5 sts and 6 rows per 1 in (2.5 cm). That gives 15 sts across 3 in (7.6 cm) and 21 rows up 3.5 in (8.9 cm). The border takes 112 edge positions to 116 stitches with balanced corners and adds 0.125 in (0.3 cm) per side, for a finished G of 3.25 in (8.3 cm) x 3.75 in (9.5 cm). Make one, then try matching letters to spell out a name.
Happy crocheting!