

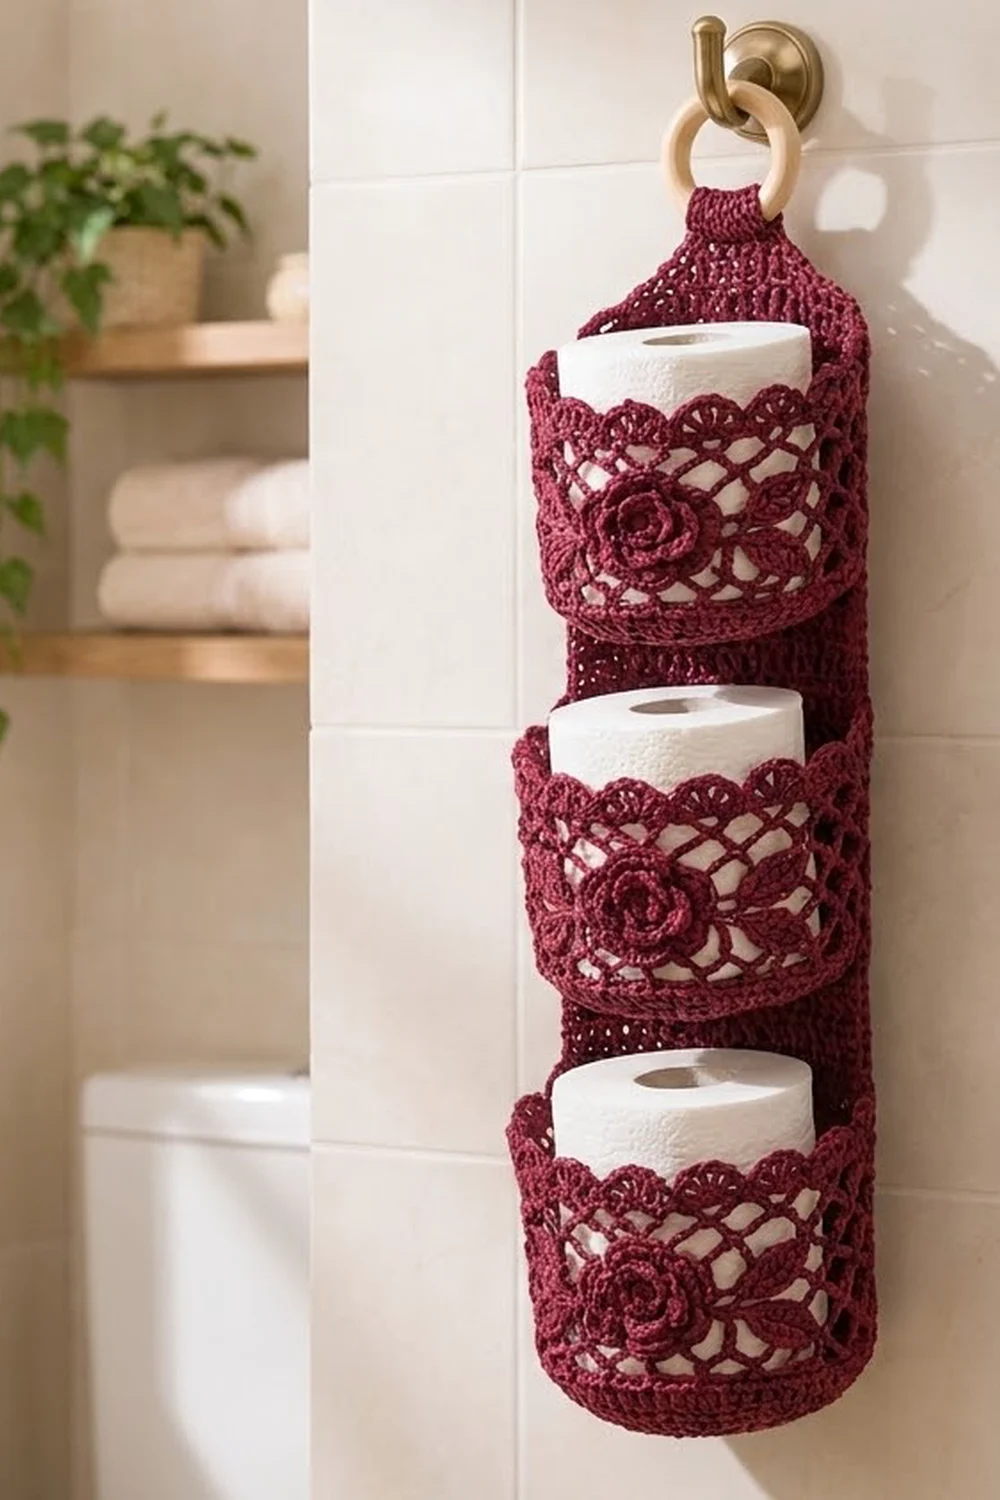
This hanging toilet paper holder gives a bathroom a vintage, romantic look. A long, solid back panel hangs from a wooden ring, and three round lace baskets sit down its front. Each basket holds one standard roll and has a crochet rose at center front.
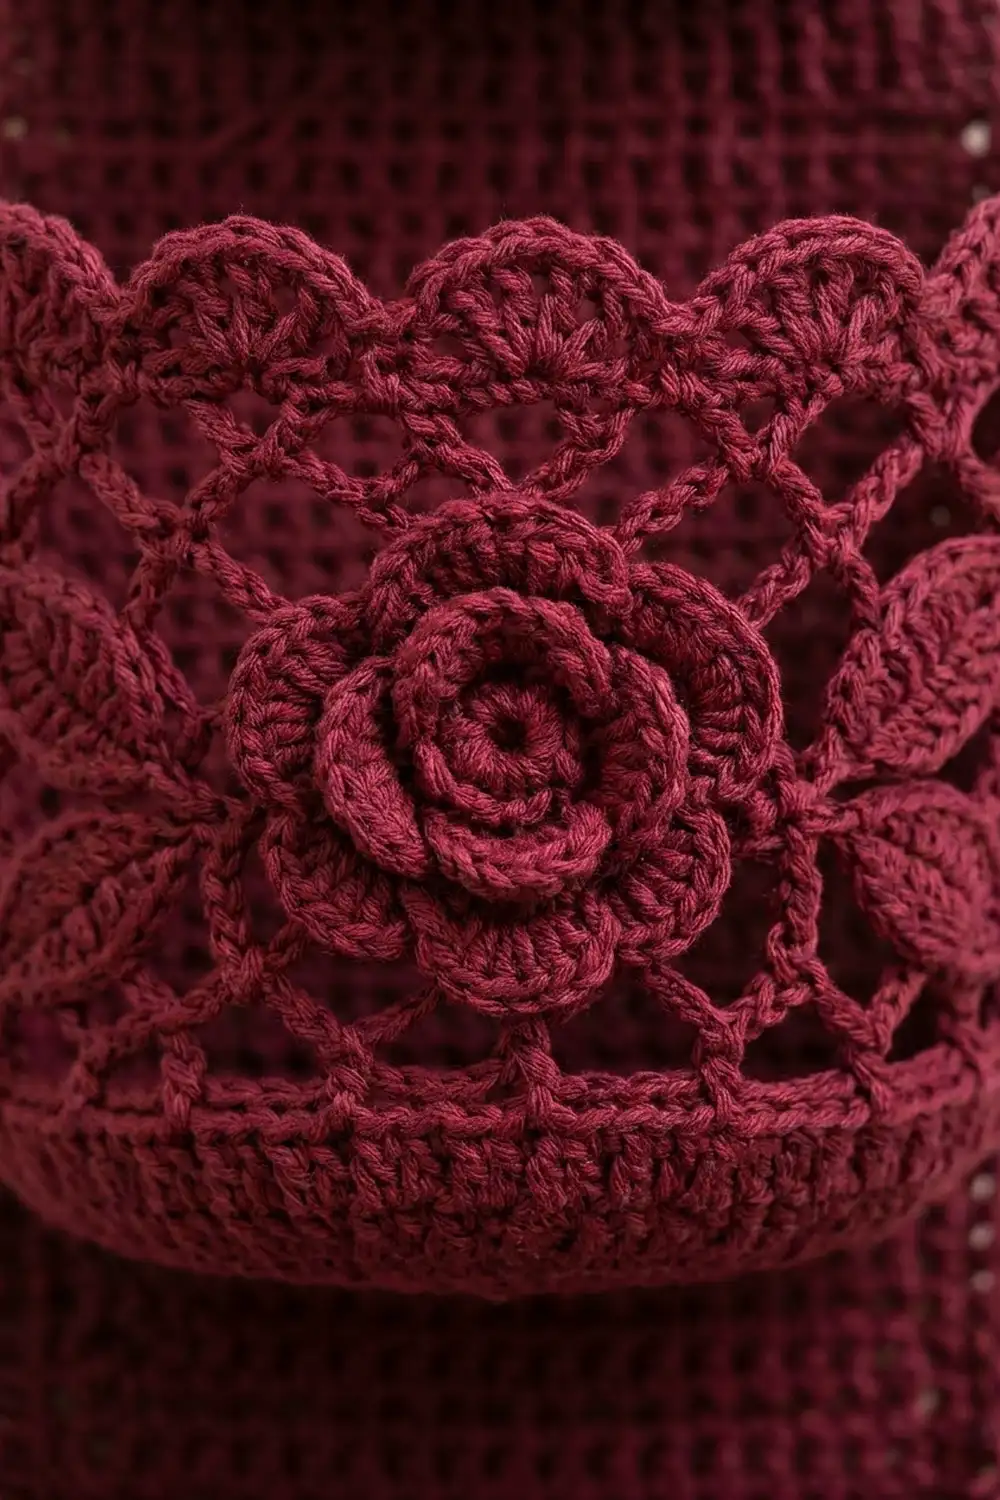
The sample uses one color, a rich burgundy cotton. With only one color, the texture stands out: a firm base, a band of leafy diamond mesh, a solid rim band and a scalloped shell edge. Each rose has three tiers of petals, so it stands out against the openwork behind it.
The pattern uses US crochet terms. The finished holder is about 5.7 in (14.5 cm) wide at the panel and about 22.75 in (57.8 cm) long from the top of the ring loop to the bottom edge. Each basket is about 5.25 in (13.3 cm) across and 3.75 in (9.5 cm) tall.
To make it, you crochet three baskets in the round, make three roses, and work the back panel in rows. Then you add a two-round border to the panel, sew everything together, and fold the tab around the ring.
Finished Size and Construction
- Finished size: 5.7 in (14.5 cm) wide x about 22.75 in (57.8 cm) long, including the ring loop
- Skill level: Intermediate
- Terminology: US crochet terms
- Yarn weight: DK / light worsted (#3) cotton
- Hook: 3.5 mm (E-4)
- Number of pieces: 7 (1 back panel, 3 baskets, 3 roses)
- Layout: 3 baskets stacked in one vertical column on the panel
- Basket size: 5.25 in (13.3 cm) across x 3.75 in (9.5 cm) tall
- Panel size before border: 5.2 in (13.2 cm) wide x 21.25 in (54.0 cm) long, plus a 2.75 in (7.0 cm) tab
- Border depth: about 0.25 in (0.6 cm) on each edge
Materials
Yarn: Use a smooth mercerized or combed cotton in DK weight. Cotton holds its shape, shows lace detail clearly and handles a steamy bathroom well. Avoid fuzzy or very soft acrylics, because the baskets will sag.
- Burgundy: about 160 g (approx. 385 m / 421 yd)
This amount includes about 15 percent extra for your gauge swatch and small tension differences.
Tools:
- 3.5 mm (E-4) crochet hook
- Wooden ring, 2 in (5.1 cm) outer diameter
- Tapestry needle
- 6 to 8 locking stitch markers
- Scissors and measuring tape
- Pins and a blocking mat
Abbreviations (US Terms)
- ch – chain
- sl st – slip stitch
- sc – single crochet
- hdc – half double crochet
- dc – double crochet
- sk – skip
- sp – space
- st(s) – stitch(es)
- BLO – back loop only
- sc2tog – single crochet 2 together (decrease)
- dc2tog / dc3tog – double crochet 2 / 3 together in the same space
- rev sc – reverse single crochet (crab stitch)
- rep – repeat
Special stitch – Leaf pair: (dc3tog, ch 3, dc3tog) all in the same ch-4 loop. To work dc3tog in one space: [yarn over, insert hook in sp, pull up a loop, yarn over, pull through 2 loops] 3 times, then yarn over and pull through all 4 loops on hook.
Gauge and Checkpoints
Gauge: 20 sc and 22 rows = 4 in (10.2 cm) in sc rows. That is 5 sts and 5.5 rows per inch.
Make one basket before you start the panel. The basket is the best gauge test because its base has to fit a roll.
Checkpoints:
- Basket Round 6: the flat circle is about 4.5 in (11.4 cm) across.
- Basket Round 7: the base is about 5.25 in (13.3 cm) across.
- Basket Round 17: the wall is about 3.75 in (9.5 cm) tall, and a standard roll slides in with a little room to spare.
- Panel Row 22: the panel is 5.2 in (13.2 cm) wide and 4 in (10.2 cm) tall.
If your piece is too big, try a 3.25 mm hook. If it’s too small or the roll won’t fit, try a 3.75 mm hook. Don’t add stitches, because the lace repeats depend on 84 stitches.
Basket (Make 3)
Work in joined rounds and don’t turn. The beginning ch 1 never counts as a stitch. The beginning ch 3 counts as the first dc.
Base
Round 1: Make a magic ring. Ch 3, 11 dc in ring, sl st to top of beginning ch 3. (12 dc)
Round 2: Ch 3, dc in same st, 2 dc in each st around, join. (24 dc)
Round 3: Ch 3, 2 dc in next st, dc in next st, 2 dc in next st rep around, join. (36 dc)
Round 4: Ch 3, dc in next st, 2 dc in next st, dc in next 2 sts, 2 dc in next st rep around, join. (48 dc)
Round 5: Ch 3, dc in next 2 sts, 2 dc in next st, dc in next 3 sts, 2 dc in next st rep around, join. (60 dc)
Round 6: Ch 3, dc in next 3 sts, 2 dc in next st, dc in next 4 sts, 2 dc in next st rep around, join. (72 dc)
Checkpoint: about 4.5 in (11.4 cm) across when lying flat.
Round 7 (conversion round): Ch 1, sc in next 5 sts, 2 sc in next st rep 12 times, join to first sc. (72 sts worked once + 12 extra = 84 sc)
Checkpoint: about 5.25 in (13.3 cm) across.
Lower Wall
Round 8: Ch 1, sc in BLO of each st around, join. (84 sc) The unworked front loops make a ridge, and the wall turns upward from here.
Round 9: Ch 3, dc in each st around, join. (84 dc)
Round 10: Ch 1, sc in each st around, join. (84 sc)
Leaf Mesh
Round 11: Ch 1, sc in first st, ch 4, sk 2, sc in next st, ch 4, sk 2 rep 26 more times, join to first sc. (28 sc and 28 ch-4 loops; 28 x 3 = 84 sts used)
Round 12: Sl st in first 2 ch of the next loop, ch 1, sc in same loop, ch 4, sc in next loop, ch 4 rep 26 more times, join to first sc. (28 ch-4 loops)
Round 13 (leaf round): Sl st in first 2 ch of the next loop. Ch 2, dc2tog in same loop (counts as first dc3tog), ch 3, dc3tog in same loop, ch 2, sc in next loop, ch 2. Leaf pair in next loop, ch 2, sc in next loop, ch 2 rep 12 more times, join to top of first cluster. (14 leaf pairs and 14 sc)
Round 14: Sl st in next ch-3 sp, ch 1, sc in same sp, ch 4, sc in next sc, ch 4, sc in next ch-3 sp, ch 4, sc in next sc, ch 4 rep 12 more times, join to first sc. (28 ch-4 loops)
Round 15: Rep Round 12. (28 ch-4 loops)
Rim
Round 16 (conversion round): Sl st in first 2 ch of the next loop, ch 1, 3 sc in each ch-4 loop around, join. (28 loops x 3 sc = 84 sc)
Round 17 (shell edge): Ch 1, sc in first st, sk 2, 7 dc in next st, sk 2, sc in next st, sk 2, 7 dc in next st, sk 2 rep 12 more times, join to first sc. (14 shells; 14 x 6 = 84 sts used)
Fasten off and leave a 30 in (76.2 cm) tail for sewing. Weave in the starting tail.
Checkpoint: the wall is about 3.75 in (9.5 cm) tall from the Round 8 ridge to the top of the shells.
Rose (Make 3)
Each rose has three tiers of five petals. You work each tier behind the one before it, so the tiers stack.
Round 1: Ch 5, sl st to first ch to form a ring. Ch 1, 10 sc in ring, join. (10 sc)
Round 2: Ch 1, sc in first st, ch 3, sk 1, sc in next st, ch 3, sk 1 rep 3 more times, join. (5 ch-3 sps)
Round 3: In each ch-3 sp work (sc, hdc, 3 dc, hdc, sc), join. (5 small petals)
Round 4: Working behind the petals, ch 5, sc around the back post of the next Round 2 sc rep 5 times. Work the last sc around the first Round 2 sc. (5 ch-5 sps)
Round 5: In each ch-5 sp work (sc, hdc, 5 dc, hdc, sc), join. (5 medium petals)
Round 6: Working behind, ch 6, sc around the back post of the next Round 4 sc rep 5 times. (5 ch-6 sps)
Round 7: In each ch-6 sp work (sc, hdc, 7 dc, hdc, sc), join. (5 large petals)
Fasten off and leave a 12 in (30.5 cm) tail. The rose is about 2.25 in (5.7 cm) across.
Back Panel (Make 1)
Foundation: Ch 27.
Row 1: Sc in second ch from hook and in each ch across, turn. (26 sc)
Rows 2–99: Ch 1, sc in each st across, turn. (26 sc)
Checkpoint: the body is 5.2 in (13.2 cm) wide x 18 in (45.7 cm) long.
Taper
Row 100: Ch 1, sc2tog, sc across to last 2 sts, sc2tog, turn. (24 sc)
Row 101: Ch 1, sc in each st across, turn. (24 sc)
Rows 102–117: Rep Rows 100–101 eight more times. (8 sc at end of Row 117)
The taper is 18 rows, about 3.25 in (8.3 cm) long.
Hanging Tab
Rows 118–132: Ch 1, sc in each st across, turn. (8 sc)
The tab is 1.6 in (4.1 cm) wide and 2.75 in (7.0 cm) long. Don’t fasten off. Go straight into the border.
Make All Pieces
You need:
- Burgundy: 3 baskets, 3 roses, 1 back panel
Layout (front view, top to bottom):
      [ ring ]
      [ tab  ]
     / taper  \
  | Basket 3 + rose |   base on panel Row 70
  | Basket 2 + rose |   base on panel Row 40
  | Basket 1 + rose |   base on panel Row 10
  |___ panel end ___|
Border (Back Panel)
Border gauge: the border uses the same 5 sc per inch as the body, so it lies flat without ruffling or pulling in.
Round 1: Ch 1. Work down the first long edge, across the bottom, up the second long edge and across the tab top:
- Each long side: Work 15 sc along the tab row ends (1 per row), then 18 sc along the taper row ends (1 per row), then 90 sc along the body row ends. For the body, sc in each of the next 9 row ends, sk 1 row end 9 times, then sc in each of the last 9 row ends. (15 + 18 + 90 = 123 sc per long side)
- Bottom edge: 3 sc in the first st, sc in next 24 sts, 3 sc in the last st. (28 sc, corners included)
- Tab top: 3 sc in the first st, sc in next 6 sts, 3 sc in the last st. (10 sc, corners included)
Join to first sc. (123 + 123 + 28 + 10 = 284 sc)
Corner sc are counted only in the bottom and tab-top totals, never in the long sides.
Round 2: Ch 1, rev sc in each st around, join. (284 rev sc) Fasten off and weave in the ends.
Why the math works: At 5.5 rows per inch, 99 body rows are 18 in (45.7 cm) long. At 5 sc per inch, that length needs 90 sc, which is exactly 9 sc per 10 row ends. The taper and tab edges are slanted or very short, so 1 sc per row keeps them smooth. On the bottom, 26 sts plus 2 extra corner sts gives 28.
With the border on, the panel is 5.7 in (14.5 cm) wide and 21.5 in (54.6 cm) long below the tab.
Joining (Baskets, Roses and Ring)
Method: Whipstitch with the yarn tails, going through one basket stitch and one panel stitch at a time.
Roses: Center a rose over the leaf mesh at the front of each basket so it covers Rounds 11–15. Sew around the backs of the largest petals so the rose lies flat. Put a marker in the stitch directly opposite the rose to mark the back of the basket.
Baskets: Flatten the back of each basket onto the panel along 22 stitches, centered on the back marker (11 sts on each side).
- Lay the panel flat, right side up. Mark Rows 10, 40 and 70, counting from the bottom.
- Line up the Round 8 front-loop ridge of Basket 1 with Row 10. Leave 2 panel stitches free on each side (2 + 22 + 2 = 26).
- Whipstitch the 22 back stitches of Round 8 to the 22 center stitches of Row 10, one to one.
- Lay the basket wall flat against the panel. Whipstitch the 22 back stitches of Round 16 to the 22 center stitches of Row 26. That’s 16 rows higher, about 2.9 in (7.4 cm).
- Repeat for Basket 2 (Rows 40 and 56) and Basket 3 (Rows 70 and 86).
The baskets are 30 rows apart, about 5.5 in (14.0 cm). This leaves a small gap between each shell rim and the base above it.
Tension: Sew snugly without pulling, so the panel doesn’t pucker. Slide a roll in to test the fit before you finish each basket.
Ring: Fold the tab through the wooden ring to the back of the panel. Sew the tab’s top edge to the back of Row 100, the first taper row.
Size checkpoint: Hanging, the holder is about 22.75 in (57.8 cm) from the top of the ring loop to the bottom edge.
Final Blocking
- Mist the whole holder lightly with water.
- Pin the panel flat at 5.7 in (14.5 cm) wide and 21.5 in (54.6 cm) long.
- Put a roll wrapped in plastic in each basket so the walls dry round.
- Open out each shell along the rim with your fingers.
- Press the rose petals flat and round.
- Let it dry completely, at least 12 hours, before removing the pins.
Final Quality-Control Checklist
- Each basket has 84 sts in Rounds 7–10 and 16, and 14 shells at the rim.
- Each basket has 14 leaf pairs in the mesh.
- Each rose has three tiers of 5 petals.
- The panel body is 26 sts wide and 99 rows tall.
- Border Round 1 has 284 sc.
- All three baskets are level and centered, with 2 free sts on each side.
- A roll fits each basket with a little room to spare.
- All ends are woven in securely.
Troubleshooting
- Base cups or ruffles: Check that Round 7 has exactly 84 sc. A cupped base usually means you’re working too tightly. A ruffled base means you’re working too loosely.
- Roll won’t fit: Your gauge is tight. Remake the basket with a 3.75 mm hook.
- Mesh loops look uneven: Make every chain the same size, and always sl st into the second chain of the loop before you start a round.
- Basket sags forward: Whipstitch a third line along Round 10 to the panel.
- Border ripples: There are too many sc on the long sides. Recount for 90 sc on the body.
Care
Hand wash in cool water with mild soap, then press out the water in a towel. Dry flat with rolls in the baskets to keep their shape, and keep it out of the dryer.
Final Notes
The measurements build on each other. 84 stitches make a 5.25 in (13.3 cm) base, which grows into a 3.75 in (9.5 cm) lace basket. 26 stitches make a 5.2 in (13.2 cm) panel, and the border brings it to 5.7 in (14.5 cm). The three baskets sit 30 rows apart on the 18 in (45.7 cm) body, and the tab and ring bring the holder to about 22.75 in (57.8 cm).
Check your gauge on the first basket and count at each checkpoint, and the rest of the holder will come together easily.
Happy crocheting!