

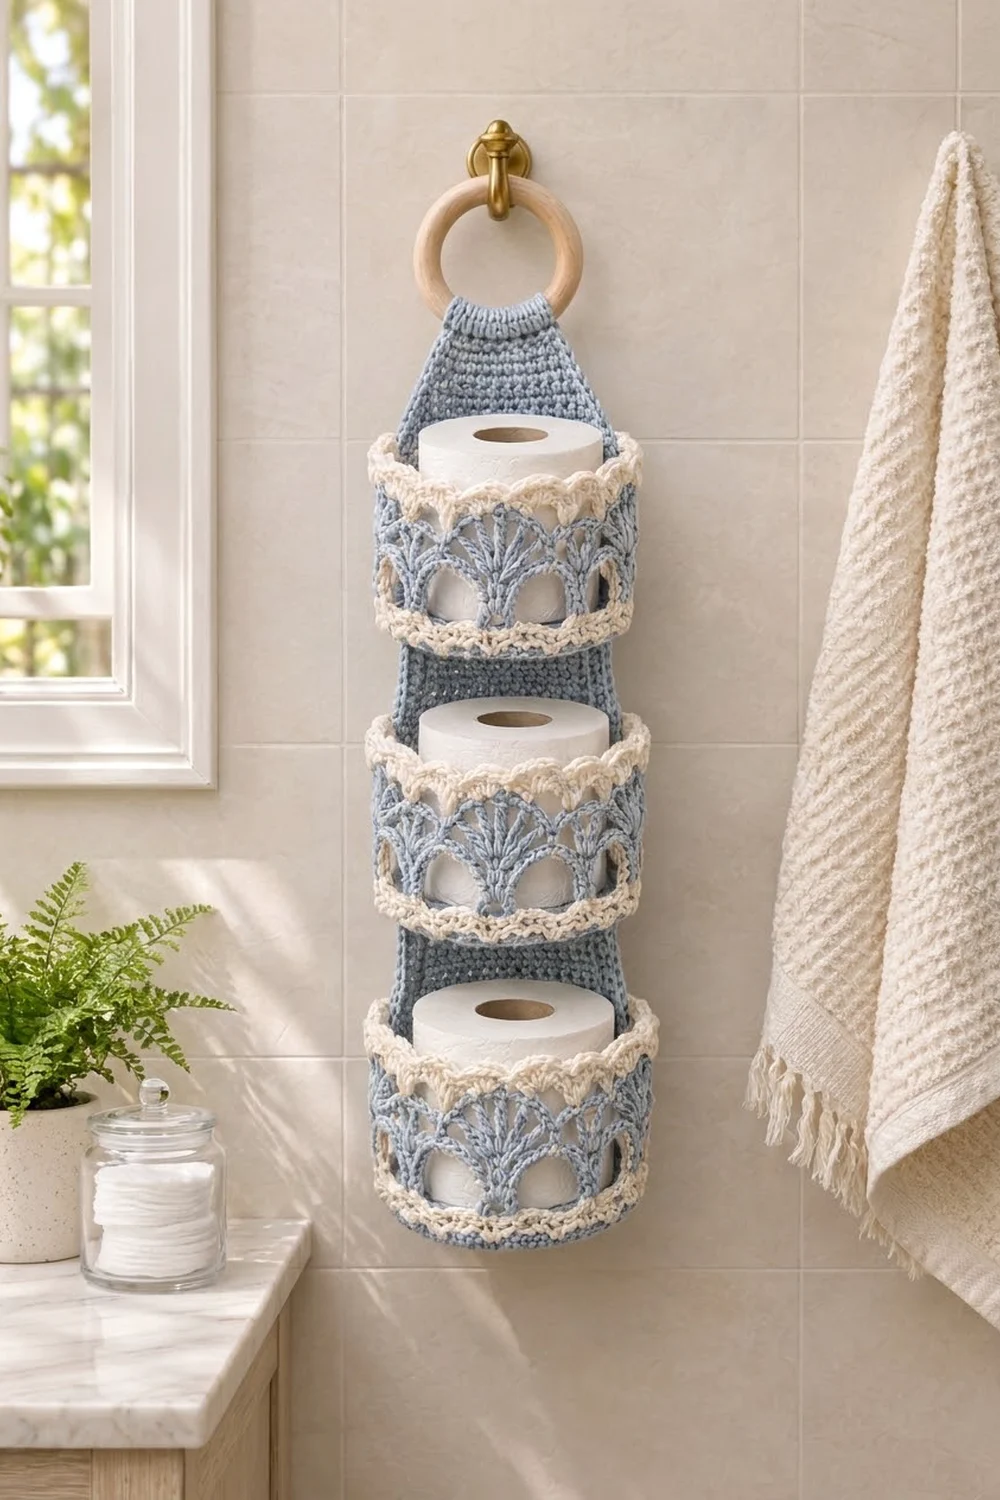
The Bluebell Fan Tower is a hanging bathroom organizer with three round baskets, each holding one standard toilet paper roll. A firm blue back panel hangs from a wooden ring, and the three baskets are stacked down its front.
Each basket uses two colors: powder blue and cream. The cream rounds outline a row of open arches. Blue fans rise from those arches, and a cream shell scallop finishes the top edge. The look is soft, light and a little vintage.
This pattern uses US crochet terms. The finished holder is about 4.5 in (11.4 cm) wide at the panel and 5.25 in (13.3 cm) wide at the baskets. It hangs about 22.5 in (57.2 cm) from the top of the strap fold, not counting the ring.
Construction is simple. You crochet one back panel in rows and add a single border round. Then you make three baskets in joined rounds, starting with a flat base and building up the lace wall. Finally you sew the baskets to the panel and fold the strap over the ring.
Finished Size and Construction
- Finished size: 4.5 in × 22.5 in (11.4 cm × 57.2 cm) hanging; baskets 5.25 in (13.3 cm) across
- Skill level: Intermediate
- Terminology: US
- Yarn weight: Worsted (#4), cotton
- Hook: 4.0 mm (US G-6)
- Number of pieces: 4 (1 back panel, 3 baskets)
- Layout: 3 baskets stacked vertically on 1 panel
- Panel size before border: 4 in × 24 in (10.2 cm × 61.0 cm), unfolded
- Panel size after border: 4.5 in × 24.5 in (11.4 cm × 62.2 cm), unfolded
- Basket size: 5.25 in (13.3 cm) base diameter, 3 in (7.6 cm) wall height
- Border depth: 0.25 in (0.6 cm)
Materials
Use a smooth, firm 100% cotton or cotton-blend worsted yarn. Cotton holds its shape, survives bathroom humidity and keeps the fans and arches crisp. Avoid fuzzy or very soft acrylic, because the baskets will sag.
- Color A, powder blue: 170 g / about 290 m
- Color B, cream: 50 g / about 85 m
These quantities include a margin of about 15–20% for your gauge swatch and small differences in tension.
Tools:
- 4.0 mm (US G-6) crochet hook
- One 3 in (7.6 cm) wooden ring
- Tapestry needle
- Locking stitch markers (at least 6)
- Scissors
- Measuring tape
- Blocking mat and rust-proof pins
Abbreviations (US Terms)
- ch: chain
- sl st: slip stitch
- sc: single crochet
- dc: double crochet
- sc2tog: single crochet 2 together
- sc3tog: single crochet 3 together
- BLO: back loop only
- MR: magic ring
- st(s): stitch(es)
- sp: space
- sk: skip
Special stitch: sc3tog. (Insert hook in next st, yarn over, pull up a loop) 3 times, yarn over and pull through all 4 loops on the hook. This makes 1 stitch from 3.
Shell: 5 dc worked in the same stitch.
Gauge and Checkpoints
Gauge: 16 sc and 18 rows = 4 in (10.2 cm) in single crochet worked in rows.
Make one basket first as your test piece. It shows your sc gauge and your lace tension at the same time.
Checkpoints:
- Base, Rnd 6 (36 sts): 2.75–3 in (7.0–7.6 cm) across
- Base, Rnd 11 (66 sts): 5.25 in (13.3 cm) across, 16.5 in (41.9 cm) around
- Finished basket: 3 in (7.6 cm) tall from the fold line to the scallop tips
- Panel after Row 72: 4 in × 16 in (10.2 cm × 40.6 cm)
Too big? Go down to a 3.75 mm hook. A loose basket will not hold a roll upright.
Too small? Go up to a 4.5 mm hook. A standard roll is about 4.5 in (11.4 cm) wide and needs some room to slide in.
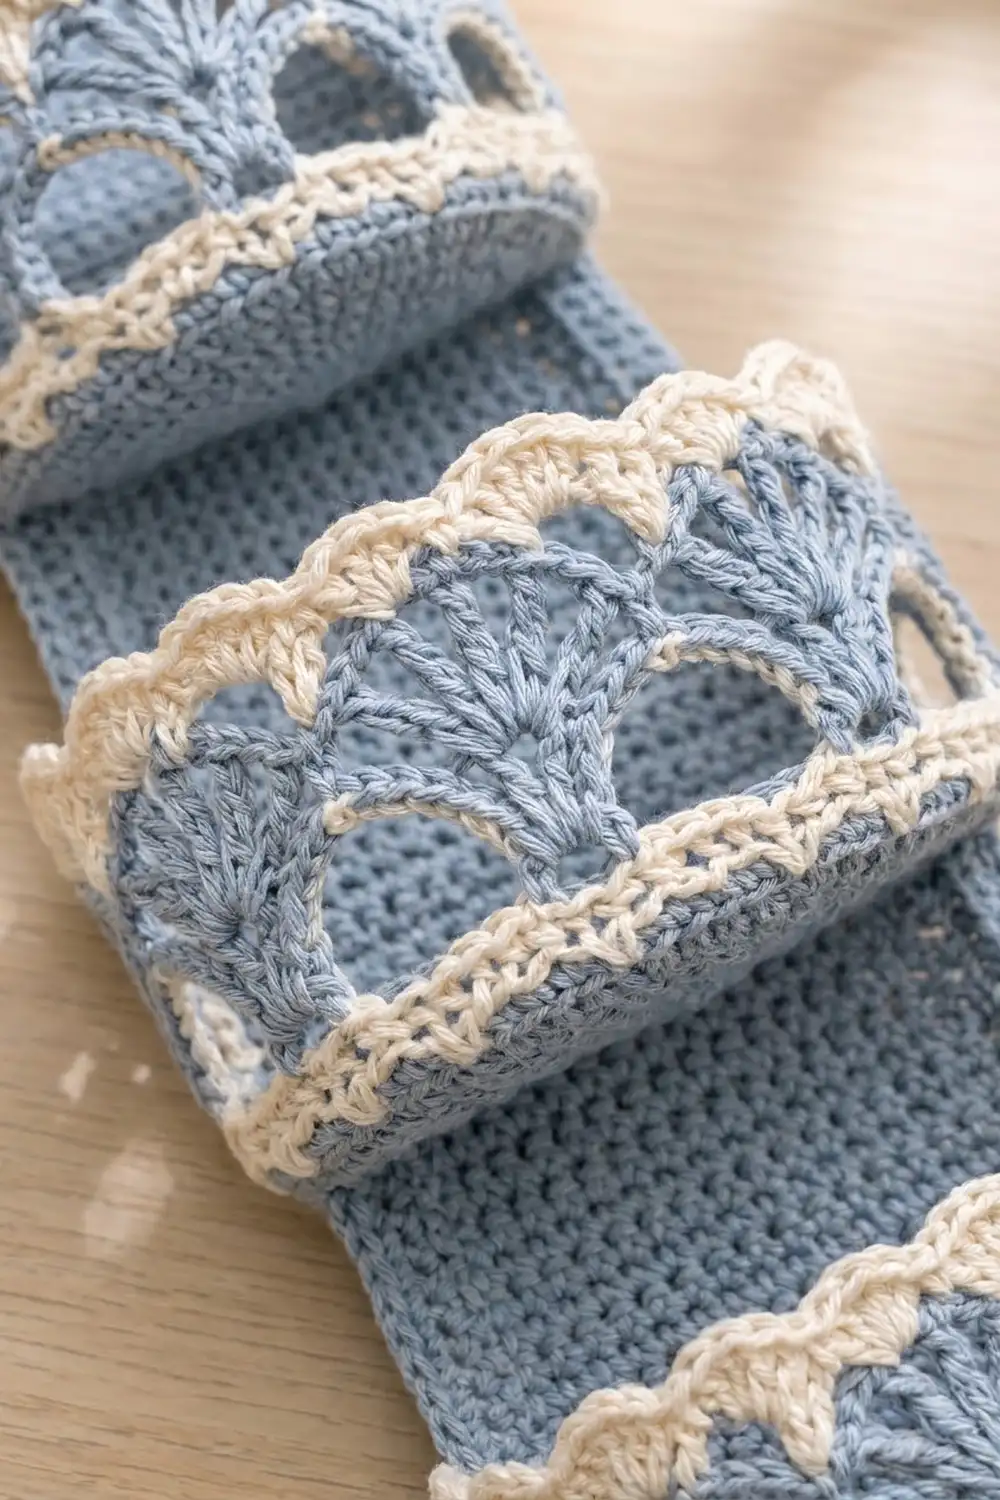
Basket (Make 3)
Base
Use Color A.
- Rnd 1: Make a MR, ch 1, work 6 sc in the ring, sl st to the first sc. (6)
- Rnd 2: Ch 1, work 2 sc in each st, sl st to the first sc. (12)
- Rnd 3: Ch 1, sc in next st, 2 sc in next st; repeat from * 6 times, sl st to the first sc. (18)
- Rnd 4: Ch 1, sc in next 2 sts, 2 sc in next st × 6, sl st. (24)
- Rnd 5: Ch 1, sc in next 3 sts, 2 sc in next st × 6, sl st. (30)
- Rnd 6: Ch 1, sc in next 4 sts, 2 sc in next st × 6, sl st. (36)
- Rnd 7: Ch 1, sc in next 5 sts, 2 sc in next st × 6, sl st. (42)
- Rnd 8: Ch 1, sc in next 6 sts, 2 sc in next st × 6, sl st. (48)
- Rnd 9: Ch 1, sc in next 7 sts, 2 sc in next st × 6, sl st. (54)
- Rnd 10: Ch 1, sc in next 8 sts, 2 sc in next st × 6, sl st. (60)
- Rnd 11: Ch 1, sc in next 9 sts, 2 sc in next st × 6, sl st. (66)
The base should lie flat and measure 5.25 in (13.3 cm) across.
Wall
- Rnd 12 (fold round): Ch 1, sc in the BLO of each st, sl st. (66) This round turns the edge up into a wall. The unused front loops of Rnd 11 stay visible, and you will use them later for sewing.
- Rnds 13–14: Ch 1, sc in each st, sl st. (66)
Change to Color B at the final sl st of Rnd 14.
- Rnd 15: Ch 1, sc in each st, sl st. (66)
- Rnd 16 (arch round): Ch 1, sc in the first st, ch 5, sk 5, sc in next st, ch 5, sk 5; repeat from * 10 more times, sl st to the first sc. (11 sc + 11 ch-5 sps)
Each repeat uses 6 stitches, and 6 × 11 = 66. The skipped stitches under each chain leave the open arch holes. Fasten off Color B.
- Rnd 17 (fan round): Join Color A with a sl st in any sc. Ch 1, sc in the same sc, work 7 dc in the next ch-5 sp, sc in next sc, 7 dc in next ch-5 sp; repeat from * 10 more times, sl st to the first sc. (11 sc + 77 dc = 88 sts)
The fans sit on top of the chains, and the holes below them stay open. The fans will flare slightly, which is normal.
- Rnd 18 (conversion round): Sl st in the next 2 dc, so you are in the 2nd dc of a fan. Ch 1, sc in the same dc and in the next 4 dc (5 sc), then sc3tog over the last dc of this fan, the sc, and the first dc of the next fan. Sc in next 5 dc, sc3tog over next 3 sts; repeat from * 10 more times, sl st to the first sc.
Stitch count: 11 × (5 sc + 1 sc3tog) = 66 sts. This uses all 88 stitches of Rnd 17 (11 × 8) and brings the wall back to its base count.
Change to Color B.
- Rnd 19: Ch 1, sc in each st, sl st. (66)
- Rnd 20 (scallop round): Ch 1, sc in the first st, sk 2, 5 dc in next st, sk 2, sc in next st; repeat from * 10 more times, but end the last repeat with sk 2 and a sl st to the first sc. (11 shells + 11 sc)
Each shell repeat uses 6 stitches, and 6 × 11 = 66. Fasten off and weave in the ends.
Checkpoint: the basket is 3 in (7.6 cm) tall and 5.25 in (13.3 cm) across. A roll should slide in with a small amount of ease.
Back Panel
Use Color A. You work the panel in rows from the bottom up.
Body
- Foundation: Ch 17.
- Row 1: Sc in the 2nd ch from the hook and in each ch across. (16)
- Rows 2–72: Ch 1, turn, sc in each st across. (16)
Checkpoint: 4 in × 16 in (10.2 cm × 40.6 cm).
Taper
Every decrease row removes 2 stitches.
- Row 73: Ch 1, turn, sc2tog, sc in next 12 sts, sc2tog. (14)
- Rows 74–75: Ch 1, turn, sc across. (14)
- Row 76: Sc2tog, sc in next 10 sts, sc2tog. (12)
- Rows 77–78: Sc across. (12)
- Row 79: Sc2tog, sc in next 8 sts, sc2tog. (10)
- Rows 80–81: Sc across. (10)
- Row 82: Sc2tog, sc in next 6 sts, sc2tog. (8)
- Rows 83–84: Sc across. (8)
- Row 85: Sc2tog, sc in next 4 sts, sc2tog. (6)
- Rows 86–90: Sc across. (6)
The taper is 18 rows, about 4 in (10.2 cm) tall.
Strap
- Rows 91–108: Ch 1, turn, sc across. (6)
The strap is 1.5 in × 4 in (3.8 cm × 10.2 cm). The panel now has 108 rows and measures 4 in × 24 in (10.2 cm × 61.0 cm) before the border. Do not fasten off; continue straight into the border.
Make All Pieces
- Back panel: 1 piece, Color A only
- Baskets: 3 pieces, each with Color A (base, Rnds 12–14, 17, 18) and Color B (Rnds 15, 16, 19, 20)
Layout (front view, top to bottom):
      [ ring ]
      [ strap ]   rows 91–108
     /  taper  \  rows 73–90
    | Basket C |  base at row 58
    |  panel   |
    | Basket B |  base at row 30
    |  panel   |
    | Basket A |  base at row 2
Joining
Sequence note: work the Border (next section) before joining. The border sits along the panel sides, and the baskets are sewn on inside it.
Method: Whipstitch with Color A and a tapestry needle.
Base seam, stitch to stitch:
- Flatten the back of a basket against the panel.
- Mark 16 consecutive unused front loops of Rnd 11.
- Lay these 16 loops along the 16 stitches of the panel row given in the layout: Row 2 for Basket A, Row 30 for Basket B, Row 58 for Basket C.
- Whipstitch one loop to one panel stitch, all the way across. The match is exactly 16 to 16, so there is nothing to ease in.
Rim tack: About 10 rows higher (Row 12, 40 or 68), tack the matching 16 stitches of basket Rnd 19 to the panel. Use 1 stitch through every 2nd stitch so the scallops stay free.
Side tack: Sew a few stitches up each side where the wall meets the panel edge.
Tension: Keep the stitches snug but not puckered. The panel should stay flat behind the basket, and the basket should stay round in front.
Checkpoint: There should be about 3.2 in (8.1 cm) of panel between one basket’s rim and the next basket’s base. This leaves room for a roll that stands 1 in (2.5 cm) above its rim.
Border
The border is one round of Color A sc worked around the whole panel. It uses the same gauge: 16 sc = 4 in (10.2 cm) across, and 18 rows = 4 in (10.2 cm) down.
At the end of Row 108, ch 1 and work as follows:
- Strap top: Sc in each of the 6 sts. Then work (ch 1) for the corner.
- First long side: Work down the row ends of the strap, taper and body. In each group of 9 row ends, sc in 8 and skip 1.
- Strap, 18 rows: 16 sc
- Taper, 18 rows: 16 sc
- Body, 72 rows: 64 sc
- Side total: 96 sc
- Then ch 1 for the corner.
- Bottom edge: Sc in each of the 16 foundation chains, then ch 1 for the corner.
- Second long side: Work as for the first side. (96 sc) Then ch 1 for the last corner and sl st to the first sc.
Total: 6 + 96 + 16 + 96 = 214 sc, plus 4 corner ch-1 sps. The side counts do not include the corner chains.
Why the math works:
- The panel has 16 stitches and 18 rows per 4 in (10.2 cm), so 8 sc for every 9 row ends matches the stitch width to the row height. The edges lie flat instead of rippling or pulling in.
- Each side has 108 rows ÷ 9 × 8 = 96 sc. At 4 sc per inch, 96 sc = 24 in (61.0 cm), which matches the panel length.
- The border adds 0.25 in (0.6 cm) on each edge, so the panel finishes at 4.5 in × 24.5 in (11.4 cm × 62.2 cm).
Fasten off and weave in the ends.
Hang it:
- Slip the strap through the ring.
- Fold the top 9 rows, 2 in (5.1 cm), back over the ring.
- Whipstitch the strap end flat to Row 91.
The holder now hangs about 22.5 in (57.2 cm) long.
Final Blocking
- Spray each basket lightly with water, or steam it gently. Cotton handles both well.
- Stuff each basket with a toilet paper roll wrapped in a plastic bag to set the round shape.
- Pin each scallop shell upright and ease the fans so they spread evenly.
- Pin the panel flat at 4.5 in (11.4 cm) wide, keeping the edges straight.
- Let everything dry completely before hanging, which usually takes 24 hours.
- Remove the pins and the bagged rolls.
Final Quality-Control Checklist
- Each base is 66 sts and 5.25 in (13.3 cm) across.
- Each basket has 11 open arches, 11 fans and 11 shells, evenly spaced.
- The Rnd 18 count is exactly 66 in every basket.
- The panel is 16 sts wide and 108 rows long before the border.
- Each border side has 96 sc, the bottom has 16 sc, and the top has 6 sc.
- Each base seam joins 16 loops to 16 panel stitches.
- The baskets sit level and centered, with no tilt.
- The strap is sewn securely around the ring.
- All ends are woven in at least 1 in (2.5 cm) and trimmed.
Troubleshooting
- Base cups or ruffles: Your tension is too tight (cupping) or too loose (ruffling). Change hook size and remake the base.
- Fans look crowded: Make sure you skipped exactly 5 sts in Rnd 16, and that you worked the 7 dc into the space, not into the chain stitches.
- Rnd 18 count is off: Each sc3tog must span last dc + sc + first dc. Place a marker on each sc from Rnd 17 to help.
- Basket tips forward: Add more tack stitches at the Rnd 19 line.
- Panel edges ripple: You used too many row ends. Keep strictly to 8 sc per 9 rows.
- Roll won’t fit: Block over a slightly larger form, or remake with a 4.5 mm hook.
Care
Hand wash in cool water with mild soap, press out the water in a towel, and dry flat with the baskets reshaped. Do not tumble dry.
Final Notes
The measurement chain is short:
- Your gauge of 16 sc and 18 rows per 4 in (10.2 cm) gives a 66-stitch base 5.25 in (13.3 cm) wide.
- Rnd 18 brings the 88-stitch fan round back to 66, so every basket keeps that width.
- The panel’s 16 stitches match each basket’s 16-stitch base seam exactly.
- The 96-stitch border sides match the 24 in (61.0 cm) panel.
- Check each stage as you go, and the finished tower will hang straight, hold three rolls and keep its fan lace crisp for years.
Happy crocheting!