

The Rose Lattice holder is a wall-hanging organizer with three round baskets, each holding one toilet roll. The baskets are stacked on a solid back strap. The strap narrows into a triangle at the top and wraps around a wooden ring, so the whole piece hangs from a single hook.
Only two colours are used. Dusty rose is used for the bases, the flower centres and the back strap. Cream outlines each flower and forms the thick top rim of each basket. Together they look soft and vintage, which suits a bathroom with warm neutrals and brass fittings.
The pattern uses US crochet terms. Each basket is 5.25 in (13.3 cm) across and 4 in (10.2 cm) tall. The strap is 3.5 in (8.9 cm) wide and 17.3 in (43.9 cm) long, not counting the ring tab. With the ring, the piece hangs about 20 in (50.8 cm) long.
Here is the order of work. First you make 18 small flower motifs and join them into three rings of six. Next you crochet three flat bases and join one to the bottom of each ring with a cream round. Then you add a cream rim to each basket, crochet the back strap, and sew the baskets onto the strap.
Finished Size and Construction
- Finished size: 5.25 in (13.3 cm) wide × about 20 in (50.8 cm) long, including the ring
- Skill level: Intermediate
- Terminology: US
- Yarn weight: Worsted (#4), cotton or cotton blend
- Hook: 4.5 mm (US 7)
- Number of pieces: 18 motifs, 3 bases and 1 back strap
- Layout: each basket wall is a ring of 6 motifs; the 3 baskets are stacked on the strap
- Motif size: 2.75 in (7.0 cm) square
- Basket height before the rim: 3.25 in (8.3 cm)
- Rim depth: 0.75 in (1.9 cm)
Materials
Use a smooth cotton yarn that does not stretch much, so the baskets keep their shape. A cotton yarn with about 85 m per 50 g (1.7 m per gram) works well.
- Dusty rose (Colour A): 150 g, about 255 m
- Cream (Colour B): 100 g, about 170 m
- 4.5 mm (US 7) crochet hook
- One wooden ring, 2.75 in (7.0 cm) across
- Tapestry needle
- Stitch markers
- Scissors
- Blocking pins and a spray bottle
These amounts include a margin of about 15% for your swatch and for small differences in tension.
Abbreviations (US Terms)
- ch: chain
- sl st: slip stitch
- sc: single crochet
- hdc: half double crochet
- dc: double crochet
- inc: 2 sc in the same stitch
- sc2tog: single crochet 2 together
- BLO: back loop only
- sp: space
- MR: magic ring
- rev sc: reverse single crochet (crab stitch). Work sc from left to right, inserting the hook into the next stitch to the right.
- st(s): stitch(es)
Special stitches
- Beg-CL (beginning cluster): Ch 2. Yarn over, insert the hook in the stitch, pull up a loop, yarn over, pull through 2 loops. Repeat from * once more (3 loops on the hook). Yarn over and pull through all 3 loops.
- CL (3-dc cluster): Yarn over, insert the hook in the stitch, pull up a loop, yarn over, pull through 2 loops. Repeat from * twice more (4 loops on the hook). Yarn over and pull through all 4 loops.
Gauge and Checkpoints
Gauge: 16 sc × 18 rows = 4 in (10.2 cm) in sc worked in rows. That is 4 sc and 4.5 rows per 1 in (2.5 cm).
Before you start, make one motif and block it. It should measure 2.75 in (7.0 cm) square. Every other measurement in this pattern depends on it.
Checkpoints:
- Motif after Round 2: 2 in (5.1 cm) across
- Motif after Round 3: 2.75 in (7.0 cm) square
- Six motifs joined in a flat strip: 16.5 in (41.9 cm) long
- Base after Round 6: 2.75 in (7.0 cm) across
- Base after Round 11: 5.25 in (13.3 cm) across
- Finished basket: 4 in (10.2 cm) tall
- Back strap after Row 68: 15.1 in (38.4 cm) long
If your motif is too big, go down 0.5 mm in hook size. If it is too small, go up 0.5 mm. Change the hook rather than the stitch counts. The base and the rim are both 66 stitches because 6 motifs × 11 edge stitches = 66, so you must keep those counts.
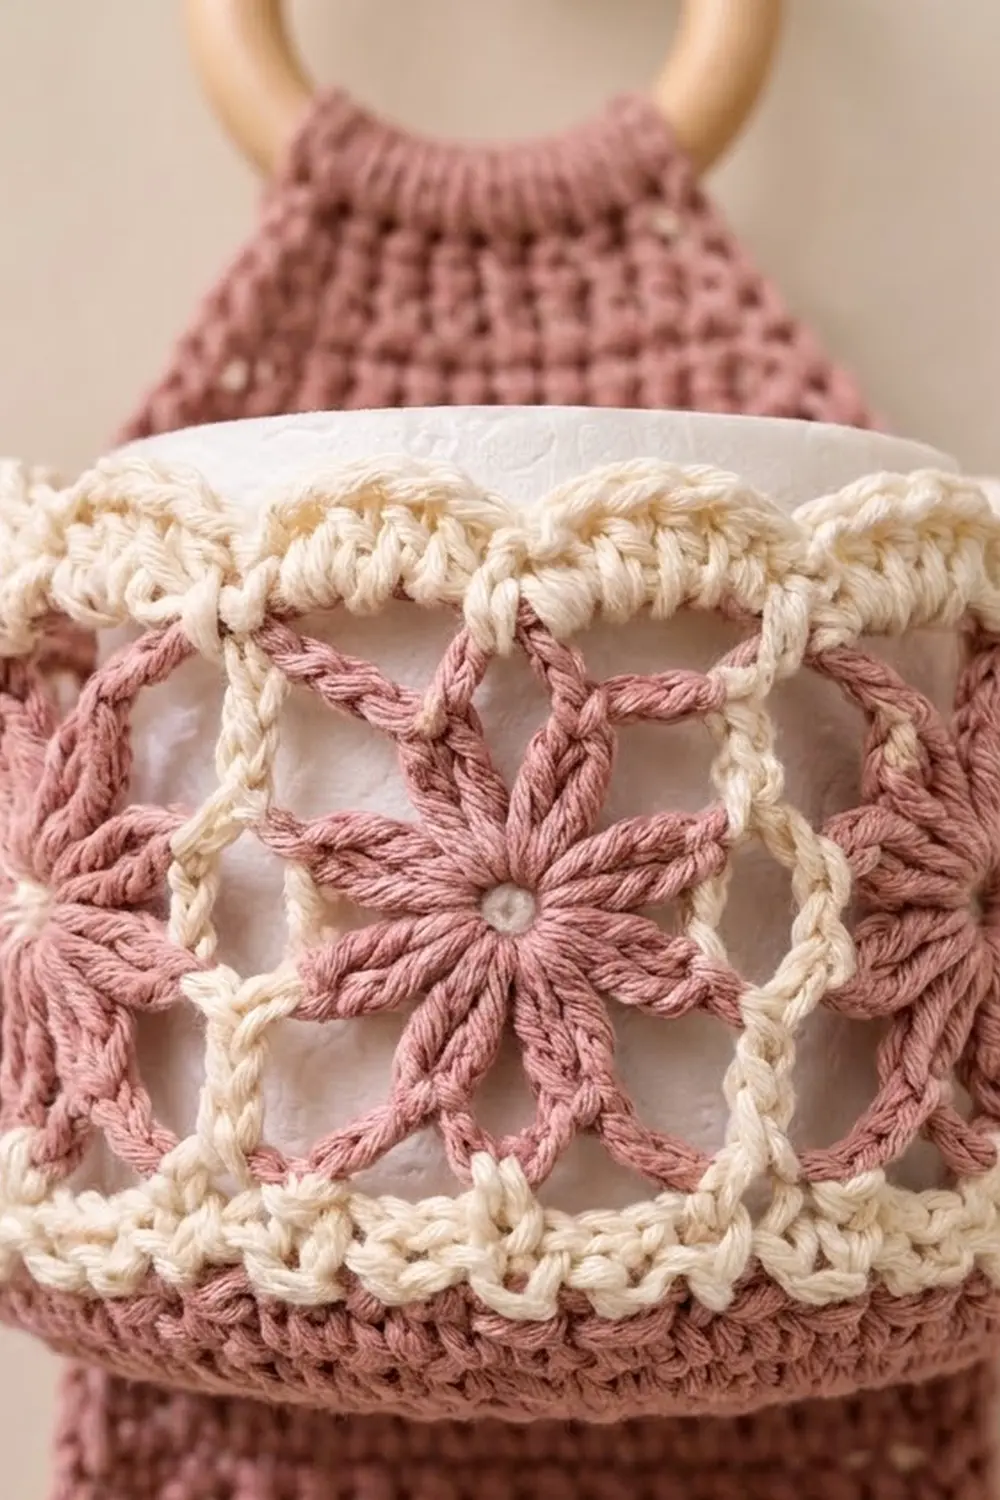
Flower Motif (Make 18)
Round 1 (Colour A): Make a MR. Ch 1, then work 8 sc in the ring. Join with a sl st to the first sc. (8 sc)
Pull the ring closed, but leave a small hole. This hole is the open centre of the flower.
Round 2 (Colour A): Work a Beg-CL in the same st. Ch 2. Work a CL in the next sc, ch 2. Repeat from * 6 more times. Join with a sl st to the top of the Beg-CL. (8 clusters, 8 ch-2 sps) Fasten off.
These 8 clusters are the petals.
Round 3 (Colour B): Join Colour B in any ch-2 sp.
- Ch 3 (counts as 1 dc). In the same sp, work (dc, ch 2, 2 dc). This is the first corner.
- Sc in the top of the next CL.
- Work 3 hdc in the next ch-2 sp.
- Sc in the top of the next CL.
- In the next ch-2 sp, work (2 dc, ch 2, 2 dc). Sc in the next CL, work 3 hdc in the next sp, then sc in the next CL. Repeat from * 2 more times.
- Join with a sl st to the top of the beginning ch-3.
(36 sts + 4 corner ch-2 sps) Fasten off and weave in the ends.
Stitches per side: Each side has 2 dc + 1 sc + 3 hdc + 1 sc + 2 dc = 9 sts.
For joining and edging, each side is counted as 11 edge stitches: the 9 sts plus 1 stitch worked into each corner ch-2 sp. These 11 already include the 2 corner positions, so do not count the corners again.
The dc stitches at the corners and the hdc stitches in the middle of each side make the cream outline square.
Make All Pieces
Colour totals:
- Colour A: 18 motif centres (Rounds 1–2), 3 bases and 1 back strap
- Colour B: 18 motif outlines (Round 3), 3 joining rounds and 3 rims
Layout of one basket wall (6 motifs; the ring closes from M6 back to M1):
| M1 | M2 | M3 | M4 | M5 | M6 | → closes back to M1
Stack on the back strap (top to bottom):
   /\      ring tab + triangle
  |  |
[Basket 1]
  |  |     1.5 in (3.8 cm) gap
[Basket 2]
  |  |     1.5 in (3.8 cm) gap
[Basket 3]
Joining
Motifs Into a Wall Ring
- Use Colour B. Hold two motifs with the right sides together.
- Work sl sts through the BLO of both motifs at the same time.
- Join from corner to corner: 1 sl st in the corner ch-2 sps, 1 sl st in each of the 9 sts, then 1 sl st in the next corner ch-2 sps. (11 sl sts per seam)
- Join M1 to M6 in the same way, making 5 seams and a flat strip.
- Check that the strip measures 16.5 in (41.9 cm).
- Join M6 to M1 with the sixth seam to close the ring.
Keep your sl sts as loose as the motif stitches. If the seams are tight, the wall will pucker and the ring will come out smaller than 16.5 in (41.9 cm) around.
Edge count: The bottom edge of the ring and the top edge are each 6 × 11 = 66 edge stitches. Neighbouring corner spaces each get their own stitch, so no extra stitches are added at the seams.
Base (Make 3)
Work in continuous rounds with Colour A. Mark the first stitch of each round.
- Round 1: 6 sc in a MR. (6)
- Round 2: Inc in each st around. (12)
- Round 3: Sc 1, inc. Repeat around. (18)
- Round 4: Sc 2, inc. Repeat around. (24)
- Round 5: Sc 3, inc. Repeat around. (30)
- Round 6: Sc 4, inc. Repeat around. (36) Checkpoint: 2.75 in (7.0 cm) across.
- Round 7: Sc 5, inc. Repeat around. (42)
- Round 8: Sc 6, inc. Repeat around. (48)
- Round 9: Sc 7, inc. Repeat around. (54)
- Round 10: Sc 8, inc. Repeat around. (60)
- Round 11: Sc 9, inc. Repeat around. (66) Checkpoint: 5.25 in (13.3 cm) across.
- Round 12 (turn-up ridge): Sc in the BLO of each st around. (66) Fasten off.
Working in the back loops makes the edge turn upward. This forms the short rose ridge under the flowers.
Base to Wall
- Place a wall ring on top of a base, with the wrong sides together. Line up a motif seam with the first stitch of Round 12.
- Join Colour B. Work 1 sc through each Round 12 stitch and the matching edge stitch of the motifs, all the way around.
- Join with a sl st. (66 sc)
This round makes the cream line along the bottom of the flowers. The basket should now measure 3.25 in (8.3 cm) tall.
Border (Top Rim)
Border gauge: The 3 rim rounds together measure 0.75 in (1.9 cm). Sc rounds are about 0.25 in (0.6 cm) each, hdc rounds are about 0.3 in (0.8 cm), and the rev sc round is about 0.2 in (0.5 cm).
Work all rim rounds with Colour B on the top edge of the wall ring. Each motif counts as 11 edge stitches.
- Round 1: Join at a seam. Ch 1. On each motif, work 1 sc in the corner sp, 1 sc in each of the 9 sts, then 1 sc in the next corner sp. Join. (66 sc = 6 motifs × 11)
- Round 2: Ch 2 (does not count as a stitch). Work 1 hdc in each st around. Join. (66 hdc = 66 worked 1-per-stitch + 0 added)
- Round 3: Ch 1. Work rev sc in each st around. Join and fasten off. (66 rev sc = 66 worked 1-per-stitch + 0 added)
Why the math works: The base, the cream joining round and every rim round all have 66 stitches. That matches 6 motifs × 11 edge stitches. The walls go straight up without flaring or pulling in, and the crab-stitch round makes the corded edge at the top.
Back Strap
Use Colour A and work in rows. Ch 1 at the start of each row; it does not count as a stitch.
Foundation: Ch 15.
Row 1: Sc in the second ch from the hook and in each ch across. Turn. (14 sc) The strap should measure 3.5 in (8.9 cm) wide.
Rows 2–68: Sc in each st across. Turn. (14 sc) Checkpoint: 15.1 in (38.4 cm) long.
Triangle:
- Row 69: Sc2tog, sc 10, sc2tog. (12)
- Row 70: Sc in each st across. (12)
- Row 71: Sc2tog, sc 8, sc2tog. (10)
- Row 72: Sc in each st across. (10)
- Row 73: Sc2tog, sc 6, sc2tog. (8)
- Row 74: Sc in each st across. (8)
- Row 75: Sc2tog, sc 4, sc2tog. (6)
- Row 76: Sc in each st across. (6)
- Row 77: Sc2tog, sc 2, sc2tog. (4)
- Row 78: Sc in each st across. (4)
The triangle is 10 rows tall, or 2.2 in (5.6 cm). The strap now measures 17.3 in (43.9 cm).
Ring tab:
- Rows 79–88: Sc in each st across. (4)
The tab is 2.2 in (5.6 cm) long. Fasten off and leave a 12 in (30.5 cm) tail.
Fold the tab over the wooden ring to the back and sew it to Row 78. Wrap the remaining tail tightly around the base of the tab a few times so it looks neat.
Attaching the Baskets
The strap has room for 3 baskets of 18 rows each, plus 2 gaps of 7 rows each: 18 + 7 + 18 + 7 + 18 = 68 rows.
- Basket 3 (bottom): Rows 1–18
- Basket 2 (middle): Rows 26–43
- Basket 1 (top): Rows 51–68
To sew each basket on:
- Centre the basket on the strap.
- With Colour A, sew two vertical seams 3.5 in (8.9 cm) apart, one along each long edge of the strap. Sew through the base ridge, the cream joining round, the motif outlines and rim Round 1.
- Sew across the bottom ridge as well, so the basket cannot tip forward.
Final Blocking
- Lightly spray the whole holder with water until it is damp.
- Put a toilet roll, or a jar 4.5 in (11.4 cm) wide, inside each basket to shape the walls.
- Lay the strap flat and pin it to 3.5 × 17.3 in (8.9 × 43.9 cm).
- Pinch each rim so the crab-stitch edge stands upright.
- Leave it to dry completely, then remove the forms.
Final Quality-Control Checklist
- Every motif is 2.75 in (7.0 cm) square, and its 8 petals are evenly spaced.
- Each wall ring has 6 seams of 11 sl sts.
- The base, joining round and all 3 rim rounds each have 66 stitches.
- Each basket is 5.25 in (13.3 cm) across and 4 in (10.2 cm) tall.
- The gaps between baskets are 1.5 in (3.8 cm).
- The ring tab is sewn securely and the ring sits centred above the triangle.
- All ends are woven in on the inside.
Troubleshooting
- The wall flares out: Your joining sl sts are too loose, or you added stitches at the seams. Count again to make sure you have 66.
- The wall pulls in at the top: Rim Round 1 is too tight. Work it with a hook 0.5 mm larger.
- The base cups up before Round 12: Your tension is tight. Go up one hook size for the base only.
- The base ruffles: Your tension is loose. Go down one hook size.
- The flower centre has a large hole: Pull the magic ring tighter before you join Round 1.
- The baskets droop forward: Add a second line of stitches across the bottom ridge, sewing it to the strap.
Care
Hand wash in cool water. Press the water out gently, without wringing, then lay flat to dry with a form inside each basket so they keep their shape.
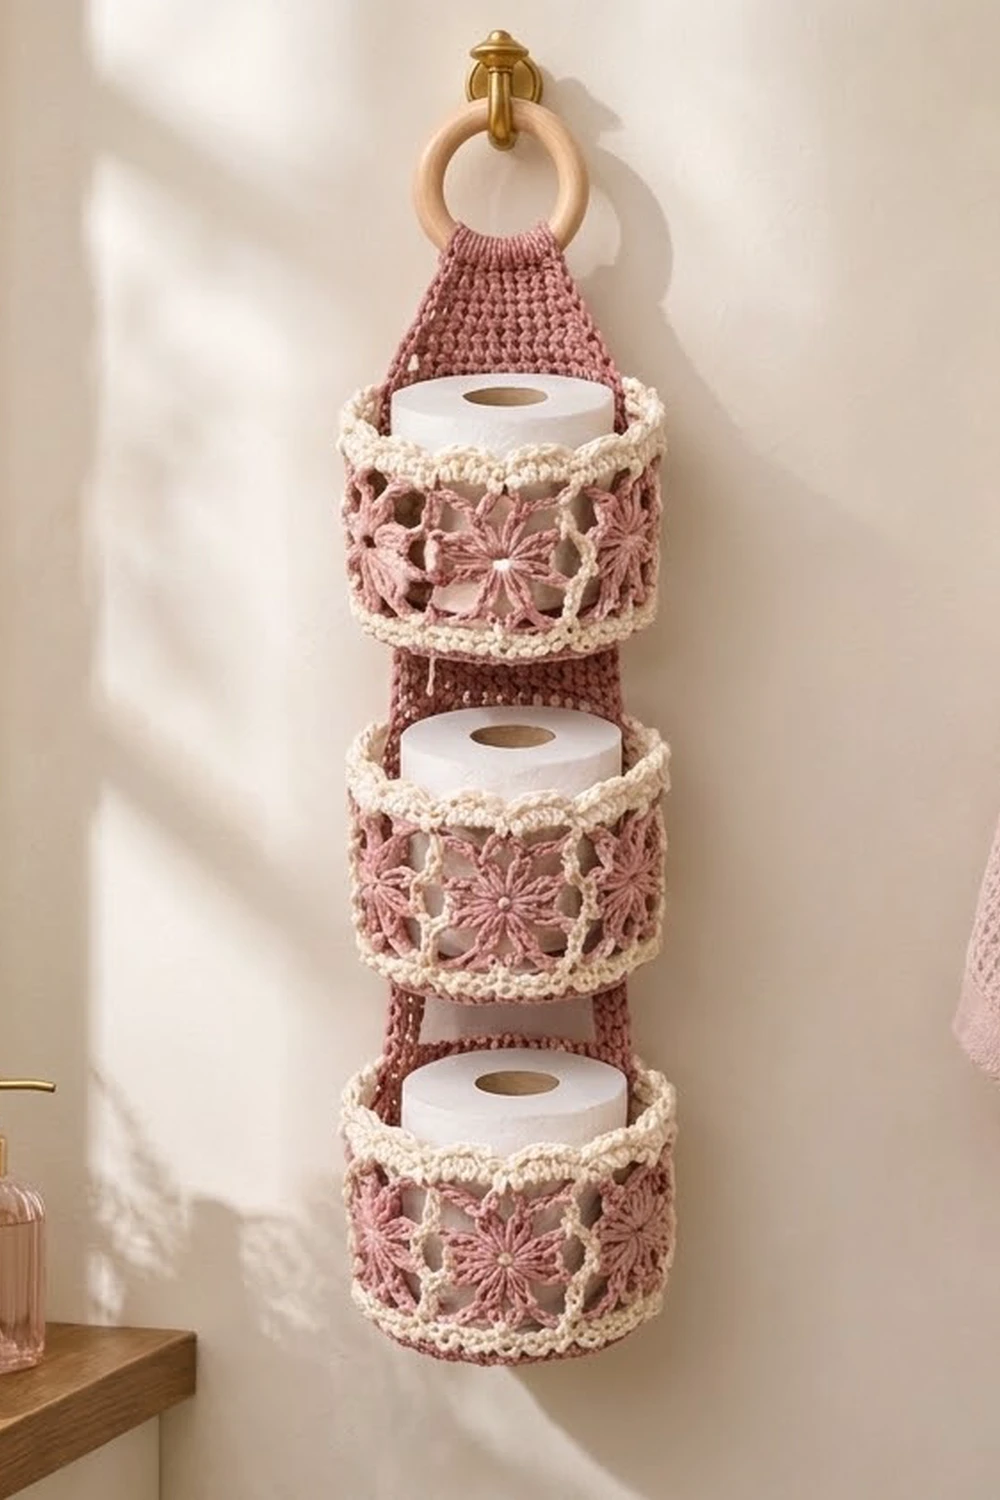
Final Notes
All the sizes in this pattern start from one measurement: a 2.75 in (7.0 cm) motif. Six motifs make a 16.5 in (41.9 cm) wall ring with 66 edge stitches. The 66-stitch base and the 66-stitch rim both match that ring exactly, so each basket is 5.25 in (13.3 cm) across and 4 in (10.2 cm) tall. The 14-stitch strap has 68 straight rows to hold three baskets with 1.5 in (3.8 cm) gaps between them, then narrows to the ring. If your first motif matches the gauge, the rest of the holder will come out to size.
Happy crocheting!