

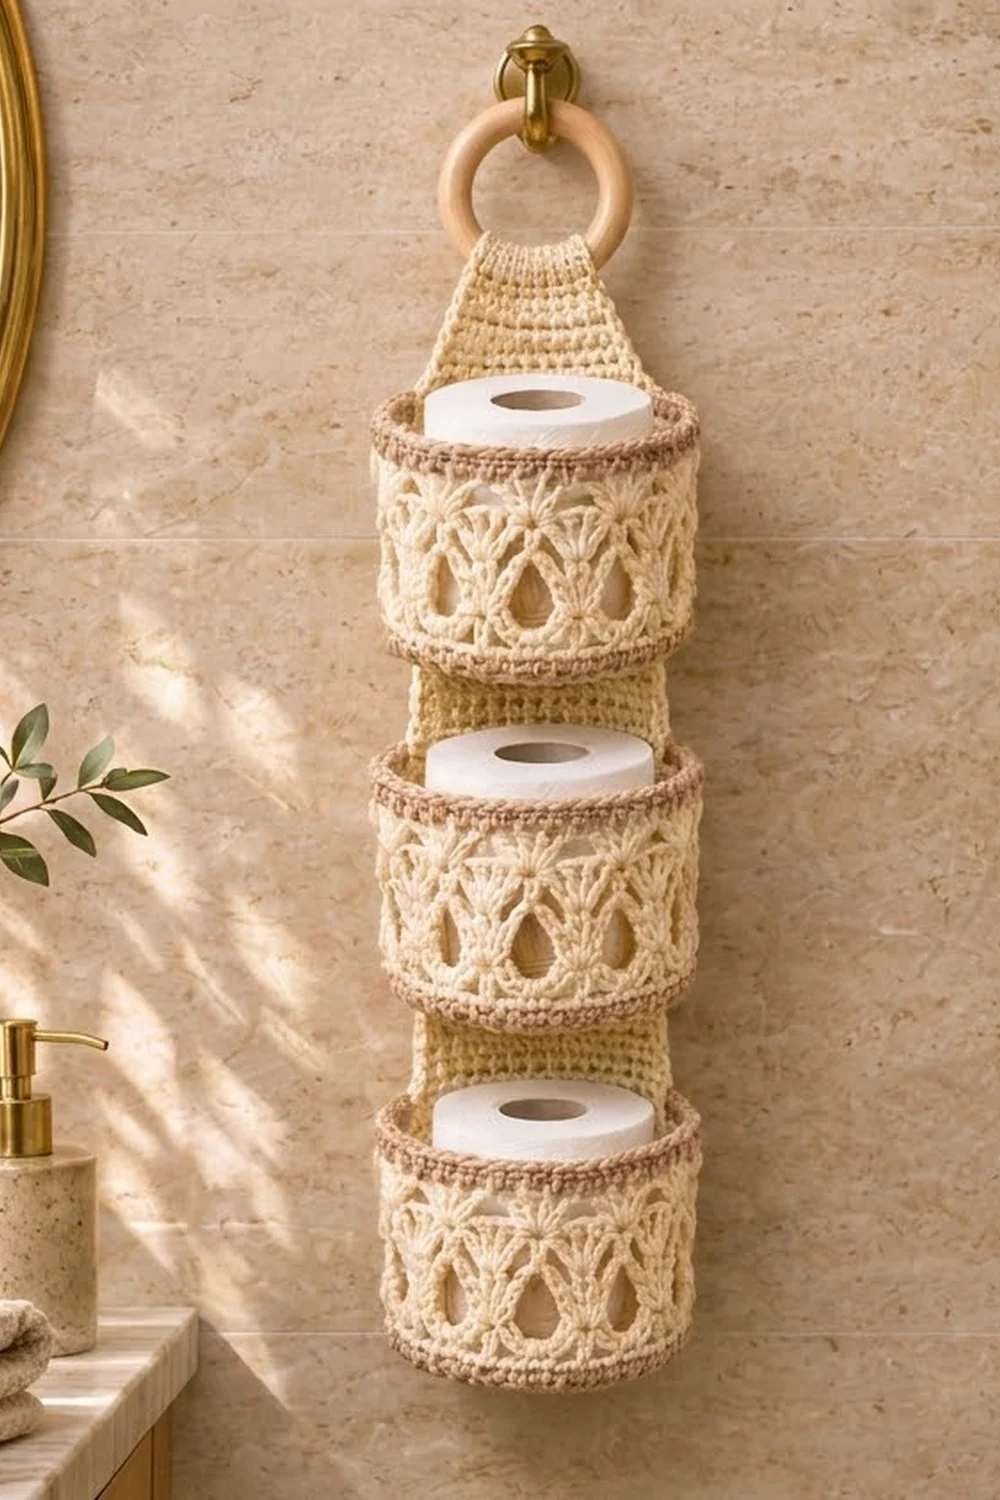
This hanging holder stores three toilet rolls in a small space. It has a slim cream back panel with three round lace baskets stacked on it. A wooden ring at the top lets you hang it from a hook or towel bar.
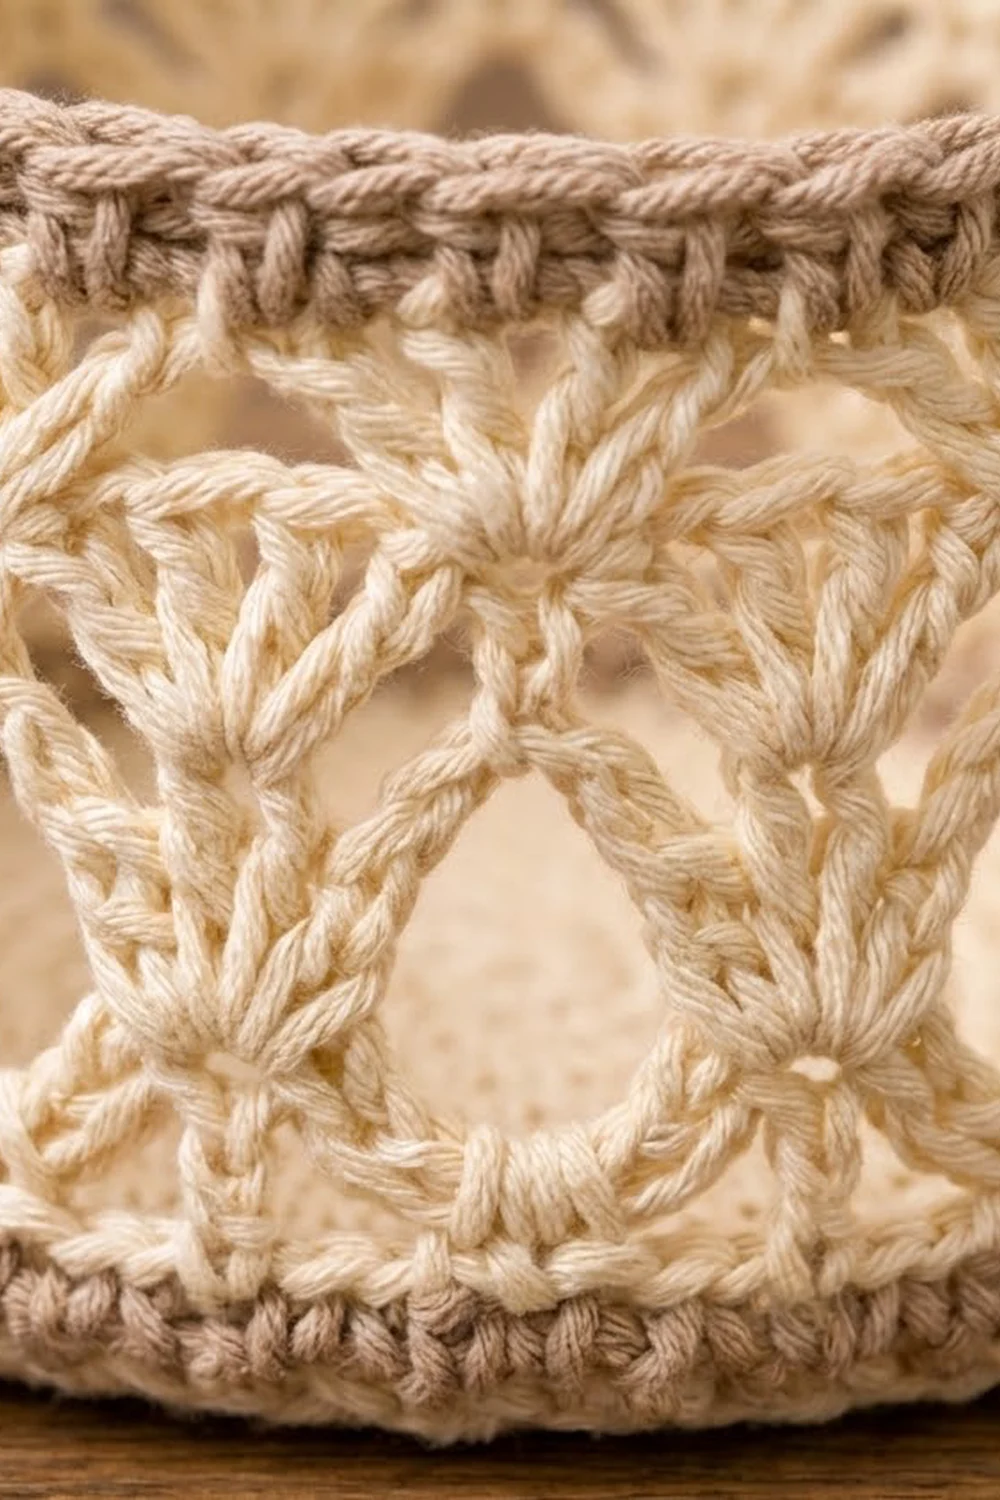
The palette is cream for the panel and the basket lace, with taupe for the rims. In each basket, flared double crochet fans open into large teardrop-shaped windows, and a second band of smaller fans sits above them. A taupe reverse single crochet rim gives each basket a rounded, rope-like top edge.
This pattern uses US crochet terms. The finished holder hangs about 22 in (55.9 cm) below the ring. Each basket is 5.5 in (14.0 cm) across and 4.25 in (10.8 cm) tall, so a standard roll of about 4.5 in (11.4 cm) drops in easily.
Construction is simple. You crochet three baskets from the base up, crochet one back panel in rows, and sew the baskets onto the panel. Then you add a single round of border to the panel and fold its tab over the wooden ring.
Finished Size and Construction
- Finished size: 4.5 in (11.4 cm) wide panel, hanging about 22 in (55.9 cm) below the ring
- Skill level: Intermediate
- Terminology: US crochet terms
- Yarn weight: Worsted (#4) cotton or cotton blend
- Hook: 5.0 mm (H-8)
- Number of pieces: 4 (1 back panel and 3 baskets), plus a purchased wooden ring
- Layout: 3 baskets in a single vertical column
- Piece size: each basket is 5.5 in (14.0 cm) across × 4.25 in (10.8 cm) tall
- Panel size before border: 4 in × 24 in (10.2 cm × 61.0 cm), measured flat with the tab unfolded
- Border depth: 0.25 in (0.6 cm), one round of single crochet
Materials
Use a smooth worsted-weight cotton or cotton blend. Cotton holds the basket shape, shows the lace clearly, and copes with bathroom humidity. Avoid fuzzy or very stretchy yarns, because they blur the teardrop openings.
Yarn:
– Cream (main color): 200 g, about 340 m (372 yd)
– Taupe (contrast color): 50 g, about 85 m (93 yd)
These quantities include a margin of roughly 10–15% for your gauge swatch and small differences in tension.
Tools:
– 5.0 mm (H-8) crochet hook
– Wooden ring, 3 in (7.6 cm) outer diameter
– Tapestry needle
– 6 locking stitch markers
– Scissors
– Measuring tape
– Pins and a blocking mat
Abbreviations (US Terms)
- ch – chain
- sl st – slip stitch
- sc – single crochet
- hdc – half double crochet
- dc – double crochet
- tr – treble crochet
- sc2tog – single crochet 2 together
- BLO – back loop only
- sp – space
- st(s) – stitch(es)
- rev sc – reverse single crochet (crab stitch)
Special stitches
- dc2tog across a gap: Yarn over, insert your hook in the first stitch given, pull up a loop, and yarn over and draw through 2 loops. Yarn over, insert your hook in the second stitch given, pull up a loop, and yarn over and draw through 2 loops. Then yarn over and draw through all 3 loops on the hook.
- Rev sc: Work single crochet from left to right instead of right to left. This makes the raised, rope-like edge.
Gauge and Checkpoints
Gauge: 14 sc and 16 rows = 4 in (10.2 cm) in sc worked in rows.
Make one complete basket before anything else. It tests your gauge and your tension in the lace at the same time.
- After base Round 5 (30 sts): about 2.75 in (7.0 cm) across.
- After base Round 10 (60 sts): 5.5 in (14.0 cm) across, with a circumference of about 17.1 in (43.4 cm).
- After Round 13: the wall stands about 1 in (2.5 cm) above the base edge.
- After Round 17: the wall is about 3 in (7.6 cm) tall.
- Finished basket: 4.25 in (10.8 cm) tall.
- Panel after Row 10: 2.5 in (6.4 cm) tall and 4 in (10.2 cm) wide.
If your basket is too big, go down 0.5 mm in hook size. If it is too small, or a roll will not fit, go up 0.5 mm. Don’t add stitches, because every lace round is based on 60 stitches.
Basket (Make 3)
Work in joined rounds. The ch 1 at the start of a round does not count as a stitch. To change color, finish the last stitch of the round with the new color, then join with that color.
Base (Cream)
Round 1: Make a magic ring. Ch 1, 6 sc in the ring, then join with a sl st to the first sc. (6 sts)
Round 2: Ch 1, work 2 sc in each st around, then join. (12 sts)
Round 3: Ch 1, sc in the next st, 2 sc in the next st; repeat from * around, then join. (18 sts)
Round 4: Ch 1, sc in the next 2 sts, 2 sc in the next st; repeat from * around, then join. (24 sts)
Round 5: Ch 1, sc in the next 3 sts, 2 sc in the next st; repeat from * around, then join. (30 sts)
Round 6: Ch 1, sc in the next 4 sts, 2 sc in the next st; repeat from * around, then join. (36 sts)
Round 7: Ch 1, sc in the next 5 sts, 2 sc in the next st; repeat from * around, then join. (42 sts)
Round 8: Ch 1, sc in the next 6 sts, 2 sc in the next st; repeat from * around, then join. (48 sts)
Round 9: Ch 1, sc in the next 7 sts, 2 sc in the next st; repeat from * around, then join. (54 sts)
Round 10: Ch 1, sc in the next 8 sts, 2 sc in the next st; repeat from * around. Change to taupe on the join. (60 sts)
Lower Trim (Taupe)
Round 11: Ch 1, sc in BLO of each st around, then join. (60 sts) This BLO round makes the ridge where the wall turns up from the base.
Round 12: Ch 1, sc in each st around. Change to cream on the join. (60 sts)
Lace Wall (Cream)
Round 13: Ch 3 (counts as dc), dc in each remaining st around, then join to the top of the ch-3. (60 sts)
Round 14 (large teardrops): Ch 3 (counts as dc), 4 dc in the same st (half fan). Sk 2, sc in the next st, ch 3, sk 3, sc in the next st, sk 2.
Work 9 dc in the next st, sk 2, sc in the next st, ch 3, sk 3, sc in the next st, sk 2; repeat from * 4 more times.
Work 4 dc in the first st of the round to finish the first fan, then join to the top of the beginning ch-3.
This gives 6 fans of 9 dc each and 12 sc, for 66 sts plus 6 ch-3 spaces. Each repeat uses exactly 10 sts of Round 13 (1 + 2 + 1 + 3 + 1 + 2 = 10).
The fans flare toward each other at the top. That leaves a wide, rounded opening above each ch-3 that narrows to a point: the teardrop. The join lands on the center (5th) dc of the first fan.
Round 15 (closing the points): Ch 1, sc in the same st (the center dc).
Ch 3, then work dc2tog across the gap: the first leg goes in the last dc of the current fan, and the second leg goes in the first dc of the next fan. Ch 3, sc in the center (5th) dc of that next fan; repeat from * around. On the last repeat, replace the final sc with a sl st to the first sc.
You now have 6 sc and 6 dc2tog, for 12 sts plus 12 ch-3 spaces. Each dc2tog closes a teardrop tip.
Round 16 (small fans): Ch 1, sc in the same st.
Ch 2, 7 dc in the top of the next dc2tog, ch 2, sc in the next sc; repeat from * around. On the last repeat, replace the final sc with a sl st to the first sc.
You now have 6 sc and 42 dc, for 48 sts plus 12 ch-2 spaces. The ch-3 spaces of Round 15 stay open underneath as small windows.
Round 17 (leveling round): Ch 4 (counts as tr).
Dc in the next ch-2 sp, hdc in the next dc, sc in the next 5 dc, hdc in the next dc, dc in the next ch-2 sp, tr in the next sc; repeat from * around. Leave out the final tr and join to the top of the ch-4.
That is 48 sts worked one into each existing stitch, plus 12 sts worked into the ch-2 spaces, for 60 sts (6 tr, 12 dc, 12 hdc, 30 sc). The taller stitches over the low points level the top edge.
Round 18: Ch 1, sc in each st around. Change to taupe on the join. (60 sts)
Top Rim (Taupe)
Round 19: Ch 1, sc in each st around, then join. (60 sts)
Round 20: Ch 1, sc in each st around, then join. (60 sts)
Round 21: Ch 1, rev sc in each st around, then join. (60 sts) Fasten off and weave in the ends.
Back Panel (Make 1, Cream)
Row 1: Ch 15, sc in the 2nd ch from the hook and in each ch across. (14 sts)
Rows 2–64: Ch 1, turn, sc in each st across. (14 sts) The panel now measures 16 in (40.6 cm).
Taper:
– Row 65: Ch 1, turn, sc2tog, sc in the next 10 sts, sc2tog. (12 sts)
– Rows 66–68: Ch 1, turn, sc in each st across. (12 sts)
– Row 69: Ch 1, turn, sc2tog, sc in the next 8 sts, sc2tog. (10 sts)
– Rows 70–72: Ch 1, turn, sc in each st across. (10 sts)
– Row 73: Ch 1, turn, sc2tog, sc in the next 6 sts, sc2tog. (8 sts)
– Rows 74–76: Ch 1, turn, sc in each st across. (8 sts)
– Row 77: Ch 1, turn, sc2tog, sc in the next 4 sts, sc2tog. (6 sts)
– Rows 78–80: Ch 1, turn, sc in each st across. (6 sts)
The taper measures 4 in (10.2 cm).
Tab:
– Rows 81–96: Ch 1, turn, sc in each st across. (6 sts)
The tab is about 1.7 in (4.3 cm) wide and 4 in (10.2 cm) long. Don’t fasten off; the border starts from here. The panel now measures 4 in × 24 in (10.2 cm × 61.0 cm).
Make All Pieces
- Baskets: 3 baskets, each using about 45 g of cream and about 12 g of taupe
- Back panel: 1 panel, using about 45 g of cream
Layout (panel rows, from the bottom up):
        ( wooden ring )
        [ Tab: rows 81–96 ]
       / Taper: rows 65–80 \
  [ Plain panel: rows 60–64 ]
  [ BASKET 3:    rows 43–59 ]
  [ Gap:         rows 39–42 ]
  [ BASKET 2:    rows 22–38 ]
  [ Gap:         rows 18–21 ]
  [ BASKET 1:    rows 1–17  ]
Each basket covers 17 rows, or 4.25 in (10.8 cm). Each gap is 4 rows, or 1 in (2.5 cm). Above the top basket there are 5 plain rows, or 1.25 in (3.2 cm).
Joining
Method: Whipstitch with cream yarn and a tapestry needle along two vertical seam lines on each basket.
Stitch-to-stitch logic: On each basket, place markers in sts 27 and 34 of Round 18. They sit 7 sts apart, which is 2 in (5.1 cm), centered on the back of the basket.
On the panel, the seam lines run up stitch columns 4 and 11. These are also 7 sts apart, or 2 in (5.1 cm), and centered on the 14-st width. Because both pairs of seam lines are 2 in apart, the basket sits flat against the panel without pulling.
Steps:
1. Pin Basket 1 so that its taupe base ridge (Round 11) lines up with Row 1 of the panel and its rim lines up with Row 17.
2. Sew up column 4 of the panel to marker 27 on the basket. Catch one panel row-stitch and one basket stitch-post with each pass, about 4 passes per inch (2.5 cm).
3. Repeat along column 11 to marker 34.
4. Add 3 tacking stitches across the bottom, joining the Round 11 ridge to Row 1 between the two seams.
5. Attach Basket 2 at Rows 22–38 and Basket 3 at Rows 43–59 in the same way.
Tension: Pull each pass snug but not tight. The panel should stay flat, and the lace should not pucker.
Size checkpoint: The gaps between baskets should measure 1 in (2.5 cm), and the plain section above Basket 3 should measure 1.25 in (3.2 cm).
Border
Border gauge: 3.5 sc per inch (2.5 cm), which matches the panel’s stitch gauge.
Round 1 (cream): Work around the whole panel, starting at the top of the tab. Each corner is 3 sc in one stitch.
- Top edge (Row 96): 3 sc in the first st, sc in the next 4 sts, 3 sc in the last st.
- Long side, working down Rows 96 to 1: Work 1 sc in each row end, skipping every 8th row end. That gives 84 sc between the corners.
- Bottom edge (foundation chain side): 3 sc in the first loop, sc in the next 12 loops, 3 sc in the last loop.
- Second long side, working up Rows 1 to 96: Work 84 sc between the corners, skipping every 8th row end as before.
- Join to the first sc.
Total: 4 corners × 3 = 12, plus 4 + 84 + 12 + 84 = 196 sts.
Why the math works: The top and bottom edges use each of their stitches once: 1 corner stitch + 4 + 1 corner stitch = 6, and 1 + 12 + 1 = 14. The corner groups are counted only once.
On the long sides, the panel has 4 rows per inch but the stitch gauge is 3.5 sts per inch. Working 7 sc for every 8 rows gives 0.875 × 4 = 3.5 sc per inch, so the sides stay flat. 96 rows ÷ 8 = 12 skipped row ends, and 96 − 12 = 84 sc.
The border makes the panel 4.5 in × 24.5 in (11.4 cm × 62.2 cm).
Ring: Fold the tab over the wooden ring toward the back of the panel. Whipstitch the end of the tab to the back of the taper, about 2 in (5.1 cm) below the ring.
Final Blocking
- Fill each basket with a toilet roll or a rolled towel so it holds a round shape.
- Mist the baskets and the panel with water until they are evenly damp.
- Lay the holder face up on a blocking mat. Pin the panel straight at 4.5 in (11.4 cm) wide.
- Open each teardrop with your fingertip, and make the fans spread evenly.
- Shape each rim into a smooth circle 5.5 in (14.0 cm) across.
- Let everything dry completely, then remove the pins and fillers.
Final Quality-Control Checklist
- [ ] Each basket base is flat and 5.5 in (14.0 cm) across.
- [ ] Each basket has 6 large teardrops, 6 small fans, and 60 sts in the rim.
- [ ] All three baskets are 4.25 in (10.8 cm) tall.
- [ ] The gaps between baskets are 1 in (2.5 cm).
- [ ] The border lies flat, with 84 sc on each long side.
- [ ] The tab is secure around the ring.
- [ ] All ends are woven in and hidden.
- [ ] The holder hangs straight when loaded with rolls.
Troubleshooting
- The base cups: Your increases are too tight. Go up a hook size for the base only.
- The base ruffles: You have too many stitches. Recount to 60 at Round 10.
- The teardrops are closed: Pull up the dc stitches in each fan a little taller.
- The top edge is wavy after Round 17: Check that the tr goes over the sc and the 5 sc go over the fan centers.
- A basket tilts forward: Add more tacking stitches along the base ridge.
- The panel edge ruffles: Skip one more row end per side, and keep the count even on both sides.
- A roll won’t fit: Go up 0.5 mm in hook size for the wall rounds.
Care
Hand wash in cool water, press out the water in a towel, and dry flat with the baskets stuffed to hold their shape. Don’t tumble dry.
Final Notes
The measurements build on each other:
- The gauge of 14 sc = 4 in (10.2 cm) gives a 60-st base 5.5 in (14.0 cm) across.
- The wall rounds stack up to a basket 4.25 in (10.8 cm) tall.
- On the panel, 17 rows hold each basket and 4 rows make each 1 in (2.5 cm) gap.
- The 64-row body measures 16 in (40.6 cm), and the taper and tab bring the panel to 24 in (61.0 cm).
- The 196-st border adds 0.25 in (0.6 cm) on each edge.
Check each step before you move on, and the finished holder will hang straight with all three baskets level.
Happy crocheting!