

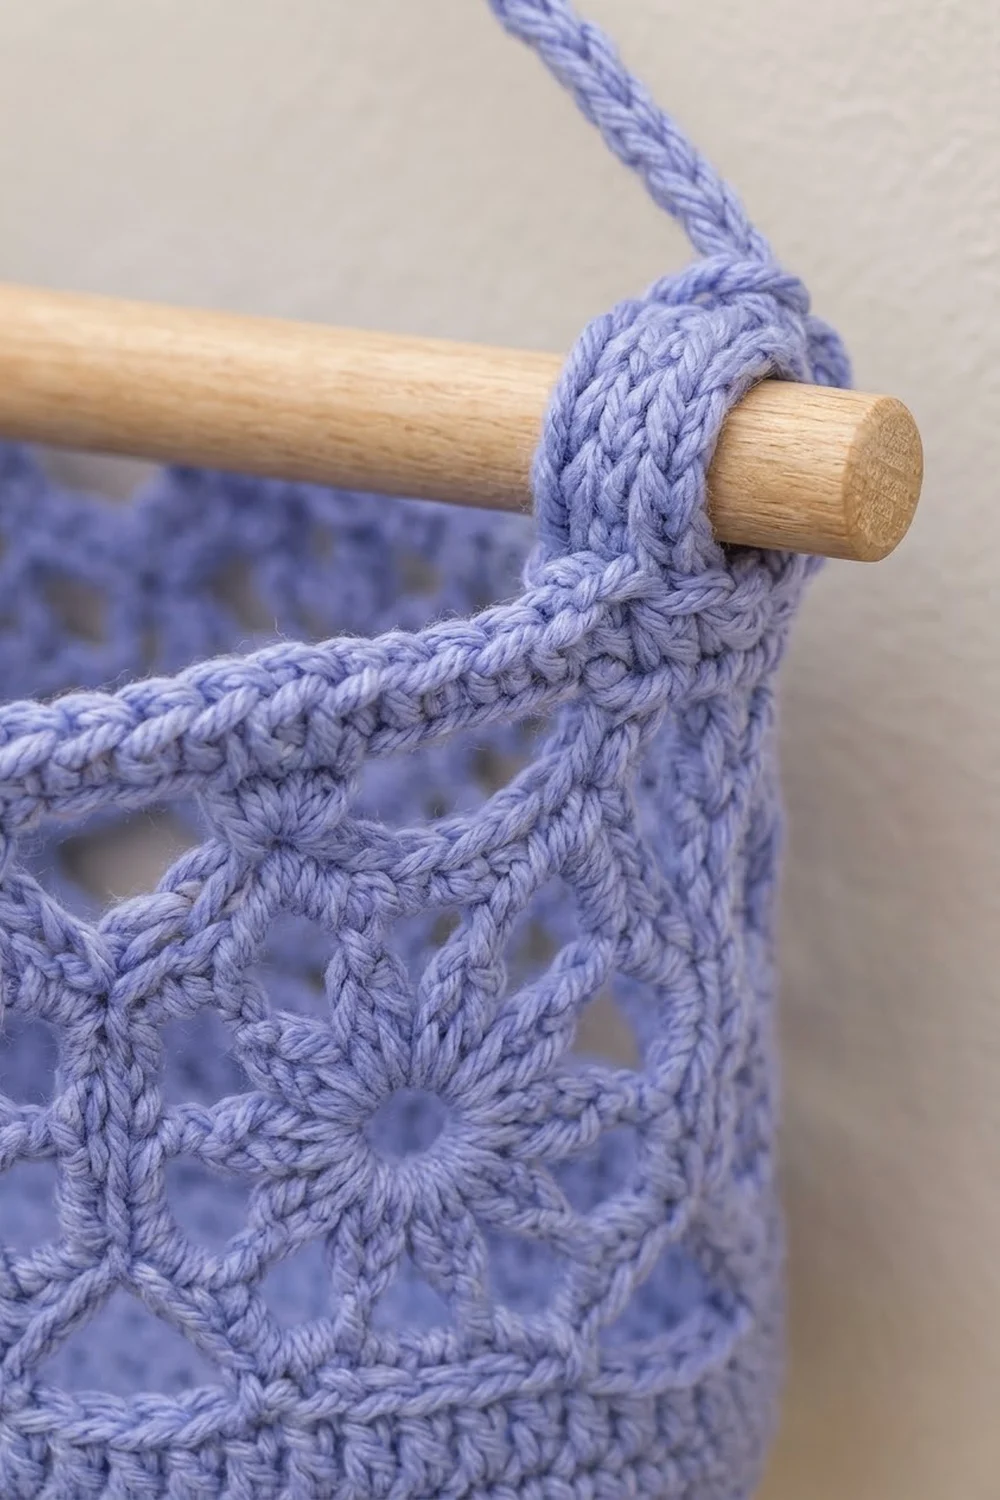
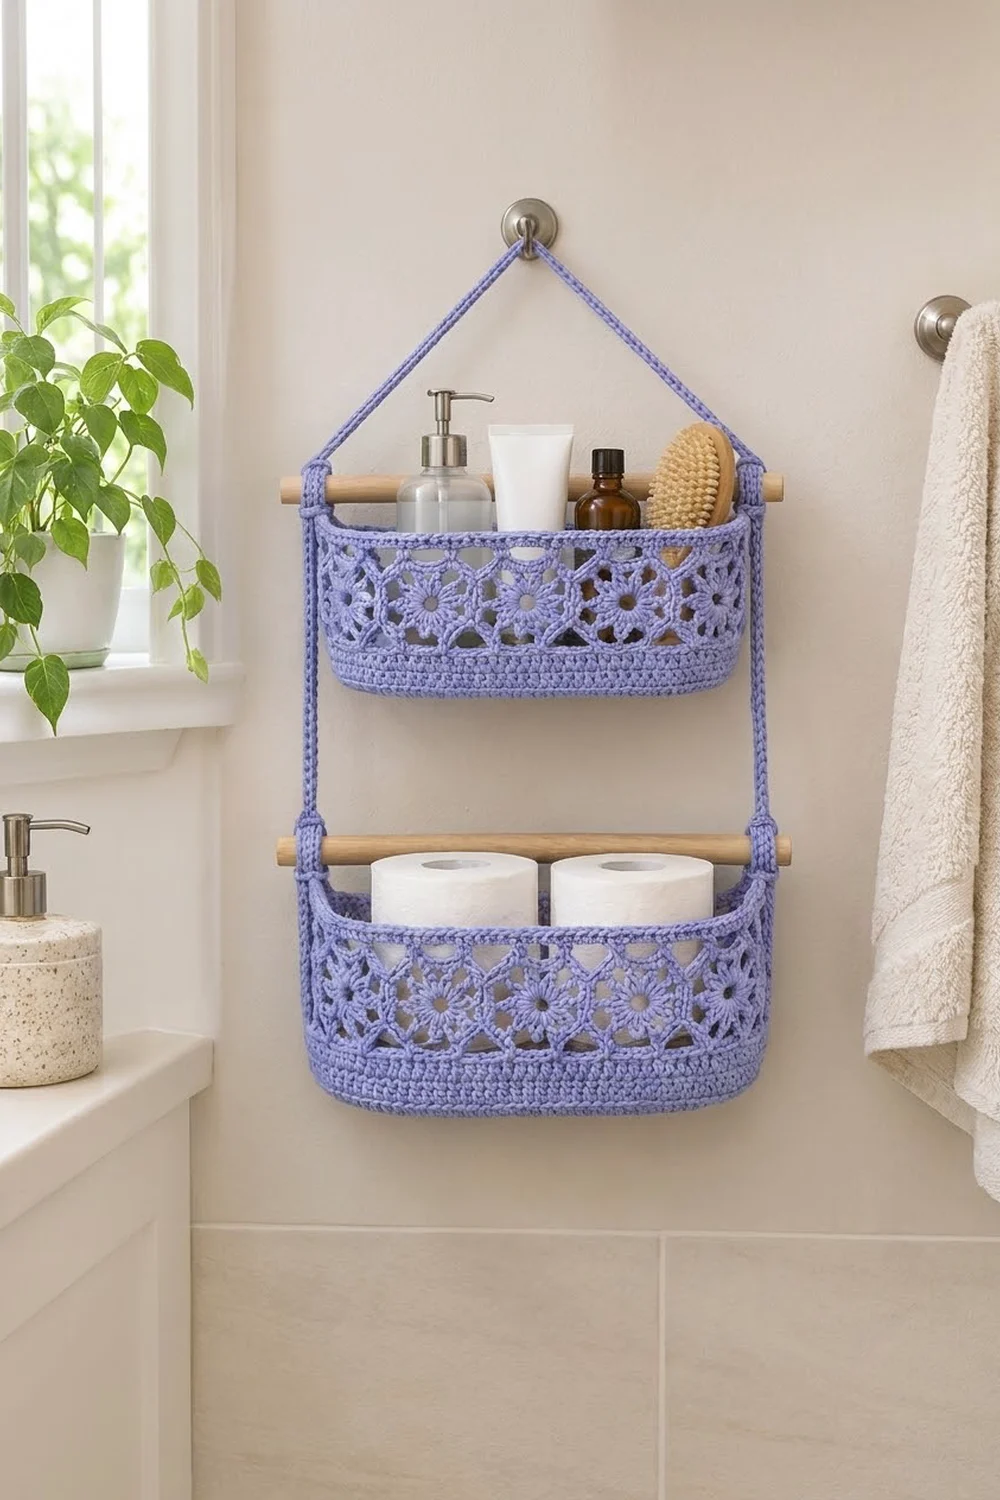
This two-tier organizer hangs from one wall hook and holds bathroom basics: soap, lotion and a brush on top, spare toilet rolls below. Each basket is a firm oval of single crochet with a band of openwork hexagon flowers around the sides.
The sample uses one color, a soft periwinkle cotton, so the stitch texture stands out. The flower motifs are lacy enough to look light but sit on a solid base, so small bottles don’t tip through. Natural wood dowels carry the weight, and the corded hanger adds a simple rope detail.
The pattern uses US crochet terms. Each basket measures 11.5 in (29.2 cm) long and 4 in (10.2 cm) deep. The lower basket is 5.75 in (14.6 cm) tall and the upper basket is 5.25 in (13.3 cm) tall. Hung, the whole organizer is about 24 in (61.0 cm) from the hook to the bottom.
Construction overview: you crochet an oval base and turn up a short solid wall. Separately, you make 8 hexagon motifs and slip-stitch them into a ring. A fill round straightens the bottom edge of the ring so it can be joined to the wall. The top edge gets the same fill round plus a sc rim (the “border”), and then two dowel tabs. Make two baskets, then two cords, and assemble.
Finished Size and Construction
- Finished size: each basket 11.5 x 4 in (29.2 x 10.2 cm); lower basket 5.75 in (14.6 cm) tall, upper basket 5.25 in (13.3 cm) tall
- Skill level: Intermediate
- Terminology: US
- Yarn weight: worsted (#4) cotton
- Hook: US H-8 (5.0 mm)
- Number of pieces: 2 bases, 16 hexagon motifs, 2 cords
- Layout: 8 motifs in a ring per basket (3 on the front, 3 on the back, 1 at each end)
- Piece size: motif 3.4 in (8.6 cm) flat to flat
- Size before border: lower basket 5.25 in (13.3 cm) tall, upper basket 4.75 in (12.1 cm) tall
- Border depth: 0.5 in (1.3 cm)
Materials
Use a smooth, firm worsted-weight cotton or a cotton blend. Cotton holds the basket shape, copes with bathroom humidity, and shows the flower spokes clearly. Avoid soft acrylic here, because the walls would slump.
- Periwinkle (lavender-blue): 300 g / about 510 m
- US H-8 (5.0 mm) crochet hook
- 2 wooden dowels, 13 in (33.0 cm) long and 0.5 in (1.3 cm) thick
- Stitch markers (4)
- Tapestry needle
- Scissors and a measuring tape
- Optional: plastic canvas cut to 11 x 3.5 in (27.9 x 8.9 cm) to stiffen each base
Yarn quantities include a margin of about 15% for swatching and joining.
Abbreviations (US Terms)
- ch – chain
- sl st – slip stitch
- sc – single crochet
- hdc – half double crochet
- dc – double crochet
- tr – treble crochet
- dtr – double treble crochet (yo 3 times, [yo, pull through 2] 4 times)
- inc – 2 sc in the same stitch
- BLO – back loop only
- sp – space
- st(s) – stitch(es)
- RS / WS – right side / wrong side
Special stitch – standing dtr: start with a slip knot on the hook, yo 3 times, insert the hook, and finish as a normal dtr.
Gauge and Checkpoints
Gauge: 14 sc x 16 rounds = 4 in (10.2 cm), worked firmly.
Make one motif first, before you start a base. It is the fastest gauge test, and all of the basket math depends on it.
- Motif after Round 1: about 1.25 in (3.2 cm) across
- Motif after Round 2: about 2.2 in (5.6 cm) across
- Finished motif: 3.4 in (8.6 cm) flat to flat
- Base after Round 8: 11.5 x 4 in (29.2 x 10.2 cm), 96 sts
- Motif ring: about 27.2 in (69.1 cm) around, which matches the base’s 27.4 in (69.6 cm) perimeter
Too big? Go down half a hook size. Too small? Go up half a size. If a motif is only 0.1 in (0.3 cm) off, keep your hook, because 8 motifs will absorb that difference. Larger differences won’t.
Base (make 2)
Ch 27.
Round 1: sc in 2nd ch from hook, sc in next 24 ch, 3 sc in last ch. Working along the other side of the chain, sc in next 24 ch, 2 sc in the same ch as the first sc. Join with a sl st to the first sc. (54 sts)
Rounds 2–8 put 3 increases at each curved end and leave the 24 side sts plain. Ch 1 at the start of each round (it does not count as a stitch), and join with a sl st to the first sc.
Round 2: inc, sc in next 24, inc 3 times, sc in next 24, inc 2 times. (60 sts)
Round 3: [sc, inc] once, sc in next 24, [sc, inc] 3 times, sc in next 24, [sc, inc] 2 times. (66 sts)
Round 4: [sc 2, inc] once, sc in next 24, [sc 2, inc] 3 times, sc in next 24, [sc 2, inc] 2 times. (72 sts)
Round 5: same pattern, with sc 3 before each inc. (78 sts)
Round 6: same pattern, with sc 4 before each inc. (84 sts)
Round 7: same pattern, with sc 5 before each inc. (90 sts)
Round 8: same pattern, with sc 6 before each inc. (96 sts)
Checkpoint: the base lies flat and measures 11.5 x 4 in (29.2 x 10.2 cm).
Round 9 (turning round): sc in BLO of each st. (96 sts) This forms the crisp fold at the bottom edge of the wall.
Lower basket: Rounds 10–12: sc in each st. (96 sts) The solid wall is 1 in (2.5 cm) tall.
Upper basket: Round 10: sc in each st. (96 sts) The solid wall is 0.5 in (1.3 cm) tall.
Fasten off.
Hexagon Flower Motif (make 16)
Round 1: magic ring, ch 3 (counts as dc), 11 dc in ring, join to top of ch-3. Pull the ring snug but leave a small open center. (12 dc)
Round 2: ch 4 (counts as dc + ch 1), [dc in next dc, ch 1] 11 times, join to 3rd ch of ch-4. (12 dc, 12 ch-1 sps) These are the flower spokes.
Round 3: ch 5 (counts as dc + ch 2), dc in same st (first corner), 2 hdc in next ch-1 sp, sc in next dc, 2 hdc in next ch-1 sp, *(dc, ch 2, dc) in next dc, 2 hdc in next ch-1 sp, sc in next dc, 2 hdc in next ch-1 sp; rep from * 4 more times. Join to 3rd ch of ch-5. (42 sts, 6 ch-2 corner sps)
Each side has 7 sts: corner dc, 2 hdc, sc, 2 hdc, corner dc. That count already includes both corner stitches, so don’t add them again. Fasten off and weave in the ends.
Make All Pieces
- Bases: 2 (1 lower with 4 wall rounds, 1 upper with 2 wall rounds)
- Motifs: 16 periwinkle (8 per basket)
- Cords: 2 (instructions under Assembly)
Ring layout per basket, as seen from above (E = end motif, F = front, B = back):
      F1   F2   F3
  E                  E
      B3   B2   B1
Joining the Motif Ring
Turn each motif so that one corner points straight up. The left and right sides are then vertical, and those are the sides you join.
- Hold two motifs RS together. Work through the back loops of both pieces at once: sl st in the corner ch-2 sp, sl st in each of the 7 side sts, then sl st in the next corner ch-2 sp. That is 9 sl sts per seam, with stitches paired one-to-one.
- Add motifs the same way until you have a strip of 8. Then join motif 8 to motif 1 to close the ring (8 seams).
- Keep your sl sts as loose as your sc. If the seams are tight, the ring will pucker and come out short.
Checkpoint: the ring measures about 27.2 in (69.1 cm) around. The top and bottom edges zigzag, with a point at the center of each motif and a valley at each seam.
Bottom Fill Round
With the RS facing you, work along the bottom zigzag. Start with a standing dtr through both joined corner sps at the bottom of any seam (a valley). Then:
Going down the next side: skip the corner dc, tr in next 2 hdc, dc in sc, hdc in next hdc, sc in next hdc, skip the corner dc (5 sts). Sc in the point ch-2 sp. Going up the next side: skip the corner dc, sc in next hdc, hdc in next hdc, dc in sc, tr in next 2 hdc, skip the corner dc (5 sts). Dtr through both corner sps at the next valley. Repeat from * around, ending before the first dtr. Join to the first dtr.
Each motif gives 1 + 5 + 1 + 5 = 12 sts, so the round has 8 x 12 = 96 sts. The edge is now straight.
Attach the Ring to the Wall
Place the ring on the base so that motifs F1–F3 are centered on the front. Hold the bottom fill round against the last wall round, WS facing you. Sl st through the inner loops of both pieces, one stitch to one stitch, for 96 sl sts. Because both pieces have 96 sts, there is no easing to do.
Border (Rim and Dowel Tabs)
Border gauge: the same as the base, 14 sc = 4 in (10.2 cm). At that gauge, 96 sts = 27.4 in (69.6 cm), which is exactly the base perimeter.
Round 1 (top fill): work the same as the bottom fill round, but along the top zigzag. (96 sts)
– Front: 36 (3 motifs x 12)
– Each end: 12
– Back: 36
– Total: 36 + 12 + 36 + 12 = 96
Rounds 2–3: ch 1, sc in each st, join. (96 sts; front 36, ends 12, back 36)
Why the math works: the motif ring (12 sts per motif), the wall (96), and the rim (96) all match one-to-one. As a result, the sides rise straight, with no flare and no pull.
Dowel tabs (2 per basket): at each end, find the 6 sts centered over the end motif’s top point. Join the yarn and work rows of sc 6, ch 1, turn, for 10 rows, making a tab 2.5 in (6.4 cm) long. Fold the tab to the inside around the dowel and sew the last row to Round 2 of the rim. Fasten off.
Checkpoint: each finished basket is 11.5 x 4 in (29.2 x 10.2 cm). The lower basket is 5.75 in (14.6 cm) tall and the upper basket is 5.25 in (13.3 cm) tall.
Assembly: Cords and Hanging
Cord (make 2): ch 85, sc in the back bump of 2nd ch from hook and in each ch across. (84 sc, about 24 in / 61.0 cm long)
- Slide a dowel through the tabs of each basket. The dowel will stick out about 0.75 in (1.9 cm) at each end.
- Wrap one end of a cord twice around the left end of the lower dowel, outside the tab, and sew it in place. This uses about 1.5 in (3.8 cm) of cord.
- Measure 10 in (25.4 cm) up the cord. Wrap it once around the left end of the upper dowel and sew.
- Repeat steps 2–3 with the second cord on the right ends of both dowels.
- Bring both free ends together above the center of the upper dowel. Overlap them by 1 in (2.5 cm) and sew to form the V-shaped apex. Add a ch-10 loop at the apex, sew it down securely, and hang it on the wall hook.
Final Blocking
- Soak both baskets in cool water for 10 minutes.
- Squeeze the water out gently in a towel; don’t wring.
- Stuff each basket firmly with a folded towel or a box cut to 11.5 x 4 in (29.2 x 10.2 cm).
- Push the motif points and petals into shape with your fingers.
- Check the measurements: 11.5 x 4 in (29.2 x 10.2 cm) for both baskets, and 5.75 in (14.6 cm) / 5.25 in (13.3 cm) tall.
- Let them dry completely. Insert the plastic canvas bases if you are using them.
Final Quality-Control Checklist
- Each base has 96 sts after Round 8 and lies flat.
- Every motif has 42 sts and 7 sts per side.
- Each ring has 8 seams with 9 sl sts each.
- Both fill rounds have 96 sts on each basket.
- The rim rounds have 96 sts: front 36, ends 12, back 36.
- The tabs are centered and the dowels sit level.
- The two cord sections between the dowels are equal, about 10 in (25.4 cm) each.
- All ends are woven in securely.
Troubleshooting
- Base cups upward: your tension is too tight on the ends. Go up a hook size for Rounds 2–8.
- Base ruffles: remove one increase round, or go down half a hook size.
- Motifs cup: loosen the Round 2 chains.
- Motifs wave: tighten the Round 3 hdc.
- Ring too short for the wall: your seams are tight. Redo them with looser sl sts.
- Rim flares: recount the top fill round. Each motif must give exactly 12 sts.
- Basket tilts when hung: make the cord sections between the dowels equal, and center the tabs.
Care
Hand wash in cool water, reshape while damp, and dry flat. Don’t put them in the dryer, because the dowels and the shaping won’t survive it.
Final Notes
All the measurements build on each other. A 3.4 in (8.6 cm) motif gives 12 fill sts, and 8 motifs give 96 sts. That 96 matches the 96-st base, which is 11.5 x 4 in (29.2 x 10.2 cm) with a 27.4 in (69.6 cm) perimeter. If your gauge holds at each checkpoint, both baskets will hang straight and level.
Happy crocheting!