

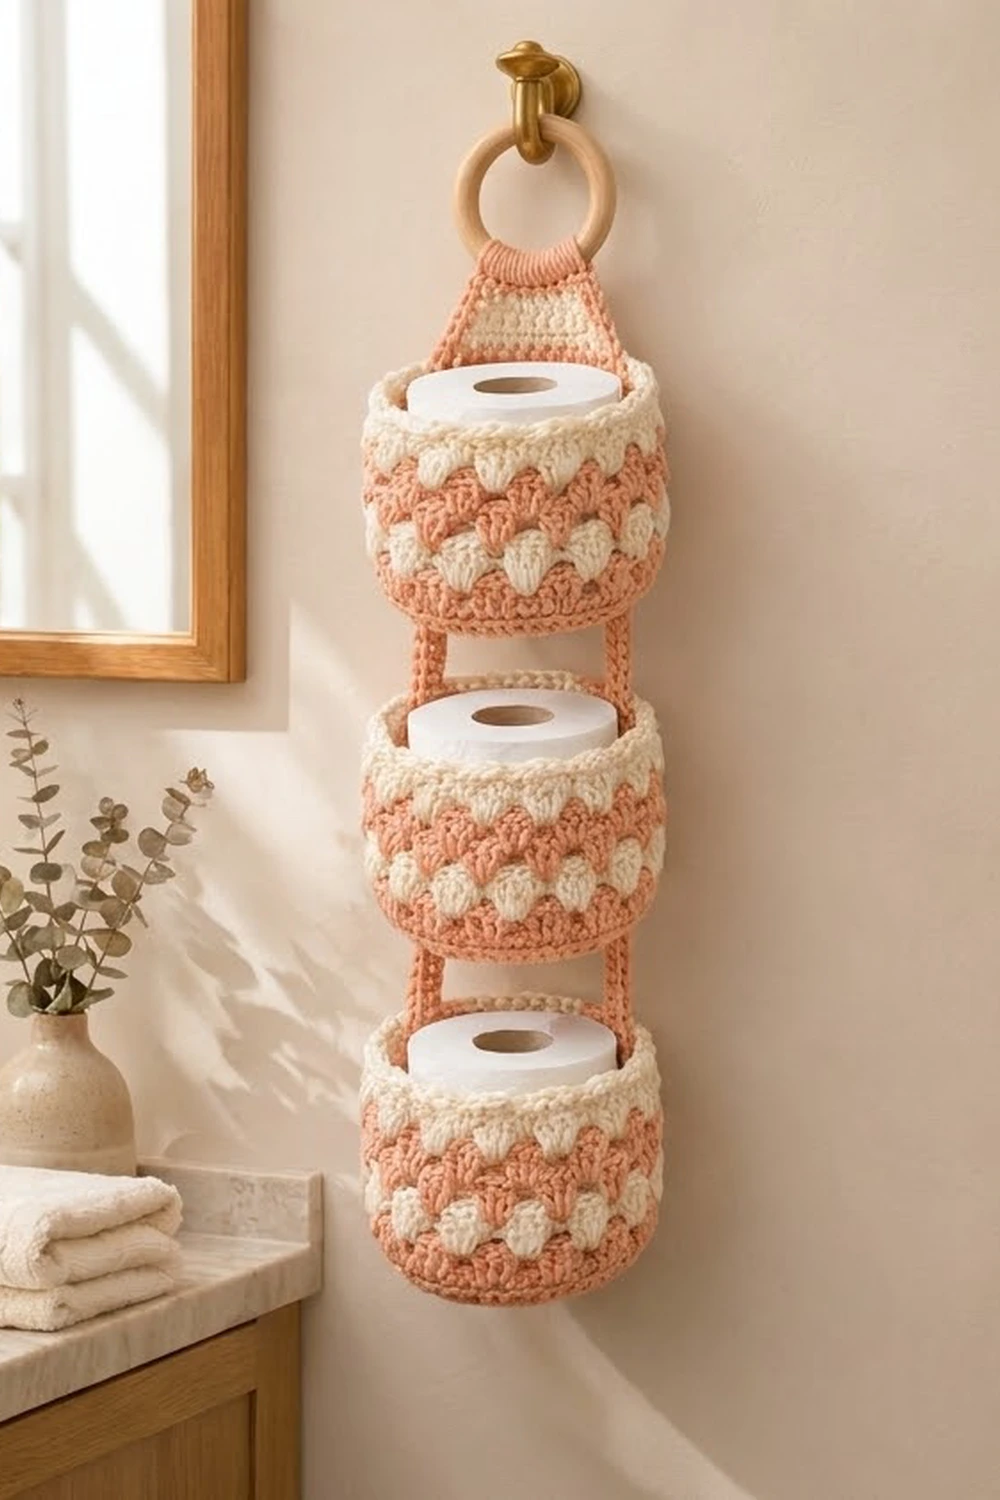
The Peach Blossom Trio is a hanging toilet paper holder made of three round baskets stacked one above the other. Each basket holds one standard roll. The whole organizer hangs from a wooden ring on a wall hook, which keeps spare rolls tidy and within reach.
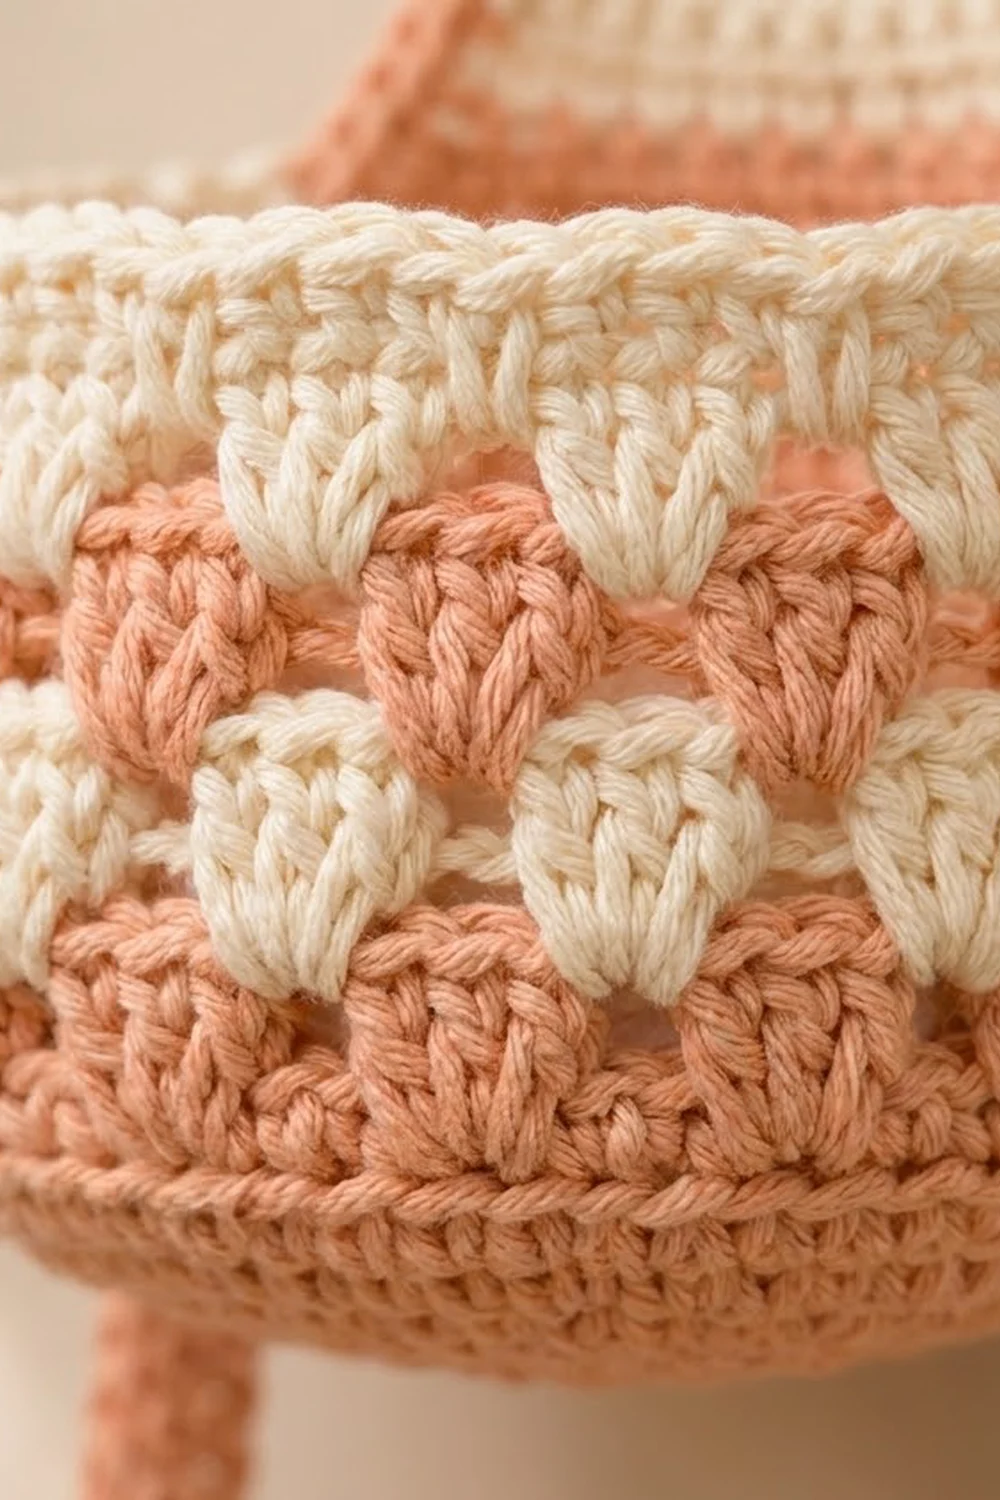
The colors are soft peach and warm cream. Each basket has a solid peach base and bottom band, then staggered cluster rounds in alternating peach and cream. The rim is cream, finished with a corded reverse single crochet edge. Short peach straps link the baskets at the sides, and a cream tab with a peach border rises to the ring.
This pattern uses US crochet terms. Each basket is 5.75 in (14.6 cm) across and 4.5 in (11.4 cm) tall. From the bottom of the ring to the bottom of the lowest basket, the holder measures about 21 in (53.3 cm).
You work each basket in the round from a magic ring. A back-loop round turns the base up into the wall, and 3-dc groups build the cluster stripes. Next, you make four flat straps and one tab and sew everything together. The tab gets its peach border before you fold it over the ring.
Finished Size and Construction
- Finished size: 5.75 in (14.6 cm) wide x about 21 in (53.3 cm) long, plus the ring
- Skill level: Easy to intermediate
- Terminology: US crochet terms
- Yarn weight: Worsted (#4) cotton or cotton blend
- Hook: 5.0 mm (H-8)
- Number of pieces: 8 (3 baskets, 4 straps, 1 hanging tab)
- Layout: 1 column of 3 baskets, with 2 straps per gap
- Basket size: 5.75 in (14.6 cm) diameter x 4.5 in (11.4 cm) tall
- Gap between baskets: 1.5 in (3.8 cm)
- Tab size before border: 3 in (7.6 cm) wide at the bottom, 1.5 in (3.8 cm) wide at the top, 6.5 in (16.5 cm) long
- Border depth: 0.25 in (0.6 cm), 1 round of sc on the tab
Materials
Use a smooth worsted-weight cotton or cotton blend. Cotton helps the baskets stand upright and copes well with bathroom humidity. Avoid fuzzy yarns, which blur the cluster stripes.
- Color A, peach: 150 g, about 255 m
- Color B, cream: 100 g, about 170 m
These quantities include a margin for gauge testing and differences in tension.
Tools:
- 5.0 mm (H-8) crochet hook
- 1 wooden ring, 3 in (7.6 cm) outer diameter
- Tapestry needle
- 6 locking stitch markers
- Scissors and measuring tape
- Rust-proof pins and a blocking surface
- 3 rolls of toilet paper to use as shaping forms
Abbreviations (US Terms)
- ch: chain
- sl st: slip stitch
- sc: single crochet
- dc: double crochet
- inc: 2 sc in the same stitch
- sc2tog: single crochet 2 together
- BLO: back loop only
- sp: space
- st(s): stitch(es)
- rnd: round
- rev sc: reverse single crochet
Special stitches:
- 3-dc group: 3 dc worked into the same stitch or space.
- Reverse single crochet (crab stitch): Work from left to right (if you crochet right-handed). Insert the hook into the next stitch to the right, yarn over, and pull up a loop. Yarn over again and draw through both loops. This makes the corded rim edge.
Gauge and Checkpoints
Gauge: 16 sc and 16 rows = 4 in (10.2 cm). In the cluster section, 2 rnds of 3-dc groups = 1 in (2.5 cm) tall.
Make one complete basket first. That basket is your gauge swatch.
Checkpoints:
- After Rnd 6 (36 sts): the flat circle is about 2.75–3 in (7.0–7.6 cm) across.
- After Rnd 12 (72 sts): the base is 5.75 in (14.6 cm) across and lies flat.
- After Rnd 15: the wall is 0.75 in (1.9 cm) tall.
- After Rnd 21: the wall is 3.75 in (9.5 cm) tall.
- After Rnd 24: the basket is 4.5 in (11.4 cm) tall.
If the basket is too big, switch to a 4.5 mm hook. If it is too small, or a roll won’t fit, switch to a 5.5 mm hook. If only the base ruffles, go down one hook size for the base. If the base cups up, go up one size for the base.
Basket (Make 3)
Join each round with a sl st to the first stitch. Mark the first stitch of every round.
Base
With Color A, make a magic ring.
Rnd 1: Ch 1, 6 sc in ring. Join. (6 sts)
Rnd 2: Ch 1, inc in each st around. Join. (12 sts)
Rnd 3: Ch 1, sc 1, inc; rep from * 6 times total. Join. (18 sts)
Rnd 4: Ch 1, sc 1, inc, sc 1; rep 6 times. Join. (24 sts)
Rnd 5: Ch 1, sc 3, inc; rep 6 times. Join. (30 sts)
Rnd 6: Ch 1, sc 2, inc, sc 2; rep 6 times. Join. (36 sts)
Rnd 7: Ch 1, sc 5, inc; rep 6 times. Join. (42 sts)
Rnd 8: Ch 1, sc 3, inc, sc 3; rep 6 times. Join. (48 sts)
Rnd 9: Ch 1, sc 7, inc; rep 6 times. Join. (54 sts)
Rnd 10: Ch 1, sc 4, inc, sc 4; rep 6 times. Join. (60 sts)
Rnd 11: Ch 1, sc 9, inc; rep 6 times. Join. (66 sts)
Rnd 12: Ch 1, sc 5, inc, sc 5; rep 6 times. Join. (72 sts)
Moving the increases on the even rounds keeps the base round rather than hexagonal.
Wall: Peach Band
Rnd 13: Ch 1, sc in BLO of each st around. Join. (72 sts = 72 worked 1-per-stitch + 0 added)
This round makes the crisp fold where the base turns up into the wall.
Rnds 14–15: Ch 1, sc in each st around. Join. (72 sts)
Fasten off Color A.
Wall: Cluster Stripes
Each cluster round has 24 groups of 3 dc. Every new round places its groups in the spaces between the groups below, so the colors stagger.
Rnd 16 (Color B): Join Color B in any st. Ch 3 (counts as dc) and work 2 dc in the same st. Skip 2 sts. 3-dc group in next st, skip 2 sts; rep from * 22 more times. Join to top of ch-3. (24 groups = 72 dc: 3 dc replace each set of 3 sc below + 0 added)
Fasten off.
Rnd 17 (Color A): Join Color A in any sp between groups. Ch 3 (counts as dc), 2 dc in same sp, 3-dc group in next sp; rep from * 22 more times. Join. (24 groups, 72 dc)
Fasten off.
Rnds 18–21: Work as Rnd 17, alternating colors: Rnd 18 Color B, Rnd 19 Color A, Rnd 20 Color B, Rnd 21 Color A. Fasten off after each round. (24 groups, 72 dc each round)
Check that the wall is 3.75 in (9.5 cm) tall.
Wall: Cream Rim
Rnd 22 (Color B): Join Color B in any dc. Ch 1, sc in each dc around. Join. (72 sts = 72 worked 1-per-dc + 0 added)
Rnd 23: Ch 1, sc in each st around. Join. (72 sts)
Rnd 24: Ch 1, rev sc in each st around. Join. (72 sts)
Fasten off. Weave in all ends on the inside.
Strap (Make 4)
With Color A, ch 4.
Row 1: Sc in 2nd ch from hook and in each ch across. Turn. (3 sts)
Rows 2–12: Ch 1, sc across. Turn. (3 sts)
Fasten off, leaving a 12 in (30.5 cm) tail. Each strap is 0.75 in (1.9 cm) wide x 3 in (7.6 cm) long.
Hanging Tab (Make 1)
With Color B, ch 13.
Row 1: Sc in 2nd ch from hook and in each ch across. Turn. (12 sts)
Rows 2–3: Ch 1, sc across. Turn. (12 sts)
Row 4: Ch 1, sc2tog, sc 8, sc2tog. Turn. (10 sts)
Rows 5–7: Ch 1, sc across. Turn. (10 sts)
Row 8: Ch 1, sc2tog, sc 6, sc2tog. Turn. (8 sts)
Rows 9–11: Ch 1, sc across. Turn. (8 sts)
Row 12: Ch 1, sc2tog, sc 4, sc2tog. Turn. (6 sts)
Rows 13–26: Ch 1, sc across. Turn. (6 sts)
Fasten off. Rows 1–14 form the trapezoid, which is 3.5 in (8.9 cm) tall. Rows 15–26 form the 3 in (7.6 cm) neck that wraps around the ring.
Make All Pieces
- Baskets: 3. Color A for the base, the band, and 3 cluster rnds; Color B for 3 cluster rnds and the rim
- Straps: 4, Color A
- Hanging tab: 1, Color B with a Color A border
Layout (front view):
          [ RING ]
          [ TAB  ]
      [  BASKET 1  ]
      |S|        |S|
      [  BASKET 2  ]
      |S|        |S|
      [  BASKET 3  ]
S = strap, with 1.5 in (3.8 cm) showing between the baskets.
Joining
Method: Whipstitch, using the Color A strap tails.
Mark the baskets. On each basket, mark one Rnd 24 stitch as the back center. Count 18 sts to the left and 18 sts to the right, and mark both. These are the side points, each a quarter of the 72-stitch round from the back center. On Baskets 1 and 2, mark the matching side-point stitches in Rnd 15 as well.
Stitch-to-stitch logic: Each strap is 3 sts wide and is centered over 3 basket stitches: the marked stitch and one on each side. Each strap end is 3 rows long, which matches 3 basket rounds exactly.
- Place Rows 1–3 of a strap against the inside of Basket 2’s rim, over Rnds 22–24 at one side point. Whipstitch all 4 edges.
- Place Rows 10–12 of the same strap against the outside of Basket 1’s peach band, over Rnds 13–15 at the matching side point. Whipstitch. Peach on peach hides the seam.
- Leave Rows 4–9 free. They form the 1.5 in (3.8 cm) gap.
- Repeat on the other side, then join Basket 3 to Basket 2 the same way.
Tension: Make each stitch snug but not tight. Tight seams pucker the wall, and loose ones let the baskets tilt.
Size checkpoint: Hold the joined baskets up by Basket 1. Each gap should measure 1.5 in (3.8 cm), and all three baskets should hang level.
Border
Work the border around the hanging tab before you attach it.
Border gauge: Work 1 sc per stitch along the top and bottom edges and 1 sc per row end along the sides. The gauge is square (16 sts and 16 rows both measure 4 in [10.2 cm]), so this ratio lies flat.
Rnd 1 (Color A): With the right side facing, join Color A in the first stitch of Row 1. Ch 1.
- Bottom edge: sc in each st. (12 sc)
- Corner: ch 1.
- First side: sc in each row end. (26 sc)
- Corner: ch 1.
- Top edge: sc in each st. (6 sc)
- Corner: ch 1.
- Second side: sc in each row end. (26 sc)
- Corner: ch 1. Join to the first sc.
Total: 70 sc + 4 corner ch-1 sps.
Why the math works: Each side’s count matches its own edge: 12 stitches in Row 1, 6 stitches in Row 26, and 26 row ends on each side. The ch-1 corners turn the edge without adding any sc, so nothing is counted twice. The slanted sides are only slightly longer than straight ones, and blocking evens that out.
After the border, the tab is 3.5 in (8.9 cm) wide at the bottom, 2 in (5.1 cm) wide at the top, and 7 in (17.8 cm) long.
Attach the tab:
- Slide the neck through the ring. Fold the top 1.75 in (4.4 cm), from Row 21 through the top border, to the back. Whipstitch it to Rows 15–20.
- Center the tab’s bottom edge on Basket 1’s back-center marker. The 3.5 in (8.9 cm) width covers 14 rim stitches.
- Place the bottom 0.75 in (1.9 cm) of the tab (the border plus Rows 1–2) against the inside of the back rim, over Rnds 22–24. Whipstitch all edges.
About 4.5 in (11.4 cm) of tab shows between the rim and the ring.
Final Blocking
- Lightly mist the holder with water, or steam it from above without touching the yarn.
- Put a roll inside each basket to set the round shape.
- Lay the holder flat.
- Smooth each rim into an even circle.
- Pin each strap gap to 1.5 in (3.8 cm), keeping the straps vertical.
- Pin the tab flat with sharp corners.
- Let everything dry completely, which takes 12–24 hours, before you hang the holder.
Final Quality-Control Checklist
- Each base has 72 sts and lies flat at 5.75 in (14.6 cm).
- Each basket is 4.5 in (11.4 cm) tall.
- Every cluster round has 24 groups, and the colors alternate correctly.
- The rev sc rim is even all the way around.
- All 4 straps are 3 sts x 12 rows.
- Every gap is 1.5 in (3.8 cm).
- The tab border has 70 sc plus 4 corner ch-1 sps.
- The fold around the ring is fully sewn.
- All ends are woven in on the inside.
- The holder hangs straight.
Troubleshooting
Base ruffles: Recount your increases, and use a smaller hook for the base.
Base cups up: Use a larger hook for the base.
Wall flares out: Your dc are loose. Go down one hook size for Rnds 16–21.
Clusters don’t stagger: From Rnd 17 on, work only into the spaces between groups, never into stitches.
Basket tilts forward: The straps are off-center. Recount 18 sts from the back center on each side and sew the straps again.
A roll won’t fit: Your gauge is tight. Remake the basket with a larger hook.
Tab border ripples: Work exactly 26 sc per side.
Care
Hand wash in cool water with mild detergent. Lay the holder flat to dry, reshaping each basket around a roll. Don’t use the dryer.
Final Notes
Every measurement in this holder follows from the gauge. At 16 sc = 4 in (10.2 cm), the 72-stitch base is 5.75 in (14.6 cm) across. Those 72 stitches divide evenly into 24 cluster groups. The 12 wall rounds build a 4.5 in (11.4 cm) basket. The 3-row strap ends match 3-round basket bands, which gives even 1.5 in (3.8 cm) gaps. The tab border follows the 12, 26, 6, and 26 edge counts, so the tab’s 3.5 in (8.9 cm) base spans exactly 14 rim stitches.
Get the first basket right, and the rest of the holder will fit together.
Happy crocheting!