

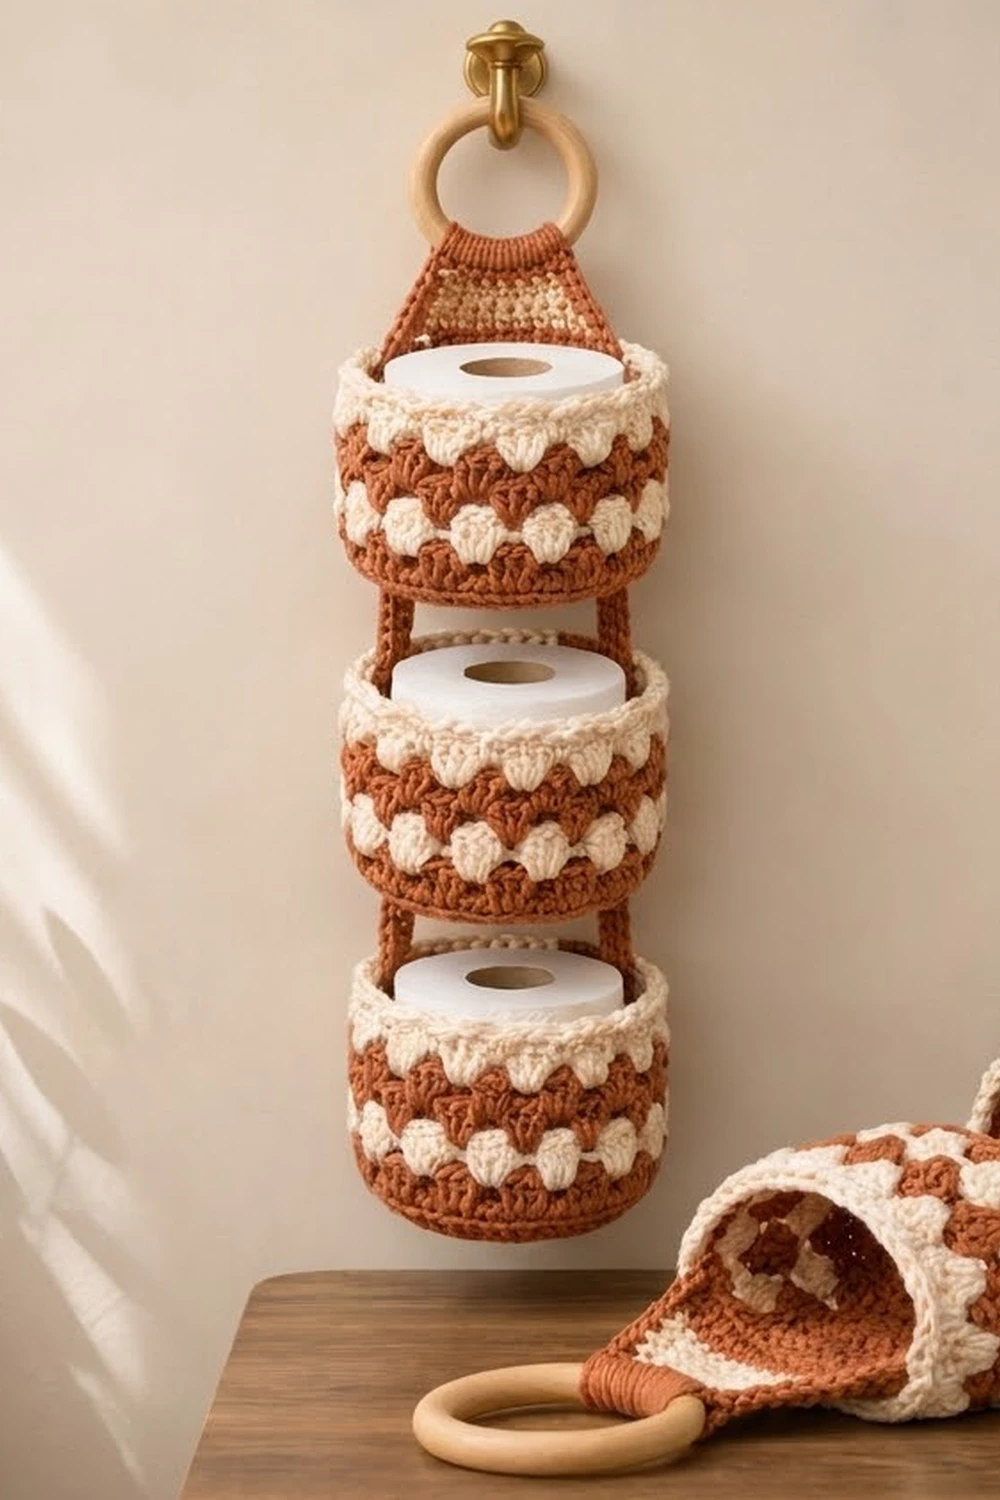
This hanging holder stacks three round baskets in a vertical column, each one sized to hold a standard toilet roll. A tapered tab at the top wraps around a wooden ring, so the whole piece hangs from a single wall hook or towel ring.
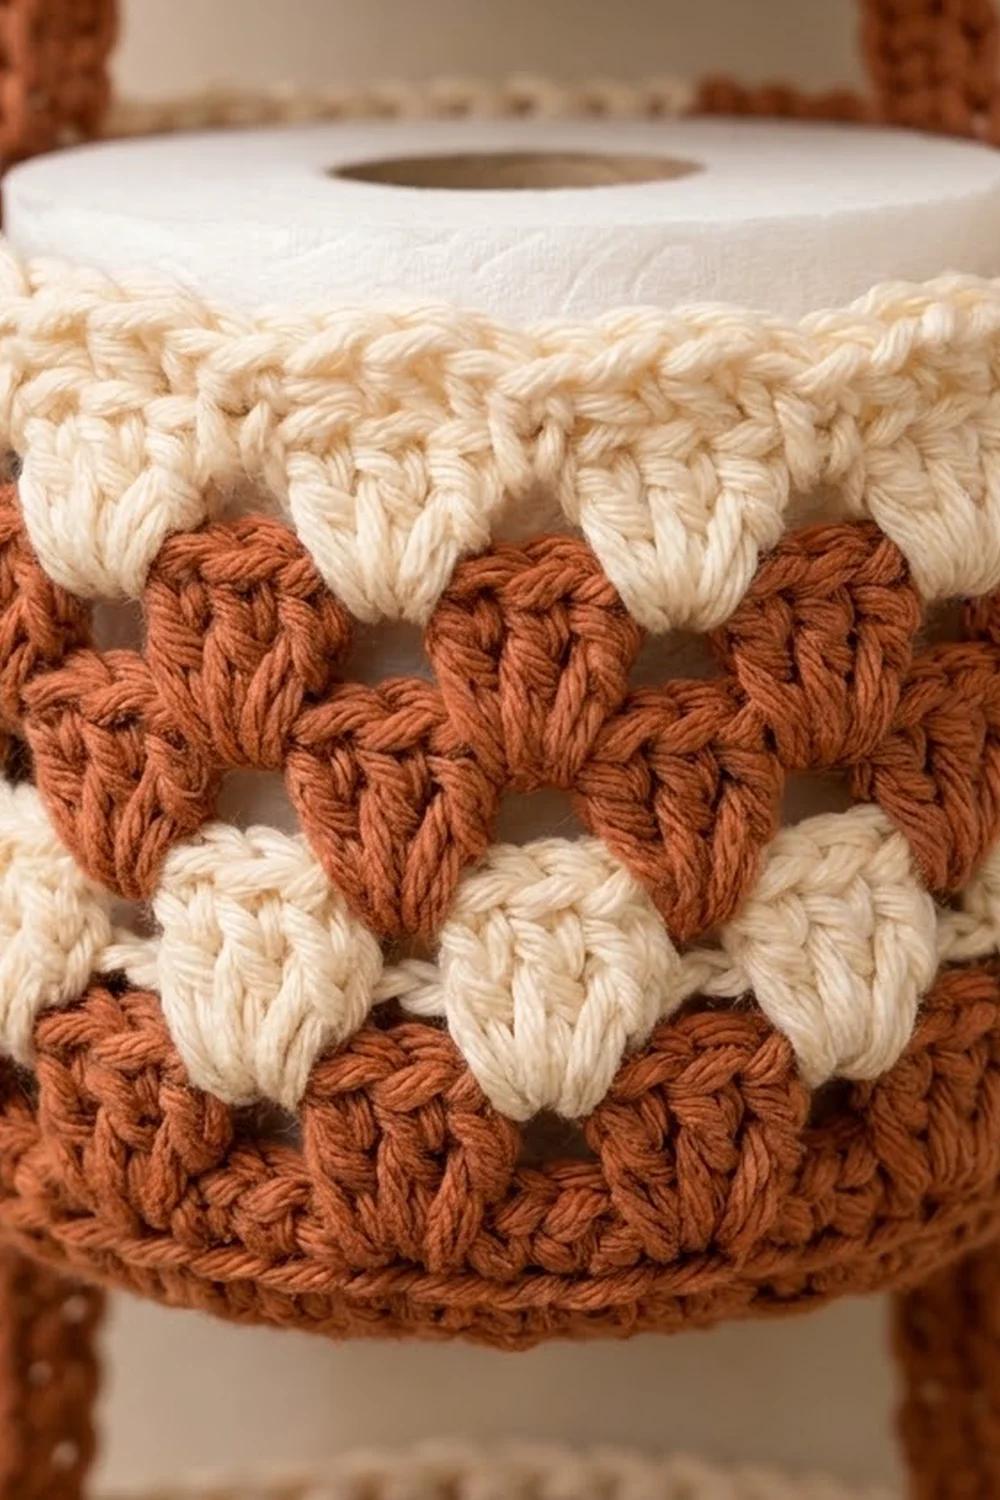
The colors are warm rust terracotta and soft cream. Every basket has a solid rust base, then alternating cream and rust rounds of 3-dc clusters, and a thick cream rim finished with reverse single crochet. Because each round’s clusters sit between the clusters of the round below, the colors form an offset, checkerboard-like pattern.
The pattern uses US crochet terms. Each basket measures 5 in (12.7 cm) across and 4 in (10.2 cm) tall. The holder is 17.25 in (43.8 cm) long from the bottom basket to the top fold of the tab, or about 20.25 in (51.4 cm) including a 3 in (7.6 cm) ring.
Here’s how it goes together. You make three identical baskets, each worked in joined rounds from the center of the base up to the rim. Then you crochet four short straps and one hanger tab, sew the straps between the baskets, sew the tab inside the back of the top basket, and wrap it around the ring.
Finished Size and Construction
- Finished size: 17.25 in (43.8 cm) from base to tab fold; about 20.25 in (51.4 cm) with ring
- Skill level: Easy-intermediate
- Terminology: US
- Yarn weight: Worsted (#4) cotton
- Hook: 5.0 mm (H-8)
- Number of pieces: 3 baskets, 4 straps, 1 hanger tab, 1 wooden ring
- Layout: 1 column of 3 baskets, spaced 1.5 in (3.8 cm) apart
- Piece size: each basket 5 in (12.7 cm) diameter x 4 in (10.2 cm) tall; 60 stitches around
- Size before border: wall 3.25 in (8.3 cm) tall after Rnd 12
- Border depth: cream rim 0.75 in (1.9 cm), Rnds 13-16
Materials
Use a smooth, firm worsted-weight cotton or cotton blend. Cotton holds the basket shape, doesn’t stretch much under the weight of the rolls, and handles bathroom humidity well. Avoid fuzzy or very soft acrylic, because the walls will sag.
- Rust / terracotta (Color A): 220 g, about 340 m (372 yd)
- Cream (Color B): 110 g, about 170 m (186 yd)
Tools:
- 5.0 mm (H-8) crochet hook
- 1 wooden ring, 3 in (7.6 cm) outer diameter
- Tapestry needle
- 4 locking stitch markers
- Scissors
- Measuring tape
- Rust-proof pins and a spray bottle for blocking
These quantities include about a 15% margin for your gauge swatch and for weaving in ends.
Abbreviations (US Terms)
- ch – chain
- sl st – slip stitch
- sc – single crochet
- dc – double crochet
- sc2tog – single crochet 2 together
- BLO – back loop only
- sp(s) – space(s)
- st(s) – stitch(es)
- rev sc – reverse single crochet (crab stitch)
- Rnd – round
Special stitch – 3-dc group: work 3 dc into the same stitch or space. Groups sit side by side, and each round places its groups in the spaces between the groups of the round below.
Reverse sc: work single crochet from left to right (right-handed). Insert the hook into the next stitch to the right, yarn over, pull up a loop, then yarn over and pull through both loops.
Gauge and Checkpoints
Gauge: 15 dc and 8 dc rows = 4 in (10.2 cm). 15 sc and 16 sc rows = 4 in (10.2 cm).
Make one complete basket before starting the others. Use it as your gauge piece, and check it at these points:
- After Rnd 1: base is 1 in (2.5 cm) across.
- After Rnd 3: base is 3 in (7.6 cm) across.
- After Rnd 5: base is 5 in (12.7 cm) across, with 60 sts.
- After Rnd 7: wall is 0.75 in (1.9 cm) tall, and the circumference is 16 in (40.6 cm).
- After Rnd 12: wall is 3.25 in (8.3 cm) tall.
- After Rnd 16: wall is 4 in (10.2 cm) tall.
Too big? Go down to a 4.5 mm hook. Too small, or does the roll fit tightly? Go up to a 5.5 mm hook. Change the hook, not the stitch counts, because the cluster pattern needs a multiple of 3 stitches.
Basket (Make 3)
Base
Start with Color A. Join every round with a sl st to the top of the first stitch. The starting ch-3 counts as a dc.
Rnd 1: In a magic ring, ch 3, then work 11 dc. Join. (12 dc)
Rnd 2: Ch 3, dc in the same st, then 2 dc in each st around. Join. (24 dc)
Rnd 3: Ch 3, 2 dc in the next st, dc in the next st, 2 dc in the next st; rep from * around. Join. (36 dc)
Rnd 4: Ch 3, dc in the next st, 2 dc in the next st, dc in each of the next 2 sts, 2 dc in the next st; rep from * around. Join. (48 dc)
Rnd 5: Ch 3, dc in each of the next 2 sts, 2 dc in the next st, dc in each of the next 3 sts, 2 dc in the next st; rep from * around. Join. (60 dc)
The base should lie flat and measure 5 in (12.7 cm) across.
Wall
Rnd 6 (turning round): Ch 1, then work sc in BLO of each st around. Join. (60 sc) The unused front loops form a crisp ridge, and the wall starts to turn upward here.
Rnd 7: Ch 3, then dc in each st around. Join. (60 dc) This is the solid rust band at the bottom of the wall. Fasten off Color A.
Rnd 8 (Color B): Join B with a sl st in any st. Ch 3, then 2 dc in the same st. Skip 2 sts, then make a 3-dc group in the next st; rep from * 18 more times. Skip the last 2 sts and join. (20 groups, 60 dc) Fasten off.
Rnd 9 (Color A): Join A with a sl st in the sp between any two groups. Ch 3, then 2 dc in the same sp. Make a 3-dc group in each of the next 19 sps. Join. (20 groups, 60 dc) Fasten off.
Rnd 10 (Color B): Work as for Rnd 9. (20 groups, 60 dc)
Rnd 11 (Color A): Work as for Rnd 9. (20 groups, 60 dc)
Rnd 12 (Color B): Work as for Rnd 9. (20 groups, 60 dc) Fasten off.
You now have three cream cluster rounds and two rust cluster rounds. Each round’s groups sit offset from the groups below, which creates the alternating color pattern. The wall should measure 3.25 in (8.3 cm).
Leave the basket at this point and continue with the Border section below to finish the rim.
Make All Pieces
Baskets: 3 baskets, each made the same way through Rnd 16.
Straps (make 4, Color A): Ch 5. Sc in the 2nd ch from the hook and in each remaining ch. (4 sc) Rows 2-18: Ch 1, turn, sc in each st. (4 sc) Fasten off and leave a 12 in (30.5 cm) tail.
Each strap measures about 1.1 in (2.8 cm) wide and 4.5 in (11.4 cm) long.
Hanger tab (make 1):
- Row 1 (Color A): Ch 16. Sc in the 2nd ch from the hook and in each remaining ch. (15 sc)
- Row 2: Ch 1, turn, sc in each st. (15 sc) Change to Color B.
- Row 3: Ch 1, turn, sc2tog, sc in each of the next 11 sts, sc2tog. (13 sc)
- Row 4: Ch 1, turn, sc in each st. (13 sc)
- Row 5: Ch 1, turn, sc2tog, sc in each of the next 9 sts, sc2tog. (11 sc)
- Row 6: Ch 1, turn, sc in each st. (11 sc)
- Row 7: Ch 1, turn, sc2tog, sc in each of the next 7 sts, sc2tog. (9 sc)
- Row 8: Ch 1, turn, sc in each st. (9 sc) Change to Color A.
- Row 9: Ch 1, turn, sc2tog, sc in each of the next 5 sts, sc2tog. (7 sc)
- Row 10: Ch 1, turn, sc in each st. (7 sc)
- Row 11: Ch 1, turn, sc2tog, sc in each of the next 3 sts, sc2tog. (5 sc)
- Rows 12-20: Ch 1, turn, sc in each st. (5 sc) Fasten off and leave a 12 in (30.5 cm) tail.
The tab is 4 in (10.2 cm) wide at Row 1 and about 1.3 in (3.3 cm) wide at Row 11. Rows 1-11 measure 2.75 in (7.0 cm), and the ring strip (Rows 12-20) measures 2.25 in (5.7 cm).
Layout (front view, top to bottom):
        [ ring ]
        [ tab  ]
   |  [ Basket 1 ]  |
   S                S
   |  [ Basket 2 ]  |
   S                S
   |  [ Basket 3 ]  |
S = strap, 1.5 in (3.8 cm) gap
Joining
Method: Whipstitch with Color A tails, going through both layers.
Markers: On each basket, call the first st of Rnd 15 st 1. This is the center back. Place markers at sts 15-18 and sts 45-48. These are the side strap positions, each 15 sts (one quarter of 60) from center back.
Stitch-to-stitch logic: Each strap is 4 sts wide and sits over exactly 4 basket sts, so there is no stretching or bunching. Strap rows line up with basket height: 6 strap rows = 1.5 in (3.8 cm).
- Upper end: Lay strap Rows 13-18 against the outside of the upper basket, over the marked sts. Start at the Rnd 6 ridge and work upward to the middle of Rnd 9, which is 1.5 in (3.8 cm). Whipstitch around all four edges.
- Gap: Leave strap Rows 7-12 free. This is the 1.5 in (3.8 cm) gap between baskets.
- Lower end: Lay strap Rows 1-6 against the outside of the lower basket, over the same marked sts. Start just below the rev sc rim and work down to the middle of Rnd 11, which is 1.5 in (3.8 cm). Whipstitch around all four edges.
- Repeat steps 1-3 for the second strap on that pair of baskets, then repeat the whole process for Basket 2 and Basket 3.
- Tab: Center tab Rows 1-2 inside the back wall of Basket 1, over sts 54-60 and 1-8 (15 sts). Whipstitch the edges to Rnds 14-15. Rows 3 and up should stand above the rim.
- Ring: Fold the ring strip (Rows 12-20) over the bottom of the ring toward the back. Sew Row 20 to the back of Row 11.
Tension: Make the stitches snug but not tight. The rows should still lie flat, without dimpling.
Size checkpoint: The basket heights are 3 x 4 in = 12 in, the gaps are 2 x 1.5 in = 3 in, and the tab adds 2.25 in above the rim. That gives a total of 17.25 in (43.8 cm).
Border
The border is the cream rim of each basket, plus a rust edging on the hanger tab.
Border gauge: 15 sc = 4 in (10.2 cm), with 4 sc rounds to 1 in (2.5 cm).
Rnd 13 (Color A): Join A in the first dc of any group. Ch 1, then sc in each dc around, working only into dc tops and not into the spaces. Join. (60 sc) Each quarter between the marker positions has 15 sc. Fasten off.
Rnd 14 (Color B): Join B. Ch 1, then sc in each st around. Join. (60 sc, 15 per quarter)
Rnd 15: Ch 1, then sc in each st around. Join. (60 sc, 15 per quarter)
Rnd 16: Ch 1, then rev sc in each st around. Join and fasten off. (60 rev sc, 15 per quarter) This makes a raised, rope-like cream rim.
Why the math works: Each 3-dc group takes up exactly 3 stitches, and 20 groups x 3 = 60. That means Rnd 13 places exactly one sc per dc and needs no increases or decreases. 60 also divides evenly into four quarters of 15, so the tab (15 sts) and the straps (4 sts each, centered at the quarter points) sit symmetrically.
Tab edging (Color A): After sewing the tab, join A at the Row 3 edge. Work 1 sc in each row end up to Row 11 (9 sc). Continue across the inside edge of the ring fold, then work 9 sc down the other side, from Row 11 to Row 3. Fasten off. This gives the tab its rust outline.
Final Blocking
- Weave in all ends inside the baskets, going through the same color.
- Lightly mist each basket until it is damp but not soaked.
- Put a toilet roll, or a 4.5 in (11.4 cm) wide can wrapped in a towel, inside each basket. This rounds out the walls.
- Press the base flat with your palm, then pinch the Rnd 6 ridge to sharpen it.
- Pin the tab flat on a towel, 4 in (10.2 cm) wide at the base.
- Let everything dry completely, for 12-24 hours.
- Hang the holder empty for an hour to let the straps settle.
Final Quality-Control Checklist
- Each basket has 60 sts in Rnds 5 through 16.
- Each cluster round has 20 groups.
- Baskets are 5 in (12.7 cm) across and 4 in (10.2 cm) tall.
- The colors alternate cream, rust, cream, rust, cream from Rnd 8 to Rnd 12.
- Straps are at sts 15-18 and 45-48 on every basket, lined up vertically.
- The gaps between baskets are 1.5 in (3.8 cm).
- The tab is centered over sts 54-8 and the ring is sewn securely.
- The total length is 17.25 in (43.8 cm) to the tab fold.
- No loose ends are showing.
Troubleshooting
Base is curling up: Your stitches are too tight, or an increase was skipped. Recount to 60 and try a larger hook for the base.
Base is ruffling: You have extra stitches. Check that Rnds 2-5 end on 24, 36, 48, and 60.
Wall is flaring out: Rnd 6 probably went into both loops. Redo it in BLO.
Groups are drifting or you have a leftover space: Count the spaces before you start each round. There must be exactly 20.
Basket tilts when hanging: One strap is sewn higher than the other. Re-sew both straps so they start at the Rnd 6 ridge.
Roll won’t fit: Go up half a hook size, or add one extra cluster round. Each round adds 0.5 in (1.3 cm) of height.
Tab is stretching: Whipstitch the tab to Rnd 14 as well, or sew a second line of stitches.
Care
Hand wash in cool water with mild soap. Reshape the baskets around rolls and lay them flat to dry.
Final Notes
Each step builds on the measurements before it. The gauge of 15 dc = 4 in (10.2 cm) gives a 5 in (12.7 cm) base with 60 sts. Twenty 3-dc groups keep the wall at 60 sts. Five cluster rounds bring the wall to 3.25 in (8.3 cm), and the cream rim takes it to 4 in (10.2 cm). Straps 4.5 in (11.4 cm) long set 1.5 in (3.8 cm) gaps, and the tab and ring finish the holder at 17.25 in (43.8 cm), or about 20.25 in (51.4 cm) with the ring.
Happy crocheting!