

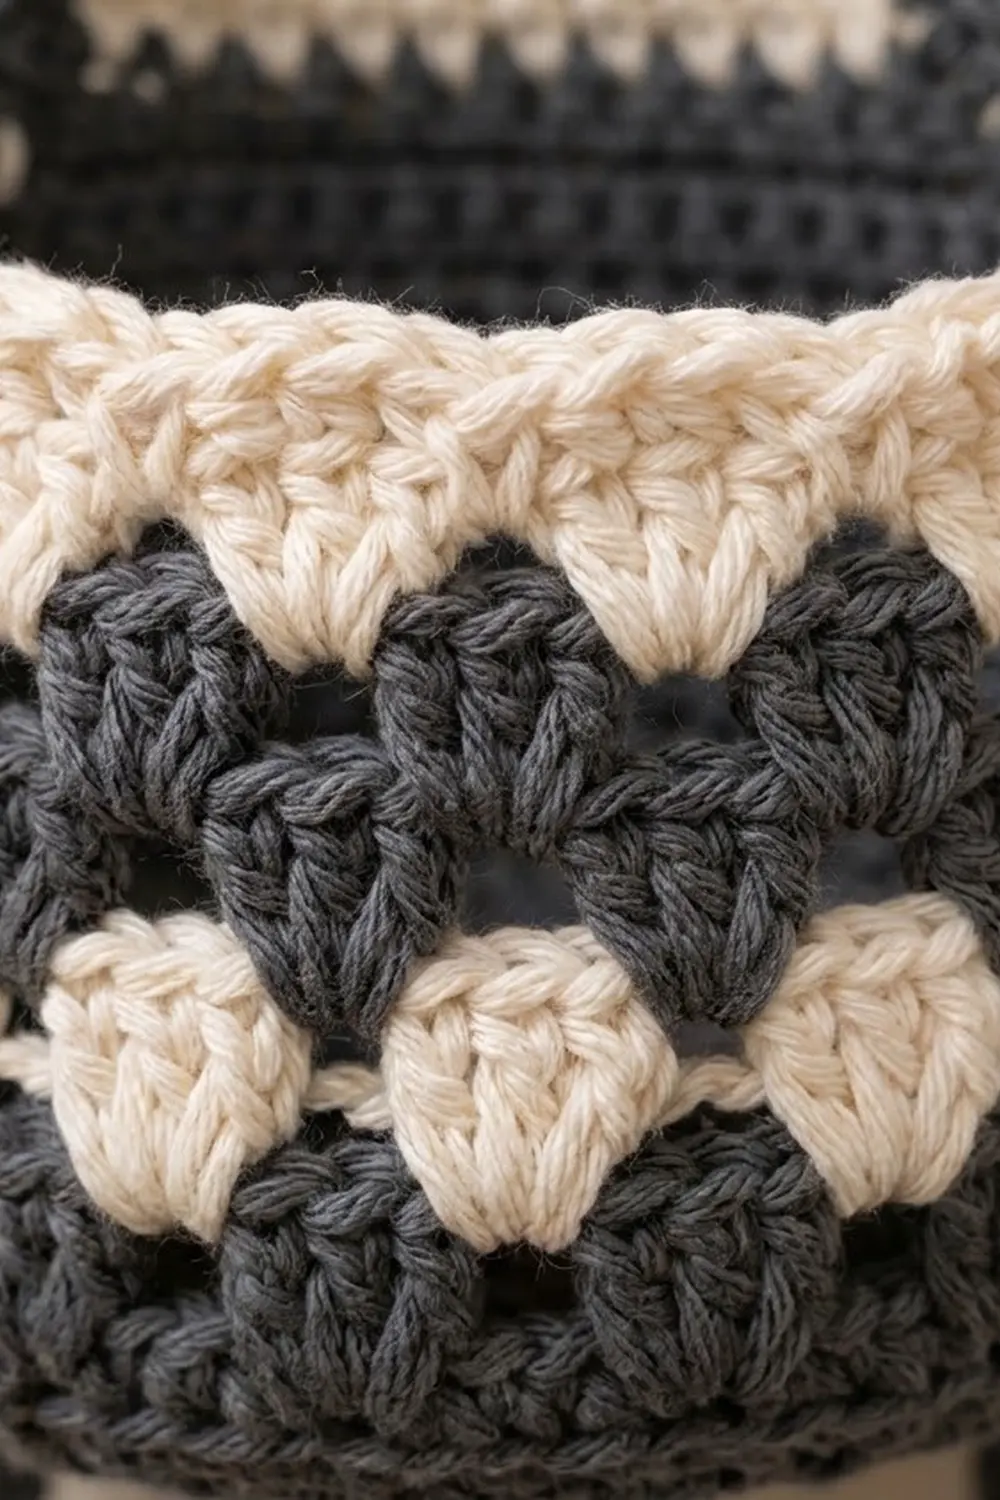
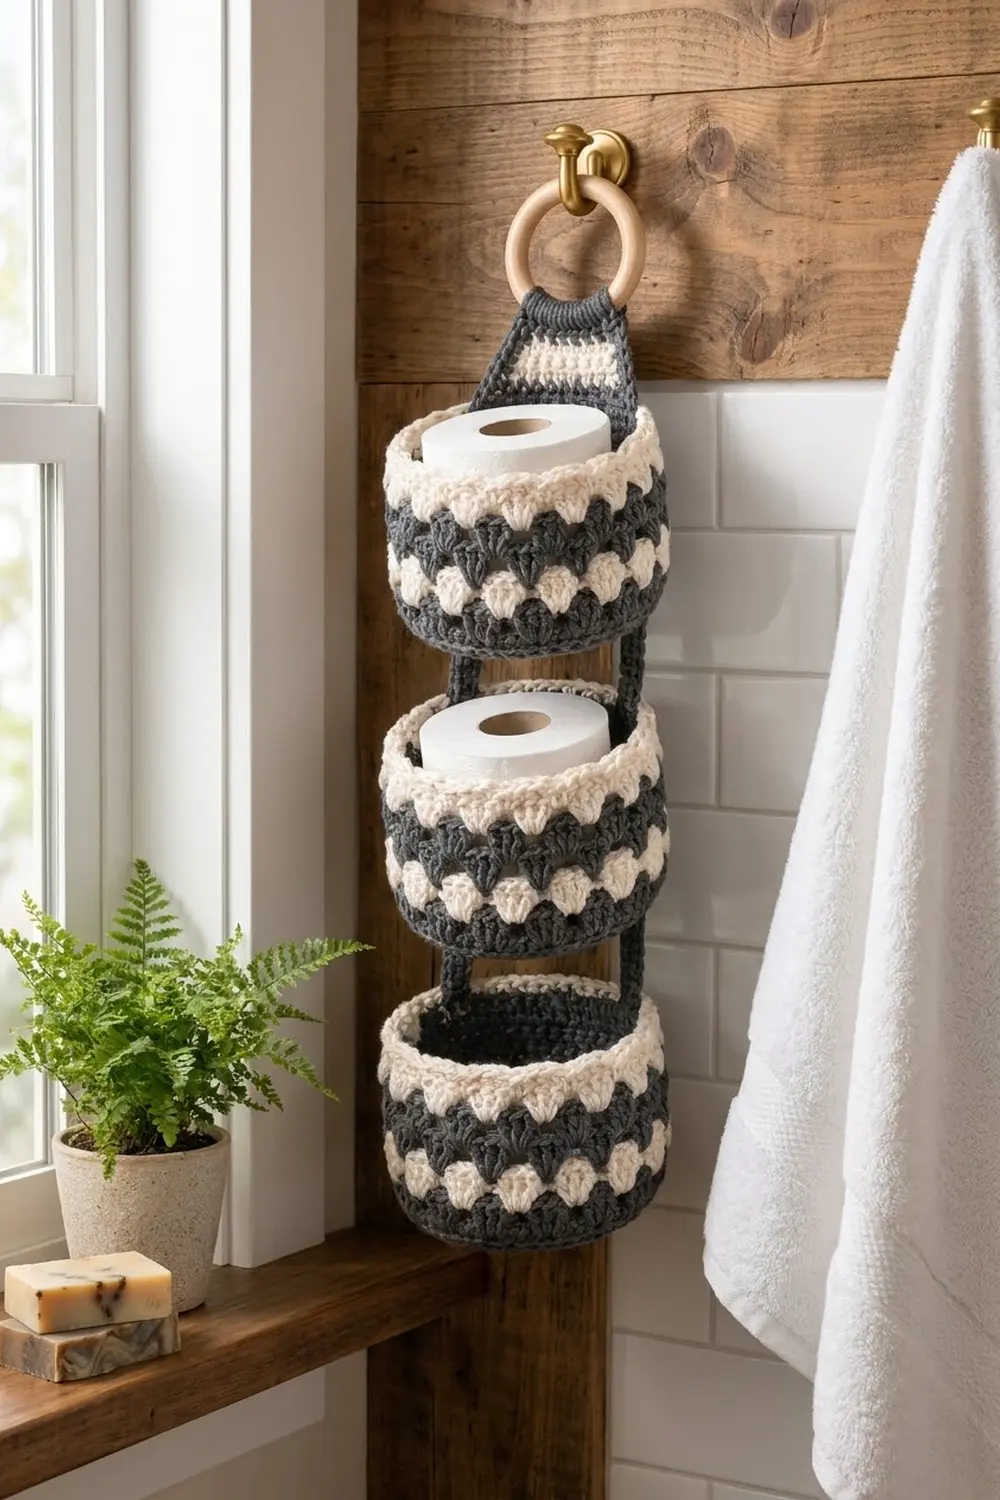
This hanging holder stores three spare rolls in a stack of round shell-stitch baskets. Each basket has a solid charcoal base and alternating rounds of cream and charcoal shells, so the fans nest together in a zigzag. A cream rim with a twisted edge finishes each top.
The palette is two colors, dark charcoal gray and cream. Paired with a natural wooden ring, the holder suits a modern farmhouse or Scandinavian bathroom. The pattern uses US crochet terms throughout.
Each basket measures about 5.5 in (14.0 cm) across and 4.5 in (11.4 cm) tall. The finished holder hangs about 23 in (58.4 cm) long including the 3 in (7.6 cm) ring.
To build it, you crochet three baskets in the round from the base up. Next you make two flat straps and sew them down the back of all three baskets. Last, you make a tapered tab, sew it over the strap tops, and wrap its narrow end around the wooden ring.
Finished Size and Construction
- Finished length: about 20.5 in (52.1 cm) to the top of the tab fold, or 23 in (58.4 cm) including the ring
- Skill level: Easy-intermediate
- Terminology: US
- Yarn weight: Worsted (#4) cotton
- Hook: 5.0 mm (H-8)
- Number of pieces: 6 (3 baskets, 2 straps, 1 tab) plus a wooden ring
- Layout: 3 baskets stacked vertically, 1 column
- Basket size: 5.5 in (14.0 cm) diameter × 4.5 in (11.4 cm) tall
- Basket height before rim: about 3.6 in (9.1 cm)
- Rim depth: about 0.9 in (2.3 cm)
- Gap between baskets: about 1.9 in (4.8 cm)
Materials
Yarn: Use a smooth worsted-weight cotton or cotton blend. Cotton holds its shape well, doesn’t stretch much when the baskets are full, and stands up to bathroom humidity. Avoid acrylic, which tends to sag under the weight of the rolls.
- Charcoal gray (MC): 180 g, about 306 m
- Cream (CC): 100 g, about 170 m
These amounts assume a yardage of about 170 m per 100 g and include a margin of roughly 15%.
Tools:
– 5.0 mm (H-8) crochet hook
– Wooden ring, 3 in (7.6 cm) outer diameter
– Tapestry needle
– 6 stitch markers
– Scissors
– Measuring tape
– Spray bottle and a towel for blocking
Abbreviations (US Terms)
- ch: chain
- sl st: slip stitch
- sc: single crochet
- hdc: half double crochet
- dc: double crochet
- inc: 2 sc in the same stitch
- sc2tog: single crochet 2 together
- BLO: back loop only
- MR: magic ring
- rev sc: reverse single crochet (crab stitch)
- st(s): stitch(es)
Special stitches
Shell: Work 5 dc in the same stitch.
Rev sc: Work single crochet from left to right (or right to left if you crochet left-handed). Insert the hook into the next stitch to the right, yarn over, pull up a loop, yarn over, and pull through both loops.
Gauge and Checkpoints
Gauge: 15 sc and 17 rounds = 4 in (10.2 cm) in sc worked in the round.
Make one complete basket before you start the others. It acts as your gauge swatch and shows whether a roll fits.
Checkpoints:
– After Rnd 4 (24 sts), the base should measure 2 in (5.1 cm) across.
– After Rnd 8 (48 sts), it should measure 4 in (10.2 cm) across.
– After Rnd 11 (66 sts), it should measure 5.5 in (14.0 cm) across.
– After Rnd 19, the sides should be about 3.6 in (9.1 cm) tall.
– The finished basket should be about 4.5 in (11.4 cm) tall.
If the base is too big, go down half a hook size. A loose base will ripple instead of lying flat.
If the base is too small, go up half a hook size. Measure a roll before you continue: a standard roll is about 4.25 in (10.8 cm) wide, and it needs at least 0.5 in (1.3 cm) of clearance.
If the base cups or ruffles, your stitch tension is the cause, not the increase rate. Change the hook size rather than the stitch counts, because the shell repeat depends on exactly 66 stitches.
Basket (Make 3)
Work in continuous rounds for the base. For the sides, join each round with a sl st. Use a marker to track the first stitch of each round.
Base
Use MC.
Rnd 1: 6 sc in MR. (6)
Rnd 2: Inc in each st around. (12)
Rnd 3: Sc 1, inc 6 times. (18)
Rnd 4: Sc 2, inc 6 times. (24)
Rnd 5: Sc 3, inc 6 times. (30)
Rnd 6: Sc 4, inc 6 times. (36)
Rnd 7: Sc 5, inc 6 times. (42)
Rnd 8: Sc 6, inc 6 times. (48)
Rnd 9: Sc 7, inc 6 times. (54)
Rnd 10: Sc 8, inc 6 times. (60)
Rnd 11: Sc 9, inc 6 times. Sl st to the first sc. (66)
Check the base diameter now. It should be 5.5 in (14.0 cm).
Sides
Rnd 12 (turning ridge): Ch 1, sc in BLO of each st around, then sl st to the first sc. (66) The unworked front loops form a crisp edge between the base and the sides.
Rnd 13: Ch 1, sc in each st around, then sl st to the first sc. (66) Fasten off MC.
Rnd 14 (CC): Join CC in any st. Ch 1 and sc in the same st. Skip 2 sts, shell in next st, skip 2 sts, sc in next st. Repeat from * 10 more times, ending with skip 2 sts, shell in next st, skip 2 sts. Sl st to the first sc. (11 shells + 11 sc = 66 sts) Fasten off.
Rnd 15 (MC): Join MC in the center dc of any shell. Ch 1 and sc in the same st. Shell in the next sc, sc in the center dc of the next shell. Repeat around, ending with a shell in the last sc. Sl st to the first sc. (11 shells + 11 sc = 66 sts) Fasten off.
Each new shell sits in the valley between two shells of the previous round. This offset is what creates the zigzag fans.
Rnd 16 (CC): Repeat Rnd 15. (66)
Rnd 17 (MC): Repeat Rnd 15. (66)
Rnd 18 (CC): Repeat Rnd 15. (66)
Rnd 19 (MC): Repeat Rnd 15. (66) Fasten off.
You now have 6 shell rounds that alternate CC and MC. The sides should be about 3.6 in (9.1 cm) tall. Carry on to the rim below.
Border (Basket Rim)
The rim levels the scalloped top of the shells and adds the twisted cream edge. Work it in CC on every basket.
Rim gauge: The 3 rim rounds add about 0.9 in (2.3 cm) of height. The rim keeps the basket’s 66 stitches, which is 17.6 in (44.7 cm) around at 15 sts per 4 in (10.2 cm). Because the count doesn’t change, the rim doesn’t flare or pull in.
Rnd 20 (leveling round): Join CC in the first dc of any shell. Ch 1. Hdc in dc 1, sc in dc 2, sc in dc 3, sc in dc 4, hdc in dc 5, dc in the next sc. Repeat 11 times. Sl st to the first hdc.
This is a conversion round: 66 sts worked 1 per existing st + 0 added = 66. The taller stitches fill the valleys and the shorter ones sit on the shell peaks, which gives a level top edge.
Rnd 21: Ch 1, sc in each st around, then sl st to the first sc. (66)
Rnd 22: Ch 1, rev sc in each st around, then sl st to the first rev sc. (66) Fasten off and weave in the ends.
Why the math works: The shell pattern repeats every 6 stitches. The base ends at 66 sts (6 × 11), so you get exactly 11 shells per round and no partial repeat at the join. All 11 rounds from the turning ridge to the rim stay at 66 stitches, which is what makes the sides straight and cylindrical.
Make All Pieces
Totals:
– Baskets: 3, each with a base and Rnds 12, 13, 15, 17, and 19 in MC, and Rnds 14, 16, 18, and 20–22 in CC
– Straps: 2, in MC
– Tab: 1, in MC with a CC band
Straps (Make 2)
Use MC.
Foundation: Ch 67.
Row 1: Sc in the 2nd ch from the hook and in each ch across. Turn. (66)
Rows 2–3: Ch 1, sc in each st across. Turn. (66)
Fasten off and leave a long tail. Each strap measures 17.6 in × 0.7 in (44.7 cm × 1.8 cm).
Place markers on each strap to split it into sections:
– Sts 1–17: sewn to Basket 1 (4.5 in / 11.4 cm)
– Sts 18–24: gap (7 sts, about 1.9 in / 4.8 cm)
– Sts 25–41: sewn to Basket 2
– Sts 42–48: gap
– Sts 49–65: sewn to Basket 3
– St 66: folded under the base of Basket 3
Tab
Use MC. Work in rows.
Foundation: Ch 17.
Row 1: Sc in the 2nd ch from the hook and in each ch across. Turn. (16)
Row 2: Ch 1, sc across. Turn. (16)
Row 3: Ch 1, sc2tog, sc 12, sc2tog. Turn. (14)
Row 4: Ch 1, sc across. Turn. (14)
Row 5: Ch 1, sc2tog, sc 10, sc2tog. Turn. (12) Change to CC.
Row 6 (CC): Ch 1, sc across. Turn. (12)
Row 7 (CC): Ch 1, sc2tog, sc 8, sc2tog. Turn. (10)
Row 8 (CC): Ch 1, sc across. Turn. (10) Change to MC.
Row 9: Ch 1, sc2tog, sc 6, sc2tog. Turn. (8)
Row 10: Ch 1, sc across. Turn. (8)
Row 11: Ch 1, sc2tog, sc 4, sc2tog. Turn. (6)
Rows 12–21: Ch 1, sc across. Turn. (6)
Fasten off and leave a long tail. The trapezoid section (Rows 1–11) narrows from 4.3 in (10.9 cm) to 1.6 in (4.1 cm) and is about 2.6 in (6.6 cm) tall. The strip (Rows 12–21) adds 2.4 in (6.1 cm).
Layout grid (back view, top to bottom):
      [ ring ]
      [ tab  ]
   |  Basket 1  |
   |            |   <- straps A and B
   |  Basket 2  |
   |            |
   |  Basket 3  |
Joining
Method: Whipstitch with the MC tails, working on the inside of each basket wherever you can reach.
Placement: On each basket, mark 16 stitches across the back of Rnd 21. Line up the baskets so these 16-stitch spans form a straight vertical line. Strap A covers columns 1–3 of the span and Strap B covers columns 14–16. That leaves 10 stitches, about 2.7 in (6.9 cm), between the straps.
Stitch-to-stitch logic: Each strap section is 17 sts long and spans the basket height, from Rnd 22 down to the turning ridge at Rnd 12. Match strap st 1 to Rnd 22 and strap st 17 to Rnd 12, and pin the middle evenly in between. Sew both long edges of the strap to the basket wall. Leave the 7-st gap sections unsewn. Fold st 66 under Basket 3 and tack it to the base.
Tension advice: Pull each whipstitch snug, but not so tight that the basket wall dimples. The straps carry the weight of the baskets below them, so take a stitch through every row edge along each section.
Tab: Center Row 1 of the tab over the 16 marked stitches on Basket 1, with the tab on the outside of the back. This covers the strap tops. Whipstitch Row 1 to Rnd 21 with 1 tab st per rim st. Next, slip the Rows 12–21 strip through the wooden ring, fold it to the back, and sew Row 21 to the back of Row 11.
Size checkpoint: Lay the holder flat. It should measure 20.5 in (52.1 cm) from the bottom of Basket 3 to the top of the tab fold, with gaps of about 1.9 in (4.8 cm) between baskets.
Final Blocking
- Lightly mist the whole holder with water until it is damp but not soaked.
- Stuff each basket with a roll wrapped in a hand towel to set the round shape.
- Lay the holder flat, with the straps straight and the gaps even.
- Pull the tab gently into a smooth trapezoid.
- Shape each rim with your fingers so the rev sc edge twists evenly.
- Leave it to dry completely, which usually takes 12–24 hours.
- Take out the towels and hang the holder.
Final Quality-Control Checklist
- Each base lies flat and measures 5.5 in (14.0 cm) across.
- Every side round has exactly 11 shells.
- The shells sit centered in the valleys of the round below.
- The rim is level all the way around, with no peaks or dips.
- All three baskets are the same height, 4.5 in (11.4 cm).
- The straps are parallel and 2.7 in (6.9 cm) apart.
- Both gaps between baskets measure 1.9 in (4.8 cm).
- The tab is centered and its CC band is straight.
- The ring loop is sewn securely through all layers.
- All ends are woven in on the inside.
Troubleshooting
Shells lean or drift: You started the next round in the wrong stitch. Always join in the center dc of a shell.
Wrong shell count: Check that Rnd 13 has 66 sts before you start Rnd 14.
Wavy rim: You probably skipped or doubled a stitch in Rnd 20. Recount to 66.
Basket tilts when hung: The straps aren’t centered. Re-pin them to the 16-stitch span and sew again.
Roll is a tight fit: Block over a slightly larger form, or go up a hook size on the next basket.
Tab puckers: Your whipstitches are too tight. Loosen them to 1 stitch per rim stitch.
Care
Hand wash in cool water and lay flat to dry, reshaping each basket over a towel. Don’t tumble dry.
Final Notes
Everything in this pattern follows from one chain of measurements. A gauge of 15 sc per 4 in (10.2 cm) gives a 66-stitch base of 5.5 in (14.0 cm). That 66 fits 11 shell repeats exactly, and holding it through the leveling and rim rounds keeps the sides straight at 4.5 in (11.4 cm). The 66-stitch straps then fit three 17-stitch basket sections and two 7-stitch gaps, with one stitch left to tuck under the base. The tab finishes the top and hangs the holder from the ring.
Happy crocheting!