

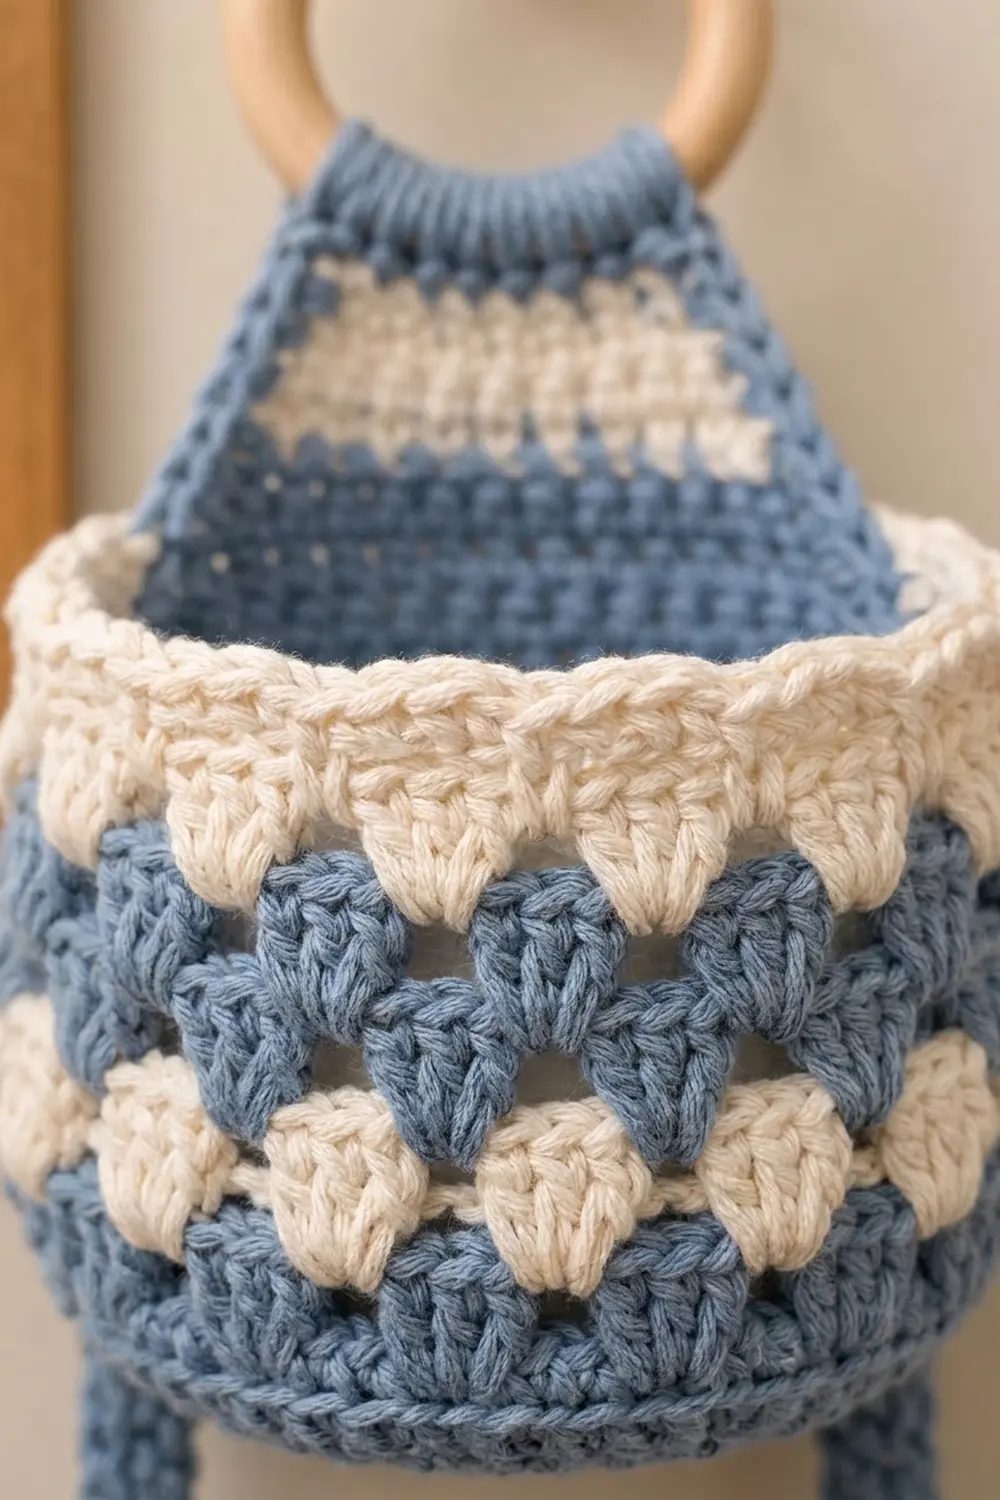
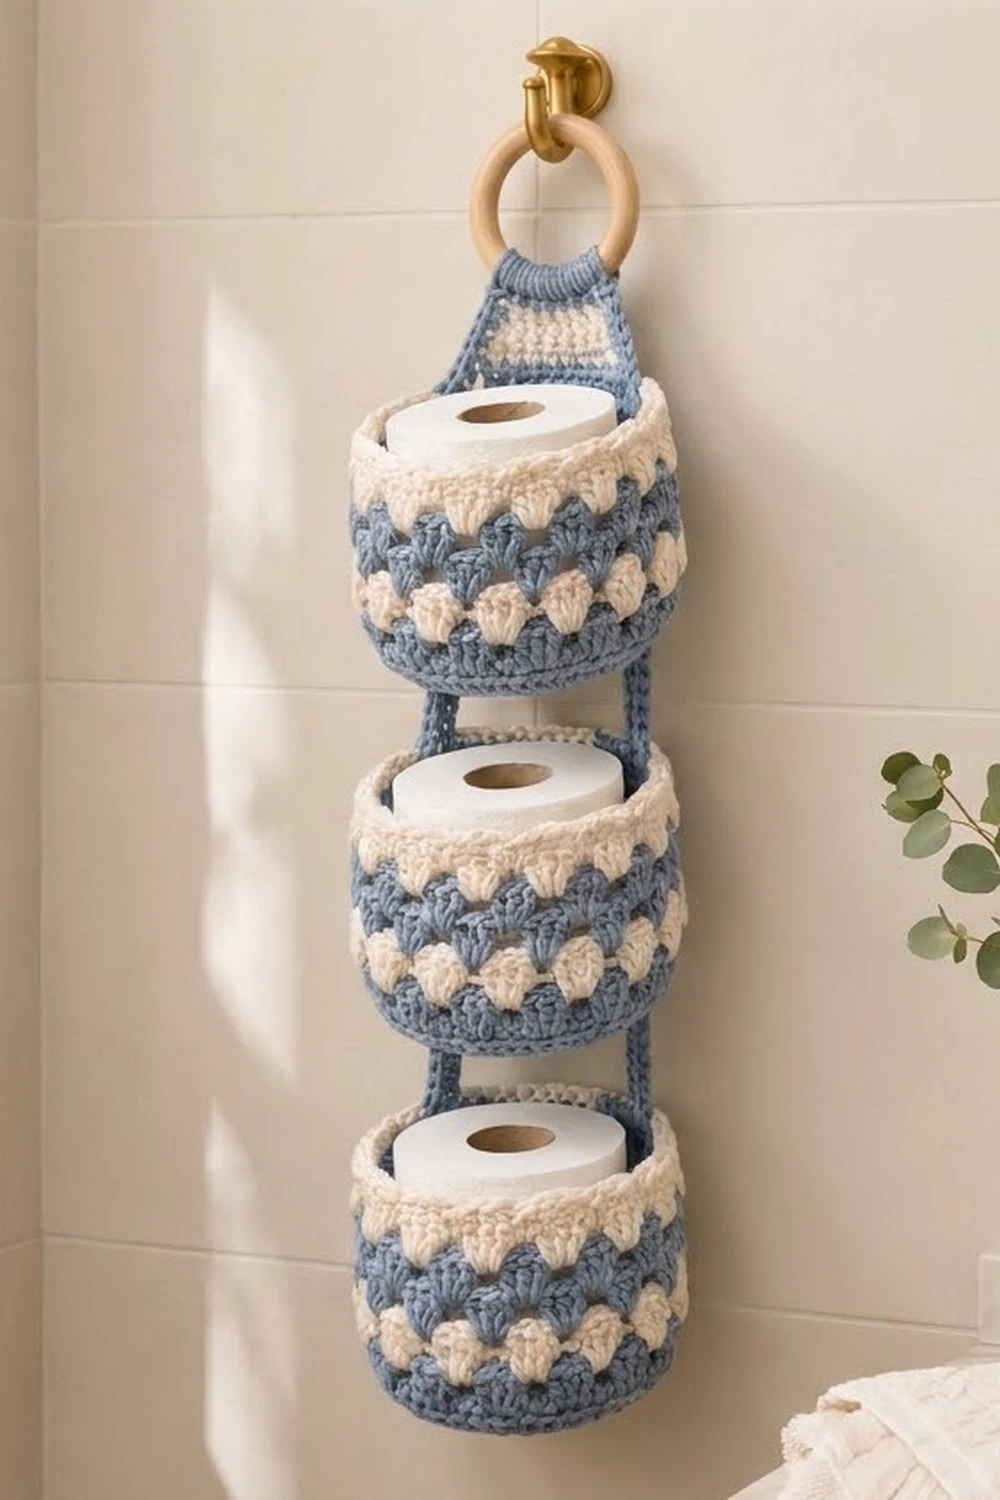
This three-tier hanging holder keeps three spare toilet rolls in a neat vertical stack. Each round basket has a solid dusty-blue base and walls of staggered three-dc clusters in alternating cream and blue rounds. A raised cream rim in reverse single crochet gives it a rope-like top edge.
The baskets hang from two blue straps sewn to their backs, with a 2 in (5.1 cm) gap between tiers. A tapered tab with a cream band rises from the top basket and folds around a 3 in (7.6 cm) wooden ring, so the whole piece hangs from one wall hook.
The pattern uses US crochet terms. Each basket is 5.5 in (14.0 cm) across and 4.25 in (10.8 cm) tall. The finished holder is 5.5 in (14.0 cm) wide and 21.75 in (55.2 cm) long, measured from the bottom of the lowest basket to the top of the hanging loop.
You crochet three identical baskets in the round from the base up. Then you make two straps and one tab flat and sew everything together. The cream rim works as the border and sets the final size of each basket.
Finished Size and Construction
- Finished size: 5.5 in (14.0 cm) wide x 21.75 in (55.2 cm) long, plus ring
- Skill level: Easy / advanced beginner
- Terminology: US crochet terms
- Yarn weight: Worsted (#4)
- Hook: 5 mm (H-8)
- Number of pieces: 6 (3 baskets, 2 straps, 1 hanging tab)
- Layout: 3 baskets in one vertical column, 2 in (5.1 cm) apart
- Piece size (each basket): 5.5 in (14.0 cm) diameter x 4.25 in (10.8 cm) tall
- Wall height before border: 3.5 in (8.9 cm)
- Border depth: 0.75 in (1.9 cm), 3 rounds
- Straps: 17.1 in (43.4 cm) x 1 in (2.5 cm) each
- Hanging tab: 5.7 in (14.5 cm) wide at the base, 1.7 in (4.3 cm) wide at the loop
Materials
Choose a smooth worsted-weight cotton or cotton blend. Cotton holds the basket shape and copes well with bathroom humidity. Avoid fuzzy or very stretchy yarn: the clusters lose definition and the baskets sag under the rolls.
- Color A (dusty blue): 220 g, about 396 m
- Color B (cream): 120 g, about 216 m
Quantities assume about 180 m per 100 g. They include a margin of about 15 percent for swatching and sewing.
Tools:
- 5 mm (H-8) crochet hook
- 1 wooden ring, 3 in (7.6 cm) outer diameter
- Tapestry needle
- Stitch markers (at least 6)
- Pins or clips
- Scissors and tape measure
Abbreviations (US Terms)
- ch: chain
- sl st: slip stitch
- sc: single crochet
- dc: double crochet
- inc: 2 sc in the same stitch
- sc2tog: single crochet 2 together
- BLO: back loop only
- MR: magic ring
- rev sc: reverse single crochet (crab stitch)
- st(s): stitch(es)
- sp: space
Cluster (CL): 3 dc worked into the same stitch or space. At the start of a round, ch 3 counts as the first dc of the first cluster.
Reverse sc: Work from left to right if you crochet right-handed. Insert the hook into the next stitch to the right, yarn over and pull up a loop, then yarn over and pull through both loops.
Gauge and Checkpoints
Gauge: 14 sc x 16 rows = 4 in (10.2 cm) in sc worked flat.
Make one complete basket before starting the others. It is your real gauge test, and it works up quickly.
Checkpoints:
- After Rnd 5 (30 sts): the base is 2.75 in (7.0 cm) across.
- After Rnd 10 (60 sts): the base is 5.5 in (14.0 cm) across.
- After Rnd 18: the wall is 3.5 in (8.9 cm) tall from the base edge.
- After Rnd 21: the wall is 4.25 in (10.8 cm) tall, and the circumference is 17.1 in (43.4 cm).
- Fit test: a standard roll, about 4.5 in (11.4 cm) across, drops in easily with a little room to spare.
If the base is too big, go down half a hook size. If it is too small, go up half a hook size. If the base is right but the walls flare out, tighten your dc. If the walls lean inward, loosen them a little. Never change the stitch counts, because the cluster repeat depends on 60 stitches.
Basket (Make 3)
Work the base in a continuous spiral and the walls in joined rounds.
Base
With color A:
- Rnd 1: MR, 6 sc in ring. (6)
- Rnd 2: inc in each st around. (12)
- Rnd 3: sc 1, inc 6 times. (18)
- Rnd 4: sc 1, inc, sc 1 6 times. (24)
- Rnd 5: sc 3, inc 6 times. (30)
- Rnd 6: sc 2, inc, sc 2 6 times. (36)
- Rnd 7: sc 5, inc 6 times. (42)
- Rnd 8: sc 3, inc, sc 3 6 times. (48)
- Rnd 9: sc 7, inc 6 times. (54)
- Rnd 10: sc 4, inc, sc 4 6 times. (60)
Sl st into the next st to smooth out the end of the spiral. Lay the base flat and check that it measures 5.5 in (14.0 cm) across.
Walls
From here on, join each round with a sl st to its first st.
- Rnd 11 (A, turning round): ch 1, sc BLO in each st around, join. (60 worked + 0 added = 60)
- Rnd 12 (A): ch 1, sc in each st around, join. (60)
The BLO round makes a crisp fold, so the base sits flat and the walls stand straight.
- Rnd 13 (B, conversion round): Join B in any st. Ch 3, 2 dc in same st, sk 2 sts, CL in next st 19 times, sk last 2 sts, join to top of ch 3. Fasten off. (20 CL = 60 dc)
- Rnd 14 (A): Join A in any sp between clusters. Ch 3, 2 dc in same sp, CL in each remaining sp between clusters, join. Fasten off. (20 CL = 60 dc)
- Rnd 15 (B): Repeat Rnd 14 with B. (20 CL = 60 dc)
- Rnd 16 (A): Repeat Rnd 14 with A. (20 CL = 60 dc)
- Rnd 17 (B): Repeat Rnd 14 with B. (20 CL = 60 dc)
- Rnd 18 (A): Repeat Rnd 14 with A. (20 CL = 60 dc)
Each new cluster sits in the space between two clusters of the round below, so the colors offset into the staggered cream-and-blue pattern. Each cluster round adds about 0.5 in (1.3 cm), so six rounds give 3 in (7.6 cm). Add the two sc rounds at 0.25 in (0.6 cm) each and the wall is 3.5 in (8.9 cm) tall before the border.
Work the border (see Border below) on each basket now, then weave in your ends.
Strap (Make 2)
With color A:
- Foundation: ch 61.
- Row 1: sc in 2nd ch from hook and in each ch across, turn. (60)
- Rows 2–4: ch 1, sc in each st across, turn. (60)
Fasten off and leave a 40 in (101.6 cm) tail for sewing. Each strap is 17.1 in (43.4 cm) long and 1 in (2.5 cm) wide.
Hanging Tab (Make 1)
Work this flat, from the wide base up to the loop. Each row begins with ch 1 (not counted as a st) and ends with a turn.
- Row 1 (A): ch 21, sc in 2nd ch from hook and across. (20)
- Row 2 (A): sc across. (20)
- Row 3 (A): sc2tog, sc 16, sc2tog. (18)
- Row 4 (A): sc across. (18)
- Row 5 (B): sc2tog, sc 14, sc2tog. (16)
- Row 6 (B): sc across. (16)
- Row 7 (B): sc2tog, sc 12, sc2tog. (14)
- Row 8 (B): sc across. (14)
- Row 9 (A): sc2tog, sc 10, sc2tog. (12)
- Row 10 (A): sc across. (12)
- Row 11 (A): sc2tog, sc 8, sc2tog. (10)
- Row 12 (A): sc across. (10)
- Row 13 (A): sc2tog, sc 6, sc2tog. (8)
- Row 14 (A): sc across. (8)
- Row 15 (A): sc2tog, sc 4, sc2tog. (6)
- Row 16 (A): sc across. (6)
- Rows 17–28 (A): sc across. (6)
Fasten off and leave a 20 in (50.8 cm) tail. Rows 1–16 form a 4 in (10.2 cm) trapezoid, and Rows 17–28 form a 3 in (7.6 cm) loop strip.
Make All Pieces
- Baskets: 3, each using about 70 g of A and 38 g of B
- Straps: 2, in A only
- Hanging tab: 1, mostly A with a B band in Rows 5–8
Layout (back view, top to bottom):
        [ ring ]
       /  tab  \
  [  Basket 3 (top)    ]
   |strap|      |strap|
  [  Basket 2 (middle) ]
   |strap|      |strap|
  [  Basket 1 (bottom) ]
Joining
Method: Whipstitch with color A, working through the strap edge and one strand of the basket wall. Keep the stitches on the inside of the strap edge so they stay hidden.
Horizontal placement: Choose the back of each basket and mark the center back st of Rnd 20. Count 6 sts out on each side of the marker. Each strap covers the next 4 sts beyond that point. That leaves 12 sts, or 3.4 in (8.6 cm), between the straps.
Vertical stitch-to-stitch logic: Number the 60 sts along each strap from the bottom.
- St 1: folds 0.3 in (0.8 cm) under the edge of the bottom basket’s base
- Sts 2–16: sew to the bottom basket wall (15 sts = 4.25 in, or 10.8 cm)
- Sts 17–23: left free (7 sts = 2 in, or 5.1 cm)
- Sts 24–38: sew to the middle basket wall
- Sts 39–45: left free
- Sts 46–60: sew to the top basket wall
That totals 1 + 15 + 7 + 15 + 7 + 15 = 60 sts. For each basket, pin the lowest strap st in its section to Rnd 11, the highest to Rnd 21, and the middle st to the top of Rnd 15. Spread the sewing evenly between those pins.
Tab: Center Row 1 of the tab behind the top basket and let Rows 1–2 overlap the rim by 0.5 in (1.3 cm). Sew the tab over the strap tops. Then wrap Rows 17–28 around the wooden ring to the back and sew Row 28 across the back of Rows 13–16.
Tension: Sew snugly but not tightly. If you pull too hard, the basket walls pucker around the straps.
Size checkpoint: Lay the holder flat. From the bottom basket’s base to the top basket’s rim should be 16.75 in (42.5 cm). Add the 5 in (12.7 cm) of tab and loop above the rim, and the total is 21.75 in (55.2 cm).
Border (Basket Rim)
Work this on each basket right after Rnd 18. It is listed here because it sets the final measurements.
Border gauge: 14 sc = 4 in (10.2 cm), the same as the base gauge.
Count the “sides” as the front half and back half of the basket: 30 sts each.
- Rnd 19 (B, conversion round): Join B in any dc. Ch 1, sc in each dc around, skip the spaces between clusters, join. (60 worked 1 per dc + 0 added = 60; front 30, back 30)
- Rnd 20 (B): ch 1, sc in each st around, join. (60; front 30, back 30)
- Rnd 21 (B): ch 1, rev sc in each st around, join. Fasten off. (60; front 30, back 30)
Why the math works: 20 clusters x 3 dc = 60 dc, and one sc per dc gives exactly 60 sts. At 3.5 sts per inch, 60 sts measure 17.1 in (43.4 cm), the same circumference as the base at Rnd 10. So the rim sits directly above the base without flaring or pulling in. The three rounds add 0.75 in (1.9 cm), bringing the wall from 3.5 in (8.9 cm) to 4.25 in (10.8 cm).
Final Blocking
- Lightly mist each basket with water until it is damp.
- Slide a toilet roll or a 5.5 in (14.0 cm) jar into each basket to shape it.
- Push the base flat from the inside along the BLO fold.
- Pin the straps and tab flat on a towel and press them gently into a straight line.
- Let everything dry completely for about 24 hours.
- Recheck the measurements: 5.5 in (14.0 cm) diameter and 4.25 in (10.8 cm) wall height.
Final Quality-Control Checklist
- Each base has 60 sts and lies flat at 5.5 in (14.0 cm).
- Every cluster round has 20 clusters.
- The colors alternate B, A, B, A, B, A from Rnd 13 to Rnd 18.
- Every rim has 60 sts and is 0.75 in (1.9 cm) deep.
- Both straps are 17.1 in (43.4 cm) long and sit straight and parallel.
- Each gap between baskets is 2 in (5.1 cm).
- The tab is centered and the ring is sewn in securely.
- All ends are woven in on the inside.
Troubleshooting
- Base cups upward: Your increases are too tight. Go up a hook size for the base only.
- Base ruffles: You have extra stitches. Recount each round against the list.
- Clusters drift or lean: Join each new round in a space, not on top of a cluster.
- Rim flares: You worked into the spaces on Rnd 19. Redo the round with sc in dc only.
- Holder tilts: The straps are uneven. Re-pin them using the stitch numbers.
- Baskets sag: Use cotton yarn and sew the straps up the full wall height.
Care
Hand wash in cool water with mild soap, press out the water, and dry flat with a roll inside each basket to keep the shape. Do not tumble dry.
Final Notes
Here is the full measurement chain. The base is 60 sts and 5.5 in (14.0 cm) across. The walls are 3.5 in (8.9 cm) before the border and 4.25 in (10.8 cm) after it. The baskets hang 2 in (5.1 cm) apart on two 17.1 in (43.4 cm) straps, which gives 16.75 in (42.5 cm) of stacked baskets. The tab and loop add 5 in (12.7 cm), for a total length of 21.75 in (55.2 cm). Check each link in that chain as you go and your holder will hang straight and hold its rolls neatly.
Happy crocheting!