

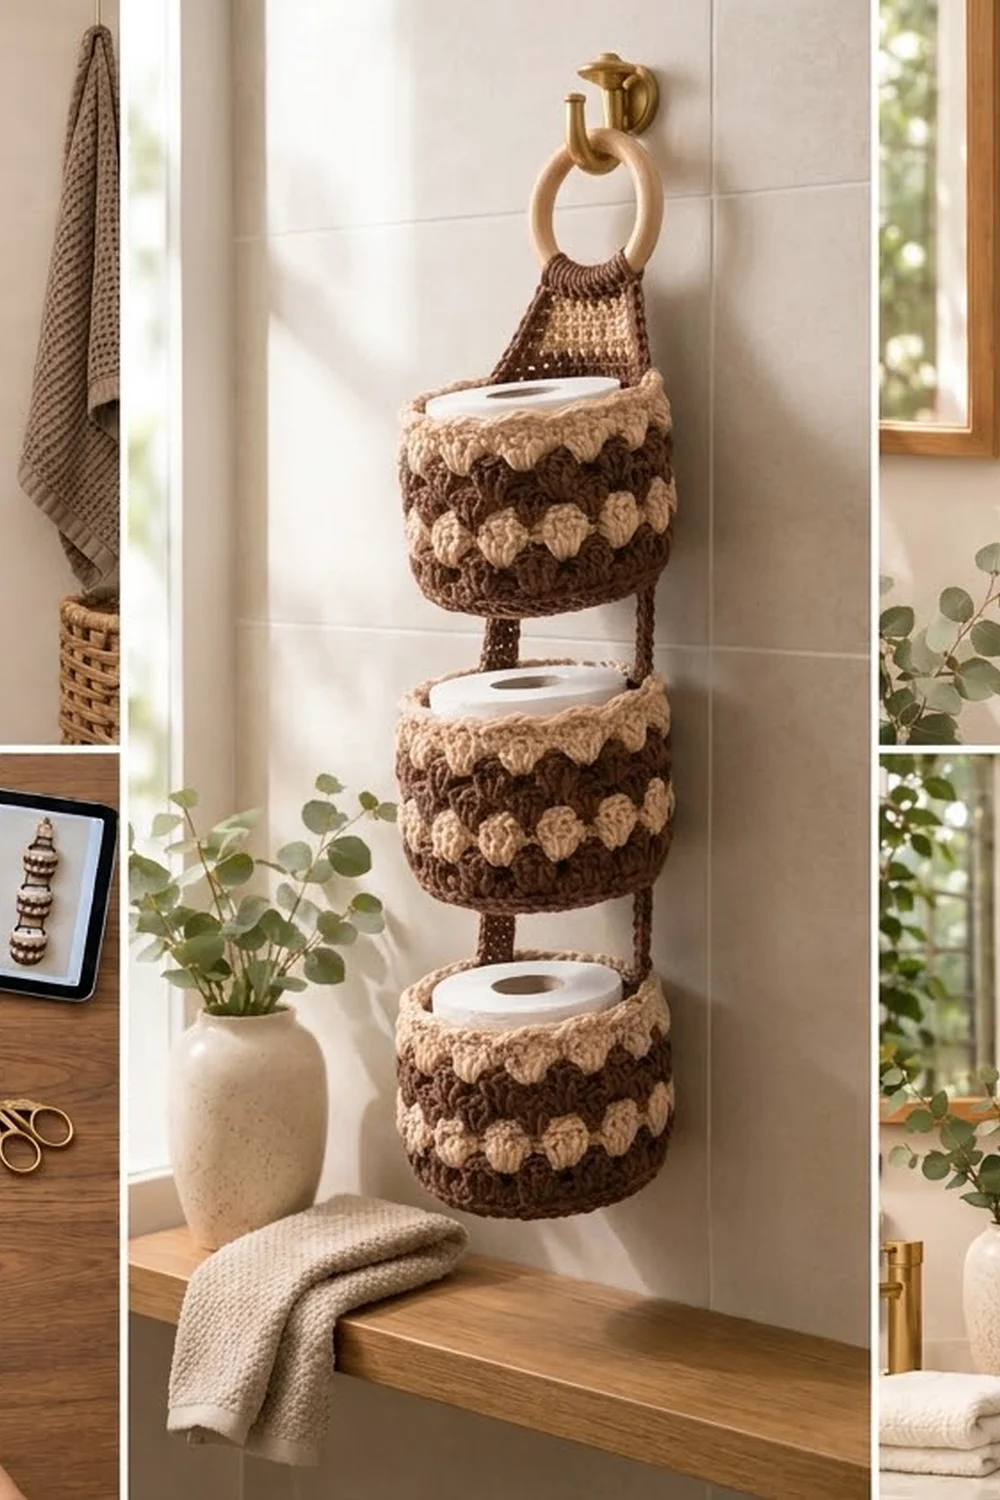
The Cocoa Shell holder is a hanging organizer with three round baskets stacked one above the other. Each basket holds one standard toilet roll, and the whole holder hangs from a wooden ring on a wall hook.
The colors are chocolate brown and sand beige. Brown is used for the bases, the straps and every other shell round. Beige is used for the alternate shell rounds, the rope-like rims and the hanger tab. The staggered shells give the baskets a scalloped, scale-like texture that suits wood, brass and linen.
This pattern uses US crochet terms. The finished holder is about 21 in (53.3 cm) long below the ring. Each basket is 5.5 in (14.0 cm) across and 4.5 in (11.4 cm) tall.
You crochet three identical baskets from the base up in joined rounds. Then you make four short straps and one hanger tab, and sew everything together around a 2.5 in (6.4 cm) wooden ring.
Finished Size and Construction
- Finished size: about 21 in (53.3 cm) long, 5.75 in (14.6 cm) wide at the baskets
- Skill level: Intermediate
- Terminology: US
- Yarn weight: Aran / worsted (4) cotton or cotton blend
- Hook: 5.0 mm (H-8)
- Number of pieces: 8 (3 baskets, 4 straps, 1 hanger tab)
- Layout: 1 column of 3 baskets, with 2 straps in each gap and the hanger tab on top
- Basket size: 5.5 in (14.0 cm) base diameter, 4.5 in (11.4 cm) tall
- Wall height before border: 4 in (10.2 cm)
- Border depth: 0.5 in (1.3 cm), 2 rounds
- Gap between baskets: 1.6 in (4.1 cm)
Materials
Choose a firm cotton or cotton blend in Aran or heavy worsted weight. Cotton holds its shape and keeps the baskets upright. Soft acrylic also works, but the walls may slump.
- Color A, chocolate brown: 200 g / 340 m (based on 100 g = 170 m)
- Color B, sand beige: 120 g / 204 m
These amounts include a margin of about 15 percent for gauge swatches and differences in tension.
Tools:
- 5.0 mm (H-8) crochet hook
- 1 wooden ring, 2.5 in (6.4 cm) outside diameter
- Tapestry needle
- Stitch markers (at least 6)
- Scissors
- Measuring tape
- Rustproof pins
Abbreviations (US Terms)
- ch: chain
- sl st: slip stitch
- sc: single crochet
- dc: double crochet
- inc: 2 sc in the same stitch
- sc2tog: single crochet 2 together
- BLO: back loop only
- rev sc: reverse single crochet (crab stitch)
- st(s): stitch(es)
- sk: skip
Shell: 5 dc in the same stitch.
Half shell: at the start of a round, ch 3 (counts as dc), then 2 dc in the same stitch. At the end of the round, work 2 dc in that same stitch to complete the shell.
Reverse sc: work from left to right if you are right-handed. Insert the hook in the next stitch to the right, yarn over, pull up a loop, yarn over and pull through both loops.
Gauge and Checkpoints
Gauge: 14 sc and 15 rows = 4 in (10.2 cm) in sc.
Make one full basket first and measure it before you start the others. The three baskets must match, or the straps will pull unevenly.
Checkpoints:
- After Rnd 10 (base): 5.5 in (14.0 cm) across, lying flat.
- After Rnd 19 (before border): the wall is 4 in (10.2 cm) tall.
- After Rnd 21 (finished basket): the wall is 4.5 in (11.4 cm) tall and a roll slides in easily.
- Strap: 3.2 in (8.1 cm) long.
- Hanger tab, beige section: 4 in (10.2 cm) wide at the bottom, 3.2 in (8.1 cm) tall.
If your base is wider than 5.75 in (14.6 cm), go down one hook size. If it is narrower than 5.25 in (13.3 cm), go up one hook size. A standard roll is about 4.5 in (11.4 cm) across, so the basket needs at least that much room inside.
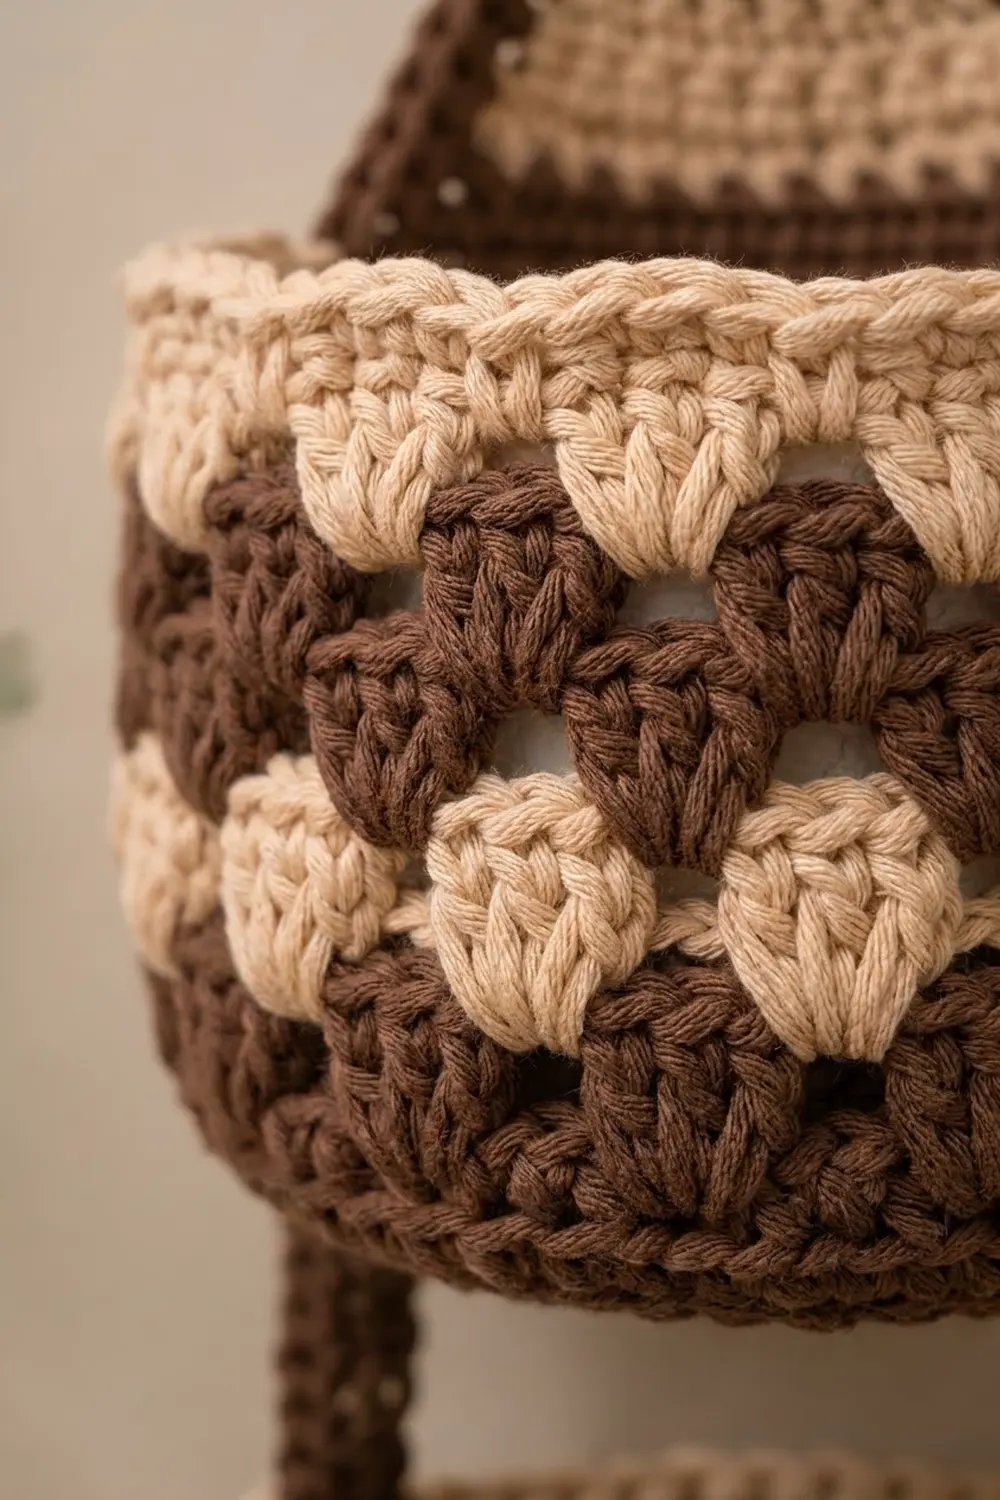
Basket (make 3)
Work in joined rounds and do not turn. The ch 1 at the start of a round does not count as a stitch.
Base
With Color A:
Rnd 1: Make a magic ring, 6 sc in ring, sl st to first sc. (6)
Rnd 2: Ch 1, inc in each st around, join. (12)
Rnd 3: Ch 1, sc 1, inc, repeat 6 times, join. (18)
Rnd 4: Ch 1, sc 2, inc, repeat 6 times, join. (24)
Rnd 5: Ch 1, sc 3, inc, repeat 6 times, join. (30)
Rnd 6: Ch 1, sc 4, inc, repeat 6 times, join. (36)
Rnd 7: Ch 1, sc 5, inc, repeat 6 times, join. (42)
Rnd 8: Ch 1, sc 6, inc, repeat 6 times, join. (48)
Rnd 9: Ch 1, sc 7, inc, repeat 6 times, join. (54)
Rnd 10: Ch 1, sc 8, inc, repeat 6 times, join. (60)
Checkpoint: the base is 5.5 in (14.0 cm) across. If the circle starts to look hexagonal, move the increases slightly from round to round.
Wall
Rnd 11: Ch 1, sc in BLO of each st around, join. (60) This round turns the wall upward.
Rnd 12: Ch 1, sc in each st around, join. (60) Drop A at the join, but do not cut it.
From here, the colors alternate every round. Carry the unused color loosely up the inside of the wall at the join instead of cutting it.
Rnd 13 (B): Pick up B. Ch 1, sc in first st, sk 2, shell in next st, sk 2, sc in next st, repeat 9 times, sk 2, shell in next st, sk 2, sl st to first sc. (10 shells + 10 sc = 60 sts)
Rnd 14 (A): With A, sl st into first sc. Half shell in this sc, sk 2 dc, sc in center dc of next shell, sk 2 dc, shell in next sc, repeat 8 times, sk 2 dc, sc in center dc of last shell, sk 2 dc, 2 dc in first sc, sl st to top of ch 3. (9 full shells + 1 split shell + 10 sc = 60 sts)
Rnd 15 (B): Pick up B and sl st into the top of the beginning ch 3, which is the center of the split shell. Ch 1, sc in same st, sk 2, shell in next sc, sk 2, sc in center dc of next shell, repeat 9 times, sk 2, shell in last sc, sk 2, sl st to first sc. (10 shells + 10 sc = 60 sts)
The beige shells of Rnd 15 now sit directly above the beige shells of Rnd 13, with the brown shells between them. This offset makes the scale pattern.
Rnd 16 (A): Repeat Rnd 14. (60)
Rnd 17 (B): Repeat Rnd 15. (60)
Rnd 18 (A): Repeat Rnd 14. (60) Cut A.
Rnd 19 (B, leveling round): Sl st into top of beginning ch 3. Ch 1, sc in same st and in next 2 dc, dc in next sc, sc in each of next 5 dc, repeat 9 times, dc in next sc, sc in last 2 dc, join. (60 worked 1-per-stitch + 0 added = 60: 50 sc + 10 dc)
Each dc fills a low point above a sc, so the top edge comes out level. Checkpoint: the wall is 4 in (10.2 cm) tall. Do not cut B, because the border continues from here.
Make All Pieces
Strap (make 4)
With A, ch 4.
Row 1: Sc in second ch from hook and in each ch across, turn. (3)
Rows 2–12: Ch 1, sc in each st across, turn. (3)
Fasten off, leaving a 12 in (30.5 cm) tail. Each strap is 0.85 in (2.2 cm) wide and 3.2 in (8.1 cm) long.
Hanger Tab (make 1)
With B, ch 15.
Row 1: Sc in second ch from hook and in each ch across, turn. (14)
Row 2: Ch 1, sc across, turn. (14)
Row 3: Ch 1, sc2tog, sc 10, sc2tog, turn. (12)
Rows 4–5: Ch 1, sc across, turn. (12)
Row 6: Ch 1, sc2tog, sc 8, sc2tog, turn. (10)
Rows 7–8: Ch 1, sc across, turn. (10)
Row 9: Ch 1, sc2tog, sc 6, sc2tog, turn. (8)
Rows 10–11: Ch 1, sc across, turn. (8)
Row 12: Ch 1, sc2tog, sc 4, sc2tog, turn. (6) Cut B.
The beige trapezoid is 4 in (10.2 cm) wide at the bottom, 1.7 in (4.3 cm) wide at the top and 3.2 in (8.1 cm) tall.
Rows 13–20 (A): Join A. Ch 1, sc across, turn. (6) This makes a 2.1 in (5.3 cm) band. Leave a 12 in (30.5 cm) tail.
Piece count and layout
- Color A only: 4 straps
- Color A and B: 3 baskets, 1 hanger tab
        ( wooden ring )
        [ hanger tab  ]
        [  Basket 1   ]
        |S1|     |S2|
        [  Basket 2   ]
        |S3|     |S4|
        [  Basket 3   ]
Border
Border gauge: 14 sc = 4 in (10.2 cm), the same as the body. Work the border on each basket before joining.
Basket rim (continue with B)
Rnd 20: Ch 1, sc in each st around, join. (60, which is 15 per quarter)
Rnd 21: Ch 1, rev sc in each st around, join. (60, which is 15 per quarter) Fasten off and weave in the ends.
Why the math works: every wall and border round holds exactly 60 stitches, the same as base Rnd 10. At 3.5 sts per inch, 60 stitches make a circumference of 17.1 in (43.4 cm), which is a diameter of about 5.5 in (14.0 cm). Since nothing is added or removed after the base, the walls rise straight without flaring or pulling in. The shell repeat is 6 stitches (sc + sk 2 + shell + sk 2), and 6 × 10 = 60.
Hanger tab edging
With A, join at the bottom right corner of Row 1. Work 1 sc in each row end up the right slanted side to the top of Row 12. (12) Fasten off. Repeat on the left side from top to bottom. (12) The total is 24 sc, one per beige row end, so the edge lies flat.
Joining
Mark the baskets: on each basket, mark Rnd 20 stitches 15–17 and 44–46 for the straps. On Basket 1, also mark stitches 24–37 at the back for the hanger tab. That is 14 stitches, centered between the strap positions.
Hanger tab: fold the brown band over the wooden ring toward the back. Whipstitch the last row of the band to the back of Row 12, one stitch to one stitch (6 to 6). Then place the foundation edge of Row 1 (14 sts) inside Basket 1, behind Rnd 20 at stitches 24–37. Whipstitch one tab stitch to one rim stitch (14 to 14).
Straps: each strap end overlaps a basket by 3 rows, which is 0.8 in (2.0 cm).
- Pin strap Rows 10–12 to the outside of the upper basket’s lower wall, starting at the Rnd 11 ridge and centered over the stitch marked 16 or 45.
- Pin strap Rows 1–3 to the inside of the lower basket, just below the rim, at the marked stitches 15–17 or 44–46.
- Whipstitch around all edges of each overlap.
That leaves 6 rows of strap visible, so each gap is 1.6 in (4.1 cm).
Tension: keep the whipstitches snug but not tight, and check that both straps in a gap are the same length before sewing the second end. If one strap is shorter, the basket will tilt.
Size checkpoint: lay the holder flat. It should measure about 21 in (53.3 cm) from the fold at the ring to the bottom of Basket 3.
Final Blocking
- Lightly mist each basket with water.
- Stuff each basket with a toilet roll or a rolled towel to square up the walls.
- Pin the hanger tab flat on a towel so its slanted sides are straight.
- Let everything dry completely, at least 12 hours.
- Remove the forms and hang the holder to check that it falls straight.
Final Quality-Control Checklist
- Each basket has 60 stitches in every round from Rnd 10 to Rnd 21.
- The bases measure 5.5 in (14.0 cm) and the walls 4.5 in (11.4 cm).
- The shells stagger evenly with no doubled color bands.
- All four straps are 3.2 in (8.1 cm) long and the gaps are equal.
- The hanger tab is centered at the back of Basket 1.
- The ring is sewn in securely and all ends are woven in.
Troubleshooting
- The base ruffles: your tension is too loose. Go down a hook size or move the increases from round to round.
- The base cups: your tension is too tight. Go up a hook size.
- The walls flare: recount to 60 stitches. A shell may have been worked into a dc instead of a sc.
- The color carry shows: carry the yarn on the inside of the wall and keep it loose.
- The holder tilts: re-sew the shorter strap so both overlaps are exactly 3 rows.
- The rim waves: work the reverse sc more loosely, or use a larger hook for Rnd 21 only.
Care
Hand wash in cool water and lay flat to dry, reshaping the baskets over rolls. Do not tumble dry.
Final Notes
The measurement chain is simple. Your gauge of 14 sc = 4 in (10.2 cm) gives a 60-stitch base of 5.5 in (14.0 cm). Sixty stitches carried straight up give a 4 in (10.2 cm) wall, and the border brings it to 4.5 in (11.4 cm). Three baskets, two 1.6 in (4.1 cm) gaps and the hanger tab add up to about 21 in (53.3 cm). Check each stage and the finished holder will hang straight and hold three rolls neatly.
Happy crocheting!