

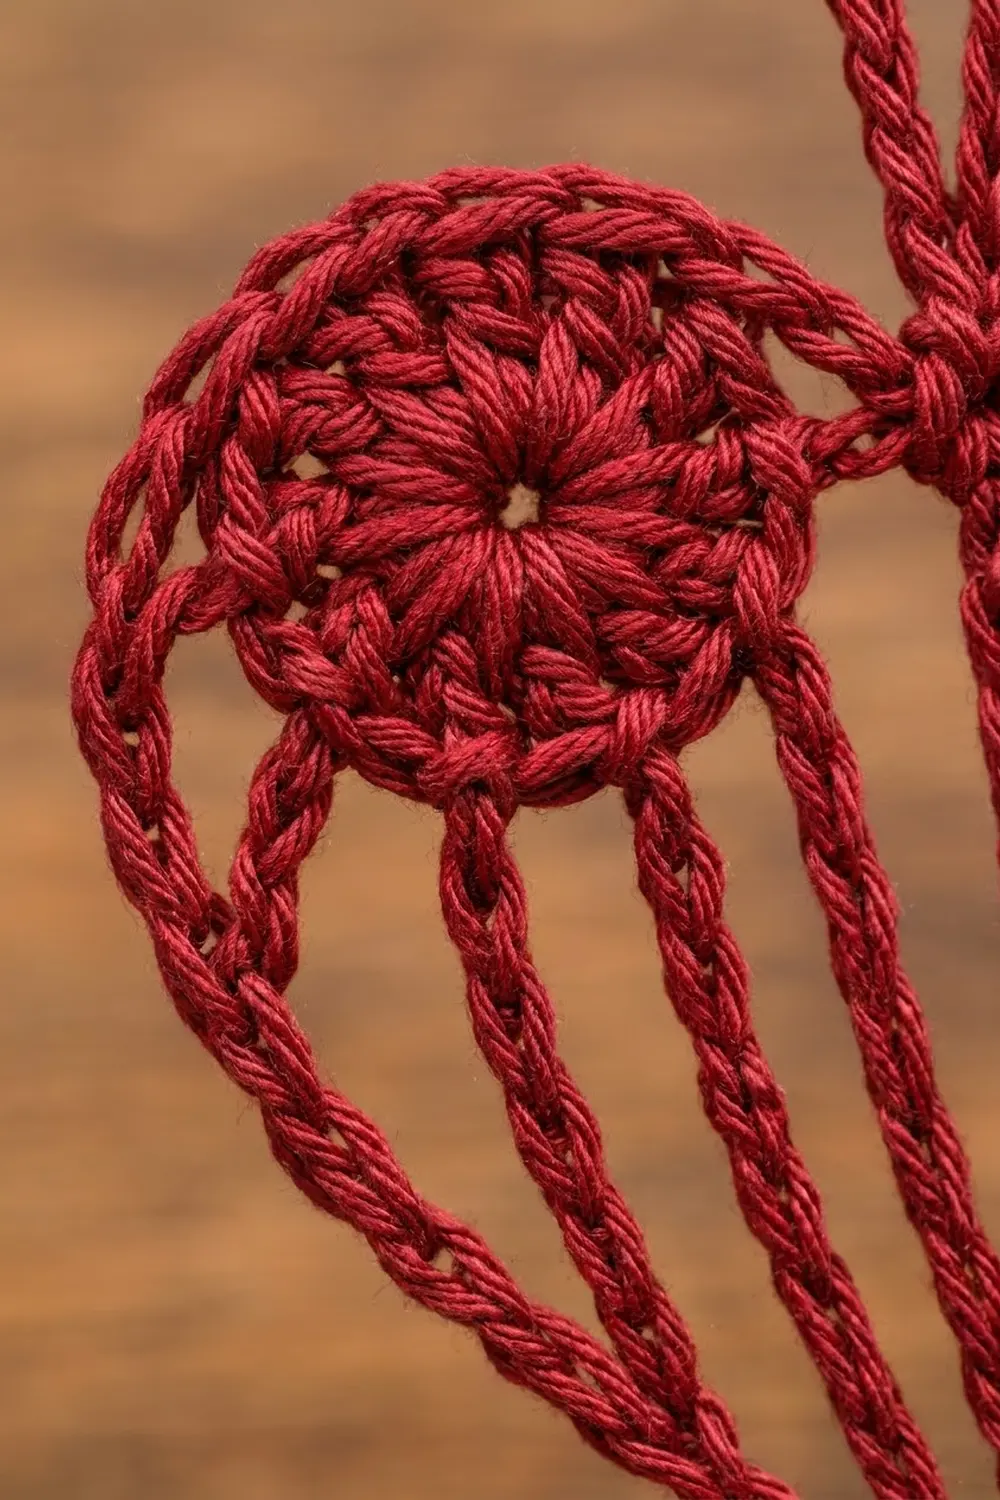
The Ribbed Lantern Heart is a light, airy Christmas ornament made from two solid circles, a small fan-shaped point, and seven slip-stitched chain ribs. The open “cage” in the middle lets tree lights glow through, so the heart looks like a little lantern hanging on a branch.
This sample is worked in one deep cranberry red, but the design looks just as good in white, gold, or forest green. A smooth, slightly shiny cotton gives the crispest ribs and the clearest circle texture.
The pattern uses US crochet terms. The finished heart measures about 3.25 in (8.3 cm) wide and 3.5 in (8.9 cm) tall, plus a hanging loop of about 1 in (2.5 cm), for a total height of about 4.5 in (11.4 cm).
Construction is simple. You make the fan point first, then two circles joined to each other as you go. Finally, you travel along the top of the fan, chaining each rib up to the circles and slip stitching back down. The two outer ribs form the heart’s outline, and you work the hanging loop in the middle of the same pass.
Finished Size and Construction
- Finished size: 3.25 in (8.3 cm) wide x 3.5 in (8.9 cm) tall; 4.5 in (11.4 cm) tall including loop
- Skill level: Easy / advanced beginner
- Terminology: US crochet terms
- Yarn weight: DK (#3 light), cotton or cotton blend
- Hook: 3.5 mm (E-4)
- Number of pieces: 1 finished ornament (built from 3 small parts joined as you go)
- Layout: two circles side by side at the top, fan point at the bottom, 7 chain ribs between
- Circle size: 1.5 in (3.8 cm) diameter
- Size before border: the joined circles span 3 in (7.6 cm) across the top
- Border depth: the outline ribs bow out about 0.1 in (0.3 cm) on each side, bringing the width to 3.25 in (8.3 cm)
Materials
Choose a smooth mercerized cotton or cotton blend in DK weight. Fuzzy or very splitty yarns blur the chain ribs, and acrylic tends to relax and droop after hanging.
- Red (cranberry): 10 g, approximately 23 m (25 yd) per ornament
Tools:
- 3.5 mm (E-4) crochet hook
- 4 locking stitch markers
- Tapestry needle
- Scissors
- Blocking mat and rust-proof pins
- Spray bottle with water (optional: light spray starch)
The yarn amount includes a margin of about 40% for swatching, a test circle, and weaving in ends.
Abbreviations (US Terms)
- ch – chain
- sl st – slip stitch
- sc – single crochet
- dc – double crochet
- st(s) – stitch(es)
- MR – magic ring
- BB – back bump of a chain
Special technique – Return slip stitch (return sl st): After you chain a rib and anchor it, work 1 sl st into the back bump of each chain, moving back toward where the rib started. This doubles the rib, makes it firm, and gives it the braided look seen on the finished heart.
Gauge and Checkpoints
Gauge is not critical for an ornament, but the ribs only sit straight if the circles and chains match each other. Make one circle first and measure it before you go on.
- Chain gauge: 6 ch = 1 in (2.5 cm), measured on a relaxed chain
- Circle Rnd 1: 1.1 in (2.8 cm) diameter
- Circle Rnd 2: 1.5 in (3.8 cm) diameter
- Fan: 1.1 in (2.8 cm) across the top, 0.6 in (1.5 cm) tall
- Joined circles: 3 in (7.6 cm) across
If your circle is larger than 1.5 in (3.8 cm), go down to a 3.25 mm hook. If it is smaller, go up to a 3.75 mm hook. Use the new hook for the whole ornament so the chain ribs stay in proportion.
To check chain gauge, chain 12 and lay it flat without stretching. It should measure 2 in (5.1 cm).
Part 1: Fan Point
The fan is a half-circle wedge that forms the bottom tip of the heart.
Row 1: MR, ch 3 (counts as dc), 6 dc in ring. Pull the ring tight. Turn. (7 dc)
Row 2 (trim row): Ch 1, 2 sc in first dc, sc in next 5 dc, 2 sc in top of turning ch. (9 sc = 7 sts worked 1-per-stitch + 2 extra)
Fasten off, leaving a 4 in (10.2 cm) tail. With the right side facing you, number the Row 2 sts 1 to 9 from left to right. The magic ring is the bottom point.
Checkpoint: 1.1 in (2.8 cm) across the top, 0.6 in (1.5 cm) tall.
Part 2: Left Circle
Rnd 1: MR, ch 3 (counts as dc), 11 dc in ring. Pull the ring closed, leaving a small open center. Sl st to top of ch 3. (12 dc)
Rnd 2: Ch 1, 2 sc in each st around. Sl st to first sc. (24 sc)
Fasten off and weave in the ends.
Checkpoint: 1.5 in (3.8 cm) diameter.
With the right side facing, picture the circle as a clock face. Since 24 sts make 12 hours, each hour is 2 sts. Place markers at 9 o’clock (outer side), 7 o’clock, 5 o’clock, and 3 o’clock (inner side, where it will meet the right circle).
Part 3: Right Circle (Join As You Go)
Rnd 1: Work as for the Left Circle. (12 dc)
Rnd 2: Ch 1, work 2 sc in each st around, joining at one point. When the stitch you are working sits at 9 o’clock, work the first sc of the pair, sl st into the marked 3 o’clock st of the Left Circle, then work the second sc of the pair. Continue around and sl st to first sc. (24 sc; the joining sl st is not counted)
Fasten off and weave in ends. Move the Left Circle’s 3 o’clock marker to the joining point. This point is the junction.
On the Right Circle, place markers at 7 o’clock, 5 o’clock, and 3 o’clock (outer side).
Checkpoint: The joined circles measure 3 in (7.6 cm) across and lie flat, touching at one point.
Part 4: Inner Ribs and Hanging Loop
Lay the fan below the circles, point down. Center fan st 5 directly under the junction, with the fan’s top edge about 1.4 in (3.6 cm) below the bottom of the circles. Pinning both parts to your mat makes this easier.
You work all the ribs in one continuous pass across the fan, from left to right. For each rib, chain up, sl st into the circle, work return sl sts down the chain, then sl st back into the same fan st.
Join yarn with a sl st in fan st 1. Work the left outline rib here first (see the Border section below), then continue:
Travel: Sl st in fan st 2, sl st in fan st 3.
Rib 2 (fan st 3 to Left Circle, 7 o’clock): Ch 11, sl st in marked st, return sl st in 11 BB, sl st in fan st 3. (11 ch + 11 sl st)
Travel: Sl st in fan st 4.
Rib 3 (fan st 4 to Left Circle, 5 o’clock): Ch 10, sl st in marked st, return sl st in 10 BB, sl st in fan st 4. (10 ch + 10 sl st)
Travel: Sl st in fan st 5.
Center Rib and Loop (fan st 5 to junction): Ch 13, sl st in the junction (insert through both circles’ joined sts).
- Stem: Ch 5.
- Loop: Ch 14, sl st in the 5th stem ch (the last stem ch made) to close the loop.
- Stem return: Return sl st in remaining 4 stem BB, sl st in junction.
- Rib return: Return sl st in 13 BB of the center rib, sl st in fan st 5. (13 ch + 13 sl st for the rib; 5 + 14 ch for stem and loop)
Travel: Sl st in fan st 6.
Rib 5 (fan st 6 to Right Circle, 7 o’clock): Ch 10, sl st in marked st, return sl st in 10 BB, sl st in fan st 6. (10 ch + 10 sl st)
Travel: Sl st in fan st 7.
Rib 6 (fan st 7 to Right Circle, 5 o’clock): Ch 11, sl st in marked st, return sl st in 11 BB, sl st in fan st 7. (11 ch + 11 sl st)
Travel: Sl st in fan st 8, sl st in fan st 9. Work the right outline rib from here (see Border).
Rib lengths: 10 ch = 1.7 in (4.3 cm); 11 ch = 1.8 in (4.6 cm); 13 ch = 2.2 in (5.6 cm). The loop’s 14 ch measure 2.3 in (5.8 cm) around, so the loop stands about 1 in (2.5 cm) tall.
Checkpoint: The five inner ribs are taut but don’t pull the circles downward. The center rib is straight and vertical.
Border: Outline Ribs
On this heart, the “border” is the pair of outline ribs that form the curved sides. They belong to the same pass as the inner ribs: you work the left one first, at fan st 1, and the right one last, at fan st 9.
Border gauge: 6 ch = 1 in (2.5 cm), the same as the inner ribs.
Left side (worked first, at fan st 1): Ch 16, sl st in Left Circle 9 o’clock marker, return sl st in 16 BB, sl st in fan st 1. Then continue with “Travel” in Part 4. (16 ch + 16 sl st)
Right side (worked last, at fan st 9): Ch 16, sl st in Right Circle 3 o’clock marker, return sl st in 16 BB, sl st in fan st 9. Fasten off. (16 ch + 16 sl st)
Top edge: The upper halves of the two circles form the top of the heart. Each circle has 12 sc from 9 o’clock to 3 o’clock, for 24 sc in total. No extra stitches are added.
Why the math works: Each outline runs from the circle’s widest point down to the fan corner. That curved path is about 2.7 in (6.9 cm), and 16 ch at 6 ch per inch also gives 2.7 in (6.9 cm). The inner ribs are shorter because they reach the lower curve of the circles. Ribs 3 and 5 attach near the center, Ribs 2 and 6 attach farther out, and the center rib climbs to the junction at mid-height. The finished height adds up as 1.5 in (3.8 cm) of circle, about 1.4 in (3.6 cm) of open ribs, and 0.6 in (1.5 cm) of fan, for 3.5 in (8.9 cm) in total.
Strand totals: 16 + 11 + 10 + 13 + 10 + 11 + 16 = 87 rib chains, plus 19 stem and loop chains.
Final Blocking
- Weave in all ends along the return sl sts so they disappear inside the ribs.
- Lightly mist the heart with water, or with diluted spray starch for a stiffer ornament.
- Pin it to the mat right side up. Pin each circle at 12 o’clock and at its outer side to keep it round.
- Pin the fan point, then pin the outline ribs into a smooth outward curve, 3.25 in (8.3 cm) at the widest.
- Make sure the inner ribs fan out evenly and the center rib is straight.
- Pin the loop into a neat oval about 1 in (2.5 cm) tall.
- Let the heart dry completely, at least 6 hours, before unpinning.
Final Quality-Control Checklist
- Each circle measures 1.5 in (3.8 cm) and has 24 sc in Rnd 2.
- The fan has 9 sc across the top and a closed point.
- There are 7 ribs in total: 2 outline ribs of 16 ch, and 5 inner ribs of 11, 10, 13, 10, and 11 ch.
- Every rib is doubled with return sl sts along its full length.
- The heart is 3.25 in (8.3 cm) wide and 3.5 in (8.9 cm) tall, plus a 1 in (2.5 cm) loop.
- The left and right halves mirror each other.
- No loose ends show on the front or back.
Troubleshooting
Circles ruffle: Your Rnd 2 tension is too loose. Use a smaller hook for Rnd 2 only.
Circles cup: Your Rnd 1 dc are too short or too tight. Pull the magic ring a little less tightly, or go up a hook size.
Ribs sag: Your chains are looser than 6 per inch. Chain 1 fewer on every rib, or chain more firmly.
Circles pull down into a V: The ribs are too short. Add 1 ch to each inner rib.
Heart leans to one side: The rib lengths don’t match. Recount both sides; they should mirror each other exactly.
Ribs twist: You worked some return sl sts into the front loop instead of the back bump. Rework that rib.
Loop twists: Block it flat, or work the loop chains a little more loosely.
Fan point is open: Tighten the magic ring tail and secure it with an extra stitch before weaving in.
Care
Hand wash in cool water, press the water out in a towel, then reshape and pin flat to dry. Store the ornament flat or hung by its loop, away from heavy decorations.

Final Notes
The measurement chain is short and easy to check. Start with 6 ch per 1 in (2.5 cm), circles of 1.5 in (3.8 cm), and a fan 1.1 in (2.8 cm) wide. The joined circles span 3 in (7.6 cm), the inner ribs add about 1.4 in (3.6 cm) of open height, and the 16-ch outlines bow the sides out to 3.25 in (8.3 cm). The finished heart is 3.5 in (8.9 cm) tall, or 4.5 in (11.4 cm) with the loop. Once your first heart matches these numbers, the rest will come out the same.
Happy crocheting!