

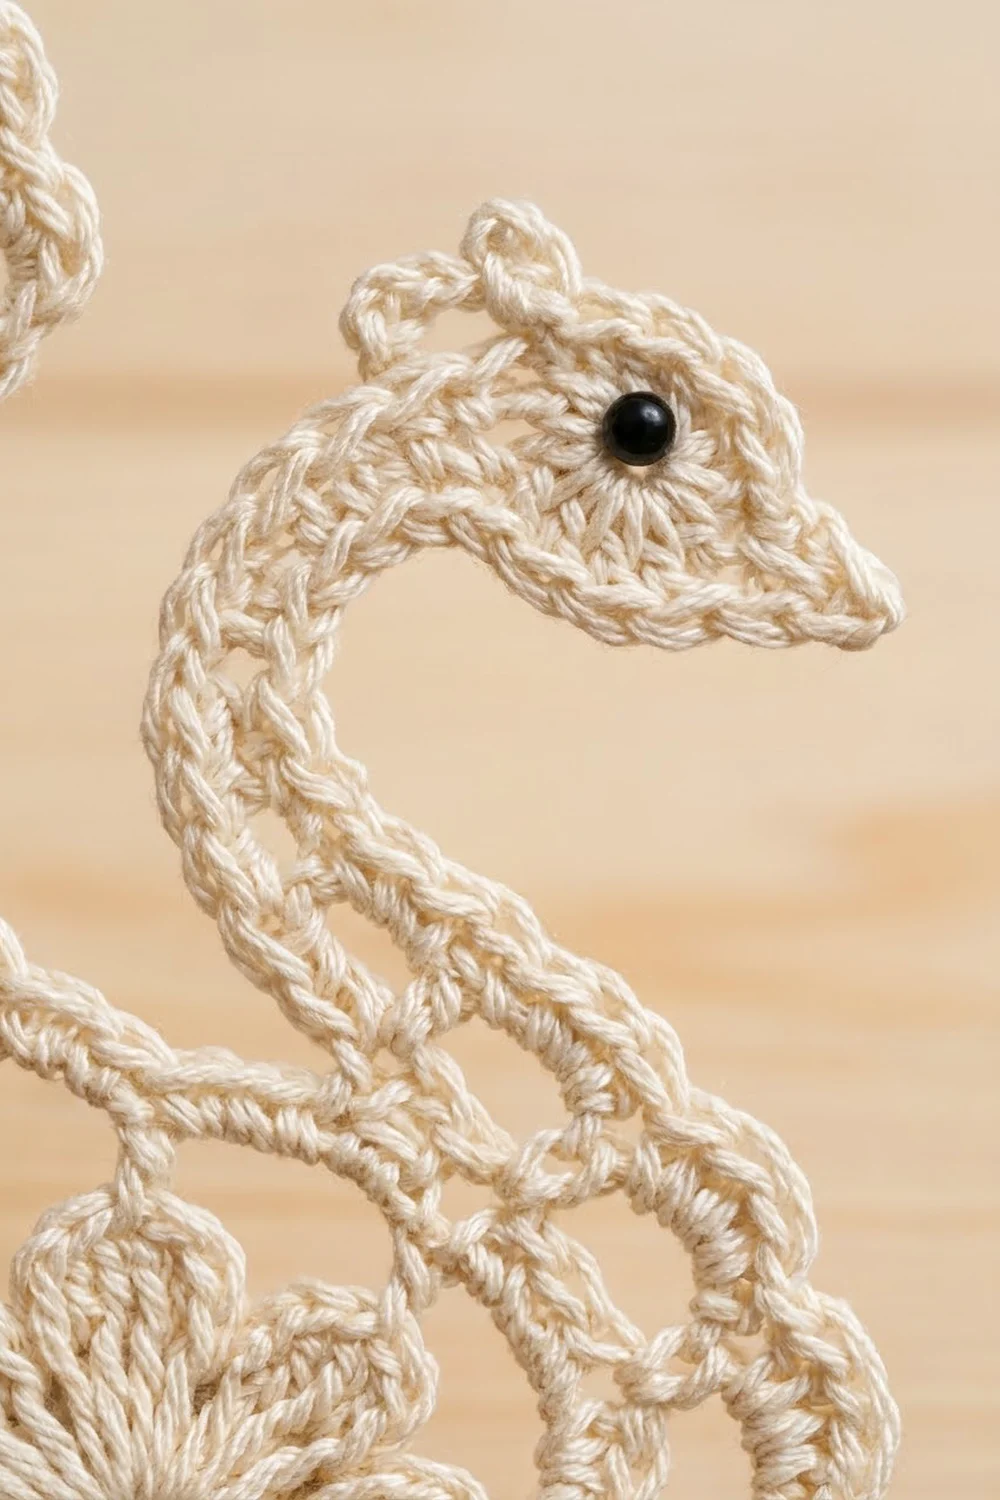
This lace swan ornament is a small, flat piece of thread crochet. It faces right, with a curved S-shaped neck, a rounded head, a short pointed beak and a black bead eye. The body is an open round of lace with a raised six-petal flower inside it. A tall scalloped wing fans up at the back and a smaller fan tail sweeps out at the lower left.
It’s worked in one color, a soft cream or ivory crochet thread, so it looks like old lace against green branches. A thin crocheted hanging loop rises from the top of the wing. Make one as a gift tag or make a whole flock for the tree.
This pattern uses US crochet terms. The finished ornament measures about 4.25 in (10.8 cm) wide and 4.25 in (10.8 cm) tall, not counting the hanging loop.
The swan is one continuous piece and nothing gets sewn on except the bead eye. You start with the flower at the center and work rounds outward to make the round body. Then you work the wing, tail and neck as short rows directly into the last body round. A two-row scalloped border finishes the exposed edges, and the hanging loop goes on last.
Finished Size and Construction
- Finished size: 4.25 in (10.8 cm) wide x 4.25 in (10.8 cm) tall, excluding loop
- Skill level: Intermediate
- Terminology: US crochet terms
- Yarn weight: Size 10 crochet cotton thread (lace weight)
- Hook: 1.75 mm steel hook
- Number of pieces: 1 (one continuous ornament)
- Layout: Single swan facing right; wing at upper left, tail at lower left, neck at right
- Body disc size: 3 in (7.6 cm) across after Rnd 7
- Size before border: 4.25 in (10.8 cm) wide x 3.875 in (9.8 cm) tall
- Border depth: about 0.375 in (1.0 cm)
- Hanging loop: about 1.25 in (3.2 cm) tall
Materials
Thread: Choose a mercerized size 10 cotton thread. It has a slight sheen, holds starch well and shows stitch detail clearly. Avoid fuzzy or very soft threads, because the open loops lose their shape.
- Cream or ivory: 5 g, about 28 m
Tools and notions:
- 1.75 mm steel crochet hook
- 1 black bead, 3 mm (or black thread for an embroidered eye)
- Fine sewing needle and cream sewing thread
- Fine tapestry needle
- Scissors
- Fabric stiffener or starch
- Blocking board, plastic wrap and rustproof pins
- Ruler or tape measure
The quantity above includes a margin for your gauge check and tails. One ornament actually uses about 3 g.
Abbreviations (US Terms)
- ch – chain
- sl st – slip stitch
- sc – single crochet
- hdc – half double crochet
- dc – double crochet
- tr – treble crochet
- sk – skip
- sp(s) – space(s)
- MR – magic ring
- RS – right side
- rep – repeat
Special stitch – Shell: (3 dc, ch 2, 3 dc) worked in the same loop or space. Each shell has 6 dc and one ch-2 sp at its center.
Gap: The space between the last dc of one shell and the first dc of the next shell.
Gauge and Checkpoints
Gauge is measured on the body itself, so the first body is your swatch. Make Rnds 1–7 and measure before you go on.
- After Rnd 4 (flower): 1.25 in (3.2 cm) across
- After Rnd 5: 1.75 in (4.4 cm) across
- After Rnd 6: 2.5 in (6.4 cm) across
- After Rnd 7: 3 in (7.6 cm) across
Measure flat without stretching. A difference of 0.125 in (0.3 cm) at Rnd 7 is fine because blocking will even it out.
If your piece is too big: go down to a 1.5 mm hook, or pull your chains a little snugger. Loose chain loops are the usual cause.
If your piece is too small: go up to a 2 mm hook. If Rnd 6 cups or Rnd 7 ruffles, the problem is your chain tension, so correct that before you change hooks.
Body
Start with the flower at the center. Work all rounds with RS facing and don’t turn.
Rnd 1: MR, ch 1, 12 sc in ring, sl st in first sc. Pull the ring closed tightly. (12 sc)
Rnd 2: Ch 1, sc in first sc, ch 3, sk 1, sc in next sc, ch 3, sk 1; rep from * 4 more times, sl st in first sc. (6 sc, 6 ch-3 sps)*
Rnd 3 (petals): In each ch-3 sp work (sc, hdc, 3 dc, hdc, sc). Sl st in first sc. (6 petals, 42 sts)
Rnd 4: Fold the petals toward you so you’re working behind them. Ch 1, sc around the post of the first sc from Rnd 2, ch 5, sc around the post of the next Rnd 2 sc, ch 5; rep from * 4 more times, sl st in first sc. (6 sc, 6 ch-5 loops)*
This round sits behind the flower, so the petals stay raised on the front. Checkpoint: 1.25 in (3.2 cm).
Rnd 5: Sl st into first ch-5 loop. Ch 1, (sc, ch 4, sc, ch 4) in ch-5 loop; rep from * in each loop around, sl st in first sc. (12 sc, 12 ch-4 loops)* Checkpoint: 1.75 in (4.4 cm).
Rnd 6: Sl st in each of the next 2 ch to reach the center of the first loop. Ch 1, sc in same loop, ch 6, sc in next loop, ch 6; rep from * 10 more times, sl st in first sc. (12 sc, 12 ch-6 loops)* Checkpoint: 2.5 in (6.4 cm).
Rnd 7: Sl st into first ch-6 loop. Ch 3 (counts as dc), (2 dc, ch 2, 3 dc) in same loop, shell in each of next 11 loops, sl st in top of ch-3. (12 shells: 72 dc, 12 ch-2 sps) Fasten off. Checkpoint: 3 in (7.6 cm).
Number the shells. Lay the disc RS up with the flower facing you. Place a marker in the shell at 2 o’clock as Shell 1, then count clockwise: Shell 2 sits at 3 o’clock, Shell 6 at 7 o’clock, Shell 9 at 10 o’clock, Shell 11 at 12 o’clock and Shell 12 at 1 o’clock. Mark Shells 1, 6 and 9.
Wing
The wing is worked in rows across Shells 9–11, at the upper left.
Row 1 (RS): Join with sl st in ch-2 sp of Shell 9. Ch 3, then in ch-2 sp of Shell 10 work (tr, ch 2) 9 times, then 1 more tr. Ch 3, sl st in ch-2 sp of Shell 11. Turn. (10 tr, 9 ch-2 sps)
All 10 trebles come out of one space, so they spread like spokes around a little hub.
Row 2: Sl st in each of next 3 ch, sl st in first tr. Ch 1, sc in same tr, ch 5, sc in next ch-2 sp; rep from * 8 more times, ch 5, sc in last tr. Turn. (11 sc, 10 ch-5 loops)*
Row 3: Ch 1. In each ch-5 loop work (sc, hdc, 3 dc, hdc, sc). (10 scallops, 70 sts) Fasten off.
Checkpoint: the wing should rise about 0.75 in (1.9 cm) above the body disc.
Tail
The tail goes across Shells 6–8, at the lower left.
Row 1 (RS): Join with sl st in ch-2 sp of Shell 6. Ch 3, then in ch-2 sp of Shell 7 work (dc, ch 1) 7 times, then 1 more dc. Ch 3, sl st in ch-2 sp of Shell 8. Turn. (8 dc, 7 ch-1 sps)
Row 2: Sl st in each of next 3 ch, ch 1, sc in first dc, ch 4, sc in next dc; rep from * 6 more times. Turn. (8 sc, 7 ch-4 loops)*
Row 3: Ch 1. In each ch-4 loop work (sc, hdc, 2 dc, hdc, sc). (7 scallops, 42 sts) Fasten off.
Checkpoint: the tail reaches about 0.5 in (1.3 cm) beyond the body disc.
Neck and Head
The neck rises from Shells 1–2, on the right.
Row 1: Join with sl st in ch-2 sp of Shell 2. Ch 34. Chains 1–30 make the neck and chains 31–34 make the head and beak.
Row 2 (beak, head, neck): Sl st in 2nd ch from hook, sc in next ch, hdc in next ch (this is the beak, 3 sts). Work 7 dc in the next ch, which is chain 30 (the head). Hdc in each of the remaining 29 ch down the neck. Sl st in ch-2 sp of Shell 1. Turn. (3 beak sts, 7 dc, 29 hdc)
Row 3 (lace edge): Ch 1, sc in first hdc, ch 3, sk 1 hdc, sc in next hdc; rep from * 13 more times. You’ll have used all 29 hdc. Sc in each of the 7 head dc, sl st at the base of the beak. (22 sc, 14 ch-3 loops)* Fasten off.
The ch-3 loops give the neck an open outline. Checkpoint: the neck is about 2.5 in (6.4 cm) long and 0.4 in (1.0 cm) wide.
Border
The border covers the two stretches of body edge that are still exposed.
Border gauge: one 6-st scallop is about 0.4 in (1.0 cm) wide, and two border rows add about 0.375 in (1.0 cm).
Lower Edge (Shells 2–5, bottom right)
Row 1: With RS facing, join with sc in ch-2 sp of Shell 2, next to the neck chain. Ch 4, sc in next gap, ch 4, sc in ch-2 sp of next shell; rep from * across Shells 3, 4 and 5. Ch 4, sc in gap between Shells 5 and 6. Turn. (8 sc, 7 ch-4 loops)*
Row 2: Ch 1. In each ch-4 loop work (sc, hdc, 2 dc, hdc, sc). (7 scallops, 42 sts) Fasten off.
Upper Back (Shells 11–1, top)
Row 1: With RS facing, join with sc in ch-2 sp of Shell 11, beside the wing. Ch 4, sc in gap between Shells 11 and 12, ch 4, sc in ch-2 sp of Shell 12, ch 4, sc in gap between Shells 12 and 1, ch 4, sc in ch-2 sp of Shell 1. Turn. (5 sc, 4 ch-4 loops)
Row 2: Ch 1. In each ch-4 loop work (sc, hdc, 2 dc, hdc, sc). (4 scallops, 24 sts) Fasten off.
Why the math works: Each shell has 2 anchor points, its ch-2 sp and the gap after it, so it takes 2 loops. The lower edge runs from the middle of Shell 2 to the end of Shell 5. That’s half a shell plus 3 full shells, or 3.5 shells, so 3.5 x 2 = 7 loops. The upper back runs from the middle of Shell 11 to the middle of Shell 1, which is 2 shells, so 2 x 2 = 4 loops. Each loop gets one 6-st scallop, the same as the tail, so the whole outline looks even. Nothing is added at the anchors, so the edge lies flat.
Hanging Loop
Join with sl st in the last sc of wing scallop 5, which is the center of the wing crest. Ch 30, sl st in the same sc. Ch 1, work 36 sc tightly over the chain loop, sl st in the first sc. Fasten off. Checkpoint: the loop is about 1.25 in (3.2 cm) tall.
Eye
Sew the 3 mm black bead to the head about 0.125 in (0.3 cm) behind the beak, with cream sewing thread. Go through it twice. Weave in all ends along the backs of the stitches, never through the open loops.
Final Blocking
- Soak the ornament in fabric stiffener or medium starch, then press out the extra in a towel.
- Cover the blocking board with plastic wrap.
- Lay the swan RS up. Pin the body disc first, as a 3 in (7.6 cm) circle.
- Pin out the wing so all 10 scallops fan open evenly. Then pin out the 7 tail scallops.
- Shape the neck into a smooth S-curve, with the head turned slightly downward and the beak pointing right.
- Pin out every border scallop and open each chain loop with a pin tip.
- Check the size: 4.25 in (10.8 cm) wide x 4.25 in (10.8 cm) tall.
- Let it dry completely, usually 12–24 hours. Then unpin it.
Final Quality-Control Checklist
- The flower petals sit raised in front of Rnd 4.
- The body has 12 even shells and the disc measures 3 in (7.6 cm).
- The wing has 10 scallops, the tail has 7 and the lower border has 7.
- The upper back border has 4 scallops.
- The neck has 14 open ch-3 loops and curves smoothly.
- The beak is pointed and the eye is sewn on securely.
- The hanging loop is centered on the wing crest.
- All ends are woven in and none show on the front.
- The ornament lies flat and is stiff enough to hang without curling.
Troubleshooting
The flower petals cup forward. Work Rnd 3 a little looser, or block the flower flat with a pin in each petal.
The body disc ruffles at Rnd 7. Your Rnd 6 chains are too long. Try ch 5 instead of ch 6, or use a smaller hook.
The body disc cups. Your chains are too tight. Relax your chain tension, or go up 0.25 mm.
The wing tips down. Check that all 10 tr are worked into the single ch-2 sp of Shell 10. Then block the wing with pins pointing upward.
The neck twists. This is normal with a long chain. Make sure the chain isn’t twisted before Row 2, and pin the neck into shape while it’s wet.
The scallops look uneven. Check that every scallop has 6 stitches and that the anchor sc alternate evenly between gaps and spaces.
Care
Hand wash in cool water with mild soap, then re-stiffen and block flat. Store flat or in tissue paper between seasons.

Final Notes
Here’s the measurement chain for this swan. The flower measures 1.25 in (3.2 cm). The rounds grow to 1.75 in (4.4 cm), then 2.5 in (6.4 cm), then to a 3 in (7.6 cm) body disc. The wing, tail and neck bring it to 4.25 in (10.8 cm) wide x 3.875 in (9.8 cm) tall. The 0.375 in (1.0 cm) border finishes it at 4.25 in (10.8 cm) square, with a 1.25 in (3.2 cm) loop. Measure at each checkpoint and your swan will come out right.
Happy crocheting!