

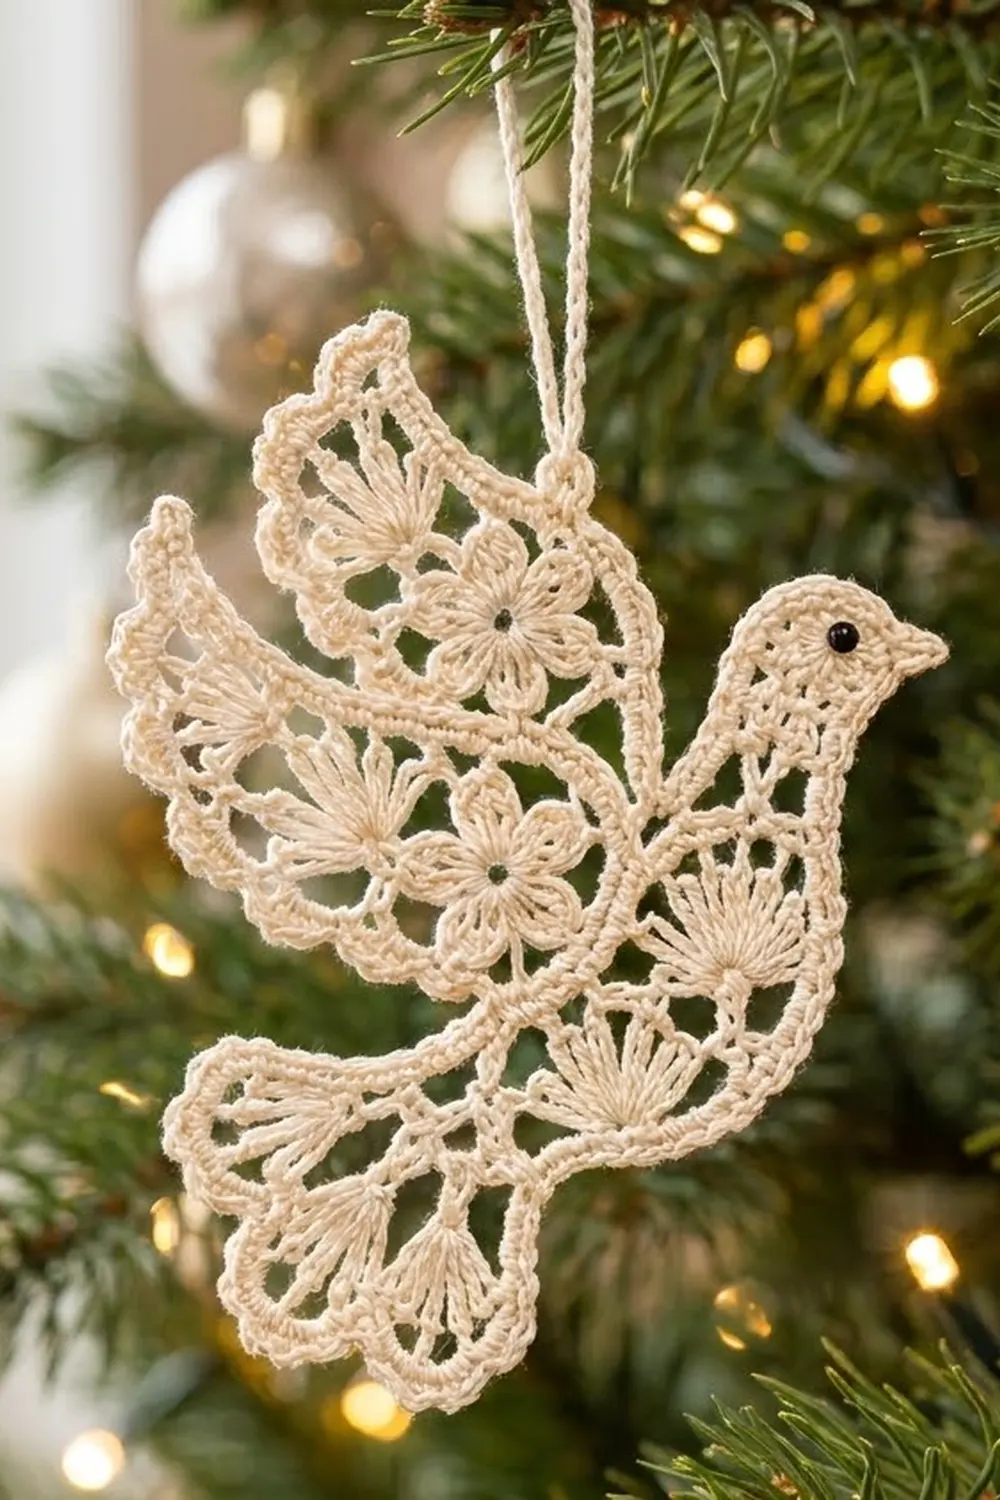
The Winter Blossom Dove is a lacy thread ornament with a soft, heirloom look. Each wing has a small five-petal flower at its center, and fans of radiating trebles form the feathers. The breast and tail end in matching scallops. Cream cotton and a single black bead eye keep it simple and classic.
The finished dove measures 4.5 in (11.4 cm) wide and 4 in (10.2 cm) tall, plus a 1.5 in (3.8 cm) hanging loop. This pattern uses US crochet terms throughout.
You crochet four small sections: the head and body, an upper wing, a lower wing, and a tail. You sew them together along short plain edges, then add one round of reverse single crochet around the whole outline for the corded edge. Last, you starch and block the dove flat.
Once you know the Fan Unit, the pattern is very repetitive. The same fan appears ten times across the dove.
Finished Size and Construction
- Finished size: 4.5 in (11.4 cm) wide x 4 in (10.2 cm) tall, plus loop
- Skill level: Intermediate
- Terminology: US
- Yarn weight: Size 10 crochet cotton thread (Lace, weight 0)
- Hook: 1.5 mm (US steel 8)
- Number of pieces: 4 (body with head, upper wing, lower wing, tail)
- Layout: Body on the right, upper wing at the top left, lower wing at the middle left, tail at the bottom left
- Piece sizes: Body 2 in x 2 in (5.1 x 5.1 cm); upper wing 2.25 in x 2 in (5.7 x 5.1 cm); lower wing 2 in x 1.75 in (5.1 x 4.4 cm); tail 2.5 in x 0.75 in (6.4 x 1.9 cm)
- Size before border: 4.25 in x 3.75 in (10.8 x 9.5 cm)
- Border depth: 0.125 in (0.3 cm) on every edge
Materials
Pick a mercerized size 10 cotton thread. Mercerized thread has a slight sheen, takes starch well, and shows the stitch detail clearly. Choose a soft cream or ecru to match the classic look.
- Cream size 10 cotton: 10 g, about 80 m
- Black: one 3 mm black bead, or 12 in (30.5 cm) of black embroidery floss for a French knot
These amounts include a safety margin. One dove uses about 7 g.
Tools:
- 1.5 mm (US steel 8) crochet hook
- Fine tapestry needle and a beading needle
- Small scissors
- Locking stitch markers
- Spray starch or liquid fabric stiffener
- Foam blocking board and rust-proof pins
Abbreviations (US Terms)
- ch – chain
- sl st – slip stitch
- sc – single crochet
- hdc – half double crochet
- dc – double crochet
- tr – treble crochet
- rev sc – reverse single crochet (crab stitch)
- sp – space
- st(s) – stitch(es)
- MR – magic ring
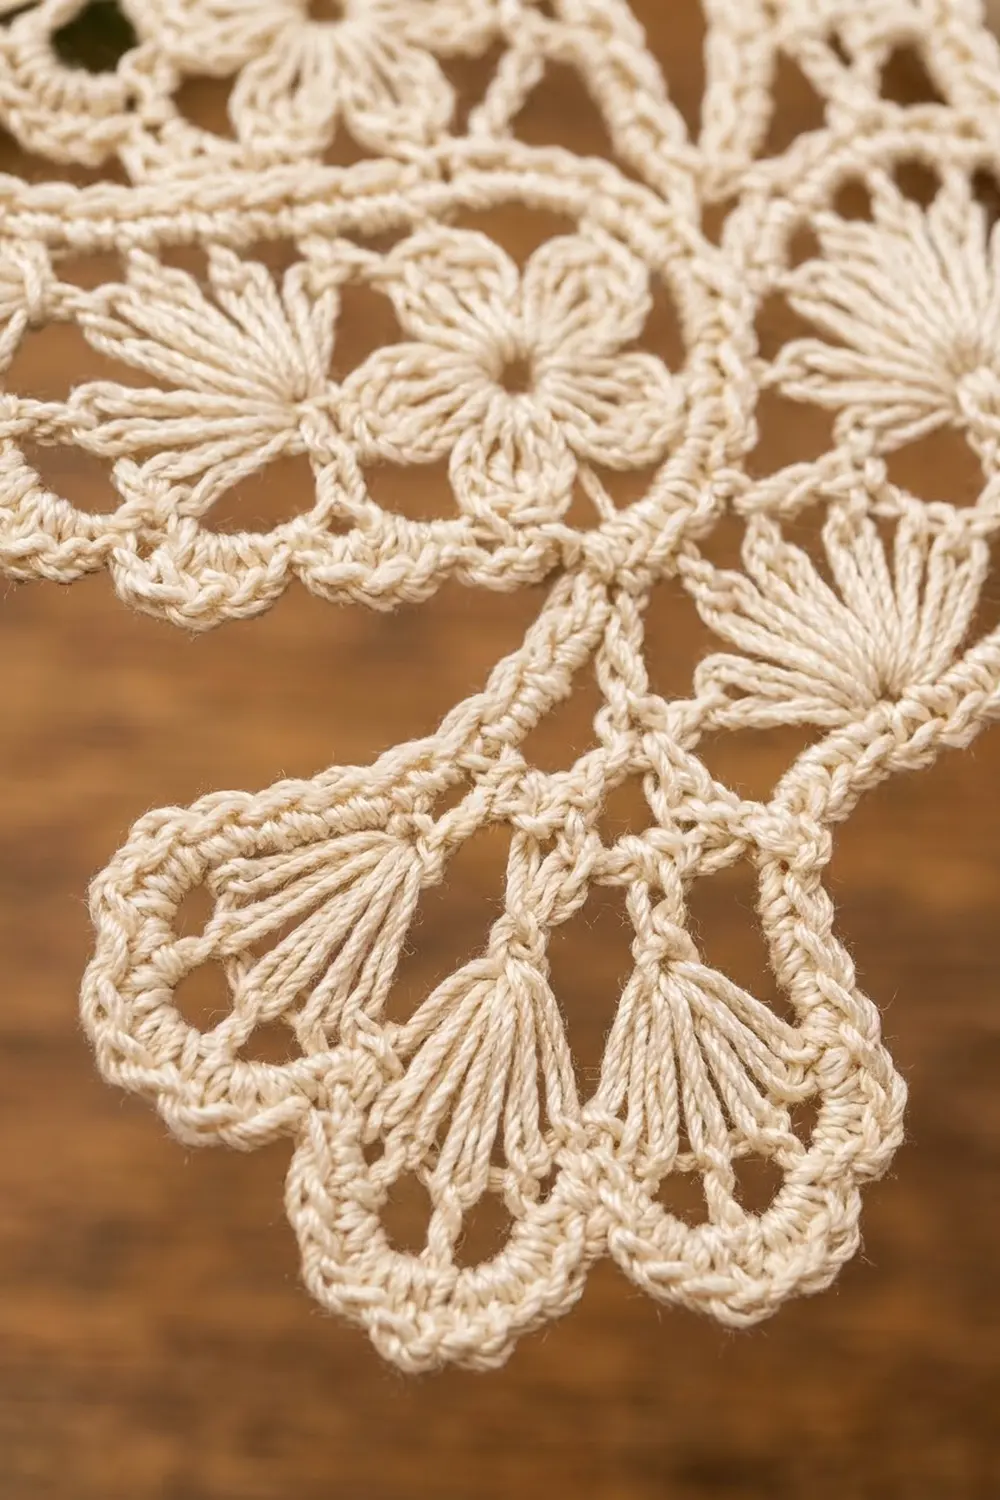
Special stitch – Fan Unit (FU), worked over 9 sts: Sc in the 1st st, ch 3, skip 3 sts, work (tr, ch 1) 6 times in the 5th st, tr in the same st, ch 3, skip 3 sts, sc in the 9th st. Each FU has 7 tr, 6 ch-1 sps, 2 ch-3 sps, and 2 anchor sc.
Fan Edge, two steps:
- Edge Step 1 (per fan): Sc in the anchor sc, 3 sc in the ch-3 sp, (sc in the next tr, ch 3) 6 times, sc in the 7th tr, 3 sc in the ch-3 sp, sc in the anchor sc. You get 15 sc and 6 ch-3 loops. Skip the ch-1 sps.
- Edge Step 2 (per fan): Sc in each sc and 4 sc in each ch-3 loop = 15 + 24 = 39 sc.
Gauge and Checkpoints
Gauge: 12 sc and 12 sc rows = 1 in (2.5 cm).
Make the upper wing before anything else and use it as your gauge swatch. Check it at each stage:
- After the flower (Round 3): 1 in (2.5 cm) across, petal tip to petal tip
- After the sc ring (Round 5): 1.25 in (3.2 cm) across
- Each fan: extends 0.5 in (1.3 cm) beyond the ring
- Finished upper wing: 2.25 in x 2 in (5.7 x 5.1 cm)
If the piece is too big, go down to a 1.4 mm hook. If it is too small, go up to a 1.65 mm (US steel 7) hook. If only the fans are off, the treble height is probably the problem. Pull each tr up to a consistent height before you yarn over.
Upper Wing (make 1)
Round 1: MR, ch 1, 10 sc in ring, sl st to the first sc. (10 sc)
Round 2: Ch 1, sc in the first sc, ch 4, skip 1 sc, sc in the next sc, ch 4, skip 1 sc; repeat from * 3 more times, sl st to the first sc. (5 sc, 5 ch-4 loops)
Round 3 (flower): Sl st into the first loop, ch 1, work (sc, hdc, 5 dc, hdc, sc) in each ch-4 loop, sl st to the first sc. (45 sts: 5 petals of 9)
Round 4: Sl st in the next 4 sts, ending in the center (3rd) dc of the first petal. Ch 1, sc in the same st, ch 6, sc in the center dc of the next petal, ch 6; repeat from * 3 more times, sl st to the first sc. (5 sc, 5 ch-6 loops)
Round 5: Ch 1, sc in the same st, 8 sc in the ch-6 loop, sc in the next sc, 8 sc in the next loop; repeat from * 3 more times, sl st to the first sc. (45 sc)
The ring now has 5 sections of 9 sts each. Section 1 is sts 1–9, Section 2 is sts 10–18, and so on. Put markers at sts 28 and 37 to mark the start of Sections 4 and 5.
Round 6: Ch 1, FU over sts 1–9, FU over sts 10–18, FU over sts 19–27, sc in sts 28–45, sl st to the first sc. (3 fans + 18 sc)
Round 7: Ch 1, Edge Step 1 on each of the 3 fans, sc in each of the 18 plain sc, sl st to the first sc. (63 sc, 18 ch-3 loops)
Round 8: Ch 1, Edge Step 2 on each fan, sc in each of the 18 plain sc, sl st to the first sc. (3 x 39 + 18 = 135 sc)
Fasten off and leave a 12 in (30.5 cm) tail for sewing. Sections 4 and 5 (9 sc each) are the plain joining edges.
Lower Wing (make 1)
Rounds 1–5: Work as for the Upper Wing. (45 sc)
Round 6: Ch 1, FU over sts 1–9, FU over sts 10–18, sc in sts 19–45, sl st to the first sc. (2 fans + 27 sc)
Round 7: Ch 1, Edge Step 1 on each fan, sc in each of the 27 plain sc, sl st. (57 sc, 12 ch-3 loops)
Round 8: Ch 1, Edge Step 2 on each fan, sc in each of the 27 plain sc, sl st. (2 x 39 + 27 = 105 sc)
Fasten off with a 12 in (30.5 cm) tail. Sections 3, 4, and 5 are the plain edges.
Tail (make 1)
Row 1: Ch 28, sc in the 2nd ch from the hook and in each ch across. (27 sc)
Row 2: Ch 1, turn, FU over sts 1–9, FU over sts 10–18, FU over sts 19–27. (3 fans)
Row 3: Ch 1, turn, Edge Step 1 on each fan. (45 sc, 18 ch-3 loops)
Row 4: Ch 1, turn, Edge Step 2 on each fan. (3 x 39 = 117 sc)
Fasten off. The 27 foundation chains are the joining edge. Number them 1–27 from the end where your starting tail hangs.
Body and Head (make 1)
Head
Round 1: MR, ch 1, 8 sc in ring, sl st. (8 sc)
Round 2: Ch 1, 2 sc in each st, sl st. (16 sc)
Round 3 (beak): Ch 1, sc in the next 3 sts, then in the 4th st work (hdc, ch 3, sl st in the 3rd ch from hook, hdc). Sc in the remaining 12 sts, sl st. (15 sc + 2 hdc = 17 sts; the picot beak is not counted)
Number the Round 3 sts 1–17. The two hdc are sts 4 and 5, and sts 10–15 are opposite the beak. Fasten off.
Neck and Breast (rows)
Row 1: Join thread in st 10 of the head, ch 1, sc in sts 10–15. (6 sc)
Rows 2–7: Ch 1, turn, 2 sc in the first st, sc across to the last st, 2 sc in the last st. (8, 10, 12, 14, 16, 18 sc)
Rows 8–9: Ch 1, turn, sc in each st. (18 sc)
Row 10: Ch 1, turn, FU over sts 1–9, FU over sts 10–18. (2 fans)
Row 11: Ch 1, turn, Edge Step 1 on each fan. (30 sc, 12 ch-3 loops)
Row 12: Ch 1, turn, Edge Step 2 on each fan. (2 x 39 = 78 sc)
Fasten off. Each side edge has 12 row ends. The left edge is the one on the side away from the beak. Its Rows 1–9 (9 row ends) are the joining edge.
Eye: Sew the black bead to the head on Round 2, two sts behind the beak, and go through it several times to secure it. A tight French knot in black floss works as well.
Make All Pieces
Every section is cream. Make one of each:
- Upper Wing: 1 (3 fans)
- Lower Wing: 1 (2 fans)
- Tail: 1 (3 fans)
- Body and Head: 1 (2 fans)
That gives 10 fans in total. Lay the sections right side up like this:
   [ UPPER WING ]   [ HEAD ]
 [ LOWER WING ]   [ BODY ]
   [   TAIL   ]
The upper wing curves up behind the head. The lower wing tucks under it, and the tail fans out below the lower wing toward the bottom left.
Joining
Use the leftover thread tails and a tapestry needle to whipstitch through both loops. Match one stitch to one stitch (or one row end) on every seam. Each seam is exactly 9 pairs:
- Seam 1: Upper Wing Section 4 (9 sc) to Body left edge Rows 1–9 (9 row ends)
- Seam 2: Upper Wing Section 5 (9 sc) to Lower Wing Section 3 (9 sc)
- Seam 3: Lower Wing Section 4 (9 sc) to Tail foundation chains 19–27
- Seam 4: Lower Wing Section 5 (9 sc) to Tail foundation chains 10–18
- Seam 5: Tail foundation chains 1–9 to Body Row 12 sts 1–9
That is 5 seams and 45 stitch pairs in total. Pull each stitch snug, but stop before the edge puckers. The pieces should lie flat next to each other without overlapping.
Checkpoint: Lay the joined dove flat. It should measure 4.25 in (10.8 cm) wide and 3.75 in (9.5 cm) tall. If a seam ripples, take it out and resew it with less tension.
Border
Border gauge: 12 rev sc = 1 in (2.5 cm), the same as the sc gauge. The rev sc adds 0.125 in (0.3 cm) to each edge.
Exposed edge stitches, per section:
- Body: 11 head sts (Round 3 sts 1–9 and 16–17) + 12 right-side row ends + 3 left-side row ends (Rows 10–12) + 69 sts of Row 12 (sts 10–78) = 95
- Upper Wing: 135 − 18 joined sts = 117
- Lower Wing: 105 − 27 joined sts = 78
- Tail: 117 Row 4 sts + 4 row ends on each side = 125
Total: 95 + 117 + 78 + 125 = 415 sts
Round 1: Join the thread at the base of the beak, ch 1. Work 1 rev sc in each exposed st and each exposed row end around the outline. When you reach a seam, go directly from the last exposed st of one section to the first exposed st of the next. Do not add stitches at the seams. Sl st to the first rev sc. (415 rev sc)
Hanging loop: Join the thread in the 20th (center) st of the upper wing’s middle fan. Ch 36, which is 3 in (7.6 cm), and sl st in the same st. The folded loop hangs 1.5 in (3.8 cm). Fasten off.
Why the math works: The border uses exactly one rev sc for every edge st or row end that was left free after joining. Rev sc and sc have the same gauge, so the edge doesn’t stretch or ruffle. The joined stitches are subtracted once, at the seams, and nothing gets added back. The outline only gets thicker by 0.125 in (0.3 cm) on each edge, so 4.25 x 3.75 in becomes 4.5 x 4 in (11.4 x 10.2 cm).
Final Blocking
- Weave in all ends along the sc rings and rows on the wrong side.
- Soak the dove in cool water, or in diluted fabric stiffener if you want it extra firm.
- Roll it in a towel and press out the extra water.
- Pin it right side up on the foam board, at 4.5 in (11.4 cm) wide and 4 in (10.2 cm) tall.
- Pin each fan at all six ch-3 loop tips so the spokes spread evenly.
- Pin the beak point and open each flower petal with a pin tip.
- Spray with starch, then let it dry completely for about 6–8 hours.
- Unpin and check that the dove lies flat.
Final Quality-Control Checklist
- Upper wing has 135 sc, lower wing 105, tail 117, body Row 12 78
- 10 fans in total, each with 7 tr and 39 edge sc
- 5 seams of 9 pairs each, all lying flat
- Border has 415 rev sc with no extra stitches at the seams
- Finished size is 4.5 x 4 in (11.4 x 10.2 cm)
- The hanging loop is centered on the upper wing’s middle fan
- The eye is secure and all ends are hidden
Troubleshooting
- Fans cup or curl: The tr are too short or the ch-3 loops are too tight. Loosen them, or block with more pins.
- Flower petals look flat: Make sure you work all 5 dc into the ch-4 loop, not into the sc.
- Body leans to one side: Check that you increased at both ends of Rows 2–7.
- A seam gapes: Whipstitch through both loops, and match the counts exactly 9 to 9.
- The border ruffles: You added stitches at a seam. Count each section against the totals above.
- The ornament is floppy: Starch it again, or use stiffener at full strength.
Care
Hand wash the dove in cool water, then reshape it and pin it flat to dry. Re-starch it as needed, and store it flat between tissue paper.
Final Notes
The measurement chain runs from small to large. The flower is 1 in (2.5 cm), and the wing ring is 1.25 in (3.2 cm). Each fan adds 0.5 in (1.3 cm). The four joined sections measure 4.25 x 3.75 in (10.8 x 9.5 cm), and the corded border brings the dove to 4.5 x 4 in (11.4 x 10.2 cm). If your first wing matches its checkpoints, the rest of the dove will follow.
Happy crocheting!