

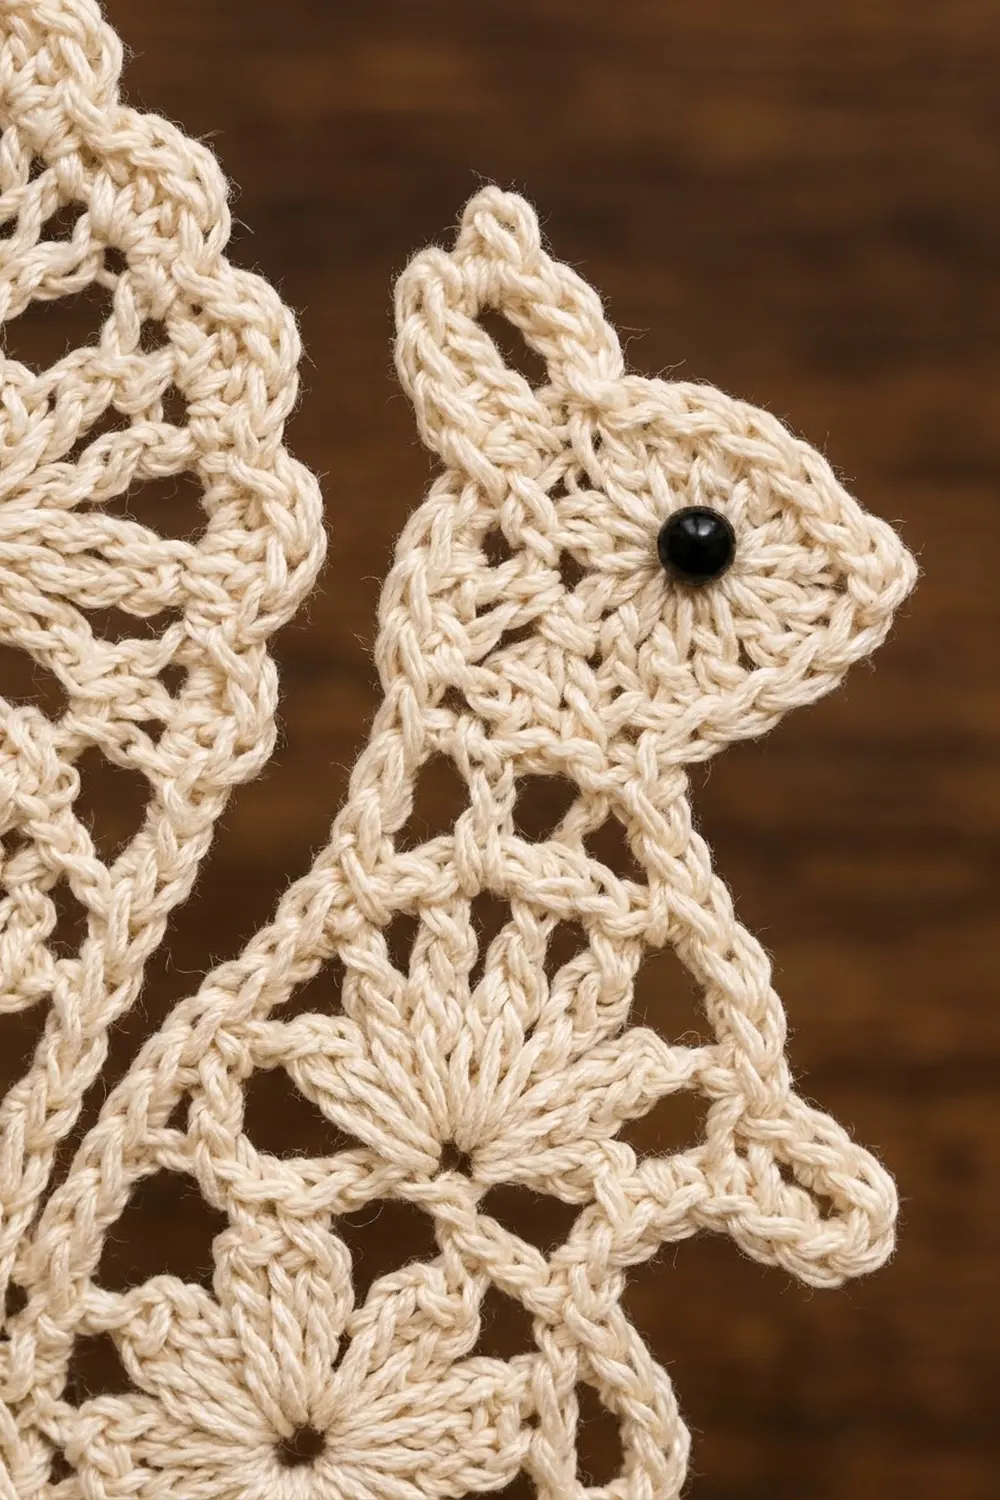
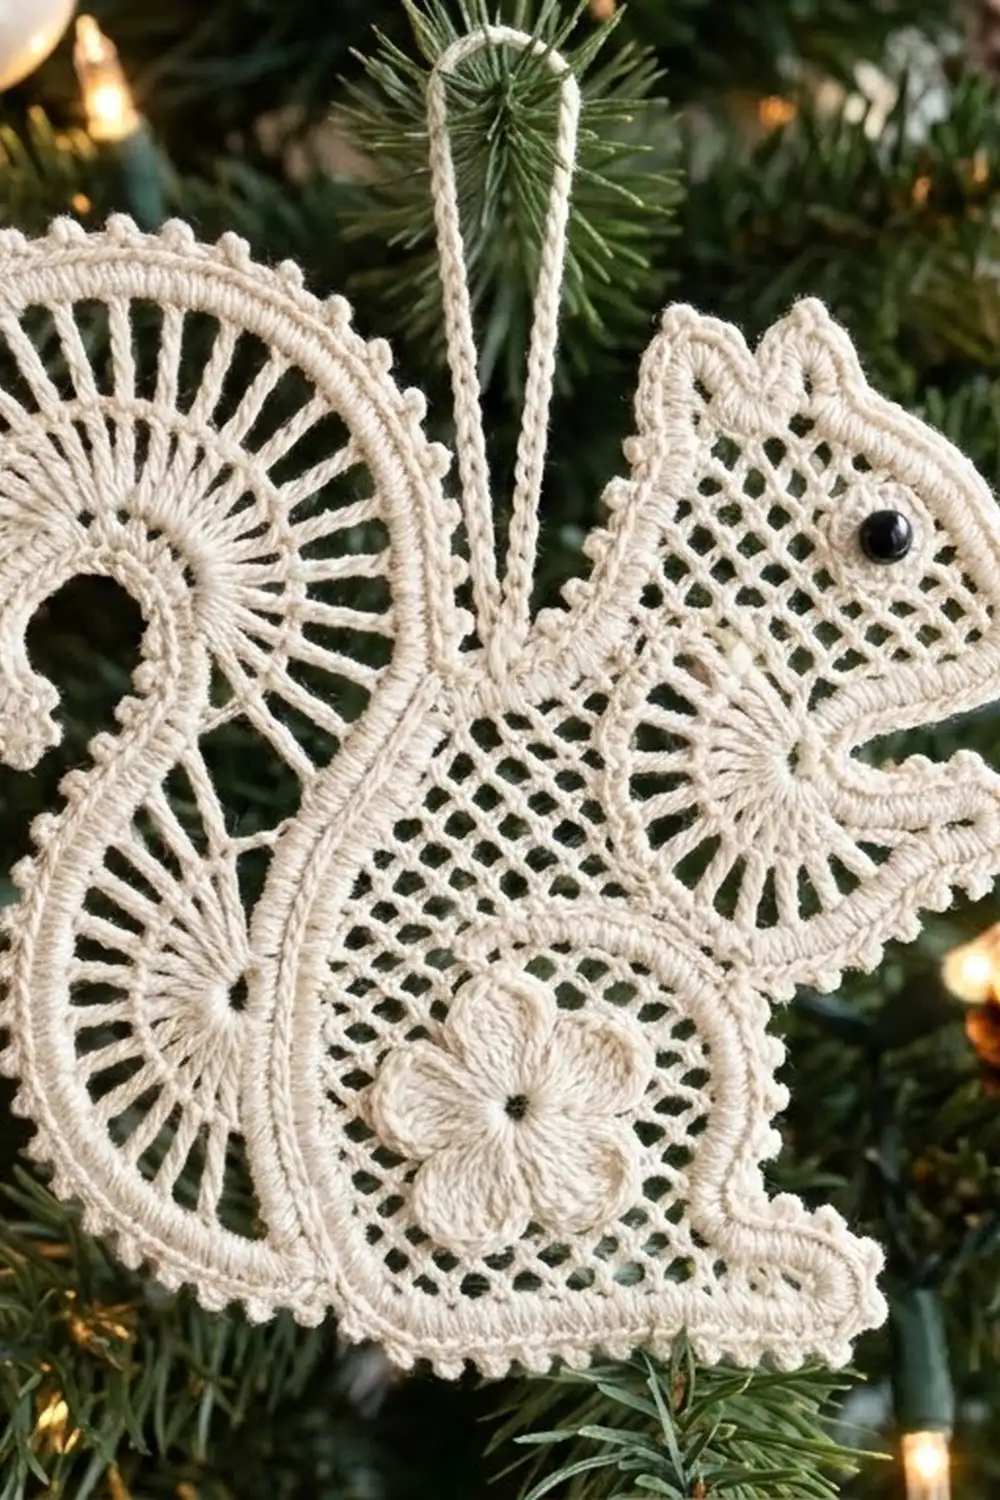
This lacy squirrel ornament is a small piece of Irish-style thread crochet. It has a curled tail full of radiating spokes, fan motifs along the back, a five-petal flower on the haunch, and a pointed head with one upright ear. A firm corded outline holds the shape, and a row of tiny picots runs along the tail.
It is worked in a single color, cream or ivory size 10 cotton thread, with a small black bead for the eye. The look is soft and vintage, perfect for a tree, a gift tag, or a window.
The pattern uses US crochet terms. The finished ornament measures 4.5 in (11.4 cm) tall by 3.75 in (9.5 cm) wide, plus a 1.5 in (3.8 cm) hanging loop.
Construction is simple once you see it. You make six small motifs, pin them into the squirrel silhouette, and join them with chain-5 mesh. Then you work a two-round outline border around the whole shape. The result is one stiff, flat ornament.
Finished Size and Construction
- Finished size: 4.5 in (11.4 cm) tall x 3.75 in (9.5 cm) wide, without loop
- Skill level: Intermediate
- Terminology: US
- Yarn weight: Lace (0), size 10 crochet cotton thread
- Hook: 1.5 mm (US steel size 8)
- Number of pieces: 6 motifs, joined into 1 ornament
- Layout: squirrel silhouette (see the layout grid below)
- Piece sizes: flower 1.25 in (3.2 cm); fan 1.25 in (3.2 cm) wide x 0.75 in (1.9 cm) tall; tail curl 2.25 in (5.7 cm) wide; head 1 in (2.5 cm) wide
- Size before border: 4.25 in (10.8 cm) x 3.5 in (8.9 cm)
- Border depth: 0.125 in (0.3 cm) per side
Materials
Choose a mercerized cotton thread in size 10. Mercerized thread has a slight sheen, shows each stitch clearly, and holds its shape after starching. Avoid fuzzy or acrylic threads, because they will not block crisply.
- Cream / ivory size 10 cotton: 8 g, about 64 m
- Black: one 3 mm black bead, plus under 1 g (about 0.5 m) of black sewing thread to attach it
Tools:
- 1.5 mm steel hook
- Small-eye tapestry needle and a beading or sewing needle
- Rustproof pins and a foam blocking board
- Fabric stiffener or starch
- Small scissors and a ruler
The quantities include a margin of about 25 percent for the gauge swatch and the hanging loop.
Abbreviations (US Terms)
- ch: chain
- sl st: slip stitch
- sc: single crochet
- hdc: half double crochet
- dc: double crochet
- tr: treble crochet
- sp(s): space(s)
- st(s): stitch(es)
- BLO: back loop only
Picot: ch 3, sl st into the top of the last sc made.
Ear spike: ch 5, sl st in 2nd ch from hook, sc in next ch, hdc in next ch, dc in next ch (uses 4 ch).
Gauge and Checkpoints
Make one flower first and measure it before anything else. The flower is your gauge piece.
- Flower after Round 3: 1.25 in (3.2 cm) across, petal tip to petal tip
- Fan after Row 3: 1.25 in (3.2 cm) wide x 0.75 in (1.9 cm) tall
- Tail curl after Round 2: 0.75 in (1.9 cm) across
- Tail curl after Row 4: 2.25 in (5.7 cm) across
- Head after Round 2: 1 in (2.5 cm) wide, nose to back
- Border gauge: 9 sc = 1 in (2.5 cm)
If your flower is larger than 1.25 in (3.2 cm), go down to a 1.25 mm hook. If it is smaller, go up to a 1.75 mm hook. A difference of 0.125 in (0.3 cm) in the flower grows to about 0.5 in (1.3 cm) across the whole squirrel, so it matters.
Motif 1: Flower (make 1)
Ch 6, sl st to the first ch to form a ring.
Round 1: Ch 1, 15 sc in ring, sl st to first sc. (15 sc)
Round 2: Ch 1, sc in first sc, ch 4, skip 2 sc, sc in next sc, ch 4, skip 2 sc; repeat from * 3 more times, sl st to first sc. (5 sc, 5 ch-4 sps)
Round 3: Sl st into first ch-4 sp. In each ch-4 sp work (sc, dc, 3 tr, dc, sc), sl st to first sc. (5 petals of 7 sts each = 35 sts)
Fasten off, leaving a 4 in (10.2 cm) tail to weave in later. Check: 1.25 in (3.2 cm) across.
Motif 2: Fan (make 3)
Ch 4, sl st to the first ch to form a ring.
Row 1: Ch 5 (counts as dc + ch 2), dc in ring, ch 2; repeat from * 4 more times, dc in ring. Turn. (7 dc, 6 ch-2 sps)
The dc posts spread out from the ring like spokes. Do not join; this is a half circle.
Row 2: Ch 1, sc in first dc, 3 sc in next ch-2 sp, sc in next dc; repeat from * 5 more times. Turn. (1 + 6 x 4 = 25 sc)
Row 3: Ch 1, sc in first sc, ch 3, skip 1 sc, sc in next sc; repeat from * 11 more times. (13 sc, 12 ch-3 loops)
Fasten off. Check: 1.25 in (3.2 cm) wide x 0.75 in (1.9 cm) tall.
Motif 3: Tail Curl (make 1)
The tail curl is a small scalloped circle with a spoked crescent added on one side only. The free half of the circle becomes the tight inner curl.
Ch 4, sl st to the first ch to form a ring.
Round 1: Ch 1, 12 sc in ring, sl st to first sc. (12 sc)
Round 2: Ch 1, (sc, ch 3) in next sc; repeat from * around, sl st to first sc. (12 sc, 12 ch-3 loops)
Check: 0.75 in (1.9 cm) across.
Row 3 (crescent): Sl st into the next ch-3 loop. Ch 6 (counts as tr + ch 2), tr in same loop, ch 2, (tr, ch 2, tr) in next loop; repeat from * 5 more times. Turn. (7 loops used; 2 + 6 x 2 = 14 tr, 1 + 6 x 2 = 13 ch-2 sps)
The 5 remaining ch-3 loops stay free as the scalloped inner curl.
Row 4: Ch 1, sc in first tr, 3 sc in next ch-2 sp, sc in next tr; repeat from * 12 more times. (1 + 13 x 4 = 53 sc)
Fasten off. Check: 2.25 in (5.7 cm) across.
Motif 4: Head (make 1)
Ch 4, sl st to the first ch to form a ring.
Round 1: Ch 1, 10 sc in ring, sl st to first sc. (10 sc)
Round 2: Ch 1, sc in next 3 sc, hdc in next sc, (dc, ch 2, dc) in next sc for the nose, hdc in next sc, sc in next 2 sc, (sc, ear spike, sc) in next sc, sc in last sc, sl st to first sc. (3 sc + 1 hdc + 2 dc + 1 hdc + 2 sc + 2 sc + 1 sc = 12 sts, plus the nose ch-2 sp and the ear spike)
Fasten off. Check: 1 in (2.5 cm) wide. Sew the black bead just behind and above the nose, between Rounds 1 and 2.
Make All Pieces
All motifs use cream thread only:
- Flower: 1
- Fan: 3
- Tail curl: 1
- Head: 1
That makes 6 motifs in total. Lay them right side up on the blocking board in this layout. The left side is the tail side and the right side is the face side.
Row 1:  [Tail Curl]            [Head]
Row 2:  [Fan A]       [Fan C - chest]
Row 3:  [Fan B]       [Flower - haunch]
Base:   ---------- flat base line ----------
Placement notes:
- Tail curl: top left. The crescent arches up and over to the right, and the inner curl faces down and to the left.
- Fans A and B: stacked down the left side with the scalloped edges facing out (left). They form the back of the tail.
- Fan C: to the right of Fan A, with the scalloped edge facing up toward the head. It forms the chest.
- Flower: lower right, sitting on the base line as the haunch.
- Head: top right, nose pointing right, ear up. The ear tip sits about 0.5 in (1.3 cm) lower than the top of the tail curl.
Pin each motif. Gaps between motifs should be no wider than 0.5 in (1.3 cm).
Joining
Join the motifs with Irish-style chain mesh worked directly between the pinned pieces.
Method: Join thread with a sl st to the edge of the flower. Ch 5, sc into the nearest st or loop of the neighboring motif. Zigzag back and forth across every gap until each motif is attached to every neighbor it touches.
Stitch logic: Each ch-5 loop spans about 0.25 in (0.6 cm). Where motifs nearly touch, use ch 3 instead. Where they touch, sl st them together directly. Anchor into ch-loops and spaces where you can, because they hold better than the tops of single stitches.
Outline chain: The silhouette edge crosses gaps under the chin, at the front paw, and along the base. Work a ch-5 chain along the pin line in those places so the outline has a continuous edge for the border.
Tension: Make each chain the same length as the gap it crosses. Tight chains pucker the motifs, and loose chains sag. Keep the work pinned the whole time.
Size checkpoint: The joined piece should measure 4.25 in (10.8 cm) tall x 3.5 in (8.9 cm) wide. Fasten off.
Border
Border gauge: 9 sc = 1 in (2.5 cm). The outline is split into five segments, and each count below is for that segment alone.
Join thread at the top of the tail curl, where the hanging loop will go. Work clockwise.
Round 1 (sc outline): Ch 1, then sc evenly around:
- Segment A, tail back (over the tail curl and down Fans A and B to the base): 50 sc, 5.6 in (14.2 cm)
- Segment B, base (tail tip to front foot): 27 sc, 3 in (7.6 cm)
- Segment C, front (up the belly and chest to the chin): 22 sc, 2.4 in (6.1 cm). At the paw position, work (sc, ear spike, sc) in one st. This counts as 2 sc; the spike itself is not counted.
- Segment D, head (nose, top of head, ear, back of head): 14 sc, 1.6 in (4.1 cm). Work 2 sc in the nose ch-2 sp and 2 sc in the ear-tip ch. Both pairs are included in the 14.
- Segment E, back (down the neck and up the inner tail edge to the start): 22 sc, 2.4 in (6.1 cm)
Sl st to first sc. (50 + 27 + 22 + 14 + 22 = 135 sc)
As a guide, work 3 sc per ch-5 loop, 2 sc per ch-3 loop, and 1 sc per motif stitch. Then adjust to hit each segment count.
Round 2 (picots and cord):
- Segment A: sc in next 2 sts, picot; repeat from * 24 more times. (50 sc, 25 picots)
- Segments B to E: sl st in BLO of each st around. (27 + 22 + 14 + 22 = 85 sl sts)
Sl st to first sc. (50 sc + 85 sl sts = 135 sts, plus 25 picots)
Hanging loop: Ch 35, sl st in the same st. Sl st in each ch back around the loop, then sl st into the base again. Fasten off. The loop stands 1.5 in (3.8 cm) tall.
Why the math works: 135 sc at 9 sc per inch makes a 15 in (38.1 cm) outline, which matches the perimeter of the 4.25 in (10.8 cm) x 3.5 in (8.9 cm) silhouette. Segment A has 50 sts, an even number, so the 2-stitch picot repeat fits exactly 25 times. Round 2 never adds or removes stitches, so the edge stays flat. The two rounds add 0.125 in (0.3 cm) per side, bringing the piece to 4.5 in (11.4 cm) x 3.75 in (9.5 cm).
Final Blocking
- Weave in all ends along stitch posts, not across open mesh.
- Wet the ornament in cool water and press out the excess in a towel.
- Soak it in fabric stiffener, then squeeze out the excess so no film fills the holes.
- Pin it right side up on the board to 4.5 in (11.4 cm) x 3.75 in (9.5 cm).
- Pin each picot, the ear, the nose, and the paw into sharp points.
- Open every fan spoke and flower petal with a pin tip.
- Clear any stiffener left in the holes with a pin.
- Let it dry completely, for at least 12 hours, then unpin.
Final Quality-Control Checklist
- The ornament measures 4.5 in (11.4 cm) x 3.75 in (9.5 cm)
- The hanging loop is 1.5 in (3.8 cm) and sits at the top of the tail curl
- Round 1 has 135 sc, and Segment A has 25 evenly spaced picots
- The inner tail curl shows 5 free scallops
- The bead eye is secure and level with the nose
- The ear and paw points are sharp
- No mesh sags and no motifs pucker
- All ends are hidden and the piece lies flat
Troubleshooting
- The tail curl cups: Row 3 is too tight. Loosen the ch-2 spaces or block harder.
- The fans ruffle: Row 2 is too loose. Work 2 sc instead of 3 in two of the spaces.
- The mesh sags: The chains are too long. Remove them and rework with ch 3 in narrow gaps.
- The border ripples: That segment has too many sc. Rework it to the exact segment count.
- The border pulls in: There are too few sc. Add stitches over the mesh loops.
- The squirrel is too small: Check the flower size, adjust your hook, and remake.
- The ornament goes floppy: Re-stiffen it and dry it flat again.
Care
Dust gently with a soft brush. If it needs washing, hand wash it in cool water, then re-stiffen and block it flat to the measurements above.
Final Notes
Each measurement builds on the last. A 1.25 in (3.2 cm) flower sets your gauge. The fans reach 1.25 in (3.2 cm) wide, the tail curl 2.25 in (5.7 cm), and the head 1 in (2.5 cm). Joined, the six motifs make a 4.25 in (10.8 cm) x 3.5 in (8.9 cm) squirrel. The 135-stitch border adds 0.125 in (0.3 cm) per side, for a finished 4.5 in (11.4 cm) x 3.75 in (9.5 cm) ornament ready to hang from its 1.5 in (3.8 cm) loop.
Happy crocheting!