

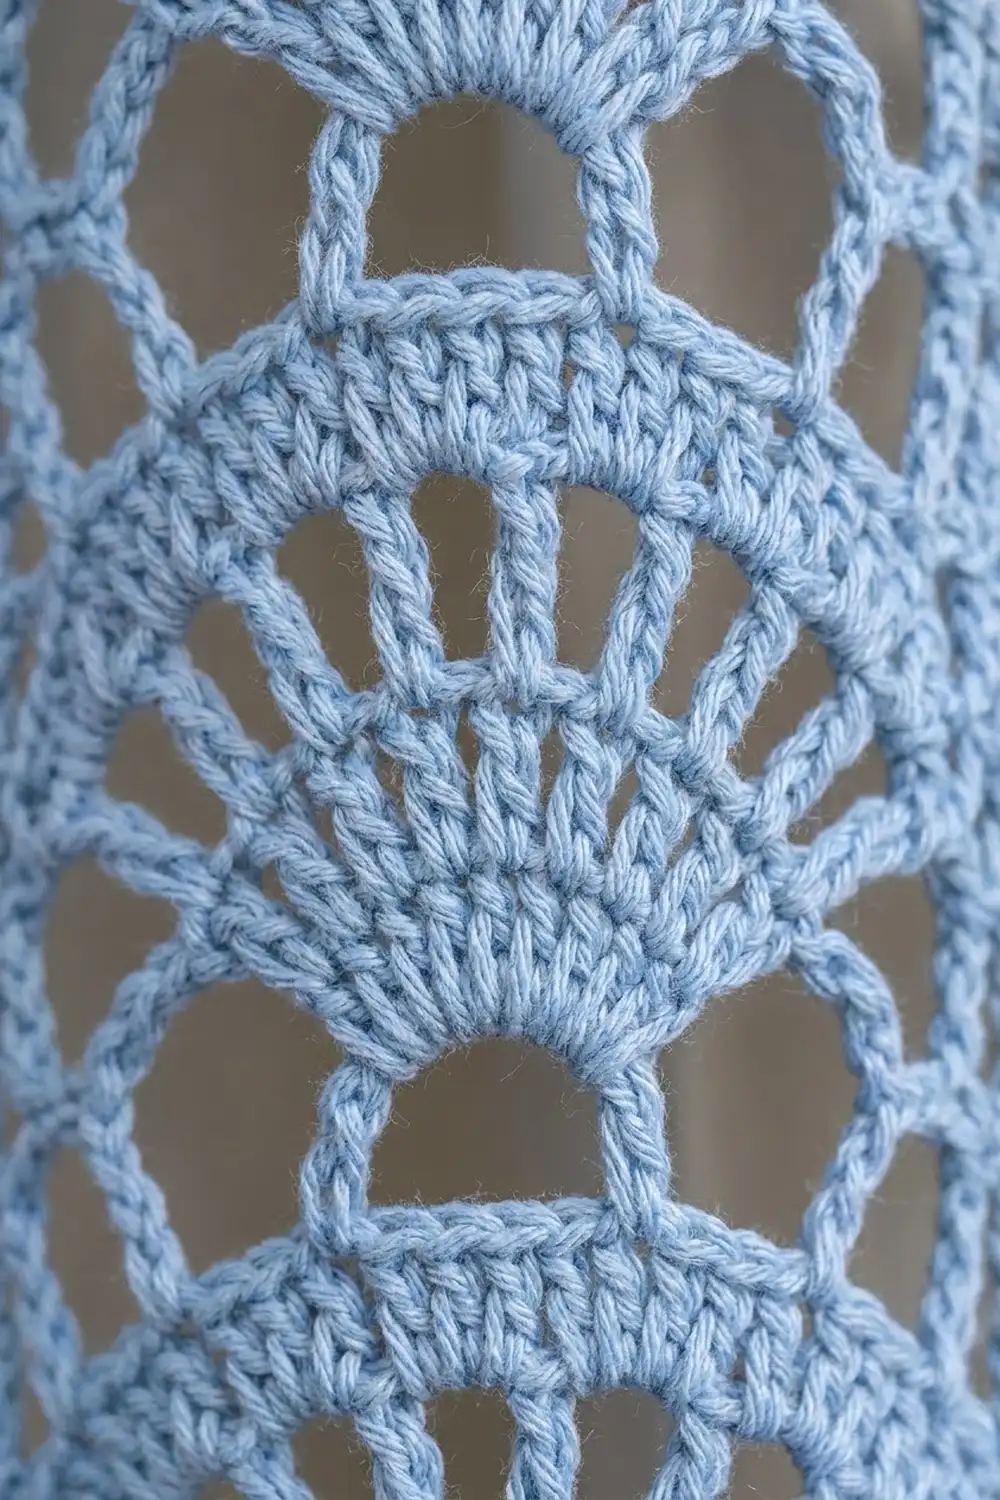
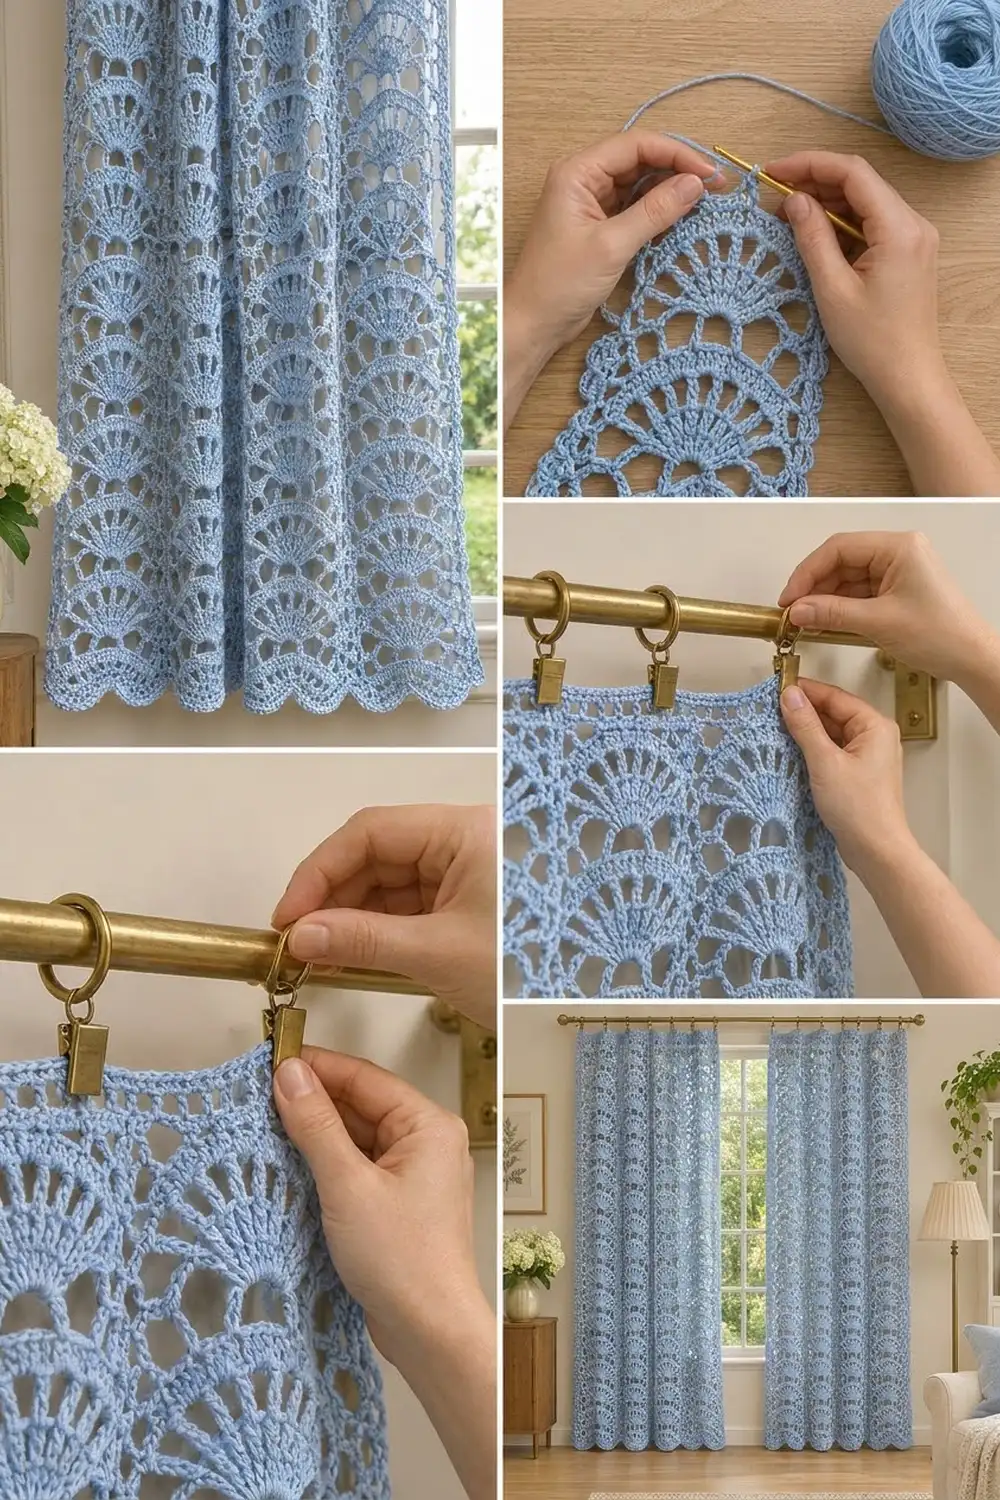
The Bluebell Fan Lace Curtain Panel is a floor-length lace curtain. It is made of columns of open fans stacked straight up the panel. Each fan has tall, airy spokes and a frame of small chain arches, so light comes through while the window still looks dressed. A row of rounded scallops finishes the bottom edge, one scallop under each fan column.
The sample is worked in a single soft powder-blue cotton, which looks fresh and cottage-style against white trim and warm wood. Any light or mid-tone solid color shows the fan pattern well. Very dark colors hide the spokes.
This pattern uses US crochet terms. One finished panel measures 37 x 83 in (94.0 x 210.8 cm) after blocking. The photo shows a pair, so you make two identical panels. They hang separately and are never joined.
Each panel is worked from the bottom up in one piece: a single crochet foundation, then a 3-row fan repeat worked 40 times. After that you add a mesh hanging band at the top, a two-row edging along each long side, and a scalloped edge worked into the foundation chain.
Finished Size and Construction
- Finished size (one panel): 37 x 83 in (94.0 x 210.8 cm)
- Skill level: Intermediate (mostly repetition, but the stitch counts need attention)
- Terminology: US crochet terms
- Yarn weight: Worsted (#4) cotton or cotton blend
- Hook: 5.0 mm (H-8)
- Number of pieces: 2 identical panels, each worked in one piece, not joined
- Layout: 9 fan columns per panel, 40 fan tiers tall
- Pattern repeat: 12 stitches = 4 in (10.2 cm) wide; 3 rows = 2 in (5.1 cm) tall
- Size before border: 36 x 80¼ in (91.4 x 203.8 cm)
- Border depth: side edging ½ in (1.3 cm) each side; top band 1 in (2.5 cm); bottom scallops 1¾ in (4.4 cm)
Materials
Yarn: Use a smooth mercerized or combed cotton, or a cotton-linen blend, in worsted weight. Cotton holds the fan shapes crisply, survives washing and sunlight, and doesn’t fuzz over the stitch spaces. Avoid acrylic, which tends to stretch into a droopy, uneven hem.
- Powder Blue: 600 g / 1,140 m (1,247 yd) per panel; 1,200 g / 2,280 m (2,494 yd) for the pair
These quantities assume roughly 190 m per 100 g and include a margin of about 10% for gauge swatches and small differences in tension. Buy all the yarn from the same dye lot.
Tools:
- 5.0 mm (H-8) crochet hook
- Tapestry needle
- 6–8 locking stitch markers
- Measuring tape
- Rust-proof pins and a large blocking surface (a clean floor with towels works)
- Spray bottle
- 10 ring clips per panel (20 for the pair) and a curtain rod
Abbreviations (US Terms)
- ch – chain
- sl st – slip stitch
- sc – single crochet
- dc – double crochet
- tr – treble crochet
- sk – skip
- sp(s) – space(s)
- st(s) – stitch(es)
- rep – repeat
Special stitch – Fan: In one stitch, work (tr, ch 1) 6 times, then 1 more tr. This gives 7 tr with 6 ch-1 spaces.
Gauge and Checkpoints
Test before you start a panel: 83 in (210.8 cm) of lace is a lot of work to rip out.
Gauge swatch: Ch 26. Work Row 1 (25 sc), then work Rows 2–4 three times, which is 2 fan columns and 3 tiers. Wet the swatch, pin it flat without stretching, and let it dry.
- Width: 2 fan columns = 8 in (20.3 cm), measured from edge stitch to edge stitch.
- Height: 3 tiers (9 rows, not counting Row 1) = 6 in (15.2 cm).
If your swatch is too big, go down to a 4.5 mm hook. If it’s too small, go up to a 5.5 mm hook. Width matters most, because it decides how the panel covers the window. A height difference can be fixed by adding or removing tiers.
Checkpoints while working (measured flat and relaxed):
- After Row 1: 109 sc, about 36 in (91.4 cm) wide
- After 10 tiers (Row 31): 20¼ in (51.4 cm) tall
- After 20 tiers (Row 61): 40¼ in (102.2 cm) tall
- After 30 tiers (Row 91): 60¼ in (153.0 cm) tall
- After 40 tiers (Row 121): 80¼ in (203.8 cm) tall, 109 sc
Panel Pattern
Foundation
Ch 110.
Row 1: Sc in 2nd ch from hook and in each ch across. Turn. (109 sc)
Don’t break or pull on the foundation chain. Its bottom loops will hold the scallop edge later.
Fan Repeat (Rows 2–4)
Row 2 (Fan row): Ch 4 (counts as tr). Sk 5 sts, Fan in next st, sk 5 sts, sc in next st. Rep from * 8 more times, but on the final repeat work a tr in the last st instead of the sc. Turn.
(9 Fans, 8 sc, 2 edge tr)
The edge tr stitches keep the side edges level with the fans. The sc between fans sits low, and the next row fills that gap.
Row 3 (Arch row): Ch 6 (counts as tr + ch 2). Sc in first ch-1 sp of next Fan, (ch 3, sc in next ch-1 sp) 5 times, ch 2, tr in next st (the sc between Fans, or the top of the ch-4 at the end of the row), ch 2. Rep from * 8 more times, ending the last repeat at . Turn.
(10 tr including turning ch, 54 sc, 45 ch-3 arches, 18 ch-2 sps)*
This row makes the scalloped frame over each fan: 5 small arches over its 6 spaces.
Row 4 (Leveling row): Ch 1, sc in first tr. Sc in next ch-2 sp, 2 sc in each of next 2 ch-3 arches, 1 sc in next (center) ch-3 arch, 2 sc in each of next 2 ch-3 arches, sc in next ch-2 sp, sc in next tr (use the 4th ch of the turning ch-6 at the end of the row). Rep from * 8 more times. Turn.
(1 + 12 x 9 = 109 sc)
Why the fans stack in straight columns: Each repeat in Row 4 has 12 sc. The single sc worked in the center arch is the 7th stitch of the repeat, and that is exactly where the next Row 2 places its Fan (sc, sk 5, Fan in 7th). So every Fan sits right above the one below it.
Rows 5–121: Repeat Rows 2–4 thirty-nine more times, for 40 tiers in total. End with a Row 4 (Row 121, 109 sc). Do not fasten off.
The panel now measures about 36 x 80¼ in (91.4 x 203.8 cm).
Make the Second Panel
Repeat the Panel Pattern and the Border in full to make a second identical panel. Count tiers on both panels before blocking so they hang at the same length.
- Powder Blue: 2 panels, 600 g / 1,140 m each
Hanging layout (seen from the room):
| Panel 1 (9 fan columns) | window | Panel 2 (9 fan columns) |
The panels are hung separately, so no joining is needed.
Border
Border gauge: Along the top and bottom, the border works 1 stitch into each of the 109 stitches. Along the sides, it works 5 sc per tier (2 sc per tr row-end, 2 sc per arch-row tr end, 1 sc per sc row-end), which is about 2½ sc per inch (2.5 cm) of side edge.
Work the edges in this order: top band, then both sides, then the bottom scallops.
Top Hanging Band (into Row 121)
Continue from the last row without fastening off.
Band Row 1: Ch 4 (counts as dc + ch 1), sk next st, dc in next st. Ch 1, sk next st, dc in next st. Rep from * across. Turn.
(55 dc + 54 ch-1 sps = 109 sts)
Band Row 2: Ch 1, sc in first dc. Sc in next ch-1 sp, sc in next dc. Rep from * across, working the last sc in the 3rd ch of the turning ch-4. Turn. (109 sc)
Band Row 3: Ch 1, sc in each st across. (109 sc) Fasten off.
The band measures 1 in (2.5 cm) deep. The mesh row lets light through at the top, and the solid sc strip gives the clips something firm to grip.
Side Edging (each long side)
With the right side facing, join at the bottom corner of the side (the end of Row 1).
Side Row 1: Ch 1. Work 1 sc in the end of Row 1. Then, for each of the 40 tiers, work 2 sc around the Row 2 end tr, 2 sc around the Row 3 end tr, and 1 sc in the Row 4 end sc. Finish with 2 sc around the Band Row 1 end dc, 1 sc in the end of Band Row 2, and 1 sc in the end of Band Row 3. Turn.
(1 + 40 x 5 + 4 = 205 sc)
Side Row 2: Ch 1, sc in each sc. (205 sc) Fasten off.
Repeat on the other long side, starting at the top corner and following the same counts in reverse order. The edging adds ½ in (1.3 cm) on each side, so the panel is 37 in (94.0 cm) wide.
Bottom Scallop Edge (into the foundation chain)
Turn the panel upside down. With the right side facing, join in the first unused foundation-chain loop.
Scallop Row 1: Ch 1, sc in first loop. Sk 5 loops, 11 dc in next loop, sk 5 loops, sc in next loop. Rep from * 8 more times. Turn.
(9 shells x 11 dc + 10 sc = 109 sts)
Scallop Row 2: Ch 1, sc in first sc. Sc in next 5 dc, (sc, ch 3, sc) in next (6th, center) dc, sc in next 5 dc, sc in next sc. Rep from * 8 more times. Fasten off.
(1 + 9 x 13 = 118 sc, plus 9 ch-3 picots)
Why the math works: The foundation has 109 loops, which is 9 x 12 + 1. Each shell sits in loop 7 of its 12-loop repeat, the same position as the Fans above it. So each scallop lines up under a fan column, the same way the photo shows. The scallops add 1¾ in (4.4 cm) at their peaks.
Finished length: 80¼ in body + 1 in top band + 1¾ in scallops = 83 in (210.8 cm).
Final Blocking
- Weave in all ends along the solid sc rows or side edging, never across a fan’s open spaces.
- Soak the panel in cool water with a little wool or cotton wash for 15 minutes.
- Press out the water without wringing. Roll the panel in towels to remove more.
- Lay it flat on towels and gently ease it to 37 x 83 in (94.0 x 210.8 cm).
- Pin the side edges straight every 4 in (10.2 cm). Pin each scallop picot so the scallops fan out evenly.
- Use your fingers to open each Fan so the spokes spread evenly and the ch-3 arches curve smoothly.
- Let it dry completely. Then hang it for 24 hours before checking the length, because cotton lace drops a little under its own weight.
Final Quality-Control Checklist
- 9 fan columns, perfectly vertical, from top to bottom
- 40 tiers on each panel, with matching tier counts on both panels
- Every Fan has 7 tr and 6 ch-1 spaces; every frame has 5 ch-3 arches
- Every Row 4 has 109 sc
- Top band has 55 dc in the mesh row; side edging has 205 sc per row
- 9 scallops, each centered under a fan column, with 9 picots
- Panel is 37 x 83 in (94.0 x 210.8 cm) after blocking and hanging
- Ends secured invisibly; no loose yarn tails in the open lace
Troubleshooting
Fans drift diagonally: The center sc in Row 4 is out of place. Count 12 sc per repeat and check that the single sc falls in the middle arch.
Side edges are lower than the fans: You started Row 2 with ch 1 and sc. Begin with ch 4 (counts as tr) and end with a tr.
Panel narrows or flares as it grows: Count Row 4 every few tiers. It must stay at 109 sc.
Scallops ruffle: Your dc are too loose. Work the shells with a 4.5 mm hook.
Side edging puckers: Rework it at exactly 5 sc per tier. Fewer than that pulls the edge in; more makes it ripple.
Panel too long after hanging: Remove tiers before the band, 2 in (5.1 cm) per tier, or block it shorter.
Care
Hand wash or machine wash on a cool gentle cycle in a mesh bag, then dry flat and re-block lightly. Rotate the panels now and then so both fade evenly in the sun.
Final Notes
The whole design comes down to one measurement chain. One 12-stitch repeat measures 4 in (10.2 cm), and 9 repeats make 36 in (91.4 cm). One 3-row tier measures 2 in (5.1 cm), and 40 tiers make 80¼ in (203.8 cm) with the foundation. A ½ in (1.3 cm) edging on each side brings the width to 37 in (94.0 cm). The 1 in (2.5 cm) band and the 1¾ in (4.4 cm) scallops bring the length to 83 in (210.8 cm). Check your gauge, count 109 every Row 4, and both panels will hang straight and match. Clip a ring above each of the 10 points between fans along the top band and hang your panels.
Happy crocheting!