

The Frosted Pane Snowflake Curtain is a pair of airy, full-length lace panels made from small framed snowflake motifs. Each motif has a soft sky-blue six-armed snowflake in the center, wrapped in a pale gray chain frame that squares it off. When the motifs are joined in long columns, the gray frames form raised vertical and horizontal lines. The panels look like frosted window glass with snowflakes caught inside.
The palette has just two colors: light sky blue for the snowflakes and soft heather gray for the frames, seams, and border. Light passes through the open mesh, so the curtains soften the light from a window without blocking it.
This pattern uses US crochet terms. Each finished panel measures 32 in wide x 82 in long (81.3 x 208.3 cm) after blocking, not counting the hanging loops. The pair hangs from hooks on a ceiling track or from rod rings.
Construction is straightforward. You crochet 192 identical square motifs in the round and join them with a raised single crochet seam into two panels of 6 x 16 motifs. Then you add a three-round border, with hanging loops along the top edge and a picot edge on the other three sides.
Finished Size and Construction
- Finished panel size: 32 x 82 in (81.3 x 208.3 cm) each; the pattern makes a pair of 2 panels
- Skill level: Intermediate
- Terminology: US crochet terms
- Yarn weight: Sport (#2) cotton or cotton blend
- Hook: 3.5 mm (E-4)
- Number of pieces: 192 motifs (96 per panel)
- Layout per panel: 6 motifs wide x 16 motifs tall
- Motif size: 5 x 5 in (12.7 x 12.7 cm)
- Panel size before border: 30 x 80 in (76.2 x 203.2 cm)
- Border depth: 1 in (2.5 cm) on each side
Materials
Choose a smooth sport-weight cotton, mercerized or matte, with about 155 m per 50 g. Cotton keeps the snowflake points crisp and blocks well. It also hangs straight over a long drop, where acrylic tends to stretch.
- Color A, light sky blue (snowflakes): 700 g / 2,170 m (14 balls of 50 g / 155 m)
- Color B, soft heather gray (frames, joining, border): 1,200 g / 3,720 m (24 balls of 50 g / 155 m)
These quantities cover both panels and include a margin of about 10%. Buy all the balls of each color from one dye lot.
Tools:
- 3.5 mm (E-4) crochet hook
- Tapestry needle
- Stitch markers
- Rust-proof blocking pins and foam blocking mats
- Spray bottle
- Measuring tape
- Curtain hooks or clip rings (6 per panel)
Abbreviations (US Terms)
- ch – chain
- sl st – slip stitch
- sc – single crochet
- hdc – half double crochet
- dc – double crochet
- tr – treble crochet
- dtr – double treble crochet
- sp – space
- st(s) – stitch(es)
- RS / WS – right side / wrong side
Picot: Ch 3, sl st in the 3rd ch from the hook.
Small point: (Dc, ch 3, sl st in the top of the dc just made, dc), all in the same space.
Gauge and Checkpoints
Gauge: 20 sc = 4 in (10.2 cm) in the motif’s last gray round. One finished motif measures 5 x 5 in (12.7 x 12.7 cm) after blocking.
Make and block one complete motif before you start the batch. With 192 motifs, a small error multiplies quickly: an extra 1/4 in (0.6 cm) per motif adds 4 in (10.2 cm) to the panel length.
Checkpoints for one motif:
- After Round 1: about 1.25 in (3.2 cm) across
- After Round 3: about 3 in (7.6 cm) across
- After Round 4: 4.5 in (11.4 cm) from one arm tip to the opposite arm tip
- After Round 5: about 4.75 in (12.1 cm) across the gray frame
- After Round 7: 5 x 5 in (12.7 x 12.7 cm), with 25 sc per side
If your blocked motif is larger than 5 in (12.7 cm), go down to a 3.25 mm hook. If it’s smaller, go up to a 3.75 mm hook. Also check the snowflake at Round 4. If the arms are floppy, your chains are loose, so tighten only the chains.
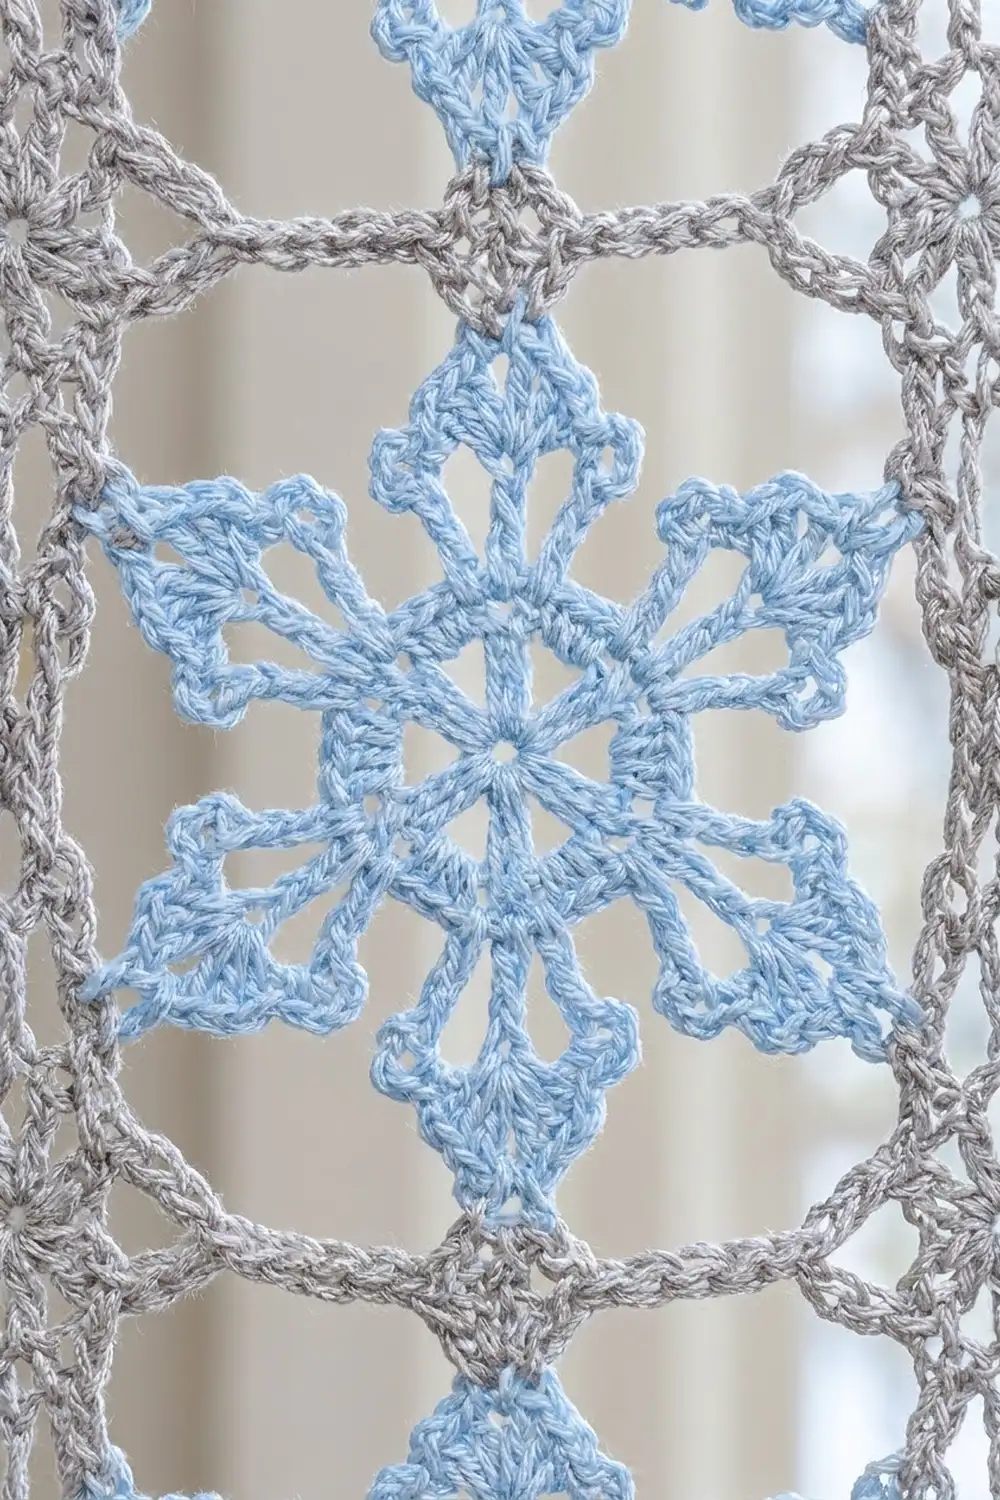
Motif (Make 192)
Snowflake (Color A)
Round 1: Make a magic ring. Ch 3 (counts as dc), work 17 dc in the ring, then sl st in the top of the beginning ch-3. Pull the ring tight. (18 dc)
Round 2: Ch 1, sc in the same st as the join, ch 4, skip the next 2 dc. Sc in the next dc, ch 4, skip the next 2 dc; repeat from * 4 more times. Sl st in the first sc. (6 sc, 6 ch-4 sps)
Round 3: Sl st in the first ch-4 sp. Ch 3 (counts as dc), then work (2 dc, ch 2, 3 dc) in the same sp. (3 dc, ch 2, 3 dc) in the next ch-4 sp; repeat from * 4 more times. Sl st in the top of the beginning ch-3. (36 dc, 6 ch-2 sps)
These six fanned groups are the bases of the snowflake arms.
Round 4 (arms): Sl st in the next 2 dc and into the first ch-2 sp. Ch 1.
In the ch-2 sp, work: sc, ch 9, sl st in the 4th ch from the hook, (ch 3, sl st in the same ch) twice, sl st in each of the next 4 ch, sc in the same ch-2 sp. This makes one arm with a three-picot tip. Ch 3, skip the next 3 dc, and work a small point in the space between this dc group and the next. Ch 3, skip the next 3 dc; repeat from * 5 more times. Sl st in the first sc. Fasten off Color A.
(6 arms with three picots each, 6 small points)
Frame (Color B)
Round 5: Join Color B with a sl st in the center picot of any arm tip. Ch 1. (Sc, ch 3, sc) in the center picot of the arm, ch 6, tr in the ch-3 picot of the next small point, ch 6; repeat from * 5 more times. Sl st in the first sc.
(12 sc, 6 tr, 6 ch-3 sps, 12 ch-6 loops)
The tr lifts each small point out to the same distance as the arm tips. That gives the frame an even ring of 12 points: six decorated corners at the arm tips and six plain tr peaks.
Round 6 (squaring round): Sl st in the next ch-3 sp, sl st in the next sc, then sl st in the first 3 ch of the next ch-6 loop. This loop is your first corner loop.
Ch 4 (counts as tr), then work (dtr, ch 3, dtr, tr) in the same loop.
- Side: Ch 3, dc in the next point (into the ch-3 sp of an arm tip, or into the top of a tr). Ch 2, hdc in the next ch-6 loop. Ch 2, sc in the next point. Ch 2, hdc in the next ch-6 loop. Ch 2, dc in the next point. Ch 3.
- Corner: (Tr, dtr, ch 3, dtr, tr) in the next ch-6 loop.
Work side, corner, side, corner, side, corner, side. Sl st in the top of the beginning ch-4.
(4 corners, 36 sts total; each side between the corner ch-3 sps has 9 sts and 14 ch = 23)
Each side covers three points of the frame. The stitch heights grow from sc in the middle to dtr at the corners, which turns the round frame into a square.
Round 7: Sl st in the next dtr and into the corner ch-3 sp. Ch 1, then work (sc, ch 2, sc) in the same sp. Sc in each of the next 23 sts and chains, (sc, ch 2, sc) in the next corner sp; repeat from * 2 more times. Sc in each of the next 23. Sl st in the first sc. Fasten off, leaving a 6 in (15.2 cm) tail.
For the 23 sts and chains on each side, work 1 sc in each st, 3 sc in each ch-3 sp, and 2 sc in each ch-2 sp.
(25 sc per side, including both corner sc; 100 sc total plus 4 corner ch-2 sps)
Weave in the Color A tails now. Leave the Color B tail so you can weave it into a seam later.
Make All Pieces
- Color A: 192 snowflakes (96 per panel)
- Color B: frames for all 192 motifs
Block the motifs lightly in batches of 10 to 12, to exactly 5 x 5 in (12.7 x 12.7 cm). Motifs that have been pinned to size are much easier to join evenly.
Layout for one panel (6 wide x 16 tall):
Row 1:  M  M  M  M  M  M
Row 2:  M  M  M  M  M  M
Row 3:  M  M  M  M  M  M
 ...    (repeat for Rows 4–15)
Row 16: M  M  M  M  M  M
All the motifs are identical, so any orientation works. Repeat this layout for the second panel.
Joining
Use Color B and a raised sc seam. The ridge it forms on the right side makes the gray lines that run between the snowflakes.
Method: Hold two motifs with wrong sides together and the edges matched. Working through both layers:
- Sc in the paired corner ch-2 sps.
- Sc in each of the 25 paired sc, stitch to stitch: sc 1 to sc 1, through to sc 25 to sc 25.
- Sc in the paired corner ch-2 sps at the far end.
Without cutting the yarn, place the next two motifs and continue. First join all 15 horizontal seams of the panel, working each one across all 6 motifs. Then join the 5 vertical seams, working each one down all 16 motifs. Where a vertical seam crosses a horizontal seam, work 1 sc through the joined corner spaces and carry on.
Tension: Keep the seam sc the same size as your Round 7 sc. A tighter seam makes the panel pucker, and a looser one makes the gray lines wave. Lay the panel flat every few seams to check.
Size checkpoint: Before you add the border, the joined panel should measure 30 x 80 in (76.2 x 203.2 cm), within 1/2 in (1.3 cm). The width is 6 x 5 in = 30 in (76.2 cm), and the length is 16 x 5 in = 80 in (203.2 cm).
Border
The border is worked in Color B.
Border gauge: The same 20 sc = 4 in (10.2 cm), which is 5 sc per inch.
At the outer edge of the panel, each motif side gives you 25 sc:
- Top and bottom edges: 6 motifs x 25 sc = 150 sc
- Long sides: 16 motifs x 25 sc = 400 sc
You skip the joined corner ch-2 spaces at the seams, so no stitches are added there.
Round 1: With the RS facing, join Color B with a sc in the first sc of the top edge, just past the top right corner. Sc in each sc along the edges, skipping the joined corner spaces at each seam. At each of the 4 panel corners, ch 2 to bridge the motif corner sp. Sl st in the first sc.
(Top and bottom: 150 sc each; sides: 400 sc each; 1,100 sc total plus 4 corner ch-2 sps)
Round 2: Ch 3 (counts as dc). Dc in each sc to the next corner, then work (2 dc, ch 2, 2 dc) in the corner sp; repeat from * 3 more times, ending with the corner at the top right. Sl st in the top of the ch-3. Fasten off.
(Top and bottom: 150 dc worked 1 per sc + 4 corner dc = 154 dc each; sides: 400 + 4 = 404 dc each; 1,116 dc total)
Round 3 (picot and hanging-loop round): With the RS facing, join Color B in the top right corner ch-2 sp. Ch 1, then work (sc, ch 2, sc) in the same sp.
- Top edge: Sc in each of the 154 dc. At the center of each motif column (dc 15, 40, 65, 90, 115, and 140 of this edge), make a hanging loop: sc in that dc, ch 8, sl st in the top of the sc you just made.
- Corners: (Sc, ch 2, sc) in the corner sp.
- Long sides and bottom edge: Sc in the corner sc you just made, then sc in the next 2 dc, picot; repeat to the corner and work (sc, ch 2, sc) in the corner sp. On the last side, stop before the starting corner.
Sl st in the first sc. Fasten off and weave in all ends.
(Top: 1 + 154 + 1 = 156 sc plus 6 ch-8 loops; bottom: 156 sc plus 77 picots; sides: 406 sc plus 202 picots each)
Why the math works:
- Each border round is worked 1 stitch per stitch, and the only stitches added are 4 per side at the corners. Nothing is added mid-edge, so the 30 in (76.2 cm) and 80 in (203.2 cm) edges stay flat with no ruffling or cupping.
- The three rounds add 1 in (2.5 cm) on every side, which brings each panel to 32 x 82 in (81.3 x 208.3 cm).
- The picot repeat divides evenly: 154 / 2 = 77, and 404 / 2 = 202.
- The hanging loops sit 25 sts apart, or 5 in (12.7 cm), so each loop lines up with a motif column.
Final Blocking
- Soak one panel for 15 minutes in cool water with a drop of wool wash or mild soap.
- Gently press out the water, then roll the panel in towels to remove more. Do not wring it.
- Lay foam mats on the floor over a 34 x 84 in (86.4 x 213.4 cm) area, or block the panel in two halves.
- Pin the four panel corners to 32 x 82 in (81.3 x 208.3 cm).
- Pin along each seam line so the gray ridges run straight.
- Pin out the arm tips of every snowflake and each picot along the edges.
- Let the panel dry completely, usually about 24 hours. Repeat with the second panel.
Final Quality-Control Checklist
- Every motif measures 5 x 5 in (12.7 x 12.7 cm), with 25 sc per side.
- All six arms of every snowflake have three open picots.
- The seams run straight, with one sc per pair of stitches.
- Border Round 1 counts are 150 / 400 / 150 / 400.
- Each panel has six hanging loops along the top, one centered on each column.
- Both panels measure 32 x 82 in (81.3 x 208.3 cm).
- All ends are woven in at least 2 in (5.1 cm) and trimmed.
Troubleshooting
The snowflake cups: Your Round 3 chains are too tight. Work the ch-2 spaces more loosely, or block the snowflake flat while it’s damp.
The arm tips flop over: Pull the sl sts back down the stem firmly so the arm stays straight.
The motif isn’t square: Check that each Round 6 corner is (tr, dtr, ch 3, dtr, tr), and count 23 sts and chains per side.
The panel is too wide: The seams are loose. Work them again with firmer tension, or use a hook half a size smaller for joining.
The border ruffles: You have extra stitches. Recount Round 1: it should be 150 on the top and bottom and 400 on each side.
The panel leans: Block it again, pinning the seam lines to a straight edge.
Care
Hand wash in cool water and lay flat to dry, reshaping the snowflake points. Don’t hang the panels while they’re wet, because the weight of the water will stretch them.

Final Notes
The measurement chain is simple. 25 sc per side gives a 5 in (12.7 cm) motif, and 6 x 16 motifs give a 30 x 80 in (76.2 x 203.2 cm) panel. A 1 in (2.5 cm) border brings each panel to 32 x 82 in (81.3 x 208.3 cm). If you check your first motif carefully, the remaining 191 will match it.
Happy crocheting!