

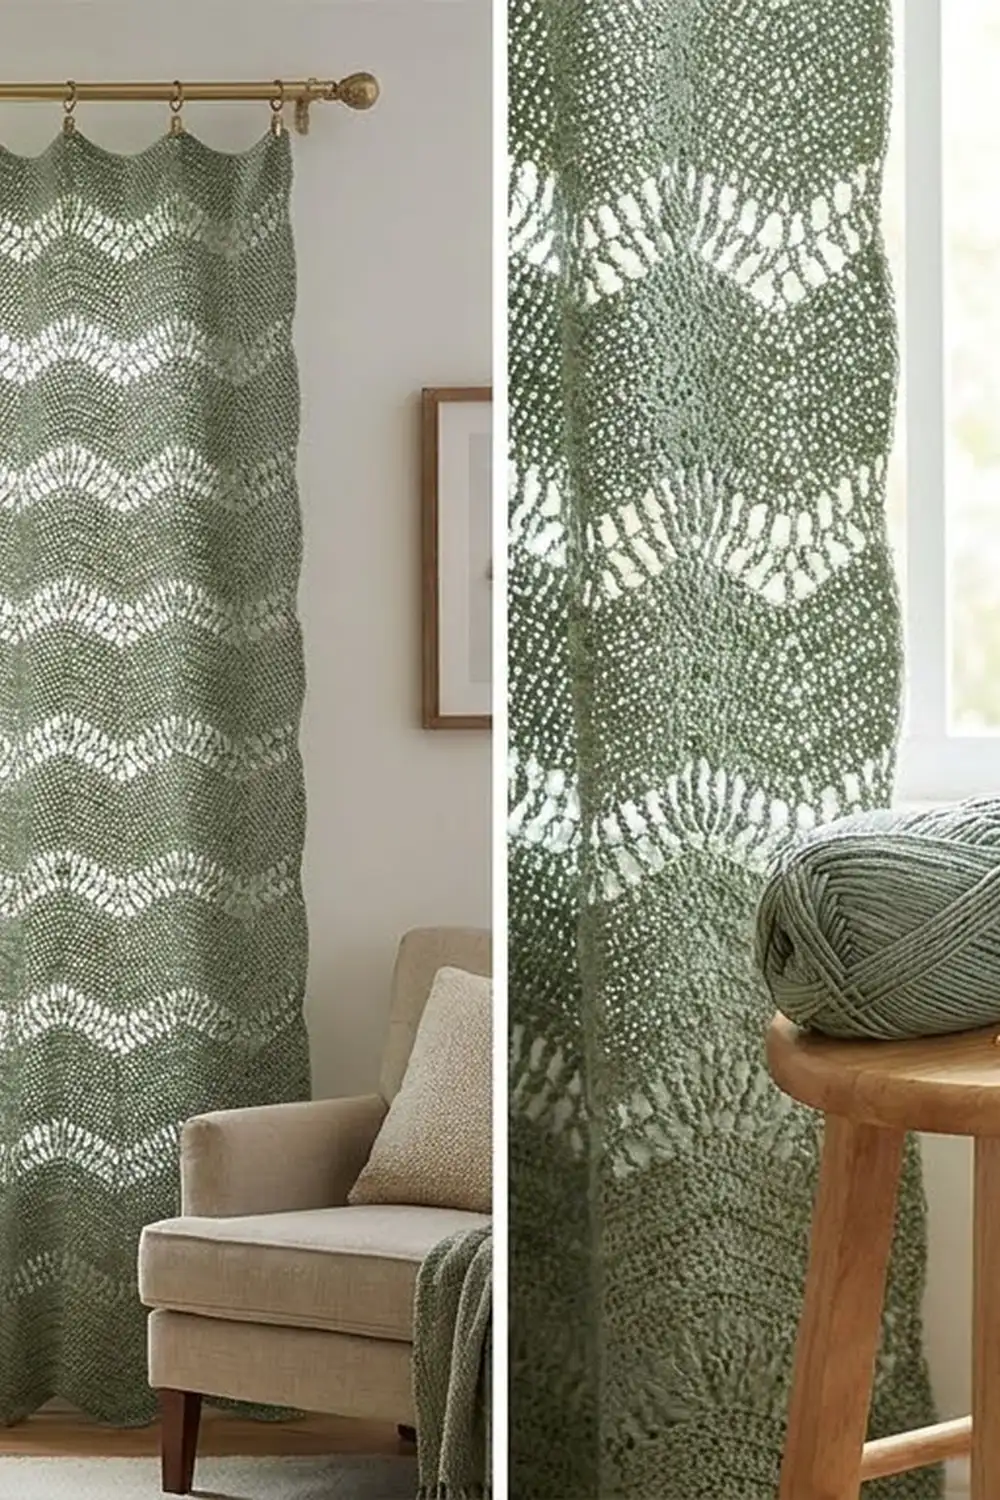
The Sage Tide Curtain is a floor-length panel made of soft, rolling waves. Solid bands of single crochet ripple across the fabric, and between them sit open rows of treble-crochet posts. The result is a curtain that filters light rather than blocking it, and it looks just as good from the street as it does from inside the room.
The sample is worked in one color, a muted sage or mint green, in worsted-weight cotton. Without any color changes, the texture does all the work: tight wavy stripes alternating with airy lace windows. The bottom edge forms natural scallops, and the top edge has gentle peaks that hang neatly from clip rings.
This pattern uses US crochet terms. One finished panel measures about 43 in wide x 84 in long (109.2 x 213.4 cm) after the side edging and blocking. The photographed window uses two identical panels hung side by side. They are never joined.
Each panel is worked flat in rows, in one piece. You start with a foundation chain, work a 4-row ripple repeat (3 single crochet rows, 1 treble lace row) 66 times, and finish with a 6-row solid top band. Last, you add a 2-row single crochet edging down each long side.
Finished Size and Construction
- Finished size (one panel): 43 x 84 in (109.2 x 213.4 cm)
- Skill level: Easy-Intermediate
- Terminology: US crochet terms
- Yarn weight: Worsted (#4), cotton or cotton blend
- Hook: 5.0 mm (US H-8)
- Number of pieces: 2 identical panels, each worked in one piece
- Layout: panels hang side by side on one rod, unjoined
- Piece size before border: 42 x 84 in (106.7 x 213.4 cm)
- Border depth: 0.5 in (1.3 cm) on each long side; no border on the top or bottom edge
- Stitch count: 169 stitches per row, 12 wave peaks across, 270 rows
Materials
Yarn: Pick a smooth worsted-weight cotton or cotton/acrylic blend. Cotton drapes well and doesn’t stretch out as much as pure acrylic when it hangs. Avoid very fuzzy yarn, because it fills in the lace holes. Buy all your yarn from the same dye lot, since two large panels will show even a small color shift.
- Sage green: about 1,500 g (about 2,625 m) per panel; 3,000 g (about 5,250 m) for the pair
These quantities include a margin of roughly 10 percent for the gauge swatch, small gauge differences, and weaving in ends.
Tools:
- 5.0 mm (US H-8) crochet hook
- Tapestry needle
- Scissors
- Locking stitch markers (at least 15)
- Measuring tape
- Rust-proof pins, and blocking wires if you have them
- 12 curtain clip rings per panel (24 for the pair)
Abbreviations (US Terms)
- ch – chain
- sk – skip
- st(s) – stitch(es)
- sp – space
- sc – single crochet
- tr – treble crochet
- sc2tog – single crochet 2 together: (insert hook in next st, yarn over, pull up a loop) twice, yarn over, pull through all 3 loops
- sc3tog – single crochet 3 together: (insert hook in next st, yarn over, pull up a loop) 3 times, yarn over, pull through all 4 loops
- rep – repeat
Special stitches:
- tr2tog (treble 2 together): *Yarn over twice, insert hook in next st, pull up a loop, (yarn over, pull through 2 loops) twice; rep from * once more, yarn over, pull through all 3 loops on hook.
- tr3tog (treble 3 together): Work as tr2tog, but repeat from * twice more (3 legs total), then yarn over and pull through all 4 loops.
- Peak shell: (tr, ch 1, tr) in the same st.
Stitch count note: In every row, each ch-1 space counts as 1 stitch. Turning chains never count as stitches.
Gauge and Checkpoints
Gauge (blocked): 14 sts (one full wave, peak to peak) = 3.5 in (8.9 cm) wide. One 4-row repeat (3 sc rows + 1 lace row) = 1.25 in (3.2 cm) tall. Each sc row is about 0.25 in (0.6 cm) tall, and each lace row is about 0.5 in (1.3 cm) tall.
Test swatch first. Ch 30. Work Rows 1–8 of the pattern below, but use 1 full repeat between the beginning and ending decreases instead of 11. That gives you 29 sts and 2 peaks. Then work 1 row like Row 5 and 2 rows like Row 2, for 11 rows. Block the swatch, then measure:
- Peak to peak: 3.5 in (8.9 cm)
- Rows 1–8: 2.5 in (6.4 cm), measured straight up one stitch column
If your swatch is too big, go down 0.5 mm. If it’s too small, go up 0.5 mm. If the width is right but the lace rows are too tall, wrap your treble stitches a little more snugly rather than switching hooks.
Panel checkpoints (measure gently, lying flat):
- After Row 4: about 42 in (106.7 cm) wide, measured from side edge to side edge
- After 16 repeats (64 rows): 20 in (50.8 cm) long
- After 33 repeats (132 rows): 41.25 in (104.8 cm) long
- After 66 repeats (264 rows): 82.5 in (209.6 cm) long
- After the top band (270 rows): 84 in (213.4 cm) long
Always measure length up a single stitch column, from a bottom scallop point to the matching valley at the top. Don’t measure diagonally across a wave.

Panel Pattern
The ripple stays balanced because each wave adds 2 stitches at the peak and removes 2 at the valley. That keeps the count at 169 sts on every row. The two edge stitches are half-valleys (2 sts worked together), so the side edges stay straight.
Foundation: Ch 170.
Row 1 (sc ripple, worked into chain): Sc2tog over the 2nd and 3rd ch from hook. Sc in next 5 ch, 3 sc in next ch, sc in next 5 ch, sc3tog over next 3 ch; rep from * 10 more times. Sc in next 5 ch, 3 sc in next ch, sc in next 5 ch, sc2tog over last 2 ch. Turn. (169 sts: 1 + 11 x 14 + 14)*
Place a marker in the center stitch of each 3-sc group. You should have 12 peak markers. Move them up every few rows.
Row 2 (sc ripple): Ch 1 (does not count), sc2tog over first 2 sts. Sc in next 5 sts, 3 sc in next st (center sc of peak), sc in next 5 sts, sc3tog over next 3 sts (centered on the valley st); rep from * 10 more times. Sc in next 5 sts, 3 sc in next st, sc in next 5 sts, sc2tog over last 2 sts. Turn. (169 sts)*
Row 3: Rep Row 2. (169 sts)
Row 4 (lace ripple): Ch 4 (does not count), tr2tog over first 2 sts. Tr in next st, [ch 1, sk next st, tr in next st] twice, peak shell in next st, tr in next st, [ch 1, sk next st, tr in next st] twice, tr3tog over next 3 sts; rep from * 10 more times. Tr in next st, [ch 1, sk next st, tr in next st] twice, peak shell in next st, tr in next st, [ch 1, sk next st, tr in next st] twice, tr2tog over last 2 sts. Turn. (169 sts: 1 + 11 x 14 + 14, counting each ch-1 as a st)*
Check one wave of Row 4. Each side section uses 5 sts and makes 5 (tr, ch, tr, ch, tr). The peak shell uses 1 st and makes 3. The tr3tog uses 3 sts and makes 1. So each full wave uses 14 sts and makes 14.
Row 5 (sc ripple over lace): Ch 1 (does not count), sc2tog over first 2 sts. Sc in each of next 5 sts and ch-1 sps, 3 sc in the ch-1 sp of the peak shell, sc in each of next 5 sts and ch-1 sps, sc3tog centered on the tr3tog; rep from * 10 more times. Sc in next 5 sts and sps, 3 sc in peak ch-1 sp, sc in next 5 sts and sps, sc2tog over last 2 sts. Turn. (169 sts)*
Rows 6–7: Rep Row 2. (169 sts each)
Row 8: Rep Row 4. (169 sts)
From here, the 4-row repeat is: 1 row like Row 5, 2 rows like Row 2, 1 row like Row 4. Rows 1–4 are repeat 1, and Rows 5–8 are repeat 2.
Rows 9–264: Work the 4-row repeat 64 more times, for 66 repeats total. You end with a lace row. (169 sts)
Top band, Row 265: Rep Row 5. (169 sts)
Rows 266–270: Rep Row 2. (169 sts each)
Fasten off. The panel now measures about 42 x 84 in (106.7 x 213.4 cm), with 12 peaks along the top edge and 13 scallop points along the bottom (11 full points plus the 2 corners).
Make All Pieces
Make 2 identical panels.
- Panel A: 1,500 g (2,625 m) sage green
- Panel B: 1,500 g (2,625 m) sage green
Layout on the rod:
[ rod ===================================== ]
[ Panel A ]     window glass     [ Panel B ]
  43 in                            43 in
The panels aren’t joined, so you won’t need a joining section. Try to make both panels with the same hook and in similar sessions so your tension stays even. Before adding the edging, lay them next to each other and compare their lengths. They should be within 0.5 in (1.3 cm) of each other.
Border (Side Edging)
Only the long sides get a border. The top and bottom keep their natural wave shapes.
Border gauge: 4 sc = 1 in (2.5 cm) along the side edge, which matches the main fabric’s sc gauge.
Edging Row 1: With the right side facing, join the yarn at the top corner of one long side. Ch 1. Working into the row ends, work 1 sc in the end of each sc row and 2 sc in the end of each lace (tr) row, down to the bottom corner. Turn. (336 sc)
Edging Row 2: Ch 1 (does not count), sc in each sc across. Fasten off. (336 sc)
Repeat Edging Rows 1–2 on the other long side, starting at the bottom corner with the right side facing. (336 sc per side)
Why the math works: Each 4-row repeat has 3 sc rows (1 sc each) and 1 lace row (2 sc), which gives 5 sc per repeat. Then 66 repeats x 5 = 330 sc, plus 6 top-band sc rows x 1 = 6, for 336 sc total. At 4 sc per inch, 336 sc = 84 in (213.4 cm), the exact panel length, so the edge won’t ruffle or pull. Two sc rows add 0.5 in (1.3 cm) to each side, so 42 in + 0.5 in + 0.5 in = 43 in (109.2 cm) of finished width.
Final Blocking
- Weave in all ends along stitch columns, not across the lace rows.
- Soak the panel in cool water with a little wool wash for 15 minutes. Press out the water; don’t wring it.
- Roll the panel in towels to remove more moisture.
- Lay it flat on a clean floor covered with towels or blocking mats. A large panel can be blocked in two halves.
- Run blocking wires or pins along both side edges so they’re straight. Measure 43 in (109.2 cm) across.
- Measure 84 in (213.4 cm) down a stitch column and pin the length.
- Pin each of the 12 top peaks and each bottom scallop point so the waves are even.
- Let the panel dry completely, usually 24–48 hours.
- Hang it for a day before you judge the final length. Cotton can drop by 1–2 in (2.5–5.1 cm) when it hangs.
Final Quality-Control Checklist
- Every row has 169 sts
- There are 12 peaks on the top edge, lined up with the peaks in every band below
- The lace rows show open ch-1 holes on both sides of each peak shell
- The side edges are straight, with 336 sc in each edging row
- The panel measures 43 x 84 in (109.2 x 213.4 cm) blocked
- Both panels are within 0.5 in (1.3 cm) of each other in length
- All ends are woven in securely and invisible from both sides
Troubleshooting
The count is off by 1–2 sts. Usually a decrease was missed or a peak was skipped. Count wave by wave using your peak markers, and frog back to the error.
The waves lean or drift sideways. The peak and valley stitches aren’t centered. The 3-sc group should go into the center st of the peak, and the sc3tog should be centered on the valley st.
The side edges are wavy. The edging is too tight or too loose. Check that you worked 2 sc into the lace row ends, not 1 or 3.
The panel grows too long when hung. Use a firmer cotton blend or go down 0.5 mm. You can also leave out 1–2 repeats; each repeat removed takes off 1.25 in (3.2 cm).
The lace holes close up. Your yarn may be too fuzzy, or your ch-1s are too tight. Try making each chain a little looser.
The panel is too narrow for your window. Add waves in multiples of 14 sts. Each extra wave adds 14 foundation ch and 3.5 in (8.9 cm) of width.
Care
Hand wash or machine wash on a cool, gentle cycle inside a mesh laundry bag, then lay flat to dry and reshape. Don’t hang the panel to dry while it’s wet, because it can stretch.
Final Notes
Here is the full measurement chain. Your swatch should show 3.5 in (8.9 cm) per wave and 1.25 in (3.2 cm) per 4-row repeat. A foundation of 170 ch gives 169 sts and 12 waves, for 42 in (106.7 cm) of width. Next, 66 repeats bring the length to 82.5 in (209.6 cm), and the 6-row top band adds 1.5 in (3.8 cm), for 84 in (213.4 cm). Finally, 336 edging sc on each side match that length exactly and bring the width to 43 in (109.2 cm). Make a second panel to the same numbers, clip 12 rings to the peaks of each one, and hang them side by side.
Happy crocheting!