

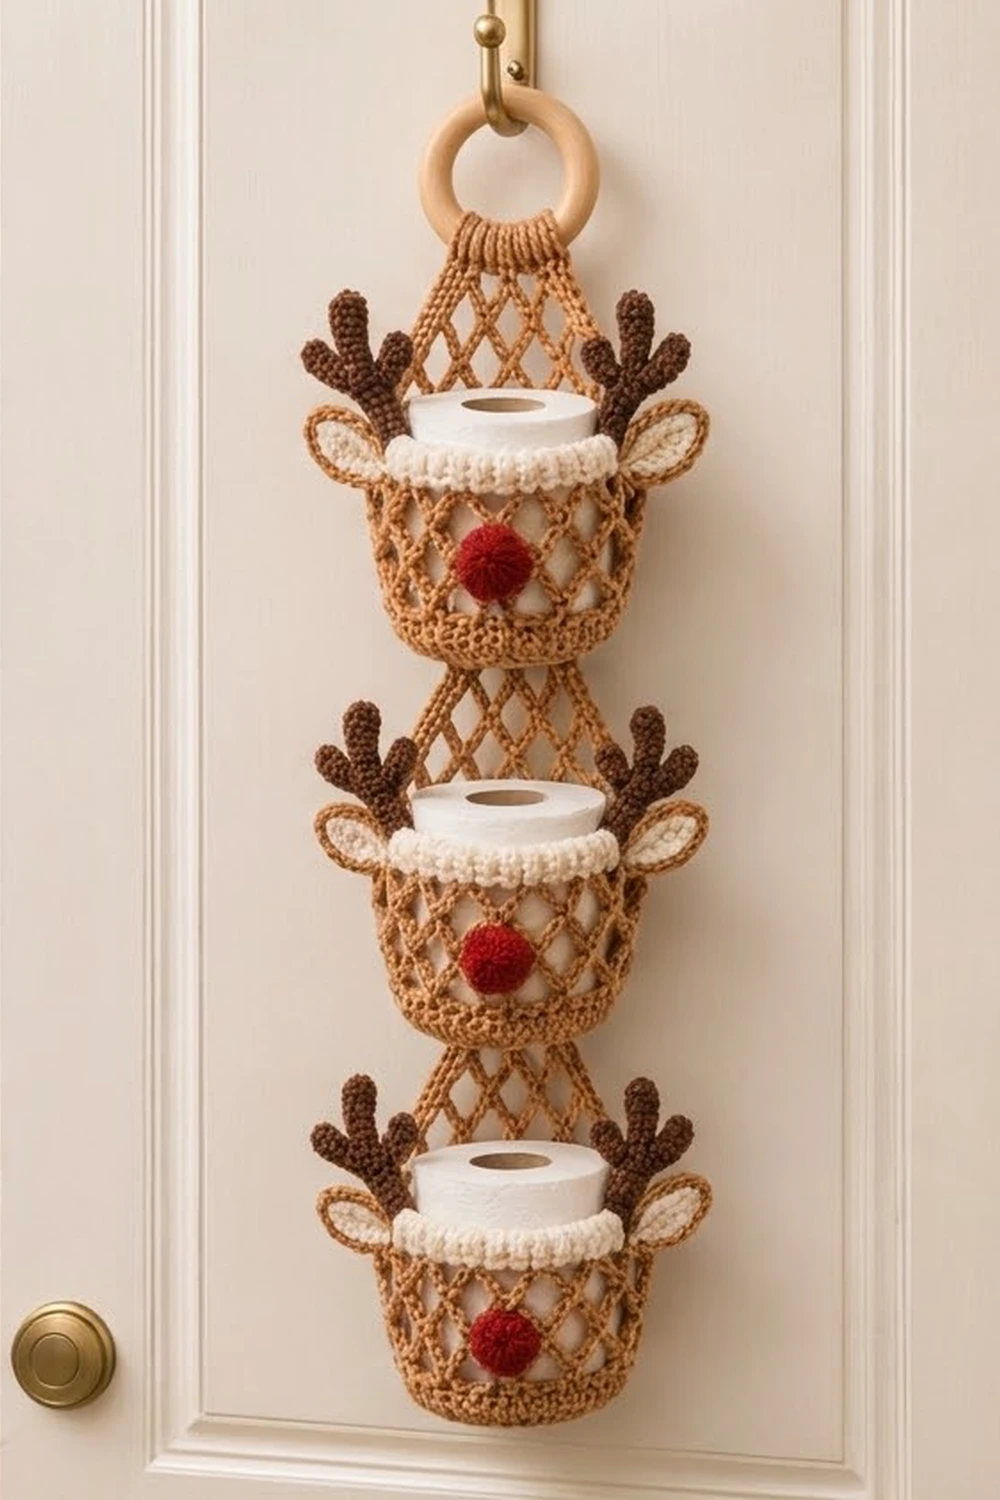
This hanging holder puts three spare toilet rolls in reach and decorates a bathroom for the holidays at the same time. Each roll sits in its own reindeer basket. The baskets have open diamond-mesh sides, a cream rim, a round red nose, branched brown antlers and pointed ears. One long mesh panel holds all three baskets and hangs from a wooden ring.
The colors are warm and simple: caramel tan for the baskets and panel, cream for the rims and inner ears, dark chocolate brown for the antlers and a bright red for the noses. The style is cozy farmhouse Christmas. It looks good on a door hook, on a towel hook or beside the sink.
The pattern uses US crochet terms. The finished hanger is about 4.25 in (10.8 cm) wide at the panel and 8 in (20.3 cm) wide across the ears. It is 19.25 in (48.9 cm) long from the ring to the bottom edge, and about 22 in (55.9 cm) long with the ring included.
Here is the construction. You make three baskets in the round, from the base up. You make one flat mesh panel in rows, starting over the ring. You make the small face pieces and sew them on, sew the baskets to the panel, add a single-crochet border around the panel, then block.
Finished Size and Construction
- Finished size: 4.25 in (10.8 cm) wide × 19.25 in (48.9 cm) long, plus a 3 in (7.6 cm) ring
- Skill level: Intermediate
- Terminology: US crochet terms
- Yarn weight: Worsted (#4), cotton or a cotton blend
- Hook: 5.0 mm (H-8)
- Number of pieces: 25 (1 panel, 3 baskets, 3 noses, 6 antlers, 6 outer ears, 6 inner ears)
- Layout: 3 baskets in a single vertical column, with gaps of 2 in (5.1 cm) between them
- Basket size: 4.75 in (12.1 cm) diameter × 4 in (10.2 cm) tall
- Panel size before border: 3.75 in (9.5 cm) × 19 in (48.3 cm)
- Border depth: 0.25 in (0.6 cm), one round of single crochet
Materials
Cotton or a cotton blend is the best choice. It holds the basket shape, shows the mesh clearly and copes with bathroom humidity. Acrylic also works, but the baskets will be a little softer. All quantities assume worsted cotton at about 170 m per 100 g.
- Tan (main color): 120 g / 204 m
- Cream: 30 g / 51 m
- Dark brown: 15 g / 26 m
- Red: 10 g / 17 m
Tools:
- 5.0 mm (H-8) hook
- Wooden ring, 3 in (7.6 cm) outside diameter
- Small amount of polyester fiberfill for the noses
- Tapestry needle
- Stitch markers
- Scissors
- Rust-proof pins and a blocking mat
- A standard toilet roll, to use as a sizing form
All quantities include a margin of about 15% for your gauge swatch and for differences in tension.
Abbreviations (US Terms)
- ch – chain
- sl st – slip stitch
- sc – single crochet
- hdc – half double crochet
- dc – double crochet
- inc – 2 sc in the same stitch
- sc2tog – single crochet 2 together
- BLO – back loop only
- MR – magic ring
- st(s) – stitch(es)
- sk – skip
- FPhdc – front post hdc: yarn over, insert the hook from front to back to front around the post of the stitch, then finish as an hdc
- BPhdc – back post hdc: the same, but insert the hook from back to front to back
Special stitch: mesh loop. A ch-5 that skips stitches, or one that is anchored with an sc in the next ch-5 loop of the previous round or row. Rows of mesh loops stack into the diamond lattice.
Gauge and Checkpoints
Gauge: 14 sc and 16 rounds = 4 in (10.2 cm). Mesh gauge: 4 loops across = 3.75 in (9.5 cm), and 2 mesh rows = 1 in (2.5 cm).
Make one complete basket before you start anything else. It is your real gauge test.
Checkpoints:
- After basket Round 9: the base lies flat and measures 4.75 in (12.1 cm) across.
- After Round 13: the solid wall measures 1 in (2.5 cm).
- After Round 17: the wall measures 3 in (7.6 cm), which includes 2 in (5.1 cm) of mesh.
- After Round 21: the basket measures 4 in (10.2 cm) tall, and a toilet roll slides in with a little room to spare.
- Panel after Row 8: 3 in (7.6 cm) long and 3.75 in (9.5 cm) wide.
If the base is too big, or ruffles, go down a hook size. If it is too small, or cups upward before Round 10, go up a hook size. If the roll won’t fit, go up a hook size and make the basket again. Don’t add stitches, because the mesh repeat depends on exactly 54 stitches.
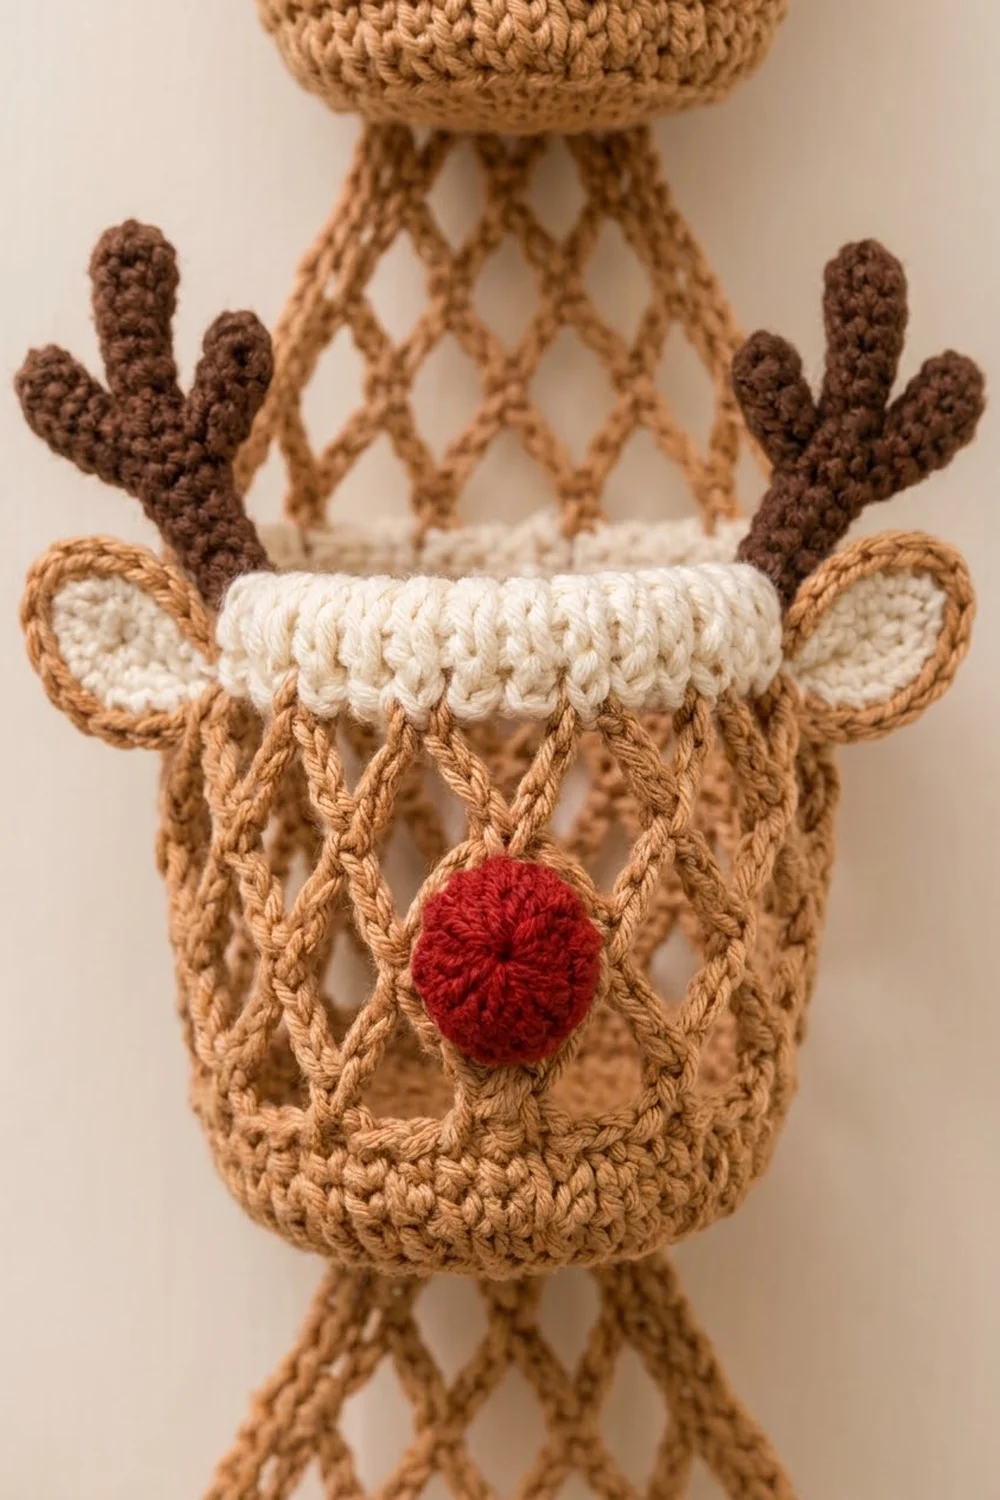
Basket (make 3, tan and cream)
Base
- Round 1: With tan, work 6 sc in a MR. (6)
- Round 2: Inc in each st around. (12)
- Round 3: Sc 1, inc 6 times. (18)
- Round 4: Sc 2, inc 6 times. (24)
- Round 5: Sc 3, inc 6 times. (30)
- Round 6: Sc 4, inc 6 times. (36)
- Round 7: Sc 5, inc 6 times. (42)
- Round 8: Sc 6, inc 6 times. (48)
- Round 9: Sc 7, inc 6 times. (54)
Work in continuous spirals and move your marker up each round. To hide the increases and keep the circle round, stagger them on Rounds 6–9.
Solid wall
- Round 10: Sc in the BLO of each st around. (54) This turning ridge makes the wall stand up.
- Rounds 11–13: Sc in each st around. (54) Sl st in the next st.
Diamond mesh
- Round 14: Ch 1, sc in the same st. Repeat ch 5, sk 2, sc in next 17 times. Then ch 2, sk the last 2 sts and dc in the first sc. (18 loops) The ch-2 and dc together make the 18th loop, and they leave your hook at the center of that loop.
- Rounds 15–16: Repeat ch 5, sc in next ch-5 loop 17 times, then ch 2 and dc in the top of the dc. (18 loops)
- Round 17: Repeat ch 5, sc in next ch-5 loop 17 times, then ch 5 and sl st in the first sc of the round. (18 full loops) Change to cream on this sl st and fasten off tan.
Cream rim
- Round 18 (conversion): Sl st into the first loop and ch 1. Work 3 sc in each ch-5 loop around, then sl st to the first sc. The count is (18 sc, 1 per loop) + (36 extra sc, 2 more per loop) = 54.
- Round 19: Ch 2 (does not count as a stitch). FPhdc around the next st, BPhdc around the next st 27 times, then sl st to the first st. (54)
- Round 20: Ch 2. Work FPhdc around each FPhdc and BPhdc around each BPhdc, then sl st to the first st. (54)
- Round 21: Ch 1, sc in each st around, then sl st to the first sc. (54) Fasten off and leave a 12 in (30.5 cm) tail.
The rim pulls in a little and rolls slightly outward, which gives it the raised band look. The opening stays at 54 sts, the same as the base, so the roll drops straight in.
Face Pieces
Nose (make 3, red)
- Round 1: 6 sc in a MR. (6)
- Round 2: Inc in each st around. (12)
- Round 3: Sc in each st around. (12)
- Round 4: Sc2tog 6 times. (6)
Stuff the nose firmly, then close the hole with the tail. The nose measures 1 in (2.5 cm) across.
Antler (make 6, dark brown)
Ch 10. Sc in the 2nd ch from the hook and the next 2 chs (3 sc, top tine). Ch 4, then sc in the 2nd ch from the hook and the next 2 chs (3 sc, first side tine). Sc in the next 3 chs of the main chain. Ch 4, then sc in the 2nd ch from the hook and the next 2 chs (3 sc, second side tine). Sc in the last 3 chs of the main chain. That is 15 sc in total: 9 on the main beam and 3 on each branch. Fasten off and leave a tail. Each antler is about 2.5 in (6.4 cm) tall and has three tines.
Outer ear (make 6, tan)
Ch 8. Starting in the 2nd ch from the hook, work sl st, sc, hdc, dc, hdc, sc. In the last ch, work (sc, ch 2, sc) to make the pointed tip. Work down the other side of the chain: sc, hdc, dc, hdc, sc, sl st. That is 14 sts plus the ch-2 tip. The ear is 1.75 in (4.4 cm) long.
Inner ear (make 6, cream)
Ch 6. Starting in the 2nd ch from the hook, work sl st, sc, hdc, sc. In the last ch, work (sc, ch 1, sc). Work down the other side: sc, hdc, sc, sl st. That is 10 sts plus the ch-1 tip. The inner ear is 1.25 in (3.2 cm) long.
Center an inner ear on an outer ear with the tips together. Whipstitch around the cream edge so that a tan margin of about 0.25 in (0.6 cm) shows all the way around.
Assemble each face:
- Sew the nose to the center front of the mesh, over the junction between Rounds 15 and 16.
- Sew one ear at each side of the rim (the 3 o’clock and 9 o’clock positions), with the wide end tucked under Round 18 and the tip pointing outward and slightly up.
- Sew the antlers to the inside back of the rim, 1 in (2.5 cm) behind each ear, so they rise about 1.75 in (4.4 cm) above the rim.
Back Panel (make 1, tan)
- Row 1: Join tan around the ring and work 13 sc over the ring. (13) Turn.
- Rows 2–4: Ch 1, sc in each st across. (13) Turn. This makes a 1 in (2.5 cm) tab.
- Row 5: Ch 1, sc in the first st. Repeat ch 5, sk 2, sc in next 4 times. (4 loops) Check the math: 1 + (4 × 3) = 13 sts used. Turn.
- Row 6: Ch 5 (counts as dc + ch 2), sc in the first loop. Repeat ch 5, sc in next loop 3 times. Ch 2, then dc in the last sc. (3 full loops + 2 edge half-loops) Turn.
- Row 7: Ch 1, sc in the dc. Repeat ch 5, sc in next ch-5 loop 3 times. Ch 5, then sc in the 3rd ch of the turning ch. (4 loops) Turn.
- Rows 8–40: Repeat Rows 6–7, ending with a Row 6 repeat on Row 40.
The tab plus 36 mesh rows gives 1 in + 18 in (45.7 cm) = 19 in (48.3 cm). Fasten off.
Joining
Lay the panel flat, right side up, with the ring at the top. Mark these basket zones, measured down from the bottom of the ring:
Ring
Tab             0–1 in    (0–2.5 cm)    Rows 1–4
Mesh            1–3 in    (2.5–7.6 cm)  Rows 5–8
BASKET 1        3–7 in    (7.6–17.8 cm) Rows 9–16
Gap             7–9 in    (17.8–22.9 cm) Rows 17–20
BASKET 2        9–13 in   (22.9–33.0 cm) Rows 21–28
Gap             13–15 in  (33.0–38.1 cm) Rows 29–32
BASKET 3        15–19 in  (38.1–48.3 cm) Rows 33–40
Each basket spans 8 mesh rows. For each basket, find the 9 center-back sts on Round 21, which is the stretch directly opposite the nose. Nine stitches are 2.6 in (6.6 cm) wide, which sits centered on the 3.75 in (9.5 cm) panel with about 0.6 in (1.5 cm) of panel showing on each side.
Stitch-to-stitch logic:
- Use the cream tail to whipstitch those 9 rim sts to the top row of the basket zone, one whipstitch per st, catching both the sc and the chain loops of the panel.
- Use tan to tack the 3 center-back mesh loops of each mesh round to the panel loops behind them, one tack per loop.
- Whipstitch the 9 center-back sts of the Round 10 ridge to the bottom row of the zone.
Tension: Sew firmly but don’t pull. If you pull, the mesh puckers and the basket tips forward. Slide a toilet roll into each basket while you sew so the basket holds its shape.
Checkpoint: Hang the panel. All three basket rims should sit level, with gaps of 2 in (5.1 cm) between baskets, and the bottom of the lowest basket should line up with Row 40.
Border
Border gauge: 3.5 sc per 1 in (2.5 cm), which matches your sc gauge.
Round 1 (tan): Join at the top of the right side edge, just below the ring. Work down the side, across the bottom and up the other side. Corners are counted separately from the sides.
- Each side: 67 sc. Work 1 sc in each of the 4 tab row ends (4). Then, across the 36 mesh rows, work 2, 2, 2 and 1 sc into each group of 4 row ends: that is 7 sc per 4 rows, repeated 9 times (63). Total per side: 4 + 63 = 67.
- Each bottom corner: 3 sc in the corner dc.
- Bottom: 13 sc. Work 2 sc in each edge half-loop (2 × 2 = 4) and 3 sc in each full loop (3 × 3 = 9). Total: 4 + 9 = 13.
- Round total: 67 + 3 + 13 + 3 + 67 = 153 sc.
Fasten off and weave the ends into the tab.
Why the math works: 67 sts ÷ 3.5 = 19.1 in, which matches the 19 in (48.3 cm) edge, so the sides neither ruffle nor pull in. The 13 bottom sts match the 13 tab sts, so the panel hangs straight and square. The 3-sc corners turn the corner flat.
Final Blocking
- Remove the toilet rolls.
- Mist the whole hanger lightly until it is damp. Don’t soak it.
- Pin the panel flat at 4.25 in (10.8 cm) × 19.25 in (48.9 cm).
- Put a dry roll, wrapped in plastic, into each basket so the basket dries round at 4.75 in (12.1 cm).
- Shape the ears flat and point the antler tines upward with your fingers.
- Press the noses into shape so they are round.
- Leave the hanger to dry completely, for 12–24 hours, before you hang it.
Final Quality-Control Checklist
- Each basket has 18 mesh loops on every mesh round and 54 sts at the rim.
- All three baskets are 4 in (10.2 cm) tall and their rims sit level.
- The panel measures 4.25 in (10.8 cm) × 19.25 in (48.9 cm) with its border.
- The border has 67 sc on each side, 13 on the bottom and 3 at each corner.
- Noses are centered and ears are mirrored.
- Antlers stand upright and are sewn securely.
- No ends show on the right side, and the ring tab is tight.
Troubleshooting
- The base cups or ruffles: check your hook size and stagger the increases.
- The mesh leans in a spiral: make sure you sc into the center of each loop, not into the sc that anchors it.
- The mesh comes out with the wrong number of loops: count 54 sts before Round 14, and skip exactly 2 sts per loop.
- The rim flares: work Round 21 more tightly, or with a hook one size smaller.
- The basket tips forward: tack more mesh loops to the panel, or move the top seam up 1 row.
- The panel edge waves: recount the 7-sc-per-4-rows repeat on the border.
- The antlers flop: sew them along their full main beam and work the sc more tightly.
Care
Hand wash in cool water with mild soap, press out the water in a towel and dry flat over the rolls to keep the shape. Don’t tumble dry, because heat shrinks cotton and flattens the noses.
Final Notes
Here is the measurement chain:
- The 14-sc gauge gives a 54-st base of 4.75 in (12.1 cm).
- Four solid rounds, four mesh rounds and four rim rounds make a basket 4 in (10.2 cm) tall.
- A 13-st tab and 36 mesh rows make a panel 19 in (48.3 cm) long.
- Three 8-row basket zones and two 4-row gaps fit exactly inside that panel.
- A 153-st border finishes the panel at 4.25 in (10.8 cm) × 19.25 in (48.9 cm).
Check each stage against its number and the reindeer will line up neatly on the door.
Happy crocheting!