

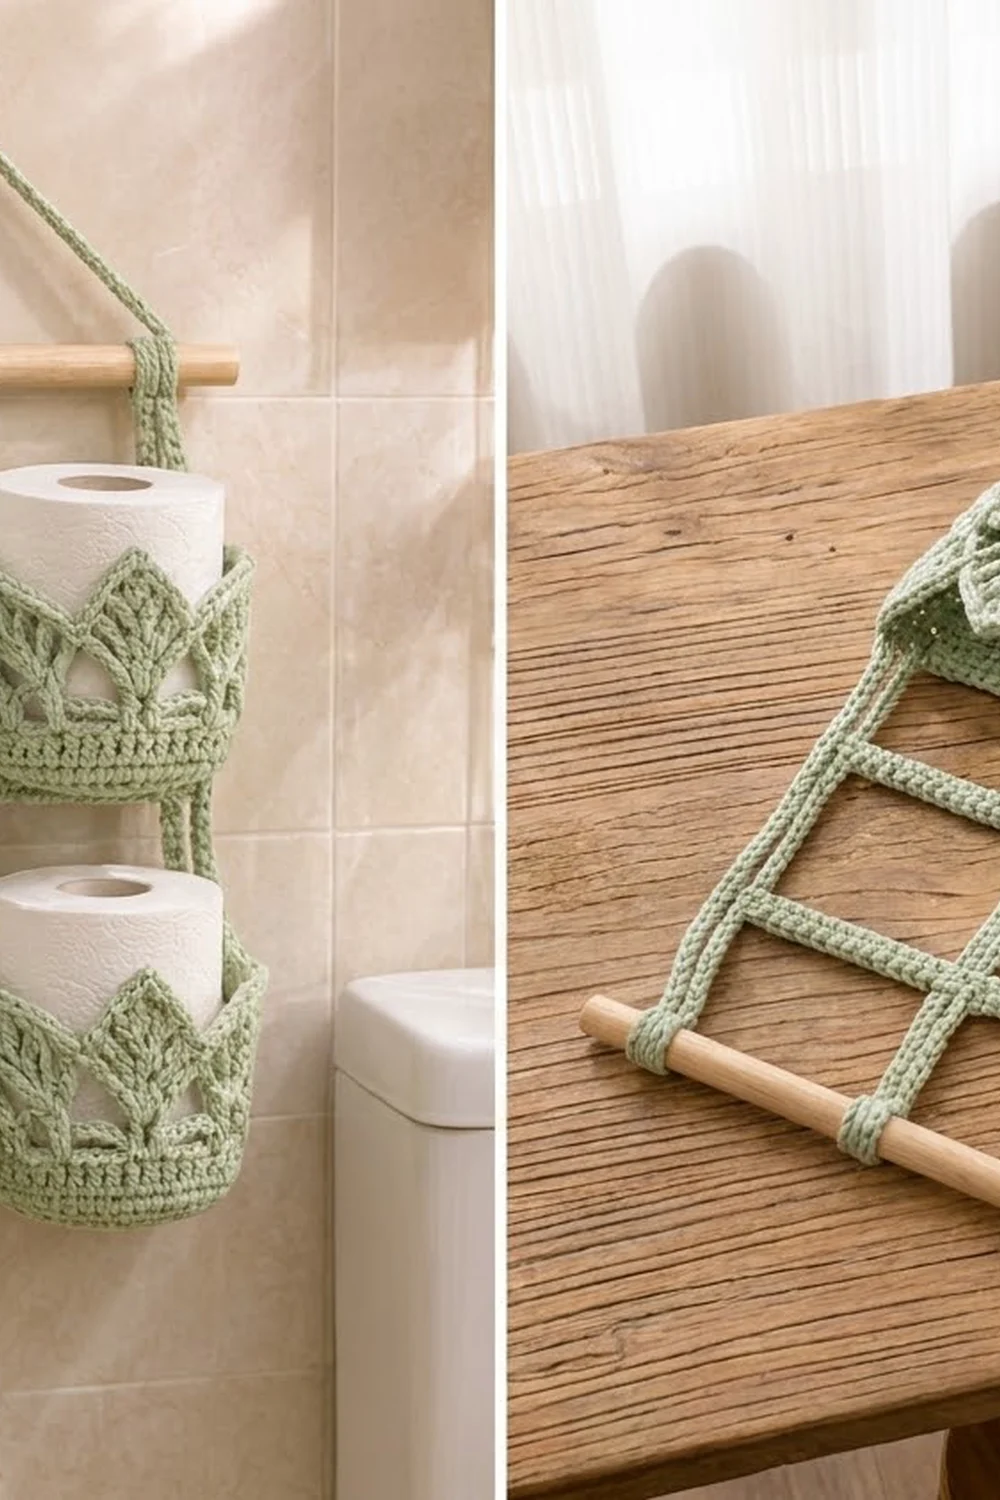
This hanging holder stores four spare rolls in a neat 2 x 2 grid of lacy baskets. Each basket has a solid lower band and a crown of six pointed leaf peaks, so the rolls stay secure while the top edge looks light.
The sample uses one soft sage green yarn, which suits calm, natural bathrooms. Each leaf peak has a raised center vein and a crisp single crochet outline.
This pattern uses US crochet terms. The finished holder is about 10 in (25.4 cm) wide and 9 in (22.9 cm) tall below a 12 in (30.5 cm) wooden dowel. Each basket is 4.75 in (12.1 cm) across and 3.75 in (9.5 cm) tall to the peak tips.
You will make four baskets in the round, plus two flat bars, three straps and a cord. The baskets are sewn to the bars in pairs. The straps frame both tiers and loop over the dowel, and the cord hangs everything from one hook.
Finished Size and Construction
- Finished size: 10 in (25.4 cm) wide x 9 in (22.9 cm) tall below the dowel
- Skill level: Intermediate
- Terminology: US crochet terms
- Yarn weight: Worsted (medium #4) cotton or cotton blend
- Hook: 5.0 mm (H-8)
- Number of pieces: 10 (4 baskets, 2 bars, 3 straps, 1 cord)
- Layout: 2 baskets wide x 2 tiers tall
- Piece size: each basket is 4.75 in (12.1 cm) in diameter x 3.75 in (9.5 cm) tall
- Size before border: each strap is 1 in (2.5 cm) wide x 10.7 in (27.2 cm) long
- Border depth: 0.2 in (0.5 cm) on each long strap edge, for a finished strap width of 1.4 in (3.6 cm)
Materials
Choose a smooth worsted cotton or cotton blend. Cotton keeps the peaks crisp and handles bathroom humidity well. Avoid fuzzy yarns, because they blur the veins and the outline.
Yarn – Sage Green: 150 g / approx. 235 m total
- Baskets: 4 x 22 g (34 m) = 88 g (137 m)
- Bars: 2 x 4 g (6 m) = 8 g (12 m)
- Straps: 3 x 7 g (11 m) = 21 g (33 m)
- Cord: 3 g (5 m)
The pieces use about 120 g (187 m). The 150 g total includes a margin of about 25% for tension differences and weaving in ends.
Tools:
- 5.0 mm (H-8) crochet hook
- Wooden dowel, 12 in (30.5 cm) long x 0.5 in (1.3 cm) in diameter
- 4 locking stitch markers
- Tapestry needle
- Scissors
- Rust-proof pins and a spray bottle
- One wall hook
Abbreviations (US Terms)
- ch – chain
- sl st – slip stitch
- sc – single crochet
- dc – double crochet
- BLO – back loop only
- sp – space
- st(s) – stitch(es)
- dc2tog – double crochet 2 together
- dc3tog – double crochet 3 together
- FPdc – front post double crochet
- BPdc – back post double crochet
Special stitch – Picot: Ch 3, then sl st in the 3rd ch from the hook.
Leaf vein: The center stitch of each peak is an FPdc on right-side rows and a BPdc on wrong-side rows. This makes one raised vein on the outside of the basket.
Gauge and Checkpoints
- 16 sc x 18 rows = 4 in (10.2 cm)
- 16 dc x 8 rows = 4 in (10.2 cm)
Make one complete basket first. It is your real gauge swatch, and every other piece is sized to match it.
Checkpoints:
- After Round 3: the base is about 3 in (7.6 cm) across
- After Round 5: the base is 4.75 in (12.1 cm) across and lies flat
- After Round 9: the solid band is 0.9 in (2.3 cm) tall and the wall is 15 in (38.1 cm) around
- After Round 12: the basket is 3.75 in (9.5 cm) tall to the peak tips
If the basket is too big, use a 4.5 mm hook. If it is too small, use a 5.5 mm hook. A standard roll should drop in easily with about 0.25 in (0.6 cm) of ease.
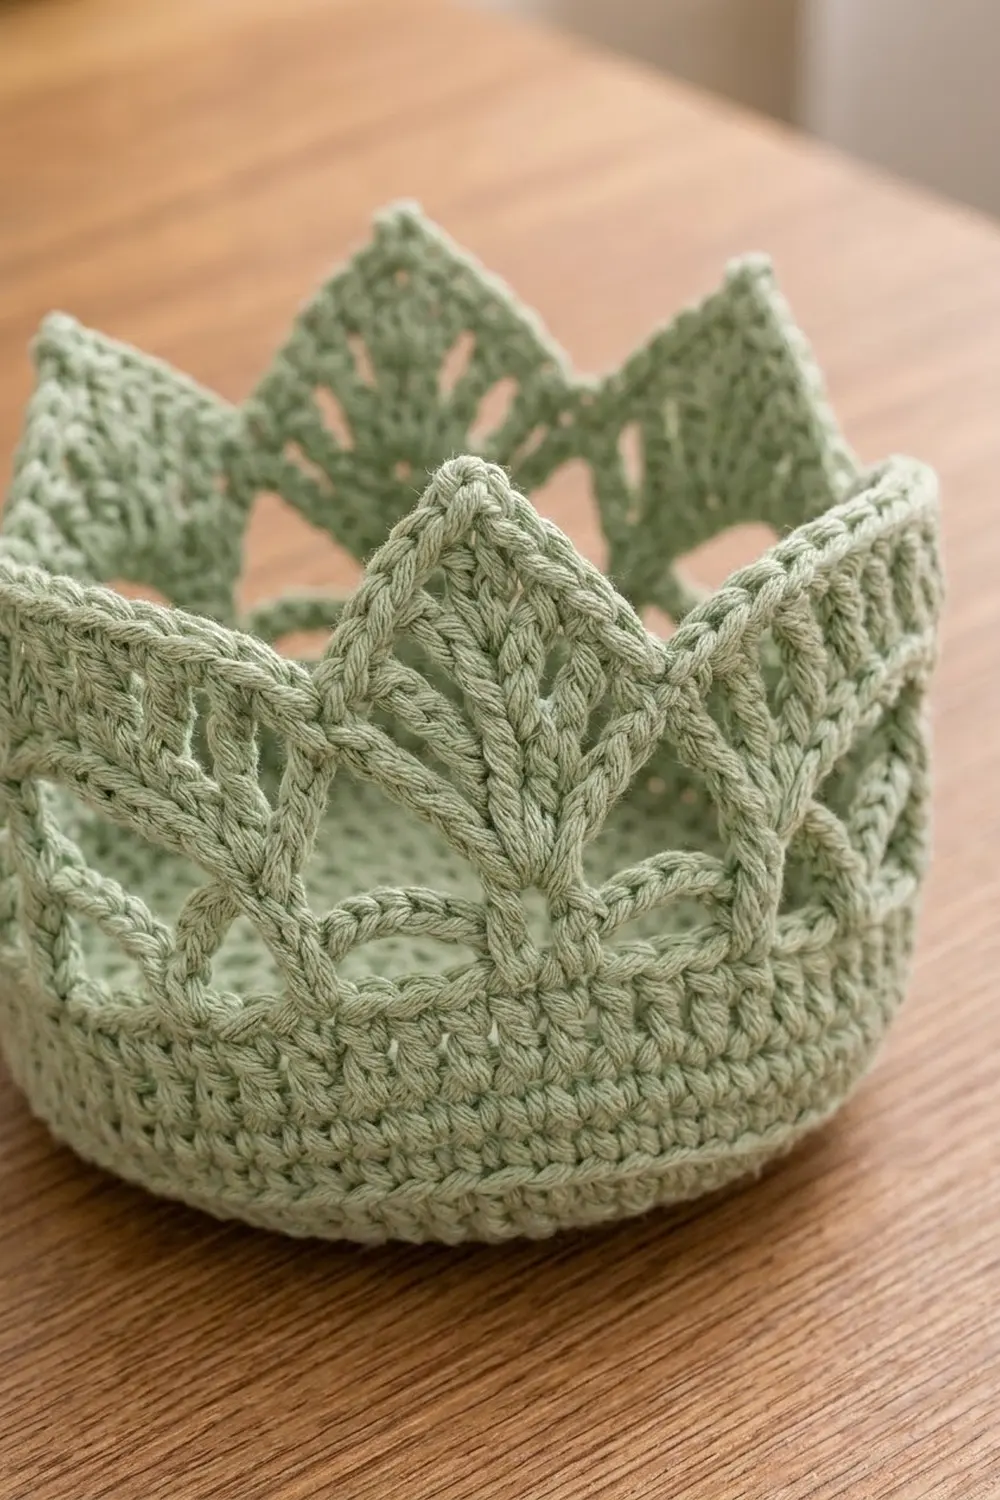
Basket (Make 4)
Base
Round 1: Make a magic ring. Ch 3 (counts as dc), work 11 dc in the ring, and join with a sl st to the top of the ch-3. (12 dc)
Round 2: Ch 3 (counts as dc throughout), dc in the same st, then 2 dc in each st around. Join. (24 dc)
Round 3: Ch 3, 2 dc in the next st, dc in the next st, 2 dc in the next st around. Join. (36 dc)
Round 4: Ch 3, dc in the next st, 2 dc in the next st, dc in the next 2 sts, 2 dc in the next st around. Join. (48 dc)
Round 5: Ch 3, dc in the next 2 sts, 2 dc in the next st, dc in the next 3 sts, 2 dc in the next st around. Join. (60 dc)
Solid Band
Round 6: Ch 1, sc in the BLO of each st around, and join to the first sc. (60 sc) This round forms the ridged turning edge.
Rounds 7–9: Ch 1, sc in each st around, and join. (60 sc)
On Round 9, place markers in st 41 and st 60. Stitches 41–60 form the back arc (20 sts), which will be sewn to a bar. Mark the same stitches on Round 6.
Arches
Round 10: Ch 1, sc in the first st, ch 5, skip 4 sts, sc in the next st, ch 5, skip 4 sts 11 times. Join to the first sc. (12 sc, 12 ch-5 arches)
Each repeat uses 5 sts, and 12 x 5 = 60.
Fans
Round 11: Sl st in the first 2 ch of the next arch. Ch 3 and work 6 dc in the same arch. Then work ch 2, sc in the next arch, ch 2, 7 dc in the next arch 5 times. End with ch 2, sc in the last arch, ch 2, and join to the top of the ch-3. (6 fans of 7 dc = 42 dc, plus 6 sc and 12 ch-2 sps)
Do not fasten off. Your hook is now in the first stitch of Fan 1.
Leaf Peaks
Work each peak in short rows over one fan, then slip stitch across to the next fan.
Row 1 (RS): Ch 2, then dc in the next st (the ch-2 and this dc together count as a dc2tog). Dc in the next st, FPdc around the next st (the 4th, center stitch), dc in the next st, and dc2tog over the last 2 sts. Turn. (5 sts)
Row 2 (WS): Ch 2, then dc in the next st (counts as a dc2tog). BPdc around the FPdc, then dc2tog over the last 2 sts. Turn. (3 sts)
Row 3 (RS): Ch 2, then dc2tog over the next 2 sts (counts as a dc3tog). Work a picot. (1 st plus picot)
Travel: Sl st down the left edge of the peak, working 1 sl st in each row-end of Rows 3, 2 and 1 (3 sl sts). Sl st in the next ch-2 sp, sl st in the sc, sl st in the next ch-2 sp, and sl st in the first dc of the next fan.
Repeat Rows 1–3 and the travel for the other 5 fans. After the 6th peak, sl st down its left edge, then sl st in the ch-2 sp and in the next sc. (6 peaks)
Outline
Round 12: Ch 1. Then work sc in the valley sc, 2 sc in the next ch-2 sp, 5 sc evenly up the right edge of the peak, (sc, ch 2, sc) in the picot, 5 sc evenly down the left edge, 2 sc in the next ch-2 sp 6 times. Join to the first sc. (102 sc and 6 ch-2 points)
Each repeat has 1 + 2 + 5 + 2 + 5 + 2 = 17 sc, and 6 x 17 = 102. Fasten off and weave in the ends.
Make All Pieces
Sage Green: 4 baskets, 2 bars, 3 straps and 1 cord.
Bar (Make 2): Ch 41. Sc in the 2nd ch from the hook and in each ch across. (40 sc) Rows 2–4: Ch 1, turn, and sc in each st across. (40 sc) Each bar measures 10 in (25.4 cm) x 0.9 in (2.3 cm). Fasten off, leaving a 40 in (101.6 cm) tail for sewing.
Strap (Make 3): Ch 5. Sc in the 2nd ch from the hook and in each ch across. (4 sc) Rows 2–48: Ch 1, turn, and sc in each st across. (4 sc) Each strap measures 1 in (2.5 cm) x 10.7 in (27.2 cm). Do not fasten off.
Cord (Make 1): Ch 80. Sl st in the back bump of the 2nd ch from the hook and in each ch across. (79 sl sts) The cord is about 20 in (50.8 cm) long.
Layout grid:
           [ cord to wall hook ]
 ========== wooden dowel ==========
  [Strap L]    [Strap C]    [Strap R]
  [ Basket A ]          [ Basket B ]
  [====== Bar 1 (40 sts) ==========]
  [ Basket C ]          [ Basket D ]
  [====== Bar 2 (40 sts) ==========]
Joining
Each bar backs one tier of two baskets.
Stitch-to-stitch logic: On Bar 1, sts 1–20 match the 20 back-arc stitches of Basket A, and sts 21–40 match the 20 back-arc stitches of Basket B. Because 2 x 20 = 40, you don’t need any extra stitches.
- Whipstitch Row 4 of the bar to the Round 9 back arc of Basket A, matching 1 stitch to 1 stitch.
- Whipstitch the bar’s foundation edge to the Round 6 back arc in the same way.
- Repeat Steps 1 and 2 for Basket B on bar sts 21–40.
- Where the two baskets touch, whipstitch one stitch column from each basket together through Rounds 6–9.
- Join Baskets C and D to Bar 2 the same way.
Tension: Sew snugly, but don’t pull. The bar should lie straight, with no ripples or bowing.
Size checkpoint: Each tier measures 10 in (25.4 cm) across the bar.
Border
The border is one round of sc edging around each strap. After that, you attach the straps.
Border gauge: Work 1 sc per row-end along the long sides (4.5 sc per inch) and 1 sc per stitch across the short ends.
Strap Border Round: Continue from Row 48. Ch 1 and turn the strap 90 degrees.
- Long side 1: 48 sc, 1 in each row-end
- Ch 1 for the corner
- Short end 1: 4 sc across the foundation chain
- Ch 1 for the corner
- Long side 2: 48 sc, 1 in each row-end
- Ch 1 for the corner
- Short end 2: 4 sc across Row 48
- Ch 1 and join to the first sc
Total: 104 sc (48 + 4 + 48 + 4) plus 4 corner ch-1 sps. The corner chains are not counted as stitches.
Why the math works: The strap has 48 rows, so each long side has exactly 48 row-ends for 48 sc. Each short end keeps its 4 stitches. The edge stays straight, and each long side gains 0.2 in (0.5 cm), so the strap becomes 1.4 in (3.6 cm) wide. Fasten off.
Attach the straps:
- Fold Rows 1–8 over the dowel toward the back, and whipstitch the foundation edge to Row 9. This makes a loop about 1.8 in (4.6 cm) around.
- Rows 9–26 hang free for a drop of 4 in (10.2 cm).
- Sew Rows 27–30 behind Bar 1.
- Rows 31–44 span 3.1 in (7.9 cm). This leaves about 0.25 in (0.6 cm) of space above the lower peaks, which stand 2.85 in (7.2 cm) above their bar.
- Sew Rows 45–48 behind Bar 2, with the bottom edges flush.
Positions: Center Strap L on bar sts 1–4. Center Strap C on sts 19–22, right over the seam between sts 20 and 21. Center Strap R on sts 37–40. The strap centers are 4.5 in (11.4 cm) apart.
Cord: Center the dowel so that 1.5 in (3.8 cm) extends past each outer strap. Tie each end of the cord around the dowel outside the strap loops, and knot it securely.
Final Blocking
- Put a roll inside each basket to support its shape.
- Mist the peaks until damp.
- Pinch each peak to a point and straighten its vein.
- Pin the bars flat against a blocking board.
- Pin the straps straight at 1.4 in (3.6 cm) wide.
- Let everything dry completely, about 12 hours.
Final Quality-Control Checklist
- Each basket has 60 sts in Rounds 5–9 and 102 sc in the outline
- All 24 peaks end in a picot and show a raised vein
- Each base is 4.75 in (12.1 cm) across and lies flat
- Each bar has 40 sts and is 10 in (25.4 cm) long
- Each strap has 48 rows and 104 border sc
- The upper peaks sit about 1.15 in (2.9 cm) below the dowel
- The holder hangs level
Troubleshooting
Base cups or ruffles: Check that your increases are evenly spaced, then change your hook size.
Peaks lean sideways: Make sure the FPdc is the 4th stitch of the fan.
Vein disappears: Make sure you worked a BPdc in Row 2.
Uneven gaps between peaks: Use exactly 3 sl sts down each peak edge.
Roll doesn’t fit: Remake the basket with a hook one size larger.
Holder tilts: Re-center the dowel and retie the cord.
Care
Hand wash in cool water, press out the extra water, and dry flat with rolls inside the baskets. Don’t tumble dry.
Final Notes
Each measurement sets up the next one. A 60-stitch base gives a 15 in (38.1 cm) wall that holds one roll. The 20-stitch back arcs on two baskets match a 40-stitch bar, so each tier is 10 in (25.4 cm) wide. Three 48-row straps set both tiers in place below a 12 in (30.5 cm) dowel. If your first basket meets its checkpoints, the rest will fit.
Happy crocheting!