

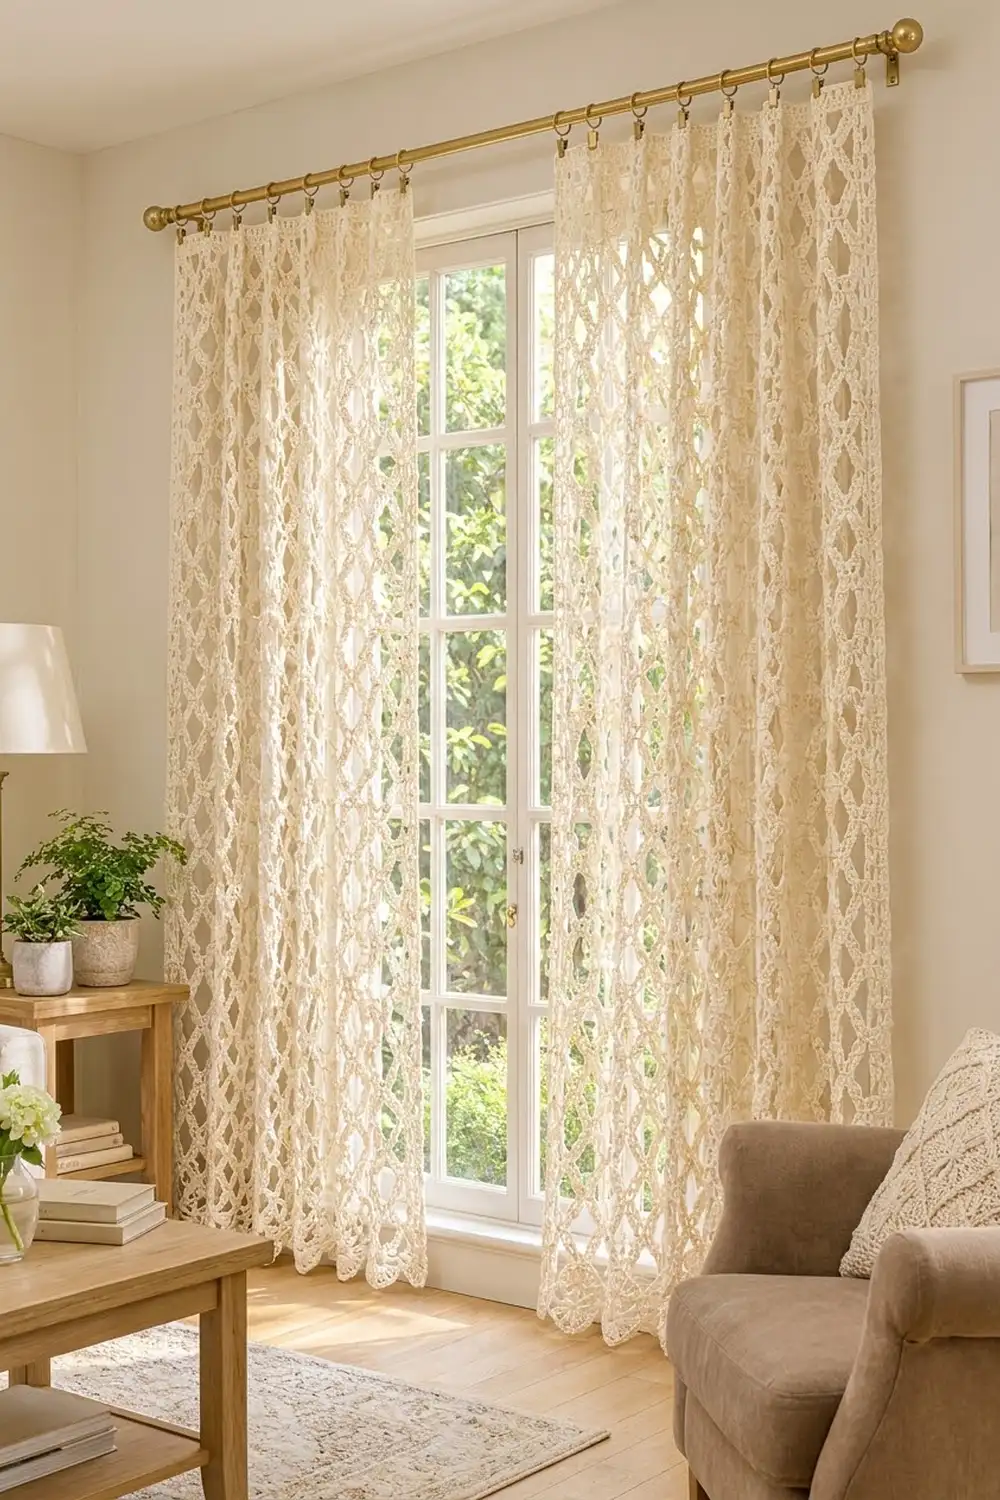
The Ivory Trellis Curtain Panel is an airy, floor-length curtain with a lattice of tall, open diamonds. Daylight comes through while the window still feels softly dressed. Each diamond is outlined by chunky chain loops that cross at small single-crochet knots, so the fabric looks like a garden trellis in yarn.
The panel is worked in one warm ivory shade. A solid double-crochet header runs across the top for clip rings, and a row of spoked, half-wheel fan scallops trims the bottom edge. The style is relaxed and cottage-bohemian, and it suits bright living rooms, bedrooms and sunrooms.
This pattern uses US crochet terms. One finished panel measures 41 in (104.1 cm) wide by 83 in (210.8 cm) long. The photo shows a pair, so you’ll make two identical panels. They hang separately and are never joined.
Construction is simple. You start with a long foundation chain and work the lattice from the bottom up, then convert the last lattice row into a solid header. Afterward you add the fan-scallop border to the underside of the foundation chain and a single-crochet edging along both long sides.
Finished Size and Construction
- Finished size (one panel): 41 in (104.1 cm) wide × 83 in (210.8 cm) long
- Skill level: Easy–Intermediate
- Terminology: US crochet terms
- Yarn weight: Bulky (#5) cotton or cotton blend
- Hook: 6.0 mm (J-10)
- Number of pieces: 2 identical panels, each worked as one piece
- Layout: One panel on each side of the window, hung separately
- Piece size before border: 40 in (101.6 cm) wide × 79.5 in (201.9 cm) long (lattice plus header)
- Border depth: Bottom scallops add 3.5 in (8.9 cm); side edging adds 0.5 in (1.3 cm) per side
Materials
Yarn: Use a smooth bulky cotton or cotton-blend yarn of about 135 m per 100 g. Cotton gives crisp diamonds and hangs well. Acrylic blends weigh less but can stretch less evenly. Avoid fuzzy yarns, because they blur the lattice.
- Ivory/Cream: 350 g (about 470 m) per panel, or 700 g (about 940 m) for the pair
These quantities include a margin of about 15% for gauge differences and swatching.
Tools:
– 6.0 mm (J-10) crochet hook
– Tapestry needle
– Stitch markers (at least 4)
– Measuring tape
– Rust-proof pins and a large blocking surface (a clean floor with towels works)
– Spray bottle
– 9 clip rings per panel (18 for the pair)
Abbreviations (US Terms)
- ch – chain
- sc – single crochet
- dc – double crochet
- sk – skip
- sp – space
- st(s) – stitch(es)
- rep – repeat
- RS / WS – right side / wrong side
Special terms:
– Lattice loop: a ch-6 that runs from one sc knot to the next. Each pair of crossing loops forms a diamond.
– Fan: 9 dc worked into the same stitch, making a half-wheel.
Gauge and Checkpoints
Lattice gauge: 4 lattice loops = 10 in (25.4 cm) wide; 8 rows = 12 in (30.5 cm) tall. Each row is about 1.5 in (3.8 cm) tall.
Foundation gauge: 8 ch = 2.5 in (6.4 cm).
Header gauge: 12 dc = 5 in (12.7 cm); 1 dc row = 1 in (2.5 cm).
Test first. Ch 34 and work Rows 1–3 of the lattice. Then rep Rows 2–3 until you have 8 rows (4 loops wide). Lay the swatch flat without stretching it and measure.
- Swatch wider than 10 in (25.4 cm): go down one hook size.
- Swatch narrower than 10 in (25.4 cm): go up one hook size.
- Width is right but height is off: adjust how far you pull up each ch. Taller loops make taller diamonds.
Checkpoints for the full panel:
– Foundation chain: about 40 in (101.6 cm) long, relaxed
– After Row 8: 12 in (30.5 cm) tall
– After Row 24: 36 in (91.4 cm) tall
– After Row 51: 76.5 in (194.3 cm) tall
– After the header: 79.5 in (201.9 cm) tall
– After the border: 83 in (210.8 cm) tall, 41 in (104.1 cm) wide
Lattice fabric relaxes when it hangs, so measure flat and also hang it from a hanger for 10 minutes at the Row 24 checkpoint.

Lattice Body
Foundation: Ch 130 (that’s 16 repeats of 8 ch, plus 1, plus 1 turning ch).
Row 1 (RS): Sc in 2nd ch from hook, ch 6, sk 7 ch, sc in next ch; rep from * across. (17 sc, 16 ch-6 loops)*
Row 2 (WS): Ch 6 (counts as dc + ch-3 half loop), turn. Sc in first ch-6 loop, ch 6, sc in next ch-6 loop; rep from * across, ending with a sc in the last loop. Ch 3, dc in last sc. (16 sc, 15 full ch-6 loops, 2 ch-3 half loops, 2 dc including turning ch)*
Row 3 (RS): Ch 1, turn. Sc in first dc, ch 6, sc in next full ch-6 loop; rep from * 14 more times (15 times total). Ch 6, sk the ch-3 half loop, sc in 3rd ch of turning ch. (17 sc, 16 ch-6 loops)*
Row 3 has the same count as Row 1. Every odd row is a full-loop row and every even row is a half-loop row.
Rows 4–51: Rep Rows 2–3 twenty-four more times. You end on Row 51, a full-loop RS row. (17 sc, 16 ch-6 loops)
The sc knots in each row sit at the centers of the loops below. That offset is what makes the diamonds. Keep each ch-6 the same length; uneven chains are the most common cause of crooked diamonds.
Checkpoint: 76.5 in (194.3 cm) tall and 40 in (101.6 cm) wide.
Header
Row 52 (WS, conversion row): Ch 3 (counts as dc), turn. 5 dc in next ch-6 loop, dc in next sc; rep from * across. (97 dc = 17 dc worked 1-per-existing sc + 80 dc worked 5 into each of the 16 loops)*
Row 53 (RS): Ch 3 (counts as dc), turn, dc in each st across. (97 dc)
Row 54 (WS): Ch 3 (counts as dc), turn, dc in each st across. (97 dc)
Fasten off and weave in the end.
At 12 dc = 5 in (12.7 cm), 97 dc measure about 40 in (101.6 cm). That matches the lattice width, so the header lies flat with no ruffling or pulling.
Checkpoint: Panel before border is 40 in (101.6 cm) × 79.5 in (201.9 cm).
Border
Border gauge:
– Across the bottom, sc match the foundation: 129 sc = 40 in (101.6 cm).
– Along the sides, 2 sc = 1 in (2.5 cm).
Bottom Scallop Border
Turn the panel upside down. You’ll work into the free loops on the underside of the foundation chain.
Border Row 1 (RS): With RS facing, join yarn in the first foundation ch at the right corner. Ch 1, then sc in the same ch and in each foundation ch across. (129 sc: 1 per existing foundation ch, 0 added)
Border Row 2 (WS): Ch 1, turn. Sc in first sc, sk 3 sc, 9 dc in next sc, sk 3 sc, sc in next sc; rep from * across. (16 fans, 17 sc)*
Each repeat uses exactly 8 sts (3 + 1 + 3 + 1). 16 × 8 + 1 = 129, so the row ends evenly. Each fan also sits below one lattice repeat, so the scallops line up with the diamonds above them.
Border Row 3 (RS): Ch 1, turn. Sc in first sc, ch 2, dc in first dc of fan, (ch 1, dc in next dc) 8 times, ch 2, sc in next sc; rep from * across. (Per fan: 9 dc, 8 ch-1 sps, 2 ch-2 sps; total 144 dc, 17 sc)*
The ch-1 spaces open the fan into a spoked half-wheel.
Border Row 4 (WS): Ch 1, turn. Sc in first sc, 2 sc in ch-2 sp, sc in next dc, (sc in ch-1 sp, sc in next dc) 8 times, 2 sc in ch-2 sp, sc in next sc; rep from * across. (353 sc = 17 sc worked 1-per-existing sc + 336 sc around the fans, 21 per fan)*
This row rounds out the scallops. Fasten off.
Checkpoint: The border adds 3.5 in (8.9 cm). The panel now measures 83 in (210.8 cm) long.
Side Edging
Side edging (worked once on each long side): With RS facing, join yarn at the top corner of the header. Ch 1 and work down the side into the row ends of the header and lattice only:
– 2 sc in each header row end (6 sc over 3 rows)
– 3 sc in each lattice row end (153 sc over 51 rows)
(159 sc per side)
Don’t edge the scallop rows; the fans finish themselves. Fasten off and repeat on the other long side, this time starting at the bottom of the lattice and working up to the header.
Why the math works: Each lattice row is 1.5 in (3.8 cm) tall, so 3 sc per row gives 2 sc per inch. Each header row is 1 in (2.5 cm) tall, so 2 sc per row also gives 2 sc per inch. That’s 159 sc over 79.5 in (201.9 cm), the same density along the whole side, so the edges hang straight without ruffling or puckering. The edging adds 0.5 in (1.3 cm) per side, bringing the panel to 41 in (104.1 cm) wide.
Make the Second Panel
Make a second panel exactly like the first, using the same hook, the same row count and the same checkpoints. Each panel needs 350 g (about 470 m) of Ivory.
Layout at the window:
[ Panel 1 ] [ window ] [ Panel 2 ]
The panels are not joined. Each one hangs on its own set of 9 clip rings.
Final Blocking
- Weave in all ends along solid stitches (the header, the scallops or the sc knots), never through the lattice loops.
- Lay the panel flat on towels on a clean floor, RS up.
- Mist it evenly with water until it’s damp but not soaked.
- Pin the header straight at 40 in (101.6 cm) wide.
- Pin the sides straight down to 79.5 in (201.9 cm), plus the border, for 83 in (210.8 cm) total.
- Pin the point of each fan scallop so all 16 curves match.
- Gently open each diamond with your fingers so the knots sit centered.
- Let it dry completely, usually 24 hours.
- Clip 9 rings to the header, one at each corner and the rest spaced 5 in (12.7 cm) apart.
- Hang the panel for a day before you hem or adjust anything. The lattice will settle slightly.
Final Quality-Control Checklist
- [ ] Each panel has 51 lattice rows and 3 header rows
- [ ] Every odd lattice row has 17 sc and 16 ch-6 loops
- [ ] The header has 97 dc in each row
- [ ] There are 16 fans, centered under the lattice repeats
- [ ] Border Row 4 has 353 sc
- [ ] Each side edging has 159 sc
- [ ] The panel measures 41 in (104.1 cm) × 83 in (210.8 cm) after blocking
- [ ] Both panels match in length within 1 in (2.5 cm)
- [ ] All ends are secured in solid stitches
Troubleshooting
Diamonds lean or look crooked. You missed a loop or worked into a half loop. Count 16 sc on every even row and 17 on every odd row.
The panel is narrowing. You’re skipping the edge half loop on odd rows, or you’ve dropped the end dc on even rows. Recheck Rows 2–3.
The header ruffles. Your dc gauge is looser than 12 dc = 5 in (12.7 cm). Work 4 dc per loop instead of 5 (81 dc) and adjust the clip-ring spacing to match.
The header pulls in. Go up one hook size for the header only.
The scallops cup. Your Row 4 tension is tight. Rework it more loosely and block the fans flat.
The panel stretches too long when hung. Cotton grows. Hang it for a day, then remove lattice rows in pairs, about 3 in (7.6 cm) per pair, before working the header.
One panel is longer than the other. Compare your row counts first, then use blocking to even out small differences.
Care
Hand wash cold or machine wash on a delicate cycle inside a mesh laundry bag. Dry flat and reshape while damp, because hanging a wet panel will stretch it.
Final Notes
The measurements build in a chain:
– The foundation sets the width: 130 ch, giving 16 lattice repeats of 2.5 in (6.4 cm) = 40 in (101.6 cm).
– The lattice sets most of the length: 51 rows × 1.5 in (3.8 cm) = 76.5 in (194.3 cm).
– The header adds 3 in (7.6 cm), for 79.5 in (201.9 cm).
– The fan border adds 3.5 in (8.9 cm), for 83 in (210.8 cm).
– The side edging adds 0.5 in (1.3 cm) per side, for 41 in (104.1 cm).
If your swatch matches, every stage will match too. Make two panels, block them to the same size, and enjoy your soft, light-filled trellis curtains.
Happy crocheting!