

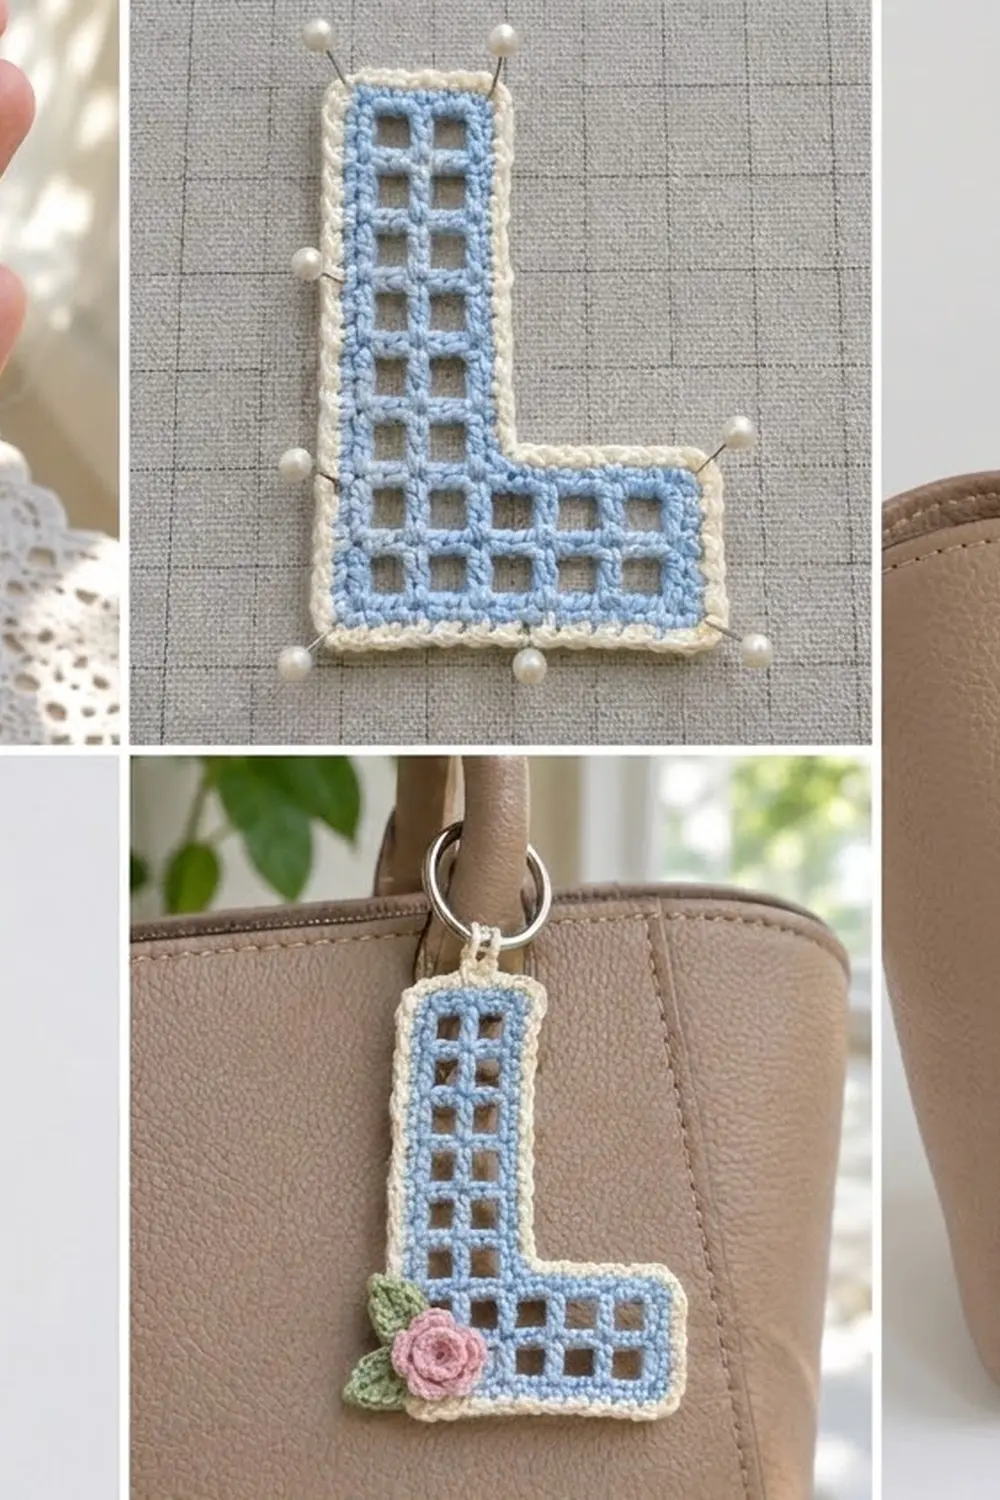
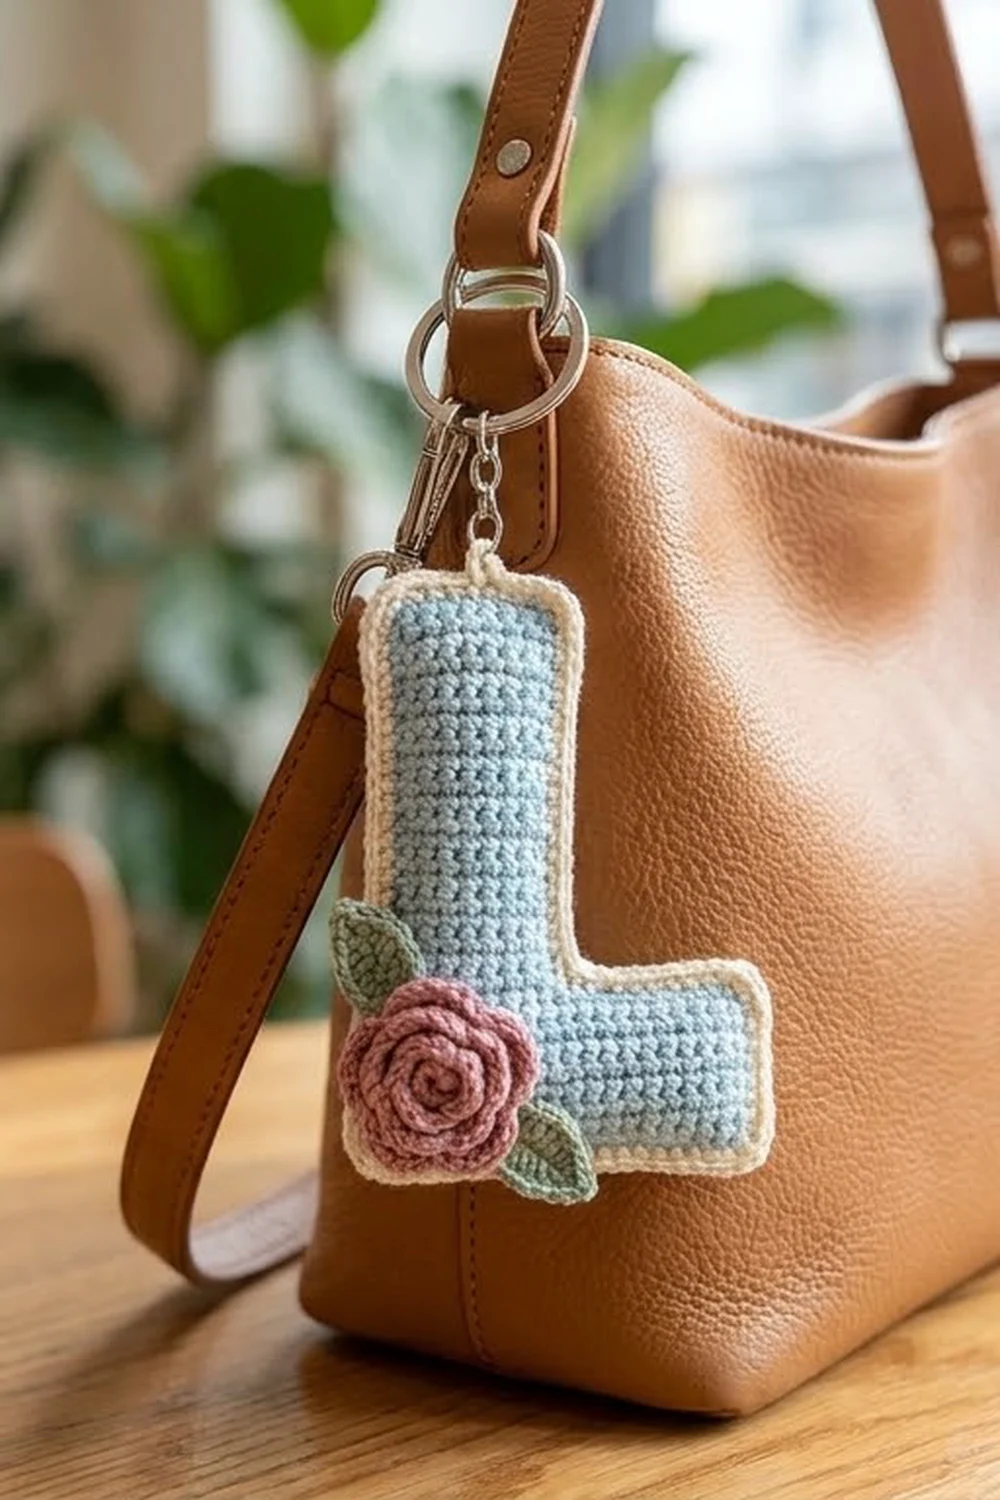
This little keychain is a crocheted capital letter L in open filet mesh. The square windows are worked in soft light blue, and a narrow cream border frames the whole letter. A tiny pink rolled rose with two sage-green leaves sits on the outer bottom corner, and a small cream loop at the top holds a silver split ring.
The look is sweet and simple, a bit cottage-style. It works as a bag charm, as a gift for someone whose name starts with L, or as a quick way to use up cotton scraps. The four colors are light blue, cream, dusty pink, and sage green.
This pattern uses US crochet terms. The finished keychain measures 2.5 in (6.4 cm) wide by 3.67 in (9.3 cm) tall, not counting the ring.
Construction is simple. You work the letter flat in rows of filet mesh: two rows across the full foot, then seven rows on the stem only. Next, two rounds of single crochet go around the whole L, one blue and one cream. Finally, you make the rose and leaves separately, sew them on, and add the hanging loop.
Finished Size and Construction
- Finished size: 2.5 in (6.4 cm) wide x 3.67 in (9.3 cm) tall
- Skill level: Easy
- Terminology: US
- Yarn weight: Sport-weight (#2) cotton
- Hook: 2.75 mm (US C-2)
- Number of pieces: 1 letter panel, plus 3 small appliqués (1 rose, 2 leaves)
- Layout: One letter L, stem on the left, foot extending right
- Piece size (mesh panel): 1.83 in (4.6 cm) wide x 3 in (7.6 cm) tall
- Stem width before border: 0.83 in (2.1 cm)
- Size before border: 1.83 in (4.6 cm) x 3 in (7.6 cm)
- Border depth: 2 rounds, about 0.33 in (0.8 cm) per side
Materials
Choose a smooth mercerized cotton in sport weight. Cotton keeps the square mesh crisp and won’t fuzz on a keychain that gets handled every day. Any yarn of about 150 m per 50 g works.
- Light blue (main color): 5 g, about 15 m
- Cream (border and loop): 3 g, about 9 m
- Dusty pink (rose): 2 g, about 6 m
- Sage green (leaves): 1 g, about 3 m
All quantities include a small margin for swatching and weaving in ends.
Tools:
- 2.75 mm (US C-2) crochet hook
- Tapestry needle
- Silver split ring, 1 in (2.5 cm) diameter
- Rust-proof pins and a blocking mat
- Small scissors
- Spray bottle
Abbreviations (US Terms)
- ch – chain
- sl st – slip stitch
- sc – single crochet
- hdc – half double crochet
- dc – double crochet
- sp – space
- sk – skip
- st(s) – stitch(es)
- tch – turning chain
- sc2tog – single crochet 2 together: insert hook in next st, pull up a loop, insert hook in following st, pull up a loop, yarn over and pull through all 3 loops.
Special stitch – mesh: One mesh is 1 dc plus 1 ch-1 sp. A row of 5 meshes = 6 dc and 5 ch-1 sps = 11 sts. A ch 4 at the start of a row counts as 1 dc + ch 1.
Gauge and Checkpoints
Mesh gauge: 6 sts and 3 dc rows = 1 in (2.5 cm). One mesh measures 0.33 in (0.8 cm) square.
Sc gauge: 6 sc = 1 in (2.5 cm). Each round of sc adds about 0.17 in (0.4 cm) to each side.
Because this is a small project, the letter itself is your test piece. Measure at each checkpoint:
- After Row 2: The foot is 1.83 in (4.6 cm) wide x 0.67 in (1.7 cm) tall.
- After Row 9: The panel is 1.83 in (4.6 cm) wide x 3 in (7.6 cm) tall, and the stem is 0.83 in (2.1 cm) wide.
- After Round 1: 2.17 in (5.5 cm) x 3.33 in (8.5 cm).
- After Round 2: 2.5 in (6.4 cm) x 3.67 in (9.3 cm).
If the foot is wider than 2 in (5.1 cm) after Row 2, start over with a 2.5 mm hook. If it’s narrower than 1.67 in (4.2 cm), try a 3 mm hook. If only the height is off, check your dc and pull the first loop up to the same height every time so the rows stay even.
Letter Panel (Light Blue)
You work the panel in rows. Filet mesh looks the same on both sides, so you choose the right side when the panel is done.
Foundation: With light blue, ch 14.
Row 1 (foot): Dc in 6th ch from hook (the 5 skipped ch count as dc + ch-1 sp), ch 1, sk next ch, dc in next ch; repeat from * 3 more times. Turn. (6 dc, 5 ch-1 sps = 11 sts; 5 meshes.)*
Row 2: Ch 4 (counts as dc + ch 1), dc in next dc, ch 1, dc in next dc; repeat from * 2 more times, ch 1, dc in top of tch. Turn. (6 dc, 5 ch-1 sps = 11 sts; 5 meshes.)*
Checkpoint: 1.83 in (4.6 cm) x 0.67 in (1.7 cm).
Row 3 (stem begins): Ch 4, dc in next dc, ch 1, dc in next dc. Leave the remaining 3 meshes unworked. Turn. (3 dc, 2 ch-1 sps = 5 sts; 2 meshes.)
Rows 4–9: Ch 4, dc in next dc, ch 1, dc in top of tch. Turn after each row except Row 9. (3 dc, 2 ch-1 sps = 5 sts per row; 2 meshes.)
You now have 9 rows. The foot is 5 meshes wide and 2 rows tall, and the stem is 2 meshes wide, with 7 open squares in each stem column above the foot.
Lay the panel down with the stem on the left and the foot running to the right. The side facing up is your right side. Do not fasten off.
Checkpoint: 1.83 in (4.6 cm) x 3 in (7.6 cm).
Border
Border gauge: Along row ends, work 2 sc per dc row. Three dc rows measure 1 in (2.5 cm), so that gives 6 sc per inch, the same as the horizontal gauge. Along the top and bottom edges, work 1 sc per st (dc or ch). The L has 5 outer (convex) corners and 1 inner (concave) corner. Each outer corner gets 3 sc. The inner corner gets an sc2tog in Round 2.
After Row 9, your hook is at the top inner corner of the stem.
Round 1 (light blue): Ch 1, do not turn.
- Top inner corner: 3 sc in top of last dc made.
- Inner stem side: Working down the row ends of Rows 9–3, 2 sc in each row end. (14 sc)
- Foot top: Working across the unworked sts of Row 2, sc in next 5 sts, 3 sc in last st (corner). (8 sc)
- Foot right side: 2 sc in each of the 2 row ends. (4 sc)
- Bottom: Working into the free loops of the foundation ch, 3 sc in first ch (corner), sc in next 9 ch, 3 sc in last ch (corner). (15 sc)
- Outer left side: 2 sc in each of the 9 row ends. (18 sc)
- Stem top: 3 sc in top of tch of Row 9 (corner), sc in next 3 sts. Sl st to first sc.
Round 1 total: 58 sts worked 1 per edge st (5 top + 14 inner + 6 foot top + 4 right + 11 bottom + 18 left) + 10 extra corner sc (2 at each of 5 corners) = 68 sc. Fasten off blue.
Checkpoint: 2.17 in (5.5 cm) x 3.33 in (8.5 cm).
Round 2 (cream): Join cream with a sl st in the center sc of the top inner corner. Ch 1.
- Corner: 3 sc in same st.
- Inner stem side: Sc in next 14 sts, then sc2tog over the next 2 sts (the last sc of the stem side and the first sc of the foot top).
- Foot top: Sc in next 5 sts, then 3 sc in center sc of corner.
- Foot right side: Sc in next 6 sts, then 3 sc in center sc of corner.
- Bottom: Sc in next 11 sts, then 3 sc in center sc of corner.
- Outer left side: Sc in next 20 sts, then 3 sc in center sc of corner.
- Stem top: Sc in next 5 sts. Sl st to first sc. Fasten off.
Round 2 per-side counts (corner groups not included): stem top 5, inner stem side 14 plus 1 sc2tog, foot top 5, foot right side 6, bottom 11, outer left side 20. Corners: 5 x 3 = 15.
Round 2 total: 68 sts from Round 1 worked once each (2 of them merged into 1 sc2tog = 67 sts) + 10 extra corner sc = 77 sc. Check: 5 + 14 + 1 + 5 + 6 + 11 + 20 + 15 = 77.
Why the math works: Two sc per dc row end match the panel’s 6 sts per inch, so the long sides lie flat without rippling. The 2 extra sc at each outer corner let the edge turn 90 degrees without cupping. At the inner corner, the outer round is shorter than the round below it, so a single sc2tog removes the extra stitch and keeps the corner crisp instead of puckered.
Checkpoint: 2.5 in (6.4 cm) x 3.67 in (9.3 cm). The stem is 1.5 in (3.8 cm) wide and the foot is 1.33 in (3.4 cm) tall.
Hanging Loop (Cream)
Join cream with a sl st in the 3rd of the 5 stem-top sts, which is the center of the stem top.
Loop: Ch 7, sl st in same st. Ch 1, work 10 sc into the ch-7 loop, then sl st in the base st. Fasten off, leaving a 4 in (10.2 cm) tail, and weave it down into the border on the wrong side.
The finished loop stands about 0.5 in (1.3 cm) tall. Open the split ring and work it onto the loop.
Rolled Rose (Dusty Pink)
Foundation: With pink, ch 13.
Row 1: Dc in 4th ch from hook (the 3 skipped ch count as dc), then 2 dc in each of the remaining 9 ch. (20 dc)
Fasten off, leaving an 8 in (20.3 cm) tail. The strip ruffles as you work. Starting at the end without the tail, roll it up tightly with the ruffled edge on top. Use the tail to sew 3–4 stitches through all layers at the base so the coil holds. The rose measures about 0.75 in (1.9 cm) across. Keep the tail for sewing it on.
Leaves (Make 2, Sage Green)
Foundation: With green, ch 6.
Round 1: Sc in 2nd ch from hook, hdc in next ch, dc in next ch, hdc in next ch, 3 sc in last ch. Working along the opposite side of the foundation ch: hdc in next ch, dc in next ch, hdc in next ch, sc in next ch. Sl st to first sc. (11 sts)
Fasten off, leaving a 6 in (15.2 cm) tail. Each leaf is about 0.6 in (1.5 cm) long with a pointed tip.
Attaching the Appliqués
- Place the letter right side up with the stem on the left.
- Set one leaf at the outer bottom-left corner with its tip angled up and out, overlapping the blue edge and the cream border.
- Set the second leaf just below it, with its tip pointing down and out past the corner.
- Place the rose over the bases of both leaves, centered on the bottom-left corner.
- Sew each leaf down along its center line, leaving the tip free.
- Sew the rose down through its base with small stitches. Anchor them in the solid sc border and dc posts, not across open mesh squares.
- Weave in all tails on the wrong side.
Final Blocking
- Mist the keychain lightly with water until it’s damp but not dripping.
- Pin it flat on the mat, right side up.
- Pin the 5 outer corners first: 2.5 in (6.4 cm) across the bottom and 3.67 in (9.3 cm) up the left side.
- Pin the inner corner so the stem is 1.5 in (3.8 cm) wide and the foot is 1.33 in (3.4 cm) tall.
- Nudge each mesh square until it’s square, with straight dc bars.
- Keep pins off the rose so it stays rounded.
- Let it dry completely, then unpin.
Final Quality-Control Checklist
- The panel has 9 rows: 2 foot rows of 5 meshes and 7 stem rows of 2 meshes.
- Round 1 has 68 sc, and Round 2 has 77 sc.
- All 5 outer corners are square, and the inner corner lies flat.
- The finished size is 2.5 in (6.4 cm) x 3.67 in (9.3 cm).
- The rose and leaves sit on the bottom-left corner and are firmly attached.
- The hanging loop is centered on the stem top, and the split ring is closed.
- All ends are woven in and trimmed.
Troubleshooting
- The mesh squares look like tall rectangles: Your dc stitches are too tall. Pull the first loop up less, or go down a hook size.
- The sides ripple after Round 1: There are too many sc on the row ends. Use exactly 2 per row.
- The sides pull in or cup: There are too few sc, or the sc are too tight. Loosen your tension, or go up a hook size for the border only.
- The inner corner bunches up: Check that you worked the sc2tog in Round 2.
- The rose is floppy: Roll it tighter and add more stitches through the base.
- The stem is on the right: Flip the panel over. Filet mesh looks the same on both sides.
Care
Hand wash in cool water with mild soap, press the water out in a towel, and dry flat. Re-pin the corners if the shape relaxes.
Final Notes
The measurement chain is short and easy to check. The 5-mesh foot measures 1.83 in (4.6 cm) wide, and nine mesh rows bring the panel to 3 in (7.6 cm) tall. The blue round brings it to 2.17 in (5.5 cm) x 3.33 in (8.5 cm), and the cream round finishes it at 2.5 in (6.4 cm) x 3.67 in (9.3 cm). If each checkpoint matches, your letter will block square and hang neatly from its ring.
Happy crocheting!