

Professor Chomp is a cheerful bathroom character: a navy cover that sits over your toilet paper roll and gives it a face. He wears oversized red glasses, has two shiny black eyes and a row of white teeth, and the paper comes out right below his grin.
The palette is simple: deep navy for the body, bright red for the frames, and white for the teeth, the stitched X on the bridge, and the running-stitch trim along the sides. The look is clean and graphic, so it suits modern bathrooms, kids’ bathrooms, and gift baskets equally well.
This pattern uses US crochet terms. The finished cover measures 5.5 in (14.0 cm) wide by 14.5 in (36.8 cm) long, which fits a standard roll about 4.5 in (11.4 cm) wide.
Construction is straightforward. You work one rectangular panel in half double crochet rows and add a single crochet border. Then you make the glasses and the teeth strip as small appliqués, attach the eyes, embroider the details, and sew a snap to the top end so it loops around the holder arm.
Finished Size and Construction
- Finished size: 5.5 in x 14.5 in (14.0 cm x 36.8 cm)
- Skill level: Easy
- Terminology: US crochet terms
- Yarn weight: Worsted (#4), cotton or cotton blend
- Hook: 4.5 mm (US 7)
- Number of pieces: 1 main panel, plus 2 small appliqués (glasses and teeth) sewn on
- Layout: Single vertical panel; snap loop at the top end, face at the bottom (front) end
- Panel size before border: 5 in x 14 in (12.7 cm x 35.6 cm)
- Border depth: 0.25 in (0.6 cm) on every side
- Glasses appliqué: about 5 in x 1.5 in (12.7 cm x 3.8 cm)
- Teeth appliqué: about 4.25 in x 1 in (10.8 cm x 2.5 cm)
Materials
Choose a smooth worsted-weight cotton or cotton blend. Cotton holds its shape on the holder, launders well, and shows crisp stitch definition, which suits the graphic face. Avoid fuzzy or very stretchy acrylics, because the panel needs to stay flat and firm.
Yarn:
– Navy (main color): 35 g, about 55 m
– Red (glasses): 5 g, about 8 m
– White (teeth, X, running stitch): 8 g, about 12 m
All quantities include a safety margin of roughly 15–20 percent.
Tools and notions:
– 4.5 mm (US 7) crochet hook
– 2 black safety eyes, 12 mm (1.2 cm), with backs
– 1 sew-on metal snap, about 15 mm (1.5 cm)
– Tapestry needle
– Sewing needle and navy thread (for the snap)
– 4 locking stitch markers
– Rust-proof pins
– Scissors and a measuring tape
Abbreviations (US Terms)
- ch – chain
- sl st – slip stitch
- sc – single crochet
- hdc – half double crochet
- dc – double crochet
- st(s) – stitch(es)
- sk – skip
- RS / WS – right side / wrong side
- rnd – round
Special stitch – Shell (tooth): Work 5 dc in the same stitch.
Gauge and Checkpoints
Gauge: 16 hdc and 12 rows = 4 in (10.2 cm) in hdc rows, measured flat before blocking.
That works out to 4 stitches and 3 rows per inch. Every measurement in the pattern depends on it.
Test one piece first. The first 12 rows of the panel are your gauge swatch. Work them, lay the piece flat, and measure.
Checkpoints:
– After Row 1: width is 5 in (12.7 cm).
– After Row 12: length is 4 in (10.2 cm).
– After Row 24: length is 8 in (20.3 cm).
– After Row 36: length is 12 in (30.5 cm).
– After Row 42: panel is 5 in x 14 in (12.7 cm x 35.6 cm).
– After the border: 5.5 in x 14.5 in (14.0 cm x 36.8 cm).
If your piece is too big, change to a 4 mm (US G-6) hook. If it is too small, change to a 5 mm (US H-8) hook. Change the hook rather than the stitch counts so the border math still works.
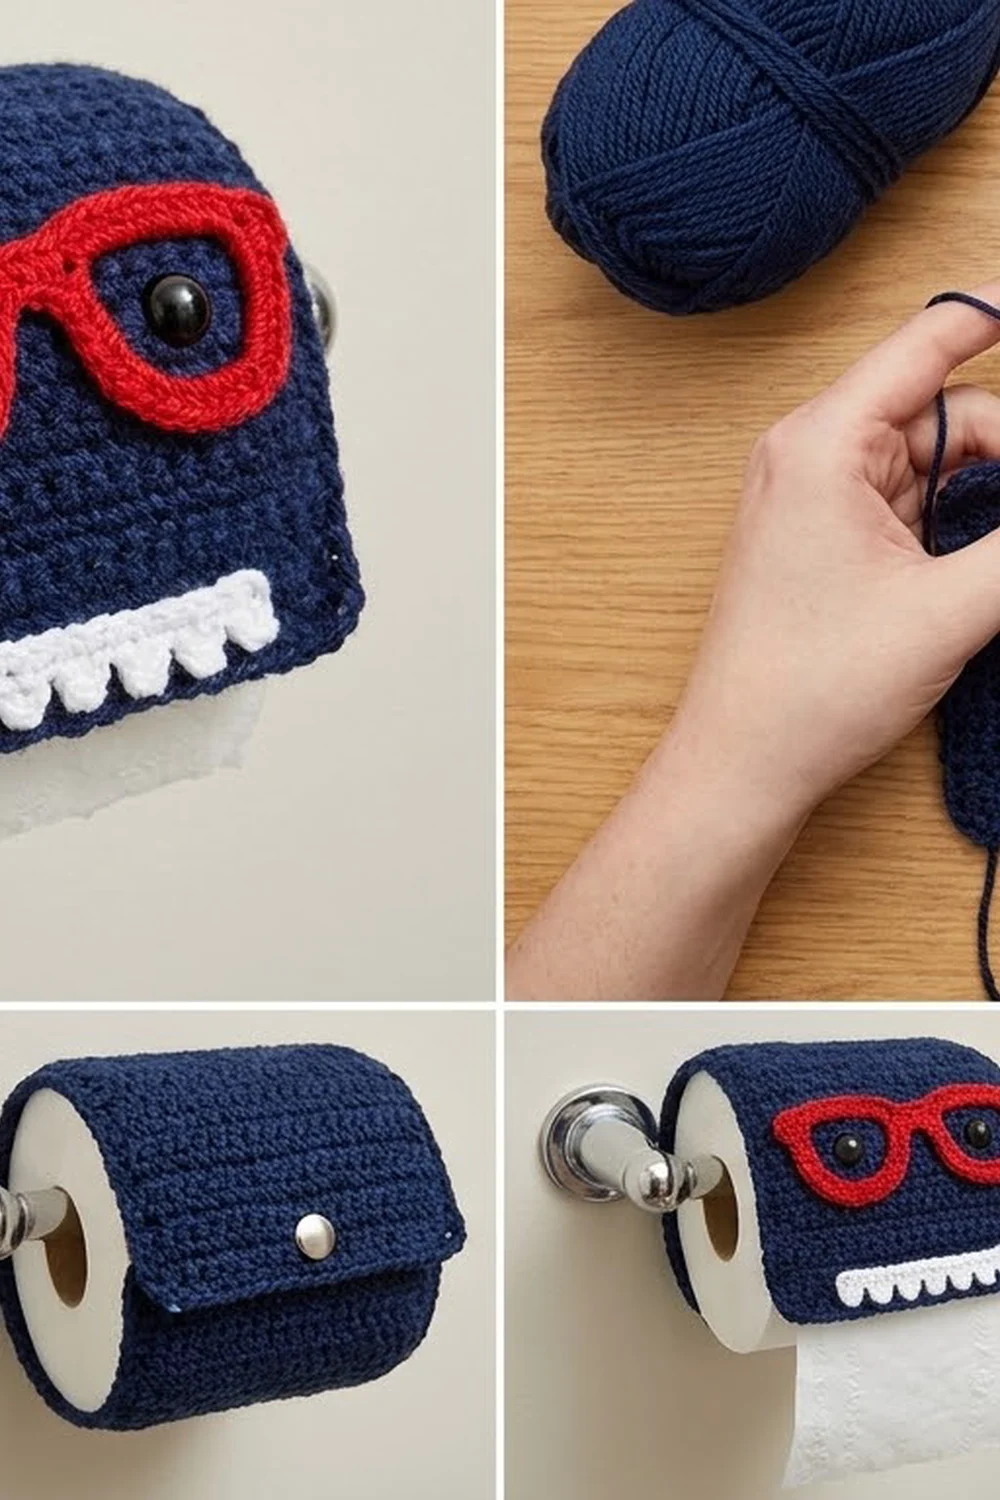
Main Panel
With navy, ch 22.
Row 1 (RS): Hdc in 3rd ch from hook and in each ch across. (20 hdc)
The skipped 2 chains do not count as a stitch.
Rows 2–42: Ch 2 (does not count as a stitch), turn, hdc in each st across. (20 hdc per row)
Count every few rows. Hdc rows tend to gain a stitch at the end if you work into the turning chain, so put a marker in the first stitch of each row until you get the rhythm.
At the end of Row 42, do not fasten off. Go straight on to the border.
Checkpoint: You should have 42 rows of 20 hdc, measuring 5 in x 14 in (12.7 cm x 35.6 cm).
Glasses Appliqué
You make two lens frames, then join them with a bridge and add temple tips. Use red throughout.
Lens (make 2)
Ch 20 and join with a sl st to the first ch to form a ring, taking care not to twist.
Rnd 1: Ch 1, sc in each ch around, sl st to first sc. (20 sc)
Rnd 2 (shaping): Ch 1. Sc in next 6 sts (top edge). Work 3 sc in next st (outer top corner). Hdc in next 4 sts (outer side). Sc in next 5 sts (bottom edge). Hdc in next 3 sts (inner side). Work 3 sc in next st (inner top corner). Sl st to first sc. (24 sts)
Check the count: the stitches worked into Rnd 1 are 6 + 1 + 4 + 5 + 3 + 1 = 20, and the stitches made are 6 + 3 + 4 + 5 + 3 + 3 = 24.
Using hdc on the sides and sc on the top gives a flat-topped lens that tapers toward the bottom, like a wayfarer frame. Fasten off the first lens with a 6 in (15.2 cm) tail. Do not fasten off the second lens.
Checkpoint: Each lens is about 1.7 in (4.3 cm) wide.
Bridge and Temple Tips
Lay the lenses side by side. Flip the first lens over so the two mirror each other, with the inner corners facing.
Bridge: From the second lens, ch 3 and sl st into the center st of the first lens’s inner top corner. Turn and work 3 sc over the ch-3 space. Sl st into the center st of the second lens’s inner corner. (3 sc)
Temple tips (one on each lens): Join red with a sl st in the center st of an outer top corner. Ch 4, sc in 2nd ch from hook and in next 2 ch, then sl st into the same corner st. (3 sc) Fasten off and repeat on the other lens.
Checkpoint: The glasses measure about 5 in (12.7 cm) across and 1.5 in (3.8 cm) tall. Leave long tails for sewing.
Teeth Appliqué
With white, ch 18.
Row 1: Sc in 2nd ch from hook and in each ch across. (17 sc)
Row 2: Ch 1, turn, sc in each st across. (17 sc)
Row 3 (teeth): Ch 1, turn. Sc in first st. Then work sk 1 st, shell in next st, sk 1 st, sc in next st 4 times. (4 shells and 5 sc)
Check the count: 1 + (4 x 4) = 17 stitches are used from Row 2. Each shell becomes one rounded tooth, and the sc between shells pinches the teeth apart.
Fasten off with a 12 in (30.5 cm) tail.
Checkpoint: The strip is about 4.25 in (10.8 cm) wide and 1 in (2.5 cm) tall.
Border
Border gauge: Single crochet at 4 sts per inch, matching the hdc stitch gauge. Along the row edges, 4 sc cover 3 hdc rows, because 3 rows also measure 1 in.
Continuing from the end of Row 42 with navy, turn so the RS faces you.
Border Rnd 1:
– Top short edge: Ch 1. Work 3 sc in first st (corner), 1 sc in each of next 18 sts, then 3 sc in last st (corner). (24 sc, counting both 3-sc corner groups)
– First long edge: Work down the row ends with 2 sc in next row-end, 1 sc in each of next 2 row-ends 14 times. (56 sc between the corner groups)
– Bottom short edge: Along the foundation chain, work 3 sc in first st, 1 sc in each of next 18 sts, then 3 sc in last st. (24 sc, counting both corner groups)
– Second long edge: Repeat the long-edge sequence 14 times. (56 sc)
– Sl st to first sc. (160 sc total)
Fasten off and weave in ends.
Why the math works: Each short edge has 20 stitches at 4 per inch, which is 5 in. Each long edge has 42 rows, which is 14 in. At 4 sc per inch, that needs 56 sc, and 14 repeats of the 4-sc group give exactly 56.
The 3-sc corners let the border turn flat without cupping. The total checks out: 24 + 56 + 24 + 56 = 160. One round of sc adds 0.25 in (0.6 cm) on each side, so the finished size is 5.5 in x 14.5 in (14.0 cm x 36.8 cm).
White Running Stitch
Thread a tapestry needle with about 1 yd (91.4 cm) of white yarn per side. Along each long edge, work a running stitch through the border, going over 2 sc and under 2 sc. Keep it just inside the outer edge and run it from the top corner to the bottom corner. Keep the stitches loose enough that the edge stays flat. Weave in the ends on the WS.
Assembling the Face
Lay the panel RS up with the bottom (foundation) edge nearest you. This end is the front of the cover.
- Teeth: Center the strip horizontally, with the shells pointing down and the tips of the teeth 0.5 in (1.3 cm) above the bottom edge. Pin it in place. Whipstitch Rows 1–2 to the panel, then tack the tip of each tooth with one small stitch.
- Glasses: Center them horizontally so the top edge sits 4.75 in (12.1 cm) above the bottom edge. Pin around the whole outline and sew with the red tail, catching only the outer loops so the stitches stay hidden.
- Eyes: Push a safety eye through the panel at the center of each lens. Snap the backs on firmly from the WS.
- Bridge X: With white yarn, embroider a small X about 0.3 in (0.8 cm) across over the bridge, making two straight stitches.
- Snap: Drape the cover over a roll on the holder. Wrap the top end around the holder arm so it overlaps the panel by about 2.5 in (6.4 cm), and mark where it lands. Sew one half of the snap to the end, centered and 0.75 in (1.9 cm) from the top edge, on the side that touches the panel. Sew the other half to the marked spot.
Final Blocking
- Remove the snap from the holder and lay the cover flat on a blocking mat, RS up.
- Mist it evenly with water until it is damp but not soaked.
- Pin the four corners to 5.5 in x 14.5 in (14.0 cm x 36.8 cm).
- Add pins about every 1 in (2.5 cm) along the edges, keeping them straight.
- Gently shape the glasses so the tops of the lenses are level, and press each tooth into a smooth curve with your fingers.
- Do not pin through the safety eyes or iron near them.
- Let it dry completely, at least 12 hours, before unpinning.
Final Quality-Control Checklist
- [ ] Panel is 20 hdc wide and 42 rows long.
- [ ] Border has 160 sc, with 3 sc in each corner.
- [ ] Finished size is 5.5 in x 14.5 in (14.0 cm x 36.8 cm).
- [ ] The white running stitch is even and the edges lie flat.
- [ ] Glasses are centered, level, and sewn down all the way around.
- [ ] Eyes are centered in the lenses and the backs are locked firmly.
- [ ] All 4 teeth are evenly spaced and tacked down.
- [ ] The snap closes securely around the holder arm.
- [ ] All ends are woven in on the WS.
Troubleshooting
Panel gets wider as you go: You are probably working into the turning chain. Recount to 20 hdc and remove the extra stitch.
Long edges ripple: You have too many border stitches. Check that you work 4 sc per 3 row-ends.
Long edges pull in: You have too few border stitches, or your tension is tight. Loosen up and recount to 56 per long edge.
Lenses look round instead of flat-topped: Pin the top edge straight while sewing, and check that the Rnd 2 corners have 3 sc each.
Teeth flare or ruffle: Work the shells more tightly, or switch to a hook 0.5 mm smaller for Row 3 only.
Cover slides off the holder: Move the snap so the loop around the arm is snugger.
Care
Remove the cover from the holder and hand wash it in cool water with mild soap. Reshape it and dry it flat, keeping it out of the dryer to protect the safety eyes.

Final Notes
The measurements build on each other. A gauge of 16 hdc and 12 rows to 4 in (10.2 cm) gives a 20-stitch, 42-row panel of 5 in x 14 in (12.7 cm x 35.6 cm). A 160-stitch single crochet border adds 0.25 in (0.6 cm) on each side, for a finished cover of 5.5 in x 14.5 in (14.0 cm x 36.8 cm).
Add the red glasses, the black eyes, and four white teeth, and Professor Chomp is ready to guard your paper supply.
Happy crocheting!