

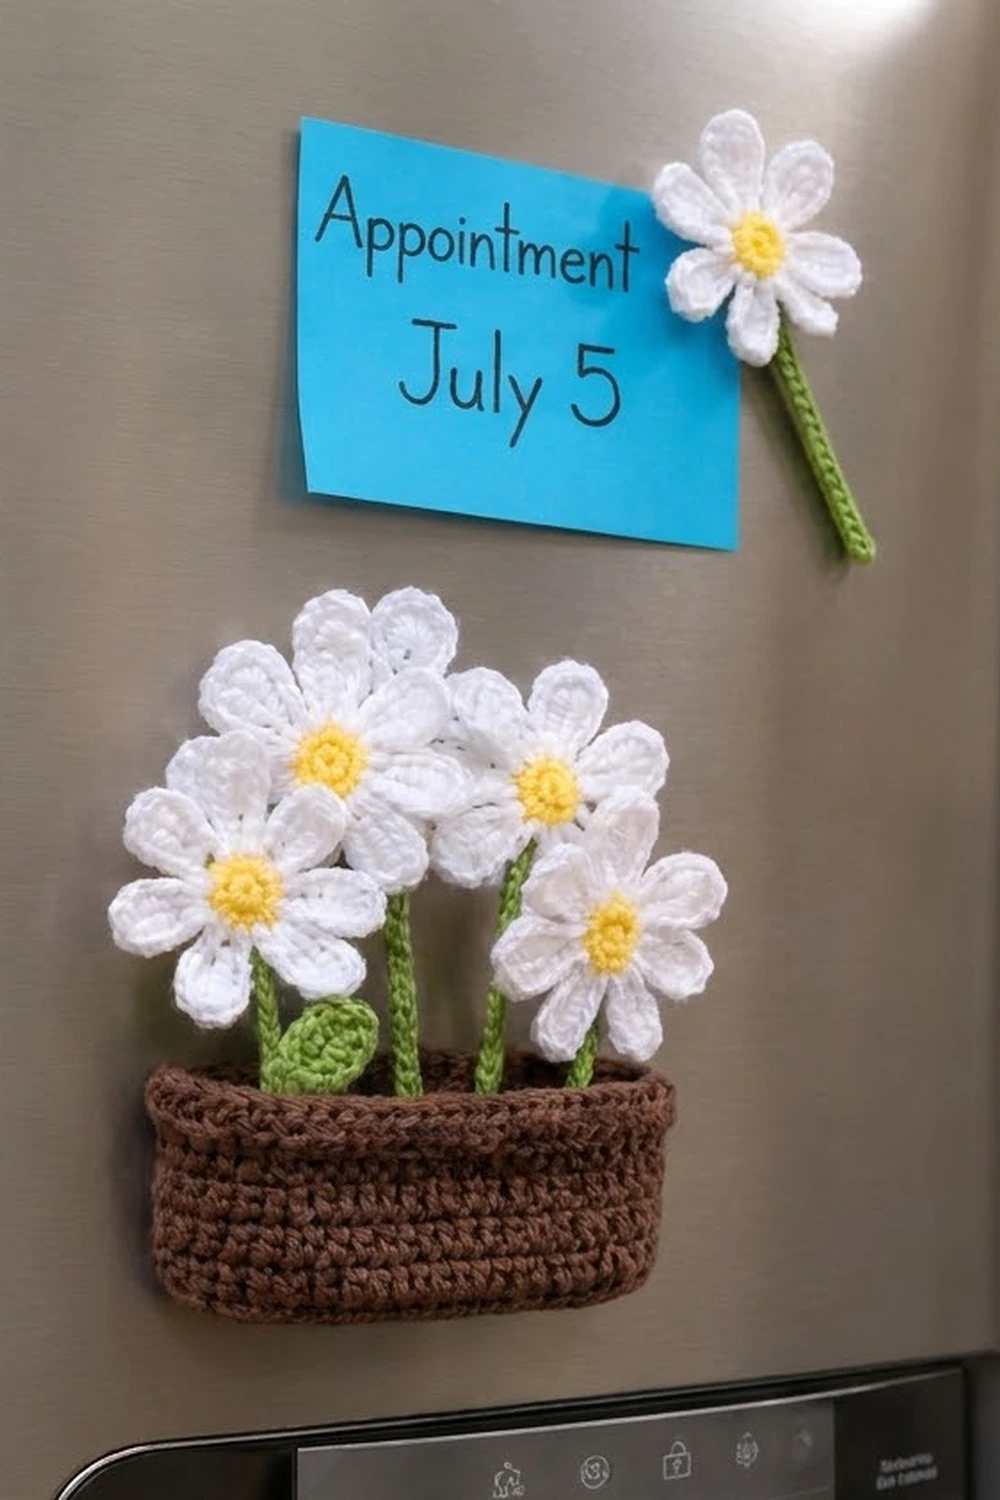
This little set turns a fridge door into a tiny garden. A brown oval basket sticks to the door, four white daisies stand inside it, and a fifth daisy pulls out to pin a note, a photo, or a reminder. Every flower is its own magnet, so you can rearrange them as often as you like.
The colors are simple and cheerful: white petals, sunny yellow centers, fresh green stems and leaves, and a warm chocolate-brown basket. The style is clean and graphic, with rounded petals, tight stitches, and a firm basket that keeps its shape.
All instructions use US crochet terms. One daisy measures 2.5 in (6.4 cm) across. The basket measures 3.75 in (9.5 cm) wide, 2 in (5.1 cm) tall, and 0.75 in (1.9 cm) deep. The finished arrangement is about 4.5 in (11.4 cm) wide and 5 in (12.7 cm) tall.
Construction is easy to follow. You crochet each daisy in the round (yellow center, then white petals), make slip-stitch stems and small leaves, and sew them together. The basket is worked as an oval base, then straight sides, then a two-round rim. Magnets go on last.
Finished Size and Construction
- Finished arrangement: about 4.5 in (11.4 cm) wide × 5 in (12.7 cm) tall
- Skill level: Easy (advanced beginner)
- Terminology: US crochet terms
- Yarn weight: DK (light worsted / 3) cotton
- Hook: 3.0 mm (C/2–D/3)
- Number of pieces: 13 crocheted pieces (1 basket, 5 daisies, 5 stems, 2 leaves) plus 7 magnets
- Layout: 4 daisies standing in the basket, 1 loose “note” daisy
- Piece size: daisy 2.5 in (6.4 cm) across; stems 2 in (5.1 cm) or 3 in (7.6 cm); leaf 1.25 in (3.2 cm) long
- Basket size before rim: 3.75 in (9.5 cm) wide × 1.75 in (4.4 cm) tall
- Rim (border) depth: 0.25 in (0.6 cm)
Materials
Choose a smooth, mercerized DK cotton. Cotton gives crisp stitch definition, holds the petal shape well, and does not fuzz on a busy fridge door. The amounts assume roughly 2.3 m per gram.
- White (petals): 20 g, about 46 m
- Yellow (centers): 5 g, about 12 m
- Green (stems and leaves): 10 g, about 23 m
- Brown (basket): 20 g, about 46 m
All quantities include a comfortable margin for gauge swatches and weaving in ends. Scraps work well here.
Tools:
- 3.0 mm crochet hook
- Tapestry needle
- 5 round disc magnets, 0.75 in (1.9 cm) across (one per daisy)
- 2 round disc magnets, 0.75 in (1.9 cm) across, or one flexible magnet strip 3 in (7.6 cm) long (for the basket)
- Strong craft glue or fabric glue
- Stitch marker
- Scissors and a ruler
Abbreviations (US Terms)
- ch – chain
- sl st – slip stitch
- sc – single crochet
- hdc – half double crochet
- dc – double crochet
- st(s) – stitch(es)
- sp – space
- BLO – back loop only
- rnd(s) – round(s)
- MR – magic ring
Special stitch – Petal: worked into one ch-5 loop: (sc, hdc, 5 dc, hdc, sc). One petal = 9 sts.
Gauge and Checkpoints
Gauge: 20 sc × 22 rows = 4 in (10.2 cm) with a 3.0 mm hook. Stems: about 5 sl sts = 1 in (2.5 cm).
Exact gauge matters less here than for a garment. Still, the basket must hold the stems and the daisies should stay in proportion. Make one daisy first and measure at each checkpoint:
- After Rnd 2 (yellow center): 0.75 in (1.9 cm) across
- After Rnd 3 (petal loops): about 1.5 in (3.8 cm) across
- Finished daisy: 2.5 in (6.4 cm) across, tip to tip
- Basket base after Rnd 2: 3.75 in (9.5 cm) × 0.75 in (1.9 cm)
- Basket before rim: 1.75 in (4.4 cm) tall
Too big? Go down 0.25 mm in hook size, or tighten your hold on the yarn.
Too small? Go up 0.25 mm in hook size. If only the petals are off, keep the hook and change the ch-5 loops to ch-4 (smaller) or ch-6 (larger).
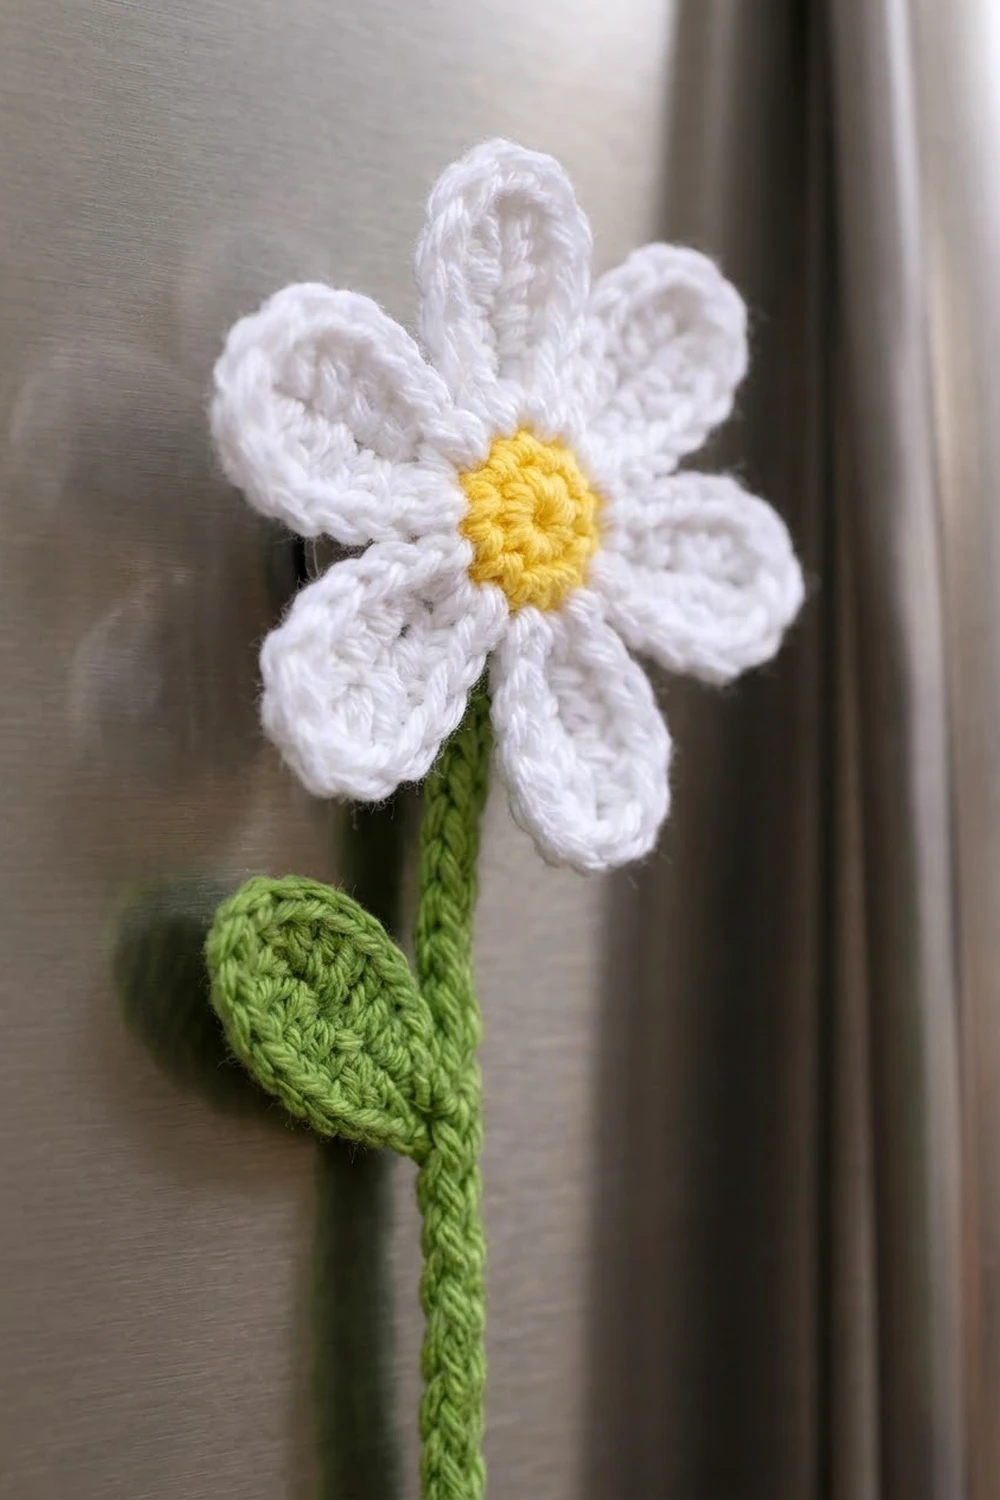
Daisy (make 5)
Rnd 1 (yellow): MR, ch 1, 8 sc in ring. Pull ring tight. Join with sl st to first sc. (8 sts)
Rnd 2: Ch 1, 2 sc in each st around. Join with sl st to first sc. (16 sts) Fasten off yellow.
Checkpoint: the center is a flat, solid disc 0.75 in (1.9 cm) across.
Rnd 3 (white): Join white with sl st in any st. Ch 5, skip next st, sl st in next st; repeat from * 6 more times. Ch 5, skip last st, sl st in the joining sl st. (8 ch-5 loops)
Each loop uses 2 center sts (16 ÷ 2 = 8), so the petals sit evenly around the center.
Rnd 4: Work 1 Petal (sc, hdc, 5 dc, hdc, sc) in next ch-5 loop, sl st in next sl st of Rnd 3; repeat from * around. (8 petals; 72 petal sts plus 8 sl sts)
The 5 dc packed into a short loop make the rounded, slightly cupped petal tip. The sc and hdc on each side taper the petal into the center.
Fasten off, leaving an 8 in (20.3 cm) tail. Weave in the yellow tail on the back. Keep the white tail for sewing.
Checkpoint: 2.5 in (6.4 cm) tip to tip.
Stems (make 5)
Use green. Work sl sts into the back bump of each chain for a neat, round cord.
Short stem (make 2): Ch 11. Sl st in 2nd ch from hook and in each ch across. (10 sl sts) Length: 2 in (5.1 cm).
Long stem (make 3): Ch 16. Sl st in 2nd ch from hook and in each ch across. (15 sl sts) Length: 3 in (7.6 cm).
Fasten off, leaving a 10 in (25.4 cm) tail at the top end for sewing.
Leaves (make 2)
Use green.
Ch 7.
Rnd 1: Working in back bumps: sc in 2nd ch from hook, hdc in next ch, dc in next 2 ch, hdc in next ch, (sc, ch 2, sc) in last ch for the tip. Rotate and work along the other side of the chain: hdc in next ch, dc in next 2 ch, hdc in next ch, sc in last ch. Sl st to first sc. (12 sts plus 1 ch-2 tip)
Count check: 5 sts on side one + 2 sc at the tip + 5 sts on side two = 12.
Size: 1.25 in (3.2 cm) long × 0.6 in (1.5 cm) wide, with a pointed tip and a rounded base. Leave a 10 in (25.4 cm) tail.
Basket (make 1)
Use brown. After Rnd 2, work in continuous rounds and place a marker in the first st of each round.
Rnd 1 (oval base): Ch 16. Sc in 2nd ch from hook (st A), sc in next 13 ch, 3 sc in last ch. Rotate and work along the other side of the chain: sc in next 13 ch, 2 sc in the same ch as st A. Join to first sc. (32 sts)
Count check: 1 + 13 + 3 + 13 + 2 = 32.
Rnd 2: Ch 1, 2 sc in first st, sc in next 13 sts, 2 sc in each of next 3 sts, sc in next 13 sts, 2 sc in each of last 2 sts. Join. (38 sts)
Count check: 2 + 13 + 6 + 13 + 4 = 38. That gives 13 sts on each long side and 6 sts around each curved end.
Checkpoint: the base measures 3.75 in (9.5 cm) × 0.75 in (1.9 cm).
Rnd 3 (turning round): Sc in BLO of each st around. (38 sts) This makes a crisp fold between the base and the wall.
Rnds 4–12: Sc in each st around. (38 sts) Do not increase; the walls rise straight.
Checkpoint: the basket measures 1.75 in (4.4 cm) tall, measured from the fold line.
Make All Pieces
Before assembly, check that you have:
- White/yellow: 5 daisies
- Green: 2 short stems, 3 long stems, 2 leaves
- Brown: 1 basket
Layout (front view, as it sits on the fridge):
  [D1]   [D2]        [D5 - loose note daisy]
     [D3]   [D4]
  leaf |  |  | leaf
 +-----------------+
 |     BASKET      |
 +-----------------+
- D1 and D2: long stems (back row, tallest)
- D3 and D4: short stems (front row)
- D5: long stem, used to hold notes
- Leaves: one on the D1 stem, one on the D4 stem
Joining
Do all joining with the yarn tails and a tapestry needle. Use a whipstitch with even, snug tension; pulling too hard puckers the daisy center.
Stem to daisy: Lay the daisy face down. Place the top 0.5 in (1.3 cm) of the stem over the back of the yellow center, ending at the middle of Rnd 1. Whipstitch each of the top 3 sl sts of the stem to the Rnd 2 st directly beneath it, one stem st to one center st. Stitch through the back loops only so nothing shows on the front.
Leaf to stem: Place the leaf base against the stem at the 4th sl st up from the bottom. Sew the 2 base sts of the leaf (the first sc and last sc of Rnd 1) to that stem st and the one above it. Angle the tip outward and up.
Magnets on daisies: Glue one 0.75 in (1.9 cm) magnet to the back of each daisy, centered over the stem end. Let it set. Then, with green or white yarn, sew 4 straight stitches across the magnet edge in an X so it cannot pop off. Check polarity first so every daisy faces the fridge the same way.
Magnets on basket: Glue the 2 disc magnets (or the strip) to the outside of one long wall, 0.5 in (1.3 cm) above the base fold. This wall becomes the back.
Size checkpoint: a long-stem daisy measures about 4.25 in (10.8 cm) from petal tip to stem end, and a short-stem daisy about 3.25 in (8.3 cm). With the stems tucked into the basket, the arrangement reaches about 5 in (12.7 cm) tall.
Border (Basket Rim)
Border gauge matches body gauge: 20 sc = 4 in (10.2 cm). The rim adds 0.25 in (0.6 cm) of height.
Rnd 13: Sc in each st around. (38 sts: 13 on the front long side, 6 on the right curved end, 13 on the back long side, 6 on the left curved end)
Rnd 14: Sl st loosely in each st around. (38 sl sts; same 13 / 6 / 13 / 6 split) Join to first sl st and fasten off.
Why the math works: the rim is worked 1 stitch into 1 stitch, so it keeps the exact 38-stitch count set in Rnd 2. At 5 sts per inch, 38 sts = 7.6 in (19.3 cm) around. Flattened against the fridge, half of that circumference forms the front, which matches the 3.75 in (9.5 cm) base length plus a little ease at the ends. With no increases or decreases, the rim neither flares nor pulls in. The slip-stitch round firms the edge so the stems do not drag it down.
Final Blocking
- Lightly mist each daisy with water.
- Pin it face up on a foam mat, with the petals spread evenly so it measures 2.5 in (6.4 cm) tip to tip.
- Gently push each petal tip to round it.
- Lay the stems straight and the leaves flat, tips pointed.
- Stuff the basket with a folded cloth so it holds its oval shape, 0.75 in (1.9 cm) deep.
- Let everything dry fully, for at least 4 hours.
- Block before gluing the magnets, or keep the magnets dry while misting.
Final Quality-Control Checklist
- Each daisy has 8 even petals and measures 2.5 in (6.4 cm).
- Yellow centers lie flat with no gap at the magic ring.
- Stems are 2 in (5.1 cm) or 3 in (7.6 cm) and lie straight.
- Leaves have a clear pointed tip.
- The basket has 38 sts per round and measures 3.75 in × 2 in (9.5 cm × 5.1 cm).
- All magnets face the same way and are stitched as well as glued.
- All ends are woven in on the back.
Troubleshooting
- Petals curl forward: the loops are too short. Use ch 6 in Rnd 3, or block more firmly.
- Petals ruffle: too many dc for your tension. Work 4 dc instead of 5.
- Center cups: Rnd 2 is too tight. Go up a hook size for the center only.
- Basket walls flare: check for accidental extra sts; recount to 38.
- Basket too floppy: go down 0.25 mm in hook size for the walls.
- Daisy slides down the fridge: the magnet is too weak; use a stronger neodymium disc.
- Stem twists: steam it lightly and pin it straight.
Care
Wipe the pieces with a damp cloth and let them air-dry. Do not machine wash them, because the glued magnets can loosen.
Final Notes
The measurement chain is short and reliable. The 0.75 in (1.9 cm) yellow center grows to 1.5 in (3.8 cm) with the petal loops and to 2.5 in (6.4 cm) with the finished petals. Stems are 2 in (5.1 cm) or 3 in (7.6 cm). The basket’s 38-stitch oval base measures 3.75 in (9.5 cm), the walls reach 1.75 in (4.4 cm), and the 2-round rim brings it to 2 in (5.1 cm). Check each step, and the whole set comes together neatly on your fridge door.
Happy crocheting!