

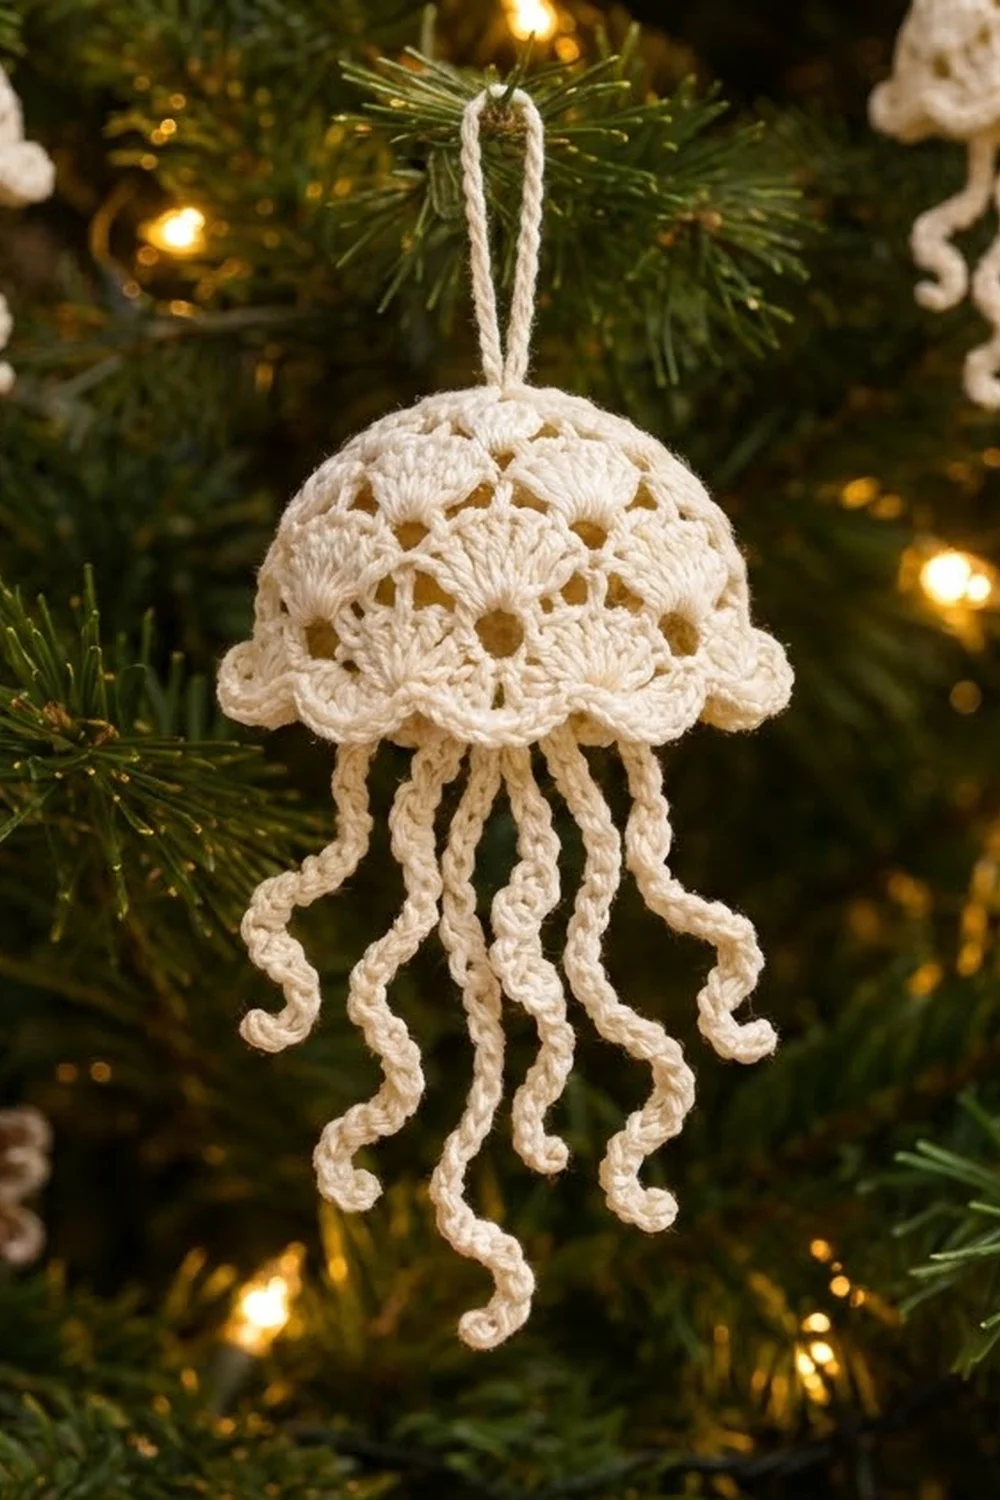
The Ivory Tide Jellyfish is a small lace ornament with a fan-shell bell, a ruffled brim, and seven curly tentacles that sway when the branch moves. It is worked in one cream cotton, so all the interest comes from the texture: open shells, tiny eyelets, and spiral tentacles that catch the light.
The style is soft and coastal but still festive. Hang one on a branch, tie it to a gift, or make a whole set for a beach-themed tree.
This pattern uses US crochet terms. The finished ornament measures about 4.5 in (11.4 cm) wide across the brim and about 6 in (15.2 cm) long from the top of the dome to the tip of the longest tentacle. The hanging loop adds 1.2 in (3.0 cm).
Construction is simple. You work the bell flat in turned rows as a semicircle. It starts at the bottom center and grows outward, so the shells open upward and the curved edge becomes the dome. Next you work a scalloped brim along the straight bottom edge and chain the tentacles straight from the brim. Last, you add a chain loop at the top.
Finished Size and Construction
- Finished size: 4.5 in (11.4 cm) wide x 6 in (15.2 cm) long, without loop
- Skill level: Easy-intermediate
- Terminology: US crochet terms
- Yarn weight: Super fine (#1) / fingering-weight cotton
- Hook: 2.25 mm (US B-1)
- Number of pieces: 1 (one continuous ornament)
- Layout: single flat piece; no joining
- Bell size before brim: 4 in (10.2 cm) wide x 2 in (5.1 cm) tall
- Brim depth: 0.4 in (1.0 cm)
- Bell with brim: 4.5 in (11.4 cm) wide x 2.4 in (6.1 cm) tall
- Tentacles: 2.25 in (5.7 cm), 2.75 in (7.0 cm), 3.25 in (8.3 cm), and 3.75 in (9.5 cm)
Materials
Choose a smooth, mercerized fingering-weight cotton. It shows the shell lines clearly and holds the tentacle curls after blocking. Avoid fuzzy or splitty yarns, which blur the eyelets.
- Cream / ivory: 10 g, about 35 m (38 yd) per ornament
Tools:
- 2.25 mm (US B-1) crochet hook
- Tapestry needle
- Scissors
- Stitch marker
- Blocking mat and rustproof pins
- Spray starch or fabric stiffener (optional, recommended)
The yarn amount includes a margin of about 25% for your test piece and for weaving in ends. One ornament actually uses about 8 g.
Abbreviations (US Terms)
- ch – chain
- sl st – slip stitch
- sc – single crochet
- dc – double crochet
- sk – skip
- sp – space
- st(s) – stitch(es)
- tch – turning chain
- RS / WS – right side / wrong side
- [ ] x N – repeat the bracketed steps N times
Special stitches:
- V-st: (dc, ch 1, dc) in the same stitch.
- Shell: the stated number of dc worked into one stitch or space. The bell uses 5-dc, 7-dc, and 9-dc shells.
- Corkscrew stitch: work 2 sc into one chain to force a twist. Alternating 2 sc and 1 sc gives a looser, wavy spiral.
Gauge and Checkpoints
Exact gauge isn’t critical for an ornament, but the bell must lie flat. To test, work the bell through Row 3 and measure it before you go on.
- Chain gauge: 10 ch = 1 in (2.5 cm)
- After Row 2: straight bottom edge measures 1 in (2.5 cm) across
- After Row 3: 1.6 in (4.1 cm) across
- After Row 5: 2.7 in (6.9 cm) across
- After Row 7: 3.8 in (9.7 cm) across
- After Row 8: 4 in (10.2 cm) across and 2 in (5.1 cm) tall
- Tolerance: ±0.25 in (0.6 cm) is fine
If your bell is too big, go down to a 2.0 mm hook. If it is too small, go up to a 2.5 mm hook. If the bell ruffles, your stitches are too loose for the increases. If it cups into a bowl, they are too tight. Change the hook size rather than the stitch counts, because the shell math depends on the counts.
Bell
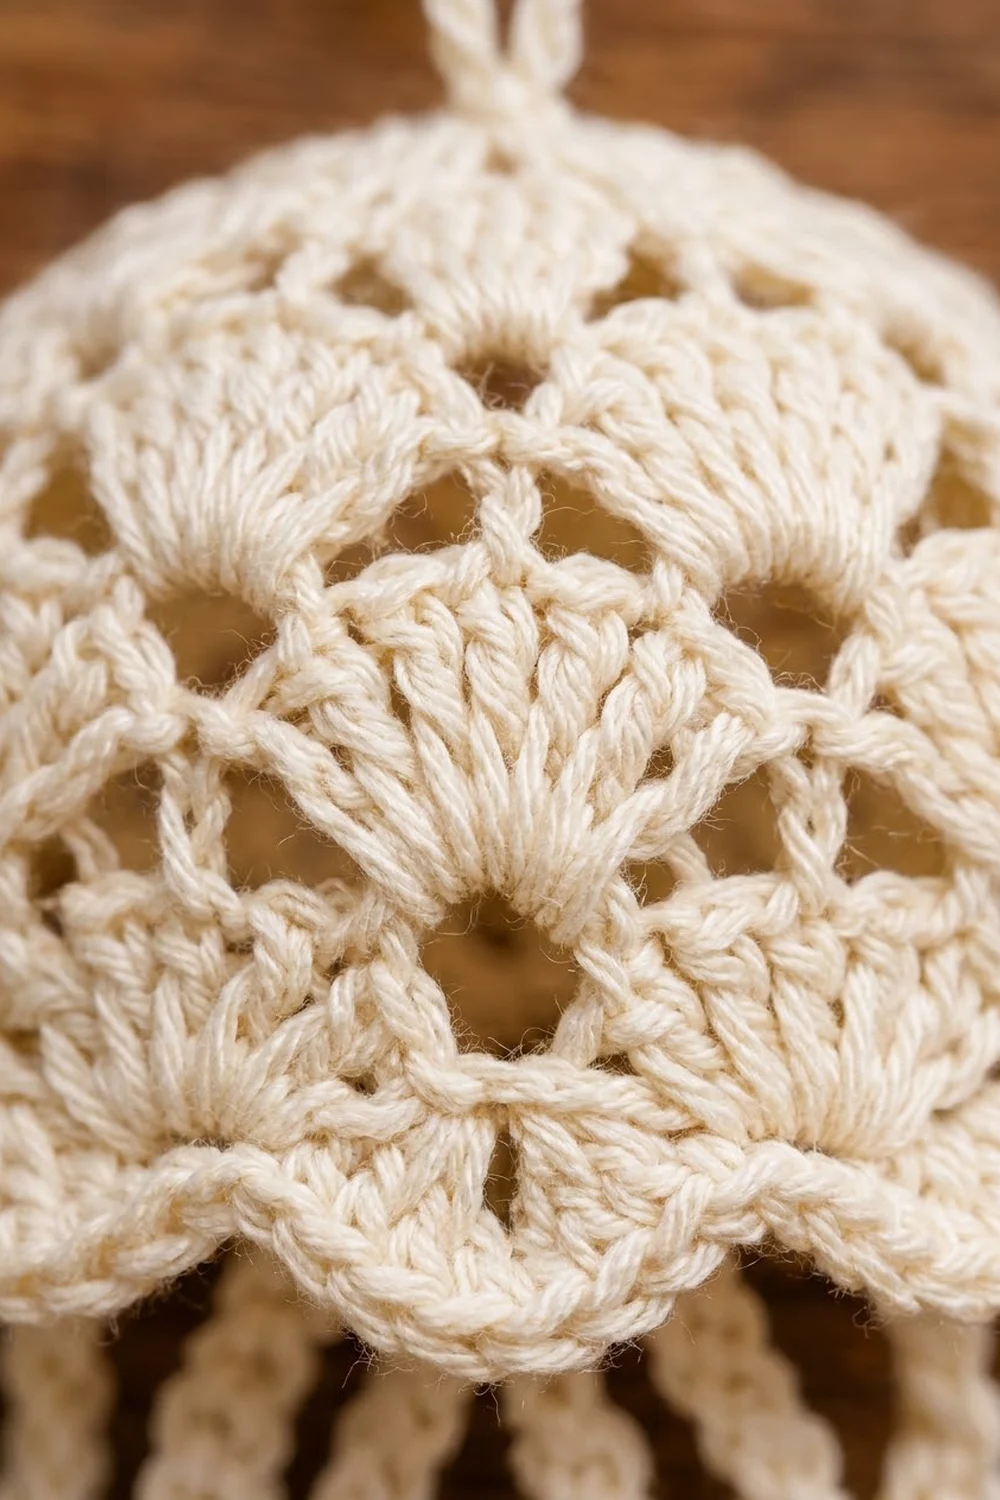
The bell is worked flat in turned rows. Row 1 sits at the bottom center, and each row forms a wider arc around it.
Row 1 (RS): Ch 4. Work 9 dc in the 4th ch from hook (the 3 skipped ch count as the first dc). Turn. (10 dc)
Row 2: Ch 3 (counts as dc in the first st), 2 dc in each of the next 8 dc, 2 dc in top of tch. Turn. (19 dc)
Row 3: Ch 1, sc in first dc, [sk 2 dc, 5 dc in next dc, sk 2 dc, sc in next st] x 3, placing the last sc in top of tch. Turn. (3 shells; 15 dc + 4 sc = 19 sts)
Each shell repeat uses 6 stitches, and 3 x 6 + 1 = 19, so the row ends exactly on the last stitch.
Row 4: Ch 4 (counts as dc + ch 1), dc in first sc (edge V-st made), ch 2, sc in center (3rd) dc of next shell, ch 2, [V-st in next sc, ch 2, sc in center dc of next shell, ch 2] x 2, V-st in last sc. Turn. (4 V-sts, 3 sc, 6 ch-2 sps)
The ch-2 spaces make the small eyelets between the shell rows.
Row 5: Ch 3 (counts as dc), 6 dc in ch-1 sp of first V-st, [sk ch-2 sp, sc in next sc, sk ch-2 sp, 7 dc in ch-1 sp of next V-st] x 3. Turn. (4 shells; 28 dc + 3 sc = 31 sts)
These 4 shells sit between and outside the 3 shells of Row 3, which gives the staggered fan pattern.
Row 6: Ch 4 (counts as dc + ch 1), dc in first dc (edge V-st), ch 2, sc in center (4th) dc of same shell, ch 2, [V-st in next sc, ch 2, sc in center dc of next shell, ch 2] x 3, V-st in top of tch. Turn. (5 V-sts, 4 sc, 8 ch-2 sps)
Row 7: Ch 3 (counts as dc), 8 dc in ch-1 sp of first V-st, [sk ch-2 sp, sc in next sc, sk ch-2 sp, 9 dc in ch-1 sp of next V-st] x 4. Turn. (5 shells; 45 dc + 4 sc = 49 sts)
Row 8 (dome outline, conversion row): Ch 1, sc in each st across, placing the last sc in top of tch. Don’t turn and don’t fasten off. (49 sc = 49 worked one-per-stitch + 0 added)
This row smooths the bumpy shell tops into a clean dome. Stitch 25 is the top center of the dome. Mark it for the hanging loop.
Checkpoint: the bell should measure 4 in (10.2 cm) along the straight edge and 2 in (5.1 cm) from that edge up to the marked top stitch.
Brim (Border)
The brim is the edging for this piece. You work it along the straight bottom edge, which is made of row ends.
Brim gauge: 29 sc across 4 in (10.2 cm), about 7.25 sc per 1 in (2.5 cm).
Row 9 (brim base): Ch 1, rotate the bell to work along the straight edge. Working into the row ends:
- 1 sc in end of Row 8, 2 sc in end of Row 7, 2 sc in end of Row 6, 2 sc in end of Row 5, 2 sc in end of Row 4, 1 sc in end of Row 3, 2 sc in end of Row 2, 2 sc in end of Row 1 (14 sc for the first half)
- 1 sc into the base of Row 1 (the foundation ch at the center) (1 sc)
- 2 sc in end of Row 1, 2 sc in end of Row 2, 1 sc in end of Row 3, 2 sc in end of Row 4, 2 sc in end of Row 5, 2 sc in end of Row 6, 2 sc in end of Row 7, 1 sc in end of Row 8 (14 sc for the second half)
Turn. (14 + 1 + 14 = 29 sc)
Why these numbers work: rows with dc-height ends (Rows 1, 2, 4, 5, 6, and 7) get 2 sc each. Rows with sc-height ends (Rows 3 and 8) get 1 sc each. This spaces the stitches evenly, so the edge stays flat.
Row 10 (scallops): Ch 1, sc in first sc, [sk 1 sc, 5 dc in next sc, sk 1 sc, sc in next sc] x 7. Fasten off. (7 scallops; 35 dc + 8 sc = 43 sts)
Why the math works: each scallop repeat uses 4 base stitches, and 7 x 4 + 1 = 29, which matches Row 9 exactly. Because 5 dc grow out of each single stitch, the brim flares and ripples slightly outward. This widens the bell to about 4.5 in (11.4 cm).
With the RS facing, number the 8 sc of Row 10 from 1 to 8, left to right. The two end sc (1 and 8) have no tentacles.
Tentacles
Each tentacle is a chain worked back with corkscrew stitches. Make them in this order, left to right:
| Tentacle | Attach to | Chain | Finished length |
|---|---|---|---|
| 1 | sc 2 | ch 27 | 2.25 in (5.7 cm) |
| 2 | sc 3 | ch 33 | 2.75 in (7.0 cm) |
| 3 | sc 4 | ch 37 | 3.25 in (8.3 cm) |
| 4 (center) | 3rd dc of scallop 4 | ch 41 | 3.75 in (9.5 cm) |
| 5 | sc 5 | ch 37 | 3.25 in (8.3 cm) |
| 6 | sc 6 | ch 33 | 2.75 in (7.0 cm) |
| 7 | sc 7 | ch 27 | 2.25 in (5.7 cm) |
Scallop 4 is the middle scallop, between sc 4 and sc 5.
For each tentacle: Join the yarn with a sl st in the attachment stitch and ch the number shown in the table. Work 2 sc in 2nd ch from hook, sc in next ch, then [2 sc in next ch, sc in next ch] to the end of the chain. Sl st in the attachment stitch. Then either fasten off, or sl st along the back of the brim to the next attachment point.
Stitch counts per tentacle:
- ch 27: 26 ch worked, 13 repeats, 39 sc
- ch 33: 32 ch worked, 16 repeats, 48 sc
- ch 37: 36 ch worked, 18 repeats, 54 sc
- ch 41: 40 ch worked, 20 repeats, 60 sc
The extra stitches make each chain twist into a loose spiral. The twist shortens the tentacle by about 0.35 in (0.9 cm). That’s why ch 41, which is 4.1 in (10.4 cm) of chain, finishes at 3.75 in (9.5 cm).
Hanging Loop
Join the yarn with a sl st in the marked stitch 25 at the top of the dome. Ch 24, then sl st in the same stitch. Fasten off and weave the tail through the base twice to strengthen it. The 24-ch loop folds to about 1.2 in (3.0 cm) tall.
Final Blocking
- Weave in all ends along the WS of the brim and the dome outline.
- Dampen the ornament with cool water and press out the extra water in a towel.
- Lay it RS up on a blocking mat.
- Pin the straight brim line to 4 in (10.2 cm) wide and the dome top 2 in (5.1 cm) above it.
- Pin each scallop point outward so the brim spreads to about 4.5 in (11.4 cm).
- Open each shell with your fingers so the fans and eyelets show clearly.
- Twist each tentacle gently in the direction of its spiral and lay it straight down, with the longest in the center.
- Spray lightly with starch or brush on diluted fabric stiffener.
- Let it dry completely, at least 6 hours, before you unpin it.
Final Quality-Control Checklist
- The bell has 3, 4, and 5 shells in Rows 3, 5, and 7.
- Row 8 has 49 sc and the dome edge is smooth.
- Row 9 has 29 sc and lies flat.
- Row 10 has 7 even scallops.
- 7 tentacles hang from the correct stitches, with the longest in the center.
- Tentacle lengths match left and right.
- The hanging loop sits exactly at the top center.
- All ends are woven in and can’t be seen from the RS.
- The finished size is 4.5 in (11.4 cm) wide and about 6 in (15.2 cm) long.
Troubleshooting
Bell cups into a bowl: Your tension is too tight. Use a larger hook, or loosen the dc in Rows 1 and 2.
Bell ruffles: Your tension is too loose. Use a smaller hook, and check that you skipped the ch-2 spaces in Rows 5 and 7.
Wrong shell count: Recount Row 2 (19 dc) and Row 4 (4 V-sts). Most mistakes start there.
Brim pulls in or waves: Recount Row 9. It must have exactly 29 sc, with 1 sc in each sc-height row end and 2 sc in each dc-height row end.
Tentacles are straight, not curly: Check that you are working 2 sc into every other chain. For tighter curls, work 2 sc in every chain.
Tentacles are too long: Your chain is loose. Remove 2 ch from each tentacle so the repeat count stays even.
Loop twists sideways: Block the top again with the loop pinned straight up.
Care
Hand wash in cool water with mild soap, press flat in a towel, and reshape while damp. Starch again after washing, and store flat in tissue between seasons.
Final Notes
The measurement chain for this ornament is short and easy to check. The bell should measure 1 in (2.5 cm) across after Row 2, 2.7 in (6.9 cm) after Row 5, and 4 in (10.2 cm) wide by 2 in (5.1 cm) tall after Row 8. The 29-stitch Row 9 and the 7-scallop Row 10 add a 0.4 in (1.0 cm) brim, which brings the bell to 4.5 in (11.4 cm) wide and 2.4 in (6.1 cm) tall. Seven corkscrew tentacles, from 2.25 in (5.7 cm) to 3.75 in (9.5 cm) long, give a finished length of about 6 in (15.2 cm), plus the 1.2 in (3.0 cm) loop.
Once your first ornament matches these checkpoints, the rest go quickly. Make one for a gift tag, or a whole school of them for the tree.
Happy crocheting!