

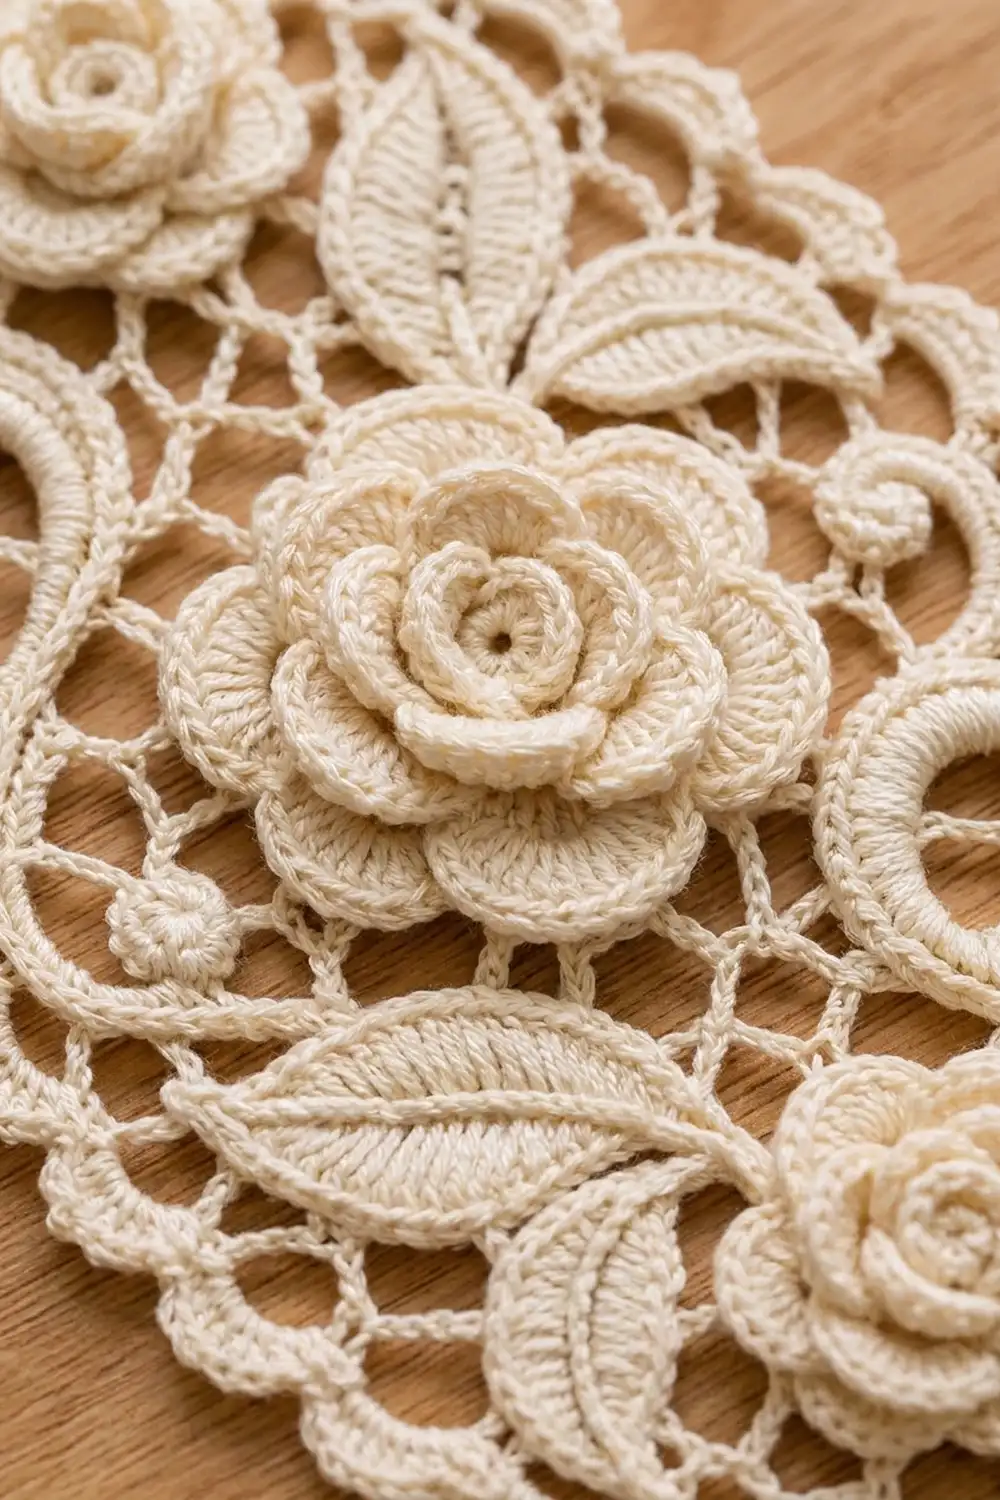
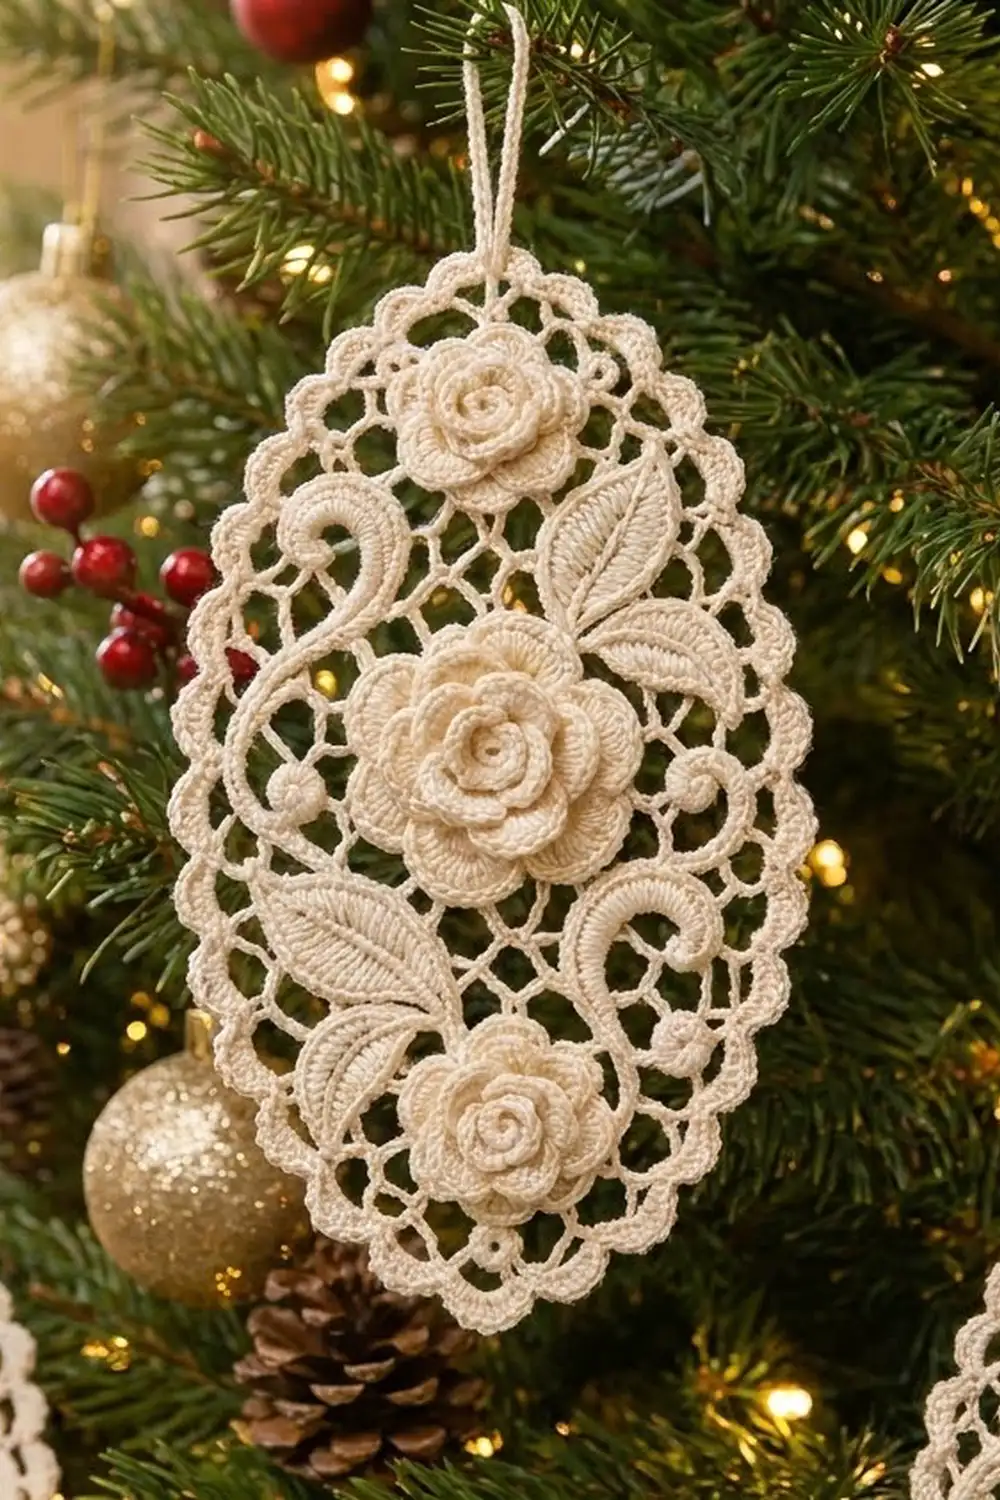
This ornament looks like a piece of old Irish lace. It is a soft ivory oval of open mesh with layered roses, ridged leaves and curling scrolls sewn on top, and a row of small picot scallops around the edge. It hangs from a slim loop and catches the light on a tree branch.
The whole piece is one color, ivory or cream cotton thread. With no color changes, the texture does all the work. The roses stand up from the mesh, the leaves show crisp raised veins, and the scallops frame everything like an antique doily.
This pattern uses US crochet terms. The finished ornament measures 6 in tall x 3.5 in wide (15.2 x 8.9 cm) after blocking.
Construction is simple to follow. You crochet one lace oval in joined rounds around a foundation chain: a solid center, three mesh rounds and a two-round picot border. Then you make 11 small appliqués (3 roses, 4 leaves, 2 scrolls, 2 rings), sew them onto the oval, add the hanging loop and block.
Finished Size and Construction
- Finished size: 6 in x 3.5 in (15.2 x 8.9 cm)
- Skill level: Intermediate
- Terminology: US crochet terms
- Yarn weight: Size 10 crochet cotton thread (Lace / 0)
- Hook: 1.75 mm steel hook
- Number of pieces: 1 finished ornament (1 lace oval base + 11 sewn-on appliqués)
- Layout: Upright oval; roses on the center line (top, center, lower right), leaves upper right and lower left, scrolls upper left and lower right
- Oval core after Rnd 2: 3.5 in x 1 in (8.9 x 2.5 cm)
- Size before border: 5.25 in x 2.75 in (13.3 x 7.0 cm)
- Border depth: 3/8 in (1.0 cm) on every edge
Materials
Use a smooth, tightly twisted mercerized cotton in size 10. Mercerized thread shows the petals and leaf ridges clearly and takes starch well. Avoid fuzzy or soft-spun thread, because the mesh will blur.
- Ivory (one color only): 10 g, about 85 m (93 yd)
The quantity includes a margin of about 25% for your gauge swatch, sewing tails and the hanging loop.
Tools:
– 1.75 mm steel crochet hook
– Fine tapestry needle (size 24–26)
– Locking stitch markers
– Rust-proof pins and a foam blocking board
– Spray starch or fabric stiffener
– Paper, ruler and pencil for a 6 x 3.5 in (15.2 x 8.9 cm) blocking template
– Small scissors
Abbreviations (US Terms)
- ch – chain
- sl st – slip stitch
- sc – single crochet
- hdc – half double crochet
- dc – double crochet
- BLO – back loop only
- BPsc – back post single crochet: insert the hook from back to front to back around the post of the stitch and work a sc
- sp(s) – space(s)
- st(s) – stitch(es)
- rnd – round
Special stitches
- Picot: ch 3, sl st in the 3rd ch from the hook.
- Picot loop (PL): ch 3, picot, ch 3. When a later round says “sc in next PL,” work the sc into the ch-3 section after the picot so the picot stays on top.
- Shell: (3 dc, picot, 3 dc) in the same stitch.
Gauge and Checkpoints
Gauge: 9 dc and 4 dc rounds = 1 in (2.5 cm). Border: 10 sc = 1 in (2.5 cm).
Rnds 1–2 of the oval act as your gauge test. Measure before you continue.
- Checkpoint 1 (after Rnd 2): 3.5 in x 1 in (8.9 x 2.5 cm)
- Checkpoint 2 (after Rnd 5): 5.25 in x 2.75 in (13.3 x 7.0 cm), lightly stretched. The three mesh rounds add 7/8 in (2.2 cm) per side.
- Checkpoint 3 (after Rnd 7): 6 in x 3.5 in (15.2 x 8.9 cm) after blocking
If your oval is too big: go down to a 1.5 mm hook. Rip back and restart. Don’t try to fix it with tighter loops later.
If your oval is too small: go up to a 2.0 mm hook.
A difference of 1/4 in (0.6 cm) or less can be fixed during blocking.
Lace Oval Base
Rnds 1–2: Solid Center
Ch 25.
Rnd 1: 5 dc in 4th ch from hook (the skipped 3 ch count as the first dc), dc in next 20 ch, 6 dc in last ch. Working along the opposite side of the foundation chain, dc in next 20 ch. Join with sl st to top of beginning ch. (52 sts: 6 per end + 20 per side)
Rnd 2: Ch 3 (counts as dc), dc in same st, 2 dc in each of next 5 sts, dc in next 20 sts, 2 dc in each of next 6 sts, dc in next 20 sts. Join with sl st to top of ch 3. (64 sts: 12 per end + 20 per side)
Only the curved ends grow. The 20 straight stitches on each long side stay the same, and that is what makes the shape an oval instead of a circle. Call the end where you start “End A”. It becomes the top of the ornament.
Rnds 3–5: Lace Mesh
Rnd 3 (conversion round): Ch 1, sc in first st, [ch 4, skip 1 st, sc in next st] around, ending with ch 4, skip last st, sl st to first sc. (32 ch-4 loops = 64 sts ÷ 2)
Section breakdown for Rnd 3:
– End A: 6 loops
– Side: 10 loops
– End B: 6 loops
– Side: 10 loops
Rnd 4 (growth round, picot mesh):
1. Sl st in first 2 ch of first loop. Ch 1, sc in same loop.
2. End A: PL, sc in same loop, [PL, sc in next loop, PL, sc in next loop, PL, sc in same loop] twice, PL, sc in next loop.
3. Side: [PL, sc in next loop] 10 times.
4. End B: PL, sc in next loop, PL, sc in same loop, [PL, sc in next loop, PL, sc in next loop, PL, sc in same loop] twice, PL, sc in next loop.
5. Side: [PL, sc in next loop] 10 times, PL, sl st to first sc.
(38 PLs) Each end now has 9 sc anchors instead of 6, and each side keeps 10. The picots make the small dots you see in the mesh.
Rnd 5 (growth round):
1. Sl st along to just past the first picot. Ch 1, sc in same PL.
2. End A: ch 5, sc in same PL, [ch 5, sc in next PL, ch 5, sc in next PL, ch 5, sc in next PL, ch 5, sc in same PL] twice, [ch 5, sc in next PL] twice.
3. Side: [ch 5, sc in next PL] 10 times.
4. End B: ch 5, sc in next PL, ch 5, sc in same PL, [ch 5, sc in next PL, ch 5, sc in next PL, ch 5, sc in next PL, ch 5, sc in same PL] twice, [ch 5, sc in next PL] twice.
5. Side: [ch 5, sc in next PL] 10 times, ch 5, sl st to first sc.
(44 ch-5 loops: 12 per end + 10 per side)
Measure now. This is Checkpoint 2: 5.25 in x 2.75 in (13.3 x 7.0 cm).
Appliqués
Leave a 10 in (25.4 cm) tail on every appliqué for sewing.
Roses (make 3: 1 large, 2 small)
Ch 6, join with sl st to form a ring.
Rnd 1: Ch 1, 15 sc in ring, sl st to first sc. (15 sc)
Rnd 2: Ch 1, sc in first sc, ch 3, skip 2 sc, [sc in next sc, ch 3, skip 2 sc] 4 times, sl st to first sc. (5 ch-3 sps)
Rnd 3: (Sc, hdc, 3 dc, hdc, sc) in each ch-3 sp, sl st to first sc. (5 petals, 35 sts)
Rnd 4: Working behind the petals: [ch 5, BPsc around next sc from Rnd 2] 5 times. (5 ch-5 sps)
Rnd 5: (Sc, hdc, 5 dc, hdc, sc) in each ch-5 sp, sl st to first sc. (5 petals, 45 sts)
Small rose: Fasten off here. It measures 1.25 in (3.2 cm) across.
Large rose: Continue with Rnds 6–7.
Rnd 6: Working behind the petals: [ch 7, BPsc around next sc from Rnd 4] 5 times. (5 ch-7 sps)
Rnd 7: (Sc, hdc, 7 dc, hdc, sc) in each ch-7 sp, sl st to first sc. (5 petals, 55 sts)
Fasten off. The large rose measures 1.75 in (4.4 cm) across.
Each back-post round sits behind the round before, so the petal tiers stack up and cup inward. With your fingers, roll the Rnd 3 petals toward the center to form the tight rosebud middle.
Ridged Leaves (make 4)
Ch 11.
Row 1: Sc in 2nd ch from hook and next 8 ch, 3 sc in last ch. Working along the opposite side of the chain, sc in next 9 ch. (21 sc: 9 + 3 tip + 9)
Row 2: Ch 1, turn. Working in BLO, sc in each st to the center st of the tip, 3 sc in center st, sc in each st to the last st, leave last st unworked. (22 sc)
Row 3: Repeat Row 2. (23 sc)
Row 4: Repeat Row 2. (24 sc)
Each row adds 2 stitches at the tip and leaves 1 unworked, so it gains 1 stitch overall. The unworked stitches taper the base, the 3-sc tip keeps the point sharp, and the back loops leave the raised vein ridges.
Fasten off. Each leaf measures 1.25 in long x 5/8 in wide (3.2 x 1.6 cm).
Spiral Scrolls (make 2)
Ch 30.
Row 1: Sc in 2nd ch from hook, 2 sc in each of next 8 ch, sc in next 20 ch. (37 sc)
Row 2: Ch 1, turn, sl st loosely in each st across. (37 sl st)
The increases make the first end curl tightly. Coil that end into a spiral about 3/4 in (1.9 cm) across. Let the straight part trail as a 1.5 in (3.8 cm) tail. The slip stitch row gives it a corded edge.
Small Rings (make 2)
Ch 8, join with sl st to form a ring. Ch 1, 16 sc in ring, sl st to first sc. (16 sc)
Fasten off. Each ring measures 3/8 in (1.0 cm) across.
Border
The border is worked on the oval before you attach the appliqués, so the outline stays even.
Border gauge: 10 sc = 1 in (2.5 cm).
Rnd 6: Sl st into first ch-5 loop. Ch 1, work 3 sc in each ch-5 loop around, sl st to first sc. (132 sc)
Count per section:
– Each end: 12 loops x 3 = 36 sc
– Each side: 10 loops x 3 = 30 sc
– Total: 36 + 30 + 36 + 30 = 132 sc
Rnd 7: Ch 1, [sc in next st, skip 2 sts, shell in next st, skip 2 sts] around, sl st to first sc. (22 scallops)
Count per section:
– Each end: 36 ÷ 6 = 6 scallops
– Each side: 30 ÷ 6 = 5 scallops
– Total: 6 + 5 + 6 + 5 = 22 scallops
Why the math works: The outer edge of Rnd 5 measures about 12.9 in (32.8 cm) around. At 10 sc per inch, 132 sc measure 13.2 in (33.5 cm). That small extra length lets the border lie flat around the curves without cupping or ruffling. Each scallop repeat uses exactly 6 stitches, and both 36 and 30 divide evenly by 6, so no scallop is squeezed.
Fasten off.
Hanging Loop
- Join thread in the sc that starts the 4th scallop of End A, which is the top point.
- Ch 50, sl st in the same sc.
- Ch 1, work 60 sc over the chain, sl st to the starting sc.
Fasten off. The loop stands about 2.75 in (7.0 cm) tall.
Placing and Sewing the Appliqués
Lay the oval right side up with End A at the top. Place the pieces as follows:
- Large rose: centered on the solid Rnds 1–2 core.
- Top small rose: on the center line, about 3/4 in (1.9 cm) below the top scallop tips.
- Bottom small rose: about 1/2 in (1.3 cm) above the bottom tips, nudged 1/4 in (0.6 cm) to the right.
- Two leaves: to the upper right of the large rose, tips pointing up and out. One sits beside the top rose.
- Two leaves: to the lower left of the large rose, tips pointing down and out.
- One scroll: upper left, with the spiral beside the top rose and the tail following the edge.
- One scroll: lower right, curling beside the bottom rose.
- Rings: one to the left of the large rose, one to the lower right.
How to sew each piece:
– Roses: whipstitch around the back of the outer petal round so the petals stay free and raised.
– Leaves: stitch along the center ridge only.
– Scrolls: sew along the inner edge of the coil and tail.
– Rings: tack them down at four points.
Sew through the mesh loops and sc anchors, never through picots. Weave in all tails on the back.
Final Blocking
- Draw a 6 in x 3.5 in (15.2 x 8.9 cm) oval on paper and lay it under clear plastic wrap on your foam board.
- Mist the ornament with water until it is damp but not dripping.
- Pin the oval to the outline at the top and bottom points first, then at the widest points of each side.
- Pin the picot of each of the 22 scallops on the outline.
- Open each mesh loop gently with a pin tip so the picot dots sit evenly.
- Spray with starch. Don’t pin through or flatten the roses; shape the petals upward with your fingers instead.
- Let it dry completely, at least 12 hours. Unpin and check that it measures 6 in x 3.5 in (15.2 x 8.9 cm).
Final Quality-Control Checklist
- [ ] Rnd 2 has 64 sts; Rnd 3 has 32 loops; Rnd 4 has 38 PLs; Rnd 5 has 44 loops
- [ ] Rnd 6 has 132 sc; Rnd 7 has 22 scallops (6 per end, 5 per side)
- [ ] Large rose: 3 petal tiers, 55 sts in the last round; each small rose: 2 tiers, 45 sts in the last round
- [ ] Each leaf has 24 sts in Row 4, sharp tip, visible ridges
- [ ] All 11 appliqués sewn firmly, with no stitches showing on the front
- [ ] Hanging loop centered at the top point
- [ ] Blocked size is 6 in x 3.5 in (15.2 x 8.9 cm)
Troubleshooting
Oval cups like a bowl: The ends have too few stitches. Check that Rnds 4 and 5 each have their 6 increases (3 per end).
Oval ruffles: Your mesh chains are too loose. Go down a hook size, or work the ch-5 loops as ch-4.
Border waves: You put 4 sc in some loops. Recount to 3 per loop, for 132 total.
Roses lie flat: You worked the BPsc from the front. Work it from behind so each tier sits behind the one before.
Leaf base is lopsided: You forgot to leave the last stitch unworked in a row. Recheck the counts: 22, 23, 24.
Scroll won’t hold its curl: Starch it and pin it coiled while it dries.
Care
Hand wash in cool water with mild soap, roll it in a towel and re-block it to shape. Store it flat in tissue paper so the roses keep their shape.
Final Notes
The measurements build on each other:
– The solid center measures 3.5 in x 1 in (8.9 x 2.5 cm).
– Three mesh rounds bring it to 5.25 in x 2.75 in (13.3 x 7.0 cm).
– The 3/8 in (1.0 cm) border, with 132 sc and 22 scallops, finishes it at 6 in x 3.5 in (15.2 x 8.9 cm).
Check each size as you go, keep the roses raised and the leaf ridges crisp, and you’ll have an heirloom ornament to hang every year.
Happy crocheting!