

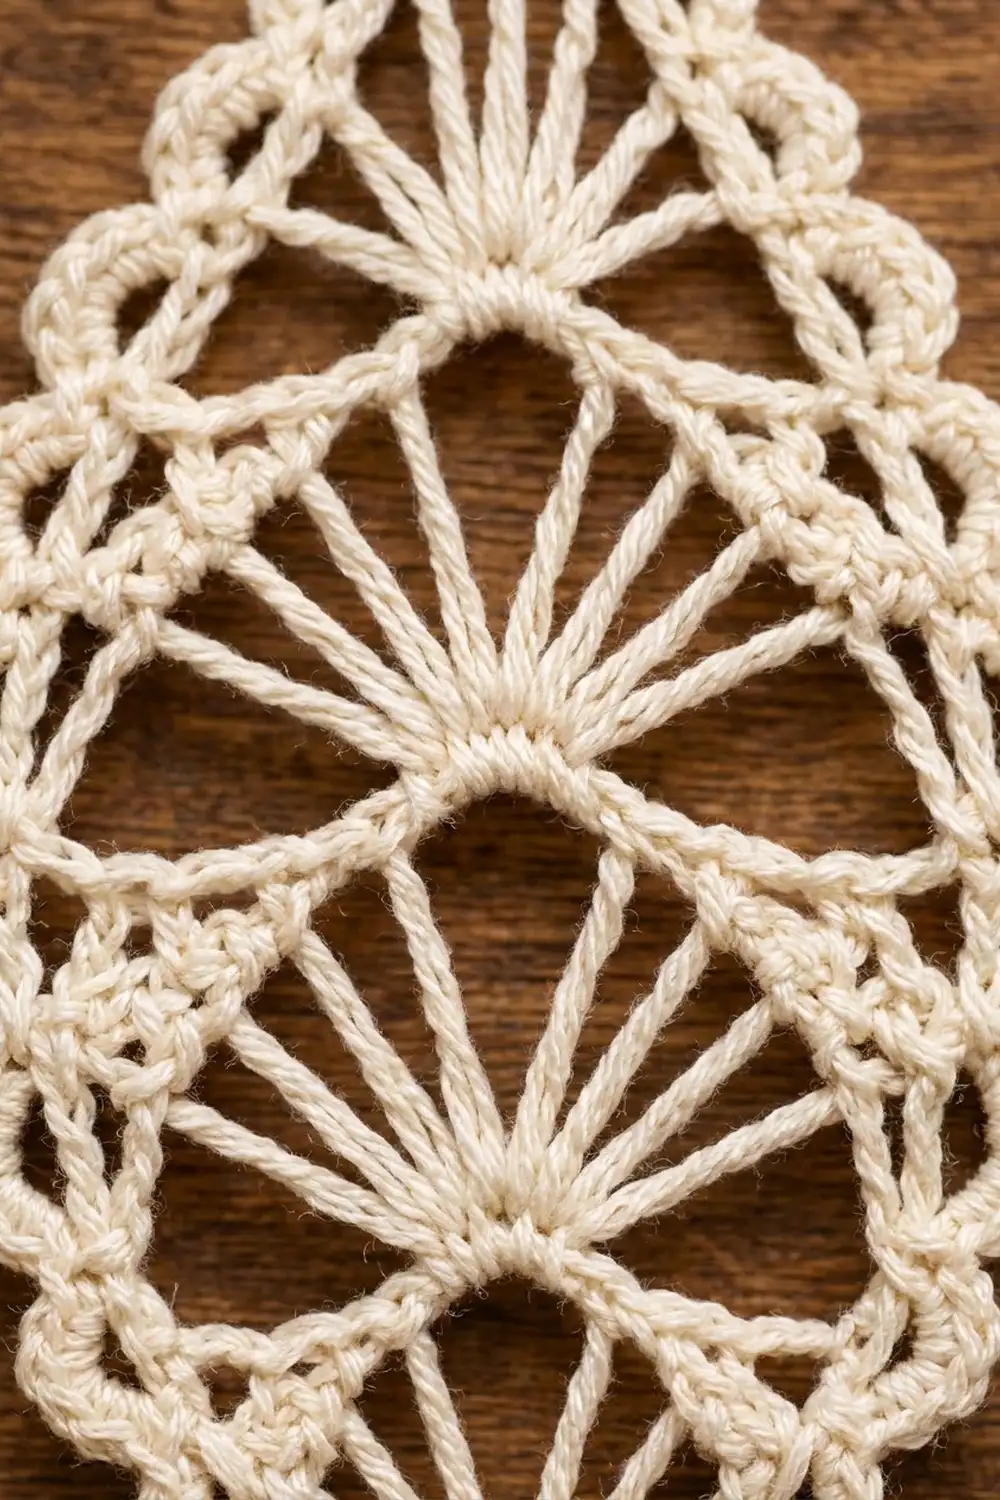
This lacy diamond ornament is built from fans of long stitches. One fan opens upward from the bottom tip. A second sunburst sits at the center point, with spokes running both down and up from it. A third fan comes down from the top tip. Scalloped chain bars separate the fans, and a soft chain-loop edge runs around the outside.
The sample is made in one cream cotton thread, which suits a natural, Scandinavian-style tree. It also looks good in white, a gold metallic blend, or pale silver gray. Since it’s one small motif, you can make a whole set from one ball.
The pattern uses US crochet terms. The finished ornament measures 3 in (7.6 cm) wide and 5.6 in (14.2 cm) tall, plus a 1 in (2.5 cm) hanging loop. That gives a total hanging length of 6.6 in (16.8 cm).
You work the body in 8 turned rows from the bottom tip to the top tip, then add a 2-round edging all the way around. The hanging loop goes into the top tip at the end. Everything is one continuous piece, with no joining.
Finished Size and Construction
- Finished size: 3 in (7.6 cm) wide x 5.6 in (14.2 cm) tall, plus 1 in (2.5 cm) loop
- Skill level: Intermediate (long stitches and multi-leg clusters)
- Terminology: US
- Yarn weight: Size 3 cotton crochet thread (light fingering)
- Hook: 2.25 mm (US B-1)
- Number of pieces: 1
- Layout: Single standalone motif, vertical diamond
- Piece size before edging: 2.4 in (6.1 cm) wide x 5 in (12.7 cm) tall
- Edging depth: 0.3 in (0.8 cm) on every side
Materials
Use a smooth, tightly plied mercerized cotton thread. It keeps the spokes crisp, takes starch well, and won’t sag on a branch. Avoid fuzzy or very soft cotton, because the long stitches will blur and stretch.
- Cream size 3 cotton thread: 8 g (about 22 m) per ornament
This amount includes a margin of about 25% for your test piece and weaving in ends. One ornament uses roughly 6 g (about 16 m). If you plan a set, budget 8 g per ornament: 10 ornaments need about 80 g (about 220 m).
Tools:
- 2.25 mm (US B-1) crochet hook
- Tapestry needle
- Small scissors
- Rust-proof pins and a foam blocking board
- Fabric stiffener or spray starch
- Ruler or tape measure
Abbreviations (US Terms)
- ch – chain
- sl st – slip stitch
- sc – single crochet
- tr – treble crochet (yarn over 2 times)
- trtr – triple treble (yarn over 4 times)
- qtr – quadruple treble (yarn over 5 times)
- sp(s) – space(s)
- st(s) – stitch(es)
- RS / WS – right side / wrong side
Special stitches:
- Partial qtr: Yarn over 5 times, insert hook in the stated place, and pull up a loop. Then [yarn over, pull through 2 loops] 5 times. This leaves 1 extra loop on the hook.
- Partial trtr: Yarn over 4 times, insert hook in the stated place, and pull up a loop. Then [yarn over, pull through 2 loops] 4 times. This leaves 1 extra loop on the hook.
- Sunburst cluster: A series of partial stitches worked into different places. Close it with one yarn over pulled through every loop on the hook, then ch 1 tightly to lock it. The legs meet at one point and form the converging spokes.
Gauge and Checkpoints
Lace gauge is checked by measuring at set stages, not with a stitch swatch. Make one complete ornament first and check it at each checkpoint before you make a set. Measure with the piece lightly flattened, before blocking.
- Row 1 fan: 1.1 in (2.8 cm) wide x 0.6 in (1.5 cm) tall
- After Row 3: 2 in (5.1 cm) wide x 1.3 in (3.3 cm) tall from the bottom tip
- After Row 5: 3.3 in (8.4 cm) tall; the center point sits about 2.3 in (5.8 cm) above the bottom tip
- After Row 7: 2.4 in (6.1 cm) wide x 4 in (10.2 cm) tall
- After Row 8: 2.4 in (6.1 cm) wide x 5 in (12.7 cm) tall
- After edging: 3 in (7.6 cm) wide x 5.6 in (14.2 cm) tall
If your Row 1 fan is too big (over 1.2 in / 3.0 cm wide), go down to a 2 mm hook. If it’s too small (under 1 in / 2.5 cm wide), go up to a 2.5 mm hook. Long stitches magnify any tension difference, so get Row 1 right before you continue.
Also check spoke length. Each qtr in Row 5 should stand about 1 in (2.5 cm) tall. If your spokes are shorter, the ornament will come out squat even when the width matches. To fix it, pull each first loop up to the full height of the hook before you start working off the loops.
Pattern
Mark the RS of Row 1 with a scrap of thread. Work every long stitch at the same steady pace so the spokes in each fan are the same length.
Bottom Fan
Row 1 (RS): Ch 5. The 4 skipped chains count as the first tr. Working into the 5th ch from hook, [ch 2, tr] 6 times. Turn. (7 tr, 6 ch-2 sps)
All 7 spokes come out of the same chain, so they fan up from one closed point. That point is the bottom tip.
First Arch Bar
Row 2 (WS): Ch 1, sc in first tr, [ch 4, sc in next tr] 5 times, ch 4, sc in top of turning ch. Turn. (7 sc, 6 ch-4 arches)
Row 3 (RS): Ch 1, sc in first sc, ch 3, sc in first ch-4 arch, [ch 5, sc in next ch-4 arch] 5 times, ch 3, sc in last sc. Turn. (8 sc, 7 arches: 2 ch-3 edge arches + 5 ch-5 arches)
Rows 2 and 3 together make the first scalloped bar across the lower part of the diamond. The short ch-3 arches at each end keep the sides sloping instead of square.
Center Sunburst
Row 4 (WS): Ch 6; this counts as the first spoke. Work a partial qtr in each of the 7 arches, then a partial qtr in the last sc. You now have 9 loops on the hook. Yarn over, pull through all 9 loops, then ch 1 tightly to lock. (1 sunburst cluster, 9 spokes)
The spokes slope in from the bar and meet at the center point. Pull the closing yarn over snug but not tight, so the outer spokes lie straight.
Row 5 (RS): Ch 6 (counts as first qtr). Working into the top of the cluster, under the locking ch, [ch 2, qtr] 6 times. Turn. (7 qtr, 6 ch-2 sps)
This fan opens upward from the center point. With the 9 spokes below and the 7 above, it forms the double sunburst in the middle of the ornament.
Second Arch Bar
Row 6 (WS): Ch 1, sc in first qtr, [ch 5, sc in next qtr] 5 times, ch 5, sc in 6th ch of turning ch. Turn. (7 sc, 6 ch-5 arches)
This is the widest row of the ornament, at 2.4 in (6.1 cm) across.
Row 7 (RS): Sl st in each of the first 3 ch of the first arch, ch 1, sc in same arch, [ch 5, sc in next arch] 5 times. Turn. (6 sc, 5 ch-5 arches)
Starting and ending inside the end arches pulls the row in, which begins the upper slope of the diamond.
Top Fan
Row 8 (WS): Ch 5; this counts as the first spoke. Work a partial trtr in each of the 5 arches, then a partial trtr in the last sc. You now have 7 loops on the hook. Yarn over, pull through all 7 loops, then ch 1 tightly to lock. (1 sunburst cluster, 7 spokes)
These spokes come down from the top tip and mirror the bottom fan. Don’t fasten off.
Edging
Border gauge: 6 sc = 1 in (2.5 cm) along the outline, measured on Round 1.
Each side runs from one tip to the other. Both sides get the same number of stitches, worked into the row ends in the order below. Work over the post of a long stitch or into the chain arch, and spread the stitches evenly.
Side allocation (top to bottom), 35 sc total:
- Row 8 end spoke: 6 sc
- Row 7 end (outer part of the Row 6 end arch): 3 sc
- Row 6 end sc: 1 sc
- Row 5 end qtr: 8 sc
- Row 4 end spoke: 8 sc
- Row 3 end ch-3 arch: 3 sc
- Row 2 end sc: 1 sc
- Row 1 end tr: 5 sc
Check: 6 + 3 + 1 + 8 + 8 + 3 + 1 + 5 = 35.
Round 1 (RS): Ch 1, then work 3 sc in the locking ch at the top tip. Work 35 sc down the first side. Work 3 sc in the bottom tip, into the foundation chain that holds the Row 1 fan. Work 35 sc up the second side. Sl st to first sc. (76 sc: 35 per side + 3 per tip)
The tip groups are counted separately from the sides, so no stitch is counted twice. The center sc of each 3-sc group is the tip stitch.
Round 2 (RS): Sl st in next sc, which is the top tip stitch. Ch 1, sc in same sc. [Ch 3, skip 1 sc, sc in next sc] 19 times; the last sc lands in the bottom tip stitch. [Ch 3, skip 1 sc, sc in next sc] 18 times, ch 3, skip 1 sc, sl st to first sc. (38 sc, 38 ch-3 loops; 19 loops per side)
Why the math works: On each side there are 37 sc between the two tip stitches: 1 tip-group sc + 35 side sc + 1 tip-group sc. Reaching the opposite tip stitch takes 37 + 1 = 38 steps. Each repeat moves 2 stitches, and 38 ÷ 2 = 19 repeats, so you land exactly on the tip. That’s why the side count has to be odd. If you change the allocation, keep 35 or switch to another odd number.
At 6 sc per inch, 35 sc covers about 5.8 in (14.7 cm). That’s slightly longer than the 5.6 in (14.2 cm) diagonal side of the 2.4 in x 5 in (6.1 cm x 12.7 cm) body. The extra gives the edge enough ease to lie flat around the arches without ruffling or cupping.
Hanging Loop
At the top tip, ch 22, then sl st in the same top tip sc. Work 30 sc into the ch-22 loop, then sl st in the top tip sc again. Fasten off and weave in all ends through the outline sc.
The covered loop stands about 1 in (2.5 cm) above the top tip.
Final Blocking
- Soak the ornament in cool water for 5 minutes, then roll it in a towel to remove the extra water.
- Dip it in fabric stiffener, or plan to starch it once it’s pinned.
- Draw a diamond 3 in (7.6 cm) wide and 5.6 in (14.2 cm) tall on paper and cover it with plastic to use as a guide.
- Pin the two tips first, then the two widest points, level with Row 6.
- Pin out each ch-3 loop on the edging so the scallops sit evenly.
- Put a pin at the base of each spoke to straighten it so the sunbursts radiate cleanly.
- Let it dry completely, for at least 12 hours. Unpin it, and lightly starch the hanging loop if it needs help standing up.
Final Quality-Control Checklist
- Bottom fan has 7 spokes
- Center sunburst has 9 spokes below the point and 7 above
- Top fan has 7 spokes
- Row 6 has 6 ch-5 arches and is the widest point
- Round 1 has 76 sc: 35 per side, 3 per tip
- Round 2 has 38 ch-3 loops, 19 per side
- Tips are sharp and centered
- Finished size is 3 in (7.6 cm) x 5.6 in (14.2 cm), plus a 1 in (2.5 cm) loop
- All ends are hidden inside the edging
Troubleshooting
Spokes look loose or twisted. Pull each “yarn over, pull through 2” step firmly, and keep the hook straight so the loops don’t rotate.
Center point has a hole. The locking ch is too loose. Work it tighter, or weave the tail through the top of the cluster to close the hole.
Arch bars curve too much. Your sc are tighter than your chains. Loosen the chains slightly, or work 1 fewer chain in each arch.
Sides look different. One side starts each row with a turning chain and the other ends with a stitch. Use the same allocation on both sides and even them out during blocking.
Edging ruffles. You worked too many sc into the row ends. Recount against the 35-stitch allocation.
Edging cups. You worked too few stitches. Add 2 sc per side so the count stays odd.
Round 2 doesn’t land on the tip. Your side count is even. Fix Round 1 so each side has 35 sc.
Hanging loop twists. Pack the sc evenly around the loop, and starch it while it’s flat.
Care
Hand wash in cool water with mild soap, then re-block and re-starch. Store flat in a box between sheets of tissue so the spokes don’t bend.

Final Notes
Here’s the measurement chain from start to finish. A 1.1 in (2.8 cm) Row 1 fan leads to a 2 in (5.1 cm) first bar, then a 2.4 in x 5 in (6.1 cm x 12.7 cm) body after Row 8. The 2-round edging adds 0.3 in (0.8 cm) on every side, for a finished 3 in x 5.6 in (7.6 cm x 14.2 cm) ornament plus a 1 in (2.5 cm) loop. If each checkpoint matches, every ornament in your set will match too.
Happy crocheting!