

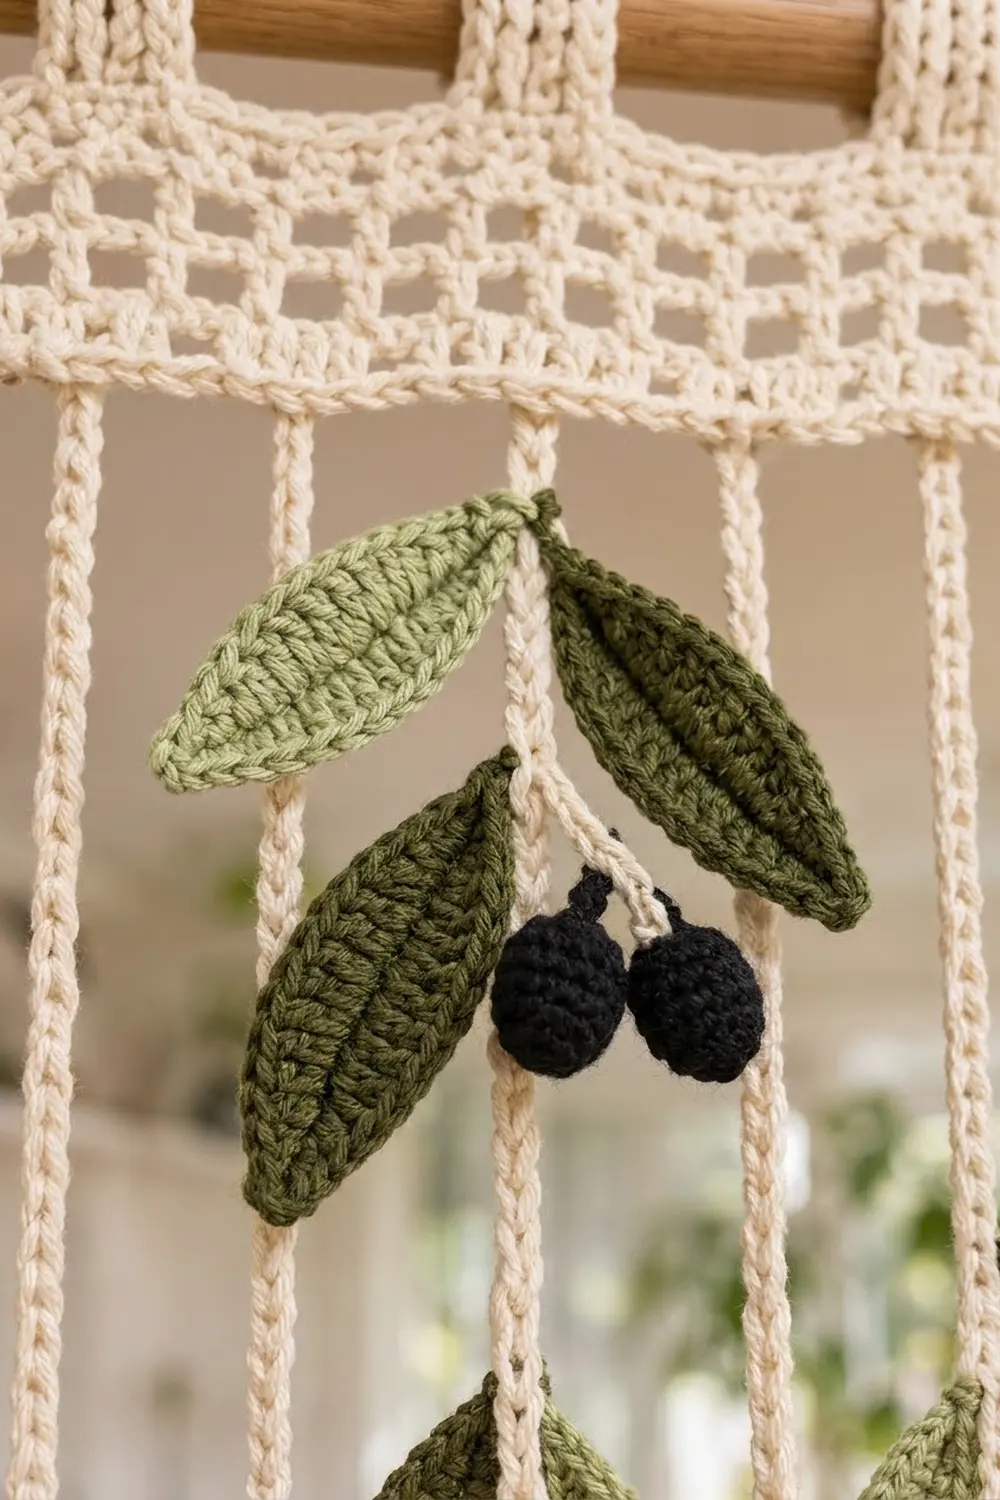
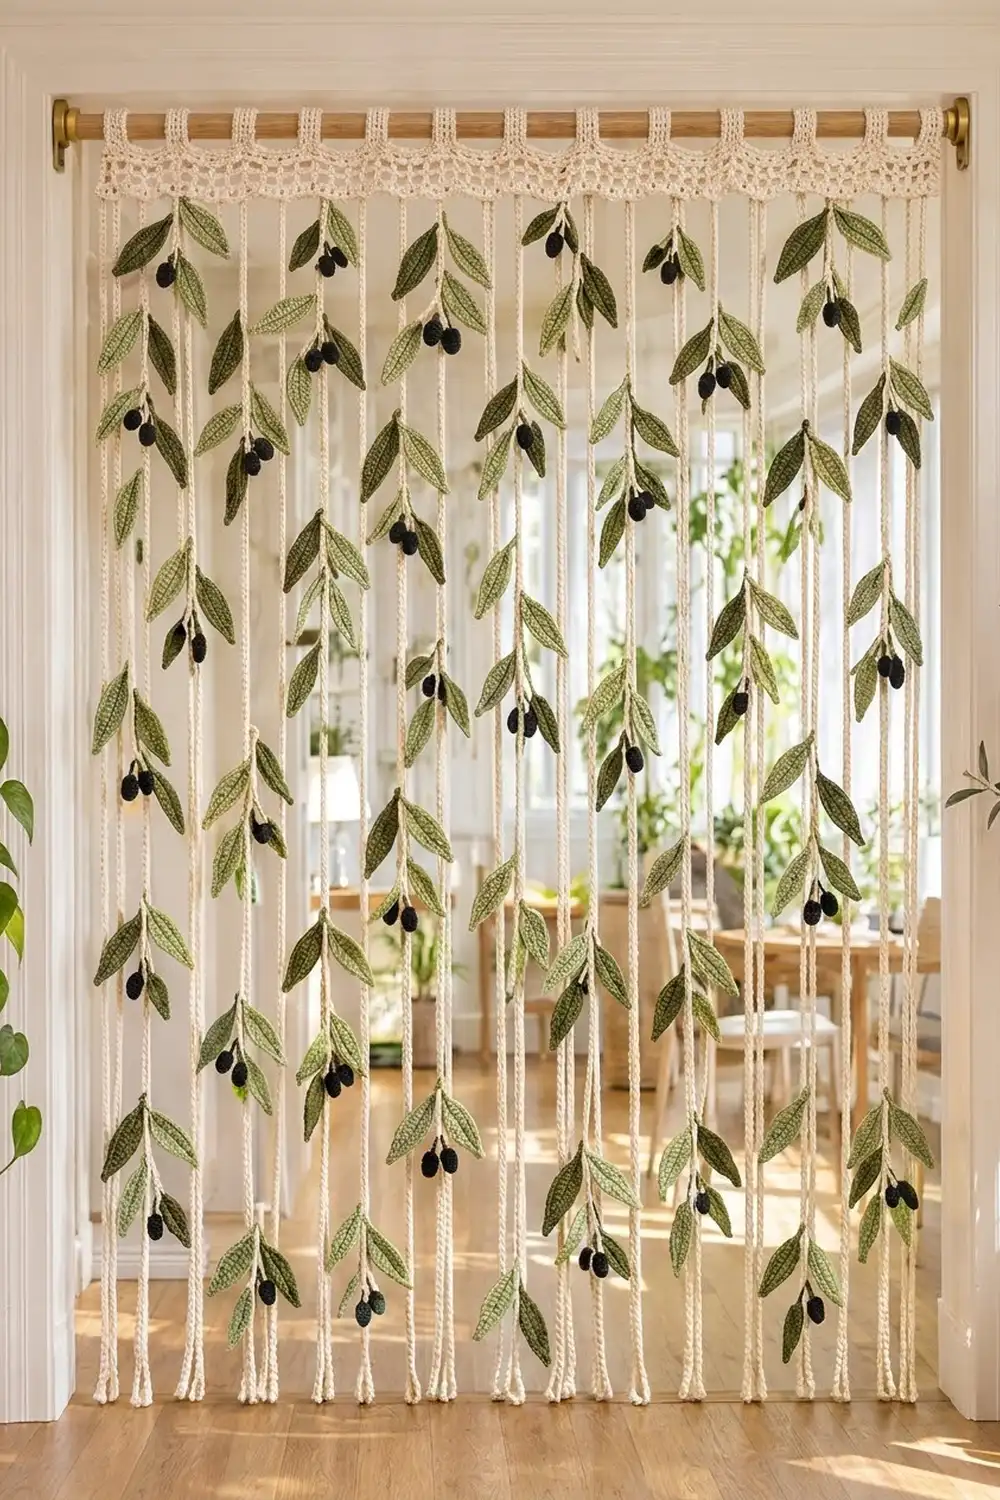
The Olive Grove Door Curtain looks like a row of olive branches hanging in your doorway. Cream cords hang from a lacy header band. Light sage and dark olive leaves grow from the cords in pairs, and small black olives hang between some of them. Light still comes through, but the doorway feels framed and softly divided.
The palette is calm and Mediterranean: cream, two greens and black. The style is natural and a little botanical, and it suits a sunny room, a pantry door or a patio entrance.
This pattern uses US crochet terms. The finished curtain measures about 37.25 in (94.6 cm) wide and 78 in (198.1 cm) long, from the top of the tab loops to the ends of the cords.
Construction is simple, even though there are many pieces. You crochet the header flat, add a two-round border, and work the tabs straight off the top edge. You then work the cords directly off the bottom edge, so they need no sewing. Last, you make the leaves and olives separately and sew them onto the cords in sprigs.
Finished Size and Construction
- Finished size: 37.25 in (94.6 cm) wide × 78 in (198.1 cm) long
- Skill level: Intermediate
- Terminology: US terms
- Yarn weight: Worsted (#4) cotton
- Hook: 5.0 mm (H-8)
- Number of pieces: 1 header (with 11 tabs and 21 cords worked on), 132 leaves, 66 olives
- Layout: 21 cords spaced 1.75 in (4.4 cm) apart, alternating leafy and plain
- Header before border: 36.25 in (92.1 cm) × 3.5 in (8.9 cm)
- Header after border: 37.25 in (94.6 cm) × 4.5 in (11.4 cm)
- Border depth: 0.5 in (1.3 cm) on each edge
- Leaf size: 3.25 in (8.3 cm) × 1 in (2.5 cm), plus stem
- Olive size: 1 in (2.5 cm) × 0.75 in (1.9 cm)
Materials
Use a smooth worsted-weight cotton or cotton blend of about 190 m (208 yd) per 100 g. Cotton hangs straight, holds the leaf texture well and stretches less than acrylic, which matters for long cords. Avoid fuzzy yarns, because they hide the ridges and the mesh.
- Cream: 450 g (855 m) for the header, border, tabs and cords
- Light sage green: 200 g (380 m) for 66 leaves and all olive stems
- Dark olive green: 150 g (285 m) for 66 leaves
- Black: 150 g (285 m) for 66 olives
All quantities include a safety margin of roughly 20 to 25 percent.
Tools:
– 5.0 mm (H-8) crochet hook
– Tapestry needle
– 20 or more locking stitch markers
– Tape measure
– Small amount of polyester fiberfill
– Rust-proof pins and a blocking surface
– Optional: a wooden rod about 1 in (2.5 cm) thick and 40 in (101.6 cm) long, with brackets
Abbreviations (US Terms)
- ch – chain
- sl st – slip stitch
- sc – single crochet
- hdc – half double crochet
- dc – double crochet
- sc2tog – single crochet 2 together (decrease)
- inc – 2 sc in the same stitch
- BLO – back loop only
- MR – magic ring
- sp – space
- st(s) – stitch(es)
- RS – right side
Special stitch: back-bump slip-stitch cord. Make a chain. Then work 1 sl st into the back bump (the ridge on the reverse side) of each chain. This gives a firm, round cord that won’t curl and stretches very little.
Gauge and Checkpoints
- Dc gauge: 16 dc × 8 rows = 4 in (10.2 cm)
- Sc gauge: 16 sc × 16 rows = 4 in (10.2 cm)
- Cord gauge: 4 sl st = 1 in (2.5 cm), measured while hanging
Test first. Before you start the header, make one leaf, one olive and a 6 in (15.2 cm) cord of 24 sl st. Check them against the sizes below. Then crochet a small dc swatch.
Checkpoints:
– One leaf after Rnd 2 is 3.25 in (8.3 cm) × 1 in (2.5 cm).
– One olive is 1 in (2.5 cm) × 0.75 in (1.9 cm).
– The header after Row 7 is 36.25 in (92.1 cm) × 3.5 in (8.9 cm).
– The header after the border is 37.25 in (94.6 cm) × 4.5 in (11.4 cm).
– Each tab is 1.75 in (4.4 cm) × 4 in (10.2 cm).
– Each cord is 72 in (182.9 cm).
If your pieces are too big, go down a hook size, to 4.5 mm. If they are too small, go up to 5.5 mm. Fix your gauge on the swatch rather than changing stitch counts, because the tab and cord spacing depend on these exact numbers.
Header Band
Use cream.
Foundation: Ch 147.
Row 1 (RS): Dc in 4th ch from hook (the skipped 3 ch count as the first dc) and in each ch across. Turn. (145 dc)
Row 2: Ch 3 (counts as dc here and throughout). Dc in each st across. Turn. (145 dc)
Row 3 (mesh): Ch 4 (counts as dc + ch 1). Skip the next st and dc in the next st. Ch 1, skip 1 st, dc in the next st. Repeat from * across. Turn. (73 dc + 72 ch-1 sps = 72 meshes)
Rows 4–5: Ch 4 (counts as dc + ch 1). Dc in the next dc. Ch 1, dc in the next dc. Repeat from * across. Work the last dc in the 3rd ch of the turning ch-4. Turn. (72 meshes each row)
Row 6: Ch 3. Dc in each ch-1 sp and in each dc across. Turn. (73 dc + 72 = 145 dc)
Row 7: Ch 3. Dc in each st across. Do not fasten off. (145 dc)
Checkpoint: The header now measures 36.25 in (92.1 cm) × 3.5 in (8.9 cm).
Border
Border gauge: 4 sc and 4 rounds = 1 in (2.5 cm).
Rnd 1: Ch 1 and keep going in the same direction.
- Top edge: Sc in each of the 145 sts. Ch 1 for the corner.
- Side edge: Work 2 sc around the post at each of the 7 row ends, for 14 sc. Ch 1.
- Bottom edge: Sc in the free loop of each of the 145 foundation chs. Ch 1.
- Second side edge: Work 14 sc as before. Ch 1.
- Sl st to the first sc. (318 sc + 4 corner ch-1 sps)
Rnd 2: Ch 1. Sc in each sc around, and work (sc, ch 1, sc) in each corner ch-1 sp. Sl st to the first sc. Fasten off.
- Top and bottom: 145 + 2 = 147 sc each
- Sides: 14 + 2 = 16 sc each
- Total: 326 sc + 4 ch-1 sps
Each side count includes its own 2 corner sc.
Why the math works:
– The 7 dc rows measure 3.5 in. Two sc per row gives 14 sc, and 14 sc at 4 sc per inch is also 3.5 in, so the sides lie flat.
– Each border round adds 0.25 in (0.6 cm) at every end of a side. After Rnd 1 the top is 36.75 in (93.3 cm) long, and 147 sc at 4 per inch is exactly 36.75 in.
– The sides grow to 4 in (10.2 cm), and 16 sc matches that.
– With Rnd 2 added, the header is 37.25 in (94.6 cm) × 4.5 in (11.4 cm).
Tabs
Work the tabs on the 147 top-edge sc of Rnd 2, with the RS facing. Number the top sc from 1 to 147, starting at the right corner.
There are 11 tabs of 7 sts each, separated by 10 gaps of 7 sts each: (11 × 7) + (10 × 7) = 147. Tab 1 uses sts 1–7, tab 2 uses sts 15–21, and so on, until tab 11 uses sts 141–147.
Row 1: Join cream in the first st of the tab. Ch 3, then dc in the next 6 sts. Turn. (7 dc)
Rows 2–8: Ch 3, then dc in the next 6 sts. Turn. (7 dc) Fasten off and leave a 12 in (30.5 cm) tail.
Fold each tab to the back. Whipstitch the last row to the back loops at the base of the same tab. Each finished loop is 4 in (10.2 cm) around, fits a rod up to 1 in (2.5 cm) thick and rises about 1.5 in (3.8 cm) above the header.
Cords
Work the cords on the 147 bottom-edge sc of Rnd 2, with the RS facing. Number them from 1 to 147, starting at the right corner.
There are 21 cords, worked in sts 4, 11, 18 and every 7th st after that, ending at st 144. This leaves 3 sts before the first cord and 3 after the last, so the cords are spaced evenly at 1.75 in (4.4 cm). The odd-numbered cords hang directly below the centers of the tabs.
For each cord:
1. Join cream in the marked st and ch 289. Place a marker every 24 ch, which is every 6 in (15.2 cm).
2. Sl st in the back bump of the 2nd ch from the hook and in each ch back up. (288 sl st)
3. Sl st into the same header st and fasten off.
Checkpoint: Each cord hangs at 72 in (182.9 cm), and 288 ÷ 4 = 72.
Leaf (make 66 light sage and 66 dark olive)
Foundation: Ch 14.
Rnd 1:
1. Work up the first side of the chain: sc in the 2nd ch from the hook, hdc in the next 2 ch, dc in the next 7 ch and hdc in the next 2 ch.
2. In the last ch, work (sc, ch 2, sc) for the leaf tip.
3. Turn the work and continue along the free loops on the other side of the chain: hdc in the next 2, dc in the next 7, hdc in the next 2 and sc in the last.
4. Sl st to the first sc.
(12 + 2 + 12 = 26 sts + tip ch-2 sp)
The short stitches at each end and the dc in the middle give the leaf its pointed oval shape. The foundation chain forms the center vein.
Rnd 2: Sl st in the BLO of each of the 26 sts, and work (sl st, ch 2, sl st) in the tip ch-2 sp. This round makes the raised outline and the ridged texture. (26 + 2 = 28 sl st + ch-2 sp)
Stem: Ch 5 at the base of the leaf, which is 1.25 in (3.2 cm) long. Fasten off and leave a 10 in (25.4 cm) tail.
Checkpoint: The leaf measures 3.25 in (8.3 cm) × 1 in (2.5 cm).
Olive (make 66)
Use black.
- Rnd 1: 6 sc in MR. (6)
- Rnd 2: Inc in each st. (12)
- Rnds 3–5: Sc in the BLO of each st. (12 each round) The back loops give the olive its fine nubby texture.
- Stuff lightly with fiberfill.
- Rnd 6: Sc2tog 6 times. (6) Close the hole and fasten off.
Stem: Join light sage at the top of the olive and ch 6, which is 1.5 in (3.8 cm). Fasten off and leave an 8 in (20.3 cm) tail.
Checkpoint: The olive measures 1 in (2.5 cm) × 0.75 in (1.9 cm).
Make All Pieces
- Light sage leaves: 66
- Dark olive leaves: 66
- Black olives with sage stems: 66
The 11 odd-numbered cords are leafy and carry 6 sprigs each. A sprig is 1 light leaf + 1 dark leaf. Sprigs 1, 3 and 5 on every leafy cord also get 2 olives.
Per leafy cord, that’s 12 leaves and 6 olives. Across 11 cords, that’s 132 leaves and 66 olives. The 10 even-numbered cords stay plain.
The sprigs are staggered so the leaves don’t line up across the curtain. “A” cords have their first sprig at 3 in (7.6 cm), and “B” cords have their first sprig at 8.5 in (21.6 cm).
Layout (cords 1–21, right to left):
Cord:  1  2  3  4  5  6  7  8  9 10 11 12 13 14 15 16 17 18 19 20 21
Type:  A  -  B  -  A  -  B  -  A  -  B  -  A  -  B  -  A  -  B  -  A
(A = leafy, early start; B = leafy, late start; - = plain)
Sprig positions, measured down from the header’s bottom edge:
| Sprig | A cords | B cords | Olives |
|---|---|---|---|
| 1 | 3 in (7.6 cm) | 8.5 in (21.6 cm) | 2 |
| 2 | 14 in (35.6 cm) | 19.5 in (49.5 cm) | — |
| 3 | 25 in (63.5 cm) | 30.5 in (77.5 cm) | 2 |
| 4 | 36 in (91.4 cm) | 41.5 in (105.4 cm) | — |
| 5 | 47 in (119.4 cm) | 52.5 in (133.4 cm) | 2 |
| 6 | 58 in (147.3 cm) | 63.5 in (161.3 cm) | — |
Sprigs sit 11 in (27.9 cm) apart. The lowest leaf ends about 68 in (172.7 cm) down, so the last 4 in (10.2 cm) of each cord stays bare.
Joining
Method: Sew each sprig to its cord with the tapestry needle, using the stem tails.
- Hang the curtain on its rod and mark each node with a stitch marker.
- Hold one light leaf and one dark leaf so their stem ends meet at the node, one on each side of the cord, angled down at about 45 degrees.
- Pass each tail through the center of the cord 3 or 4 times. Go stitch to stitch: catch the same sl st each time so the node stays compact.
- Alternate sides from one sprig to the next. On odd sprigs, put the light leaf on the left; on even sprigs, put it on the right.
- On sprigs 1, 3 and 5, sew the two olive stems at the same node so the olives hang between the leaves.
- Knot the tails at the back of the cord, then hide them inside the cord for 2 in (5.1 cm) before trimming.
Tension: Sew loosely enough that the cord stays straight. Pulling tight bunches the cord and shortens it.
Size checkpoint: After sewing, each leafy cord should still measure 72 in (182.9 cm). It should hang no more than 0.25 in (0.6 cm) shorter than the plain cord next to it.
Final Blocking
- Weave in all remaining ends.
- Pin the header flat to 37.25 in (94.6 cm) × 4.5 in (11.4 cm). Keep the mesh squares even and the edges straight.
- Spray the header with water until it is damp and let it dry completely.
- Pin the tabs flat to 1.75 in (4.4 cm) wide before you fold them, if they flare.
- Hang the curtain. Mist the cords and leaves lightly, and smooth each leaf flat with your fingers along its vein.
- Let the curtain dry while it hangs, so gravity straightens the cords.
- Re-measure the cords and adjust any node that pulls.
Final Quality-Control Checklist
- The header is 37.25 in (94.6 cm) × 4.5 in (11.4 cm) with square corners.
- There are 72 even meshes across Rows 3–5.
- There are 11 tabs, each 7 sts wide, with 7-st gaps between them.
- There are 21 cords, each 72 in (182.9 cm) long.
- The odd cords are leafy and the even cords are plain.
- Each leafy cord has 6 sprigs, 12 leaves and 6 olives.
- Each leaf has a clean pointed tip and a visible vein.
- The olives are firm and evenly stuffed, and their stems are secure.
- No tails show on the front.
Troubleshooting
- The header ruffles: Your border stitches are too loose. Redo Rnd 1 with the hook one size smaller.
- The header cups: You have too few sc on the sides. Make sure there are exactly 2 sc per row end.
- The mesh is uneven: Keep the ch-1 sps the same height as the dc. Don’t pull the chains tight.
- The cords twist: Work every sl st in the back bump, never in a top loop.
- The cords are different lengths: Count the markers in groups of 24, and hang the cords to compare them before fastening off.
- The leaf tip is round: Make sure the ch-2 tip and Rnd 2’s (sl st, ch 2, sl st) are both there.
- The olives look lumpy: Use less stuffing, and push it in before Rnd 6.
- The leaves twist on the cord: Anchor the stem through the center of the cord, not along its surface.
Care
Hand wash the curtain cold with a mild soap, press out the water in a towel and dry it flat. While it’s still slightly damp, rehang it so the cords dry straight.
Final Notes
Every part of the curtain depends on the measurement before it, so here is the chain in order:
- A gauge of 16 dc per 4 in (10.2 cm) gives a header of 145 sts and 36.25 in (92.1 cm).
- The two border rounds bring the top and bottom edges to 147 sts and 37.25 in (94.6 cm).
- The 147 top sts divide exactly into 11 tabs and 10 gaps of 7 sts each.
- The 147 bottom sts divide exactly into 21 cords spaced 1.75 in (4.4 cm) apart.
- Each cord’s 288 sl sts make 72 in (182.9 cm), and 6 sprigs sit 11 in (27.9 cm) apart on each leafy cord.
Check your gauge first and keep your counts honest, and the curtain will come out right. Happy crocheting!