

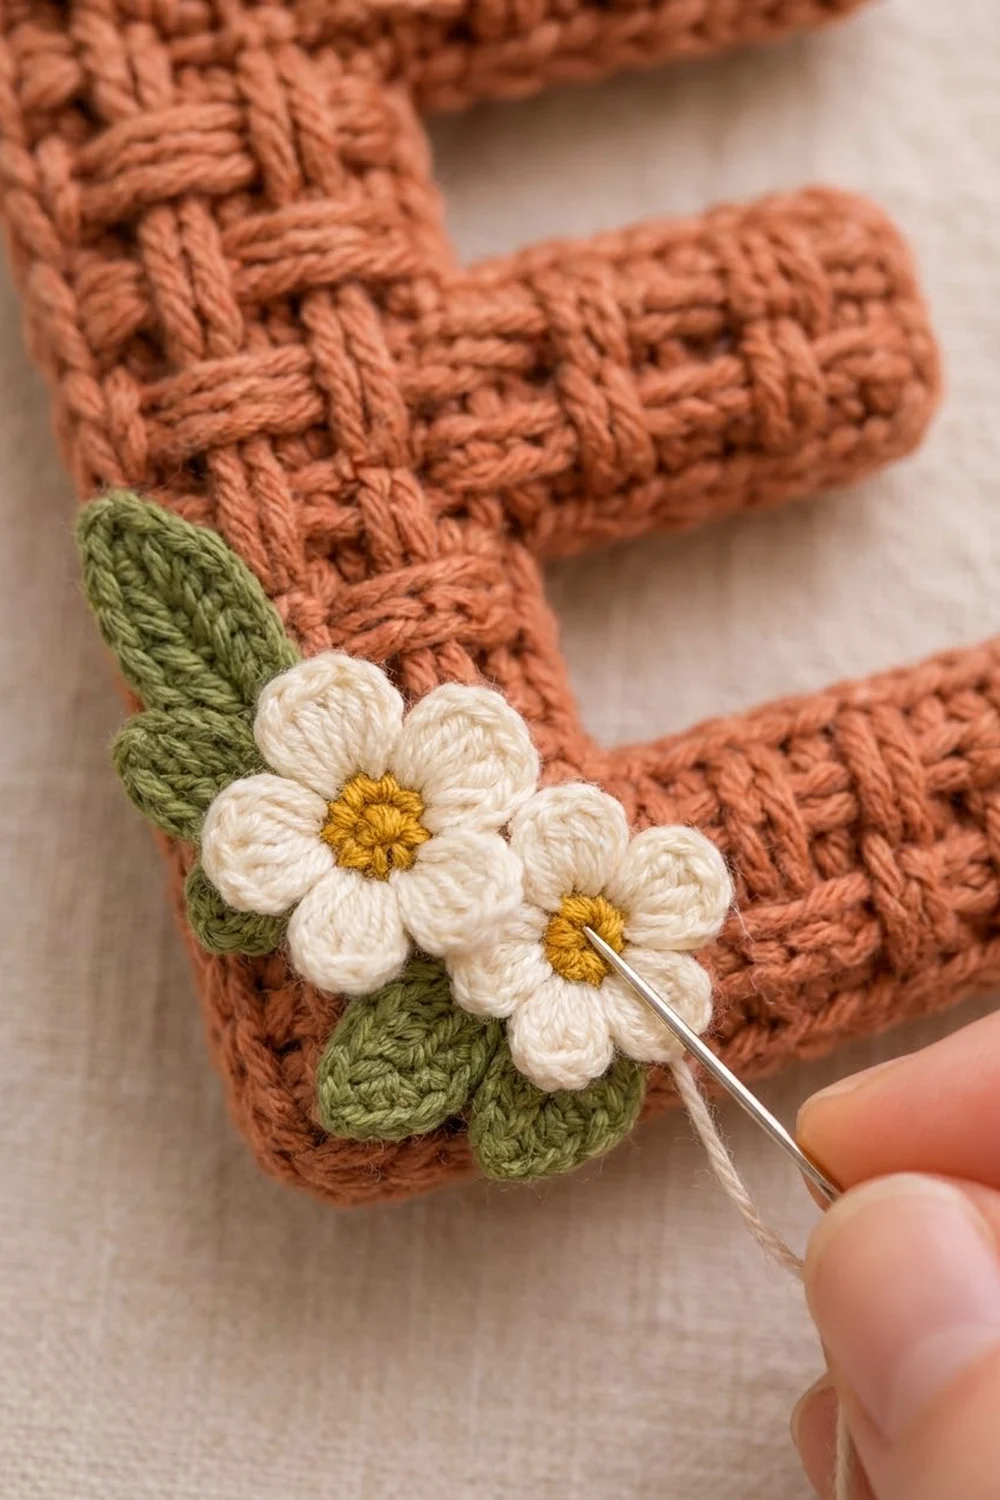
This little keychain is a capital letter E in a warm terracotta basketweave, with two cream five-petal flowers and three sage-green leaves tucked onto its lower left corner. A gold split ring on a short chain hangs from the top left corner, ready for a backpack zipper, a tote, or a set of keys.
The basketweave uses front post and back post double crochet in 2-stitch blocks that switch every 2 rows. This makes a dense, cushioned fabric with a woven look. A single crochet border rounds every outer corner. The colors are terracotta, cream, mustard, and sage green.
This pattern uses US crochet terms. The finished letter measures 2.65 in wide x 4.25 in tall (6.7 cm x 10.8 cm) after the border and blocking.
The E is worked flat in one piece in 15 rows, from the bottom arm up to the top arm. For the spine sections you stop each row early, and for the middle and top arms you add a short chain. One round of single crochet edges the outline. Then you sew on the flowers and leaves and attach the hardware.
Finished Size and Construction
- Finished size: 2.65 in x 4.25 in (6.7 cm x 10.8 cm), hardware not included
- Skill level: Intermediate
- Terminology: US
- Yarn weight: DK (#3) cotton
- Hook: 3.0 mm
- Number of pieces: 1 letter panel, plus 2 flower and 3 leaf appliqués
- Layout: single letter, no joining
- Piece size before border: 2.4 in x 4 in (6.1 cm x 10.2 cm)
- Border depth: 1 round of sc, 1/8 in (0.3 cm) per side
Materials
Choose a smooth, tightly plied DK cotton. It keeps the post-stitch texture crisp and the keychain firm. Fuzzy yarn will blur the blocks.
- Terracotta: 10 g, about 22 m (24 yd), letter and border
- Cream: 3 g, about 7 m (8 yd), petals
- Mustard: 1 g, about 2 m (2 yd), flower centers
- Sage green: 2 g, about 4 m (4 yd), leaves
All quantities include a small margin for test rows and sewing tails.
Tools:
- 3.0 mm crochet hook
- Tapestry needle
- Gold split ring, 1 in (2.5 cm), with a chain about 1 in (2.5 cm) long
- Gold jump ring, 1/4 in (0.6 cm)
- 2 pairs of flat-nose pliers
- Rust-proof pins and a blocking board
- Scissors and a ruler
Abbreviations (US Terms)
- ch: chain
- sl st: slip stitch
- sc: single crochet
- hdc: half double crochet
- dc: double crochet
- FPdc: front post double crochet
- BPdc: back post double crochet
- MR: magic ring
- st(s): stitch(es)
- RS / WS: right side / wrong side
FPdc: Yarn over and insert the hook from front to back to front around the post of the stitch. Yarn over, pull up a loop, then (yarn over, pull through 2) twice. The stitch sits forward on the side facing you.
BPdc: Yarn over and insert the hook from back to front to back around the post, then finish like a dc. The stitch pops forward on the opposite side.
Column groups: With the RS facing, number the 12 columns from the left edge in pairs: G1 (columns 1-2), G2 (3-4), G3 (5-6), G4 (7-8), G5 (9-10), and G6 (11-12).
- Block A: G1, G3, and G5 are raised on the RS.
- Block B: G2, G4, and G6 are raised on the RS.
A raised group is worked as FPdc on RS rows and BPdc on WS rows. Every row below is written out in full.
The ch 2 at the start of each row does not count as a stitch.
Gauge and Checkpoints
Gauge: 12 sts = 2.4 in (6.1 cm). 15 rows of basketweave = 4 in (10.2 cm), so each 3-row section is 0.8 in (2.0 cm) tall.
The letter is your test piece. Work Rows 1-3 and measure before you go on.
Checkpoints (before border):
- After Row 3: 2.4 in (6.1 cm) wide x 0.8 in (2.0 cm) tall
- After Row 6: 1.6 in (4.1 cm) tall, with the spine 1.2 in (3.0 cm) wide
- After Row 9: 2.4 in (6.1 cm) tall, with the middle arm 2 in (5.1 cm) long
- After Row 12: 3.2 in (8.1 cm) tall
- After Row 15: 2.4 in x 4 in (6.1 cm x 10.2 cm)
Too big by more than 1/8 in (0.3 cm)? Go down 0.25 mm in hook size. Too small? Go up 0.25 mm. Keep your post stitches relaxed, because tight post stitches shorten the rows.
Letter E Panel
Work with terracotta. RS rows run right to left. WS rows run left to right, starting at column 1.
Bottom Arm (Rows 1-3)
Row 1 (RS): Ch 14, dc in 3rd ch from hook and in each ch across. (12 dc)
Row 2 (WS, Block A): Ch 2, turn. [BPdc in next 2 sts, FPdc in next 2 sts] 3 times. (12 sts)
Row 3 (RS, Block A): Ch 2, turn. [BPdc in next 2 sts, FPdc in next 2 sts] 3 times. (12 sts)
Lower Spine (Rows 4-6)
Row 4 (WS, Block B): Ch 2, turn. FPdc in next 2 sts, BPdc in next 2 sts, FPdc in next 2 sts. Leave the remaining 6 sts unworked. (6 sts)
Row 5 (RS, Block B): Ch 2, turn. BPdc in next 2 sts, FPdc in next 2 sts, BPdc in next 2 sts. (6 sts)
Row 6 (WS, Block A): Ch 2, turn. BPdc in next 2 sts, FPdc in next 2 sts, BPdc in next 2 sts. (6 sts) Ch 6 for the middle arm.
Middle Arm (Rows 7-9)
Row 7 (RS, Block A): Turn. Dc in 3rd ch from hook and in next 3 ch, which makes columns 10 to 7. Then FPdc in next 2 sts, BPdc in next 2 sts, FPdc in next 2 sts. (4 dc + 6 post sts = 10 sts)
Row 8 (WS, Block B): Ch 2, turn. FPdc in next 2 sts, BPdc in next 2 sts, FPdc in next 2 sts, BPdc in next 2 sts, FPdc in next 2 sts. (10 sts)
Row 9 (RS, Block B): Ch 2, turn. BPdc in next 2 sts, FPdc in next 2 sts, BPdc in next 2 sts, FPdc in next 2 sts, BPdc in next 2 sts. (10 sts)
Upper Spine (Rows 10-12)
Row 10 (WS, Block A): Ch 2, turn. BPdc in next 2 sts, FPdc in next 2 sts, BPdc in next 2 sts. Leave the remaining 4 sts unworked. (6 sts)
Row 11 (RS, Block A): Ch 2, turn. FPdc in next 2 sts, BPdc in next 2 sts, FPdc in next 2 sts. (6 sts)
Row 12 (WS, Block B): Ch 2, turn. FPdc in next 2 sts, BPdc in next 2 sts, FPdc in next 2 sts. (6 sts) Ch 8 for the top arm.
Top Arm (Rows 13-15)
Row 13 (RS, Block B): Turn. Dc in 3rd ch from hook and in next 5 ch, which makes columns 12 to 7. Then BPdc in next 2 sts, FPdc in next 2 sts, BPdc in next 2 sts. (6 dc + 6 post sts = 12 sts)
Row 14 (WS, Block A): Ch 2, turn. [BPdc in next 2 sts, FPdc in next 2 sts] 3 times. (12 sts)
Row 15 (RS, Block A): Ch 2, turn. [BPdc in next 2 sts, FPdc in next 2 sts] 3 times. (12 sts)
Do not fasten off. Your hook is now at the top left corner.
Flowers (Make 2)
Rnd 1: With mustard, MR, 5 sc in ring, pull the ring closed, join with sl st to first sc. Fasten off. (5 sc)
Rnd 2: Join cream with sl st in any sc. *(Ch 2, 2 dc, ch 2, sl st) in same sc, sl st in next sc; rep from * 3 more times, (ch 2, 2 dc, ch 2, sl st) in same sc. Fasten off, leaving an 8 in (20.3 cm) tail. (5 petals)
Each flower is about 1 in (2.5 cm) across.
Leaves (Make 3)
With sage green, ch 7.
Rnd 1: Sl st in 2nd ch from hook, sc in next ch, hdc in next ch, dc in next ch, hdc in next ch, 3 sc in last ch. Then work in the free loops along the other side of the chain: hdc, dc, hdc, sc, then sl st in the same ch as the first sl st. Fasten off, leaving an 8 in (20.3 cm) tail. (15 sts)
Each leaf is about 1 in (2.5 cm) long and 0.5 in (1.3 cm) wide, and pointed at the sl st end.
Border
Border gauge: 5 sc per 1 in (2.5 cm). On row edges, work 4 sc per 3-row section.
Corner sc: At each of the 8 outer corners, work 1 extra sc into the same spot as the next edge sc, so that spot holds 2 sc. At the 4 inner corners, add nothing.
Rnd 1 (RS): Ch 1, do not turn. Work:
- Corner sc in the last st of Row 15.
- Left edge: 20 sc.
- Corner sc.
- Bottom edge: 12 sc in the free loops of the foundation chain.
- Corner sc.
- Right edge of bottom arm: 4 sc.
- Corner sc.
- Top of bottom arm: 6 sc in the unworked sts of Row 3.
- Spine edge, Rows 4-6: 4 sc.
- Underside of middle arm: 4 sc in the free loops of the chain.
- Corner sc.
- Right edge of middle arm: 4 sc.
- Corner sc.
- Top of middle arm: 4 sc in the unworked sts of Row 9.
- Spine edge, Rows 10-12: 4 sc.
- Underside of top arm: 6 sc in the free loops of the chain.
- Corner sc.
- Right edge of top arm: 4 sc.
- Corner sc.
- Top edge: 12 sc across Row 15.
Join with sl st to the first sc. Fasten off and weave in the ends.
Count: 12 + 4 + 6 + 4 + 4 + 4 + 4 + 4 + 6 + 4 + 12 + 20 = 84 edge sc, plus 8 corner sc = 92 sc.
Why the math works: Horizontal edges get 1 sc per stitch, so 12 sc match the 2.4 in (6.1 cm) width. Each 4 sc measures 0.8 in (2.0 cm), which is exactly one 3-row section. The left edge’s 20 sc match the full 4 in (10.2 cm). The 8 corner sc give just enough ease to round each outer corner. The border adds 1/8 in (0.3 cm) per side, for 2.65 in x 4.25 in (6.7 cm x 10.8 cm).
Final Blocking
- Mist the letter until it is just damp.
- Lay it RS up on a blocking board.
- Pin the 8 outer corners into soft curves.
- Check the size: 2.65 in x 4.25 in (6.7 cm x 10.8 cm).
- Pin the arms straight and level.
- Pat the blocks with your fingertips so each group sits clearly forward or back.
- Let it dry completely, then unpin.
- Place the first flower on the left edge just above the bottom arm, and the second one down and to the right so it overlaps the bottom arm. Tuck one leaf above the top flower, one at the left edge, and one below the lower flower.
- Sew each appliqué on with its tail, stitching through back loops so nothing shows on the RS.
- Open the jump ring, pass it through the top left corner, add the end link of the chain, and close the ring fully.
Final Quality-Control Checklist
- The letter measures 2.65 in x 4.25 in (6.7 cm x 10.8 cm).
- Section counts are 12, 6, 10, 6, 12.
- The blocks alternate in a clean checkerboard.
- The border has 92 sc, lies flat, and has rounded corners.
- The flowers have 5 even petals.
- No sewing shows on the RS.
- The jump ring is fully closed.
Troubleshooting
Blocks look muddled. Blocks switch on Rows 4, 6, 8, 10, 12, and 14. Compare each row to the written sequence.
The letter slants. Make sure you skip the ch 2 at the start of each row and work into the last stitch.
Gap where an arm meets the spine. Snug the extension chain before Row 7 or Row 13, and close any gap with the tail.
The border ruffles. Keep to 4 sc per 3 rows.
The border cups. Go up 0.25 mm for the border only.
The petals flop. Close the MR tightly.
Care
Hand wash in cool water and lay flat to dry. Keep the hardware dry to protect the gold finish.

Final Notes
The measurement chain: 12 sts = 2.4 in (6.1 cm), 3 rows = 0.8 in (2.0 cm), 15 rows = 4 in (10.2 cm), and the 92-sc border adds 1/8 in (0.3 cm) per side, for a finished letter of 2.65 in x 4.25 in (6.7 cm x 10.8 cm). Check each stage and your E will come out crisp and ready to clip on.
Happy crocheting!