

This little keychain is a chunky capital “G” worked in soft mint green, with a single line of plump puff stitches running along the center of the letter. A narrow single-crochet edge frames the puffs and gives the letter a clean outline, and a gold keyring sits at the top of the curve.
At the lower left, a small spring bouquet finishes the design: one larger butter-yellow flower, two smaller yellow flowers, cream knotted centers, and three sage-green leaves tucked behind. The look is sweet and cottage-style, perfect for a bag charm or a personalized gift.
The pattern uses US crochet terms. The finished letter measures about 3.75 in (9.5 cm) tall and 3.25 in (8.3 cm) wide, with a band about 1 in (2.5 cm) wide.
Construction is simple. You crochet one straight strip on a foundation chain: a single-crochet row and a puff row. A border round of single crochet then adds extra stitches along the puff edge, which pulls the strip into the curve of the G and turns the crossbar. Blocking sets the shape, and the flowers and leaves are sewn on last.
Finished Size and Construction
- Finished size: about 3.75 in (9.5 cm) tall x 3.25 in (8.3 cm) wide
- Skill level: Easy to intermediate
- Terminology: US crochet terms
- Yarn weight: Worsted (#4) for the letter, DK (#3) for the appliqués
- Hook: 4.0 mm (G-6) for the letter, 3.0 mm for the appliqués
- Number of pieces: 1 letter body plus 6 small sewn-on appliqués (1 large flower, 2 small flowers, 3 leaves), all finished as one single keychain
- Layout: one continuous strip shaped into a “G”; the appliqué cluster sits at the lower left of the curve
- Strip size before border: about 7.25 in (18.4 cm) long x 0.6 in (1.5 cm) wide
- Border depth: about 0.2 in (0.5 cm) on each long edge
- Band width after border: about 1 in (2.5 cm)
Materials
Choose a smooth, light-colored worsted yarn for the letter so the puffs show clearly. Cotton or a cotton blend holds its shape best on a keychain. Acrylic is softer but needs firmer blocking. For the flowers and leaves, a DK cotton keeps them small and crisp.
- Mint green, worsted (#4): 12 g, about 24 m
- Butter yellow, DK (#3): 4 g, about 10 m
- Sage green, DK (#3): 3 g, about 8 m
- Cream, DK (#3): 1 g, about 3 m
Quantities include a safety margin of roughly 20 percent.
Tools:
- 4.0 mm (G-6) and 3.0 mm crochet hooks
- Gold split keyring, about 1 in (2.5 cm) across, with a short chain and jump ring
- Flat-nose pliers for the jump ring
- Tapestry needle
- 2 stitch markers
- Scissors
- Blocking mat, rustproof pins, and spray bottle
- Optional: fabric stiffener or diluted white glue
Abbreviations (US Terms)
- ch – chain
- sl st – slip stitch
- sc – single crochet
- hdc – half double crochet
- dc – double crochet
- sc2tog – single crochet 2 together
- sk – skip
- sp – space
- st(s) – stitch(es)
- puff – puff stitch (see below)
Puff stitch: (Yarn over, insert hook in the stitch, yarn over, pull up a loop to about 0.25 in (0.6 cm) tall) 4 times, yarn over and pull through all 9 loops on the hook, ch 1 to close. The closing ch 1 is part of the puff and does not count as a separate stitch.
Gauge and Checkpoints
Make a quick test strip before you start. With the 4.0 mm hook and mint yarn, ch 12 and work 2 rows of sc.
- Gauge: 9 sc = 2 in (5.1 cm)
- Checkpoint 1 (after Row 1): the strip measures about 7.25 in (18.4 cm) long.
- Checkpoint 2 (after Row 2): the strip measures about 0.6 in (1.5 cm) tall from the foundation edge to the puff tops.
- Checkpoint 3 (after the border): the band measures about 1 in (2.5 cm) wide, and the strip already curls on its own.
If your strip is too long, go down half a hook size. If it is too short, go up half a size. If the puffs look flat, pull the loops up slightly taller. If they crowd and buckle, pull them shorter.
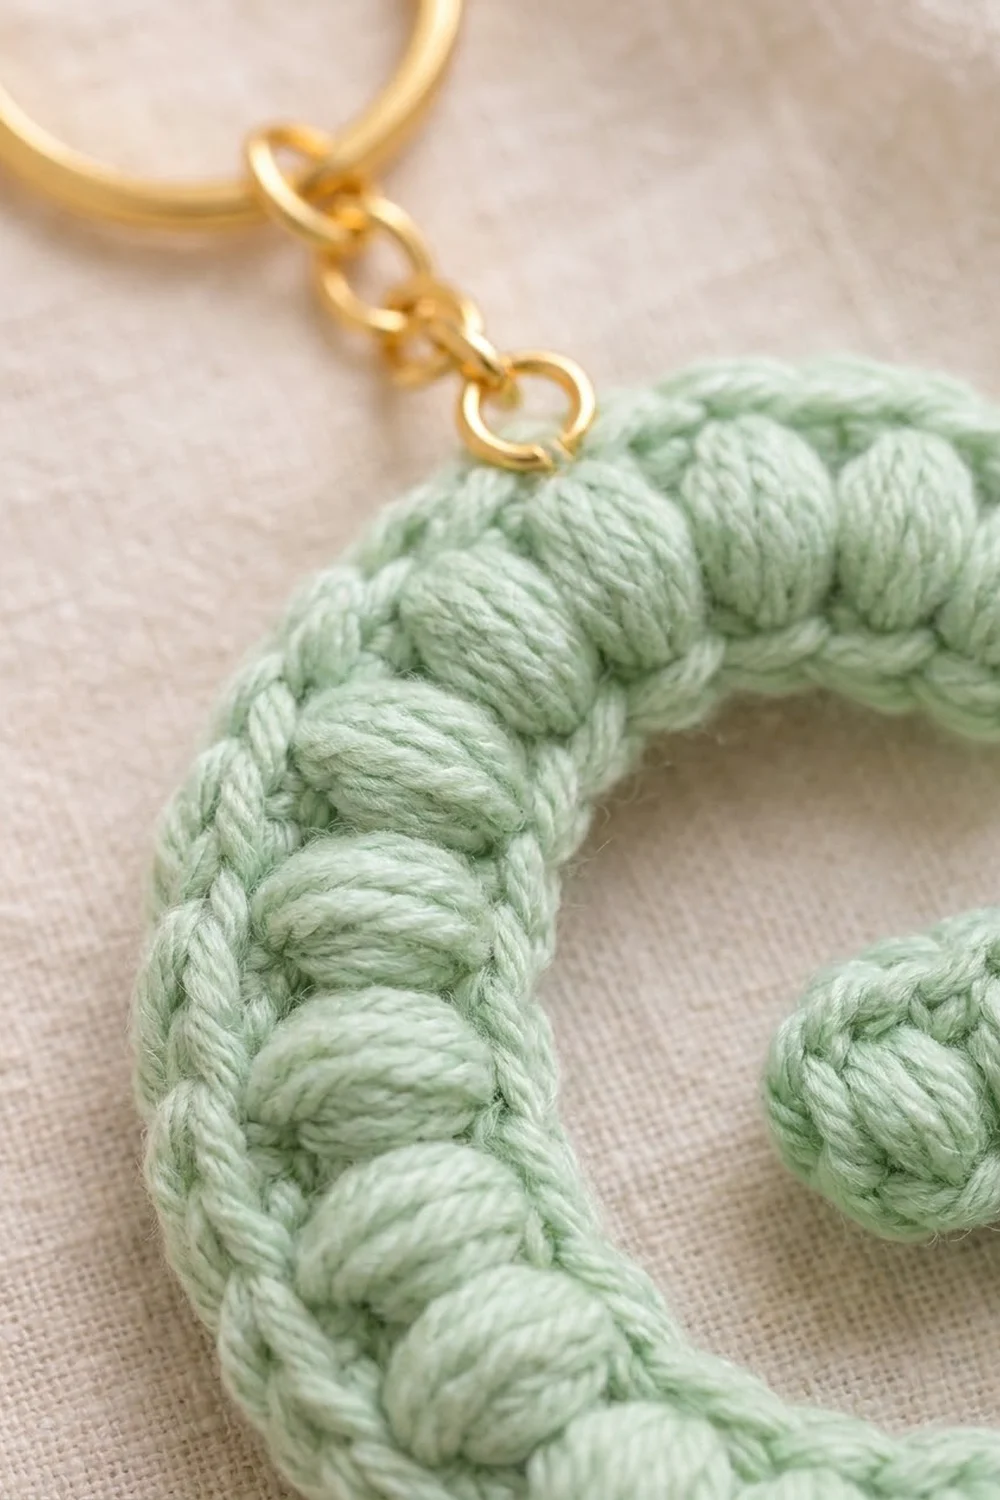
Letter Body
Row 1 is worked from the crossbar tip toward the top of the G. Row 2 is worked back the other way.
Foundation: With mint and the 4.0 mm hook, ch 34.
Row 1 (RS): Sc in 2nd ch from hook and in next 8 ch (9 sc for the crossbar), sc in next ch and place marker in this sc (corner sc), sc in each of the remaining 23 ch (curve). Total: 33 sc.
Row 2: Ch 2 (does not count as a st), turn. Puff in first sc, [ch 1, sk 1 sc, puff in next sc] 11 times (12 puffs along the curve), ch 1, sk the marked corner sc, puff in next sc, [ch 1, sk 1 sc, puff in next sc] 4 times (5 puffs along the crossbar). Total: 17 puffs and 16 ch-1 sps.
Move the marker into the ch-1 sp that sits over the corner sc. This is the 12th ch-1 sp, the corner sp.
Check: 1 + (11 x 2) + 2 + (4 x 2) = 33 sc used, so every Row 1 stitch is accounted for. Do not fasten off. You are now at the crossbar tip.
Border
The border is one round of sc worked all the way around the strip. It gives the letter its outline and its curve.
Border gauge: keep the same 9 sc = 2 in (5.1 cm) tension. Along the foundation edge, the border stays 1 stitch per chain, so that edge keeps its length. Along the curved puff edge, extra stitches make that edge longer, which bends the strip.
Round 1: Ch 1, do not turn. Work all sts as sc unless stated otherwise.
- Crossbar tip: 2 sc in the side of the last puff, 1 sc in the side of the last Row 1 st. Count: 3 sts.
- Inner (foundation) edge: Working in the free loops of the foundation chain, sc in each of the first 8 loops, sc2tog over the next 2 loops (the inner corner), sc in each of the remaining 23 loops. Count: 32 sts (8 + 1 + 23).
- Top end: 1 sc in the side of the first Row 1 st, 2 sc in the side of the first puff. Count: 3 sts.
- Outer curve: Sc in top of first puff, [3 sc in next ch-1 sp, sc in next puff, 2 sc in next ch-1 sp, sc in next puff] 5 times, 3 sc in next ch-1 sp, sc in next puff. Count: 40 sts (1 + 35 + 4).
- Outer corner: 3 sc in the marked corner sp. Count: 3 sts.
- Crossbar outer edge: [Sc in next puff, sc in next ch-1 sp] 4 times, sc in last puff. Count: 9 sts.
Join with sl st to first sc. Round total: 90 sts (3 + 32 + 3 + 40 + 3 + 9). Fasten off, leaving a 6 in (15.2 cm) tail.
Why the math works: The curve section has 23 Row 1 sts, which gives 12 puffs and 11 ch-1 sps. Along the inner edge, those 23 chains get 23 sc, so the inner edge keeps its length. Along the outer edge, the 12 puffs get 1 sc each and the 11 sps alternate 3 sc and 2 sc (6 x 3 + 5 x 2 = 28), for 40 sts. That puts 40 stitches on the outside over 23 on the inside, roughly a 1.7 ratio. This matches the outer and inner arcs of a curve about 3.75 in (9.5 cm) tall. The crossbar is straight, so its two edges stay about even: 9 sts on the outer edge, and 8 sc plus part of the sc2tog on the inner edge. The 3 sc at the outer corner and the sc2tog at the inner corner turn the crossbar inward.
Size checkpoint: Lay the piece down. It should curl naturally into an open C, with the crossbar folding inward at the lower right.
Flowers and Leaves
Use DK yarn and the 3.0 mm hook for all appliqués. Leave 8 in (20.3 cm) tails for sewing.
Large flower (make 1, yellow):
- Round 1: Magic ring, ch 1, 5 sc in ring, sl st to first sc. (5 sts)
- Round 2: (Sc, hdc, dc, hdc, sc) in next st 5 times, sl st to first sc. (25 sts, 5 petals)
The flower measures about 1.1 in (2.8 cm) across.
Small flower (make 2, yellow):
- Round 1: Magic ring, (ch 2, hdc, ch 2, sl st) in ring 5 times. Pull ring closed. (5 petals)
Each flower measures about 0.75 in (1.9 cm) across.
Centers: With cream, work 3 French knots in the center of the large flower and 1 French knot in the center of each small flower.
Leaf (make 3, sage):
- Ch 7. Sc in 2nd ch from hook, hdc in next ch, dc in next 2 ch, hdc in next ch, sl st in last ch (6 sts). Ch 2 for the tip. Working in the free loops on the other side: hdc in next loop, dc in next 2 loops, hdc in next loop, sc in next loop, sl st in the first skipped ch (6 sts).
Each leaf measures about 1 in (2.5 cm) long. If you like, add a vein with one line of backstitch in a lighter green.
Assembly
- Lay the letter face up with the crossbar at the right.
- Pin the large flower on the lower left of the curve, at about the 8 o’clock position.
- Pin the two small flowers along the bottom curve, just right of the large flower, so they overlap its petals slightly.
- Tuck one leaf above the large flower, one below it, and one to the right of the second small flower, so only the leaf tips show past the petals.
- Sew the leaves first, then the flowers. Use small stitches through the back loops of the border so nothing shows on the reverse.
- Open the jump ring with pliers and pass it through 2 border sts at the top of the curve, directly above the 4th puff. Attach the keyring chain and close the ring tightly.
Final Blocking
- Lightly mist the letter until it is damp, not soaked. You can block before or after sewing on the appliqués.
- Lay it face up on the blocking mat and shape a clean G: a round, open curve with a flat crossbar pointing inward.
- Pin around the outer edge every 0.5 in (1.3 cm). Angle the pins outward so they don’t crush the puffs.
- Check the size: 3.75 in (9.5 cm) tall and 3.25 in (8.3 cm) wide.
- Plump each puff gently with a fingertip.
- For a firm keychain, brush a thin layer of stiffener on the back only.
- Let it dry completely, for at least 8 hours, before unpinning.
Final Quality-Control Checklist
- Row 1 has 33 sc; Row 2 has 17 puffs and 16 ch-1 sps.
- The border round has 90 sts.
- The band is about 1 in (2.5 cm) wide everywhere.
- The letter is 3.75 in (9.5 cm) tall and 3.25 in (8.3 cm) wide.
- The crossbar sits flat and points inward.
- All 6 appliqués are secure, with no stitches showing on the back.
- The jump ring is fully closed.
- All tails are woven in and trimmed.
Troubleshooting
The strip will not curve: your outer-edge stitches are too tight. Loosen the border, or check that the sps really have 3 and 2 sc.
The edge ruffles: the border is too loose. Go down half a hook size for the border only.
The crossbar flops outward: re-pin it inward during blocking and add stiffener to the back of that section.
Puffs lean or twist: pull all 4 loops to the same height before closing.
Flowers cup upward: steam them flat before sewing.
Holes at the corner: close them with one small stitch from the tail on the wrong side.
Care
Spot clean with mild soap and cool water, then reshape and lay flat to dry. Do not machine wash, especially if you used stiffener.

Final Notes
The measurement chain is short and easy to follow. A gauge of 9 sc = 2 in (5.1 cm) gives a 33-st strip about 7.25 in (18.4 cm) long. The puff row brings it to 0.6 in (1.5 cm) wide. The 90-st border adds about 0.2 in (0.5 cm) on each edge for a 1 in (2.5 cm) band. It also pulls the strip into a G about 3.75 in (9.5 cm) tall and 3.25 in (8.3 cm) wide. Add the bouquet, clip on the ring, and your initial is ready to travel.
Happy crocheting!