

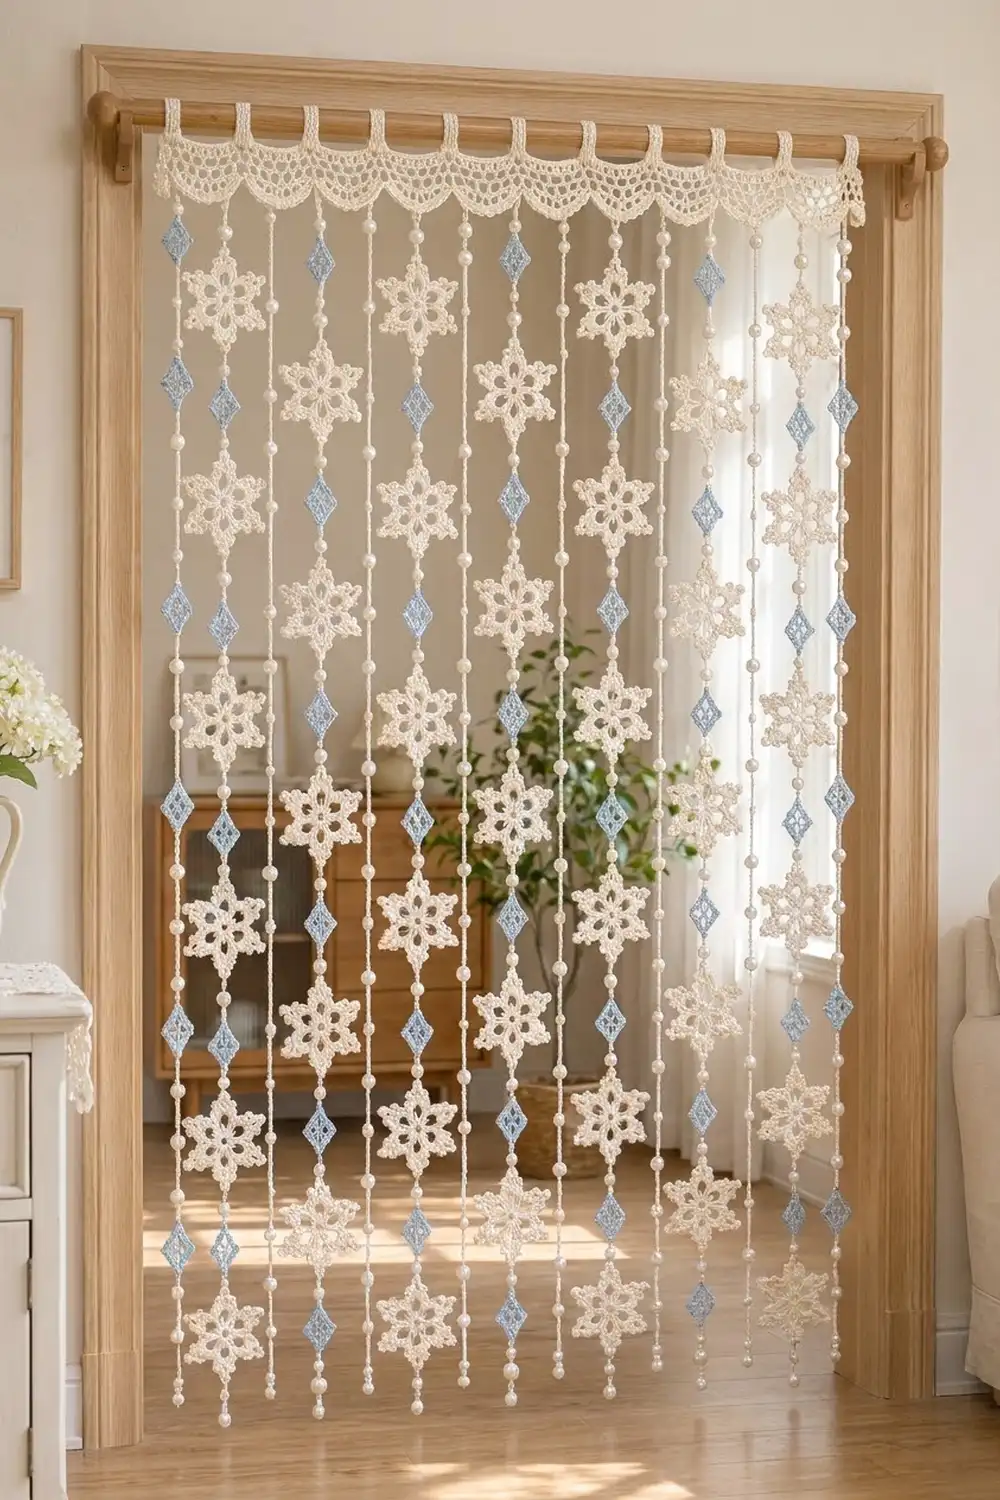
This airy doorway curtain looks like a light snowfall caught on strings. A cream mesh header with soft scallops hangs from a wooden rod. Below it, twelve beaded strands alternate between cream lace snowflakes and small light blue diamonds, with pearl beads chained in between.
The palette is calm and wintry: warm cream, pale sky blue and glossy pearl white. It suits a cottage-style hallway, a bedroom doorway or a seasonal window display. Light can pass through it, so the motifs read clearly against it.
The pattern uses US crochet terms. The finished curtain measures about 36.2 in (91.9 cm) wide and 75.6 in (192.0 cm) long from the top of the header to the lowest bead. The tabs add loops above the header.
You will make 48 snowflakes and 72 diamonds, crochet one header band, and then join the motifs to the header with chained bead cords. No sewing between motifs is needed. Each motif is caught in its strand with slip stitches as you go.
Finished Size and Construction
- Finished size: 36.2 in (91.9 cm) wide × 75.6 in (192.0 cm) long
- Skill level: Intermediate
- Terminology: US crochet terms
- Yarn weight: DK / light (#3) cotton
- Hook: 3.5 mm (E-4)
- Number of pieces: 1 header, 48 snowflakes, 72 diamonds, joined into 12 strands
- Layout: 12 strands that alternate diamond strand (D) and snowflake strand (S), starting with D at the left
- Piece sizes: snowflake 4 in (10.2 cm) point to point; diamond 2.5 in (6.4 cm) point to point
- Header size before border: 36.2 in × 2.4 in (91.9 cm × 6.1 cm)
- Border depth: scallops add 1.2 in (3.0 cm), so the header is 3.6 in (9.1 cm) deep
- Strand drop: about 72 in (182.9 cm) below the header
Materials
Choose a smooth mercerized cotton or cotton blend in DK weight. Cotton gives crisp snowflake points and hangs without stretching too much. Avoid fuzzy yarns, because they hide the lace.
The quantities below assume about 110 m (120 yd) per 50 g:
- Cream (header, snowflakes, all cords): 350 g, about 770 m (842 yd)
- Light blue (diamonds): 200 g, about 440 m (481 yd)
These quantities already include a margin of about 20% for gauge differences and swatching.
Tools and notions:
- 3.5 mm (E-4) crochet hook
- 190 pearl beads, 8 mm, with holes of at least 2 mm (174 are used, plus spares)
- A big-eye beading needle or dental-floss threader for stringing the beads
- Tapestry needle
- Stitch markers
- Rust-proof pins, blocking mats and a spray bottle
- Measuring tape
- A curtain rod up to 1.25 in (3.2 cm) in diameter
Abbreviations (US Terms)
- ch – chain
- sl st – slip stitch
- sc – single crochet
- dc – double crochet
- sk – skip
- sp – space
- st(s) – stitch(es)
- RS / WS – right side / wrong side
Special stitches:
- Point: ch 5, sl st in 4th ch from hook (this makes a picot ring), then sl st in the remaining ch.
- PB (pearl bead chain): slide one pre-strung bead up against the hook, then ch 1 around it so the bead is locked into the chain. One PB adds about 0.3 in (0.8 cm).
Gauge and Checkpoints
- Fabric gauge: 20 dc and 10 rows = 4 in (10.2 cm)
- Chain gauge: 5 ch = 1 in (2.5 cm)
Make one snowflake and one diamond before anything else. Block them lightly and measure them. Gauge matters most here, because every strand repeats the same motif 8 or 12 times, so a small error per motif adds up over the length.
Snowflake checkpoints:
- After Rnd 1: 1.1 in (2.8 cm) across
- After Rnd 2: 2 in (5.1 cm) across
- After Rnd 3: 3 in (7.6 cm) corner to corner
- After Rnd 4: 4 in (10.2 cm) point to point
Diamond checkpoints:
- After Rnd 1: 1 in (2.5 cm) per side
- After Rnd 2: 1.5 in (3.8 cm) per side
- After Rnd 3: 1.8 in (4.6 cm) per side, which gives 2.5 in (6.4 cm) point to point
If your motifs are too big: go down 0.25–0.5 mm in hook size.
If your motifs are too small: go up 0.25–0.5 mm in hook size.
The header and the cords should use the same hook as the motifs. Recheck the chain gauge separately, because many crocheters chain tighter than they stitch.
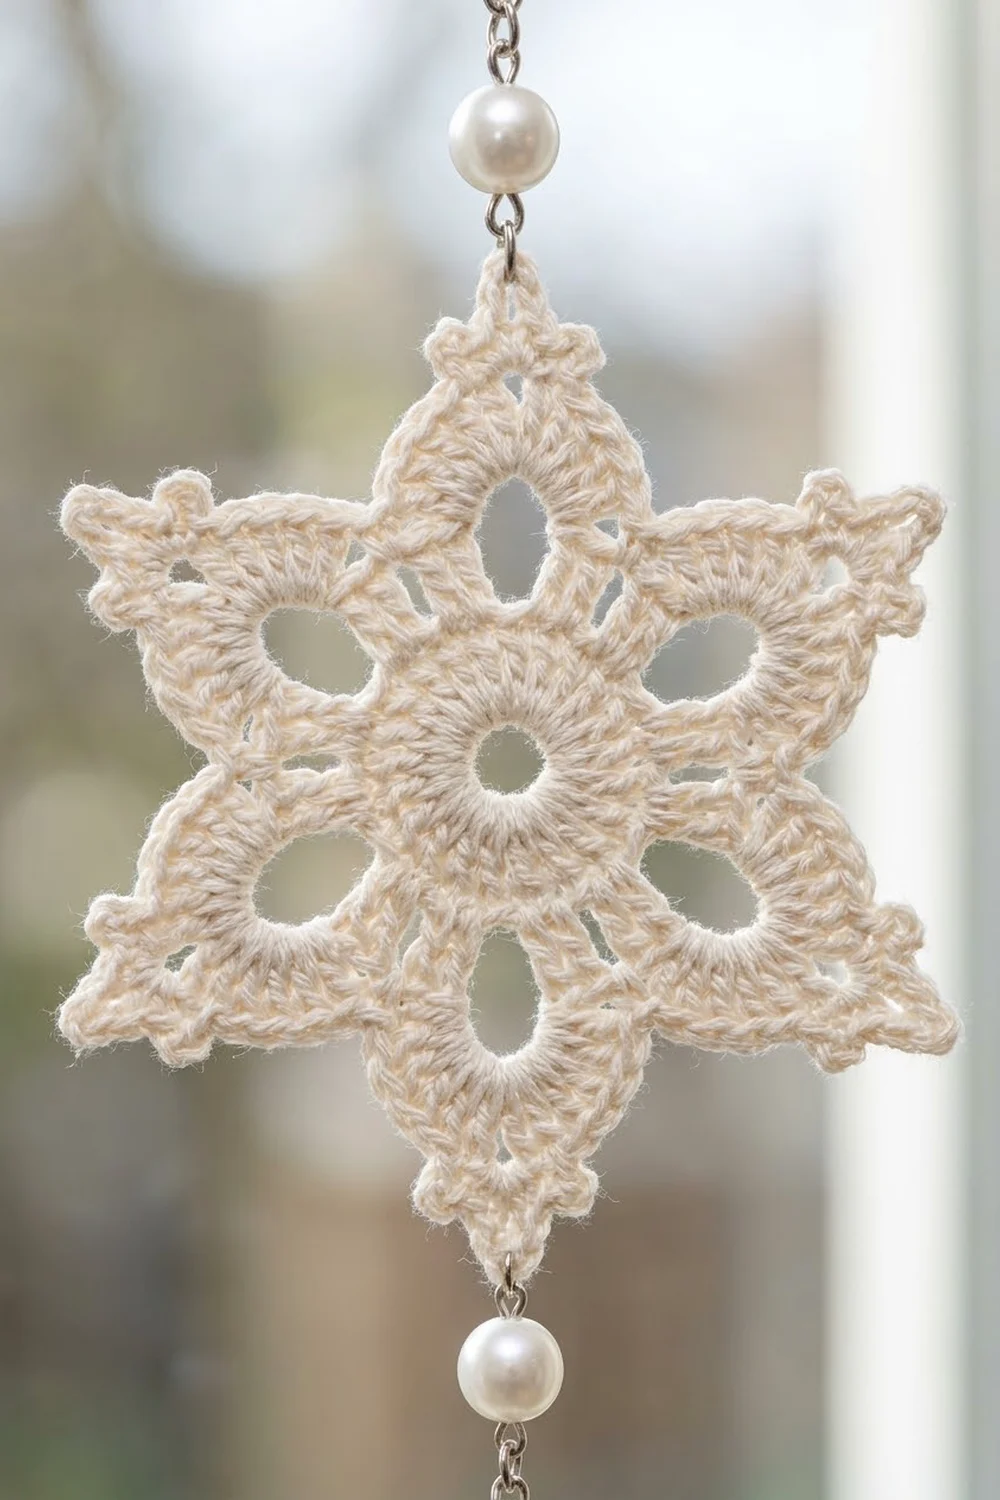
Snowflake (Make 48, Cream)
Rnd 1: Make a magic ring. Ch 3 (counts as dc), work 17 dc in the ring, then sl st to the top of the ch-3. Pull the ring closed. (18 dc)
Rnd 2: Ch 1, sc in the same st, ch 5, sk 2. Sc in next st, ch 5, sk 2; repeat from * 4 more times. Sl st to the first sc. (6 sc, 6 ch-5 sps) These loops form the six open petals.
Rnd 3: Sl st into the first ch-5 sp. Ch 3, then work (2 dc, ch 3, 3 dc) in the same sp, ch 1. (3 dc, ch 3, 3 dc) in next ch-5 sp, ch 1; repeat from * 4 more times. Sl st to the top of the ch-3. (36 dc, 6 ch-3 sps, 6 ch-1 sps)
Rnd 4: Ch 1, then sc in the same st and in the next 2 dc. (Sc, Point, sc) in the ch-3 sp. Sc in next 3 dc, sc in ch-1 sp, sc in next 3 dc, (sc, Point, sc) in next ch-3 sp; repeat from * 4 more times. Sc in next 3 dc, sc in the ch-1 sp, then sl st to the first sc. Fasten off. (54 sc, 6 Points)
Count check: each side has 7 sc between points, and each point contributes 2 sc. That gives 6 × 7 + 6 × 2 = 54.
Diamond (Make 72, Light Blue)
Rnd 1: Make a magic ring. Ch 3 (counts as dc), work 2 dc, ch 2. 3 dc, ch 2; repeat from * 2 more times. Sl st to the top of the ch-3. (12 dc, 4 ch-2 corners)
Rnd 2: Sl st in the next 2 dc and into the ch-2 sp. Ch 3, then work (dc, ch 2, 2 dc) in the same sp. Ch 2, sk 3 dc, (2 dc, ch 2, 2 dc) in next ch-2 sp; repeat from * 2 more times. Ch 2, then sl st to the top of the ch-3. (16 dc, 4 corner sps, 4 side sps) The ch-2 side spaces form the open lattice.
Rnd 3: Ch 1, then sc in the same st and the next dc. (Sc, ch 2, sc) in the corner sp, sc in next 2 dc, 2 sc in the side sp. Sc in next 2 dc, (sc, ch 2, sc) in corner sp, sc in next 2 dc, 2 sc in side sp; repeat from * 2 more times. Sl st to the first sc. Fasten off. (32 sc, 4 ch-2 corners)
Count check: each side has 8 sc, including its two corner sc, and 4 × 8 = 32. This solid round gives the crisp outline.
Header
The header is worked in rows from the top edge down, using cream.
Foundation: Ch 183.
Row 1 (RS): Dc in the 4th ch from hook and in each ch across. Turn. (181 sts, with the skipped ch counting as the first st)
Row 2: Ch 4 (counts as dc + ch 1), sk next st, dc in next st. Ch 1, sk 1, dc in next st; repeat from * across, working the last dc in the top of the turning ch. Turn. (91 dc, 90 ch-1 sps = 181 sts)
Rows 3–5: Ch 4, dc in the next dc. Ch 1, dc in next dc; repeat from * across, working the last dc in the 3rd ch of the turning ch-4. Turn. (181 sts in each row)
Row 6: Ch 3 (counts as dc), then dc in each ch-1 sp and each dc across. Turn. (181 dc)
Checkpoint: the header should measure 36.2 in × 2.4 in (91.9 cm × 6.1 cm). Do not fasten off; continue straight into the Border.
Make All Pieces
| Piece | Color | Quantity |
|---|---|---|
| Header | Cream | 1 |
| Snowflakes | Cream | 48 (6 strands × 8) |
| Diamonds | Light blue | 72 (6 strands × 12) |
| Pearl beads | — | 174 (6 × 16 + 6 × 13) |
Layout grid (header across the top, strands numbered from left to right):
[==============  HEADER WITH 12 SCALLOPS  ==============]
 1   2   3   4   5   6   7   8   9   10  11  12
 D   S   D   S   D   S   D   S   D   S   D   S
12d  8s 12d  8s 12d  8s 12d  8s 12d  8s 12d  8s
D = diamond strand with 12 diamonds and 13 pearls. S = snowflake strand with 8 snowflakes and 16 pearls.
Block every motif flat before joining.
Border
The border has three parts: scallops along the lower edge, a short edging on each side, and hanging tabs along the top edge. Border gauge is the same as the fabric gauge, 20 sts = 4 in (10.2 cm). The scallop rows should lie flat without ruffling.
Scallop Row S1 (along the lower edge): Ch 1, sc in the first dc. Ch 5, sk 4, sc in next dc; repeat from * 35 more times. Turn. (37 sc, 36 ch-5 loops)
Scallop Row S2: Ch 1. 5 sc in next loop, 9 dc in next loop, 5 sc in next loop; repeat from * 11 more times. Sl st in the last sc and fasten off. (12 scallops × 19 sts = 228 sts)
Place a marker in the 5th dc (the center dc) of each scallop. These 12 markers are where the strands attach.
Side edging: Join cream at the top corner of one short side. Work 2 sc in each row-end of Rows 1–6 to get 12 sc on that side, then fasten off. Repeat on the other short side (12 sc).
Hanging tabs (along the top edge): Turn the header so the foundation chain faces up. The top edge has 181 free loops, one under each Row 1 stitch. Join cream in the 1st loop.
- Tab Row 1: Ch 1, then sc in this loop and the next 4 loops. Turn. (5 sc)
- Tab Rows 2–18: Ch 1, sc in each sc across. Turn. (5 sc)
After Row 18 the tab measures about 4.5 in (11.4 cm). Fasten off, leaving a 10 in (25.4 cm) tail. Skip the next 11 loops and make the next tab in the same way. Make 12 tabs in total.
Fold each tab to the WS and whipstitch its last row to the back of Row 2. Check that each loop slides over your rod, which can be up to 1.25 in (3.2 cm) in diameter.
Why the math works:
- Bottom edge: 181 = 1 + (36 × 5), so the 36 loops of S1 use every stitch exactly. Three loops make one scallop, giving 36 ÷ 3 = 12 scallops, each 15 sts wide, or 3 in (7.6 cm).
- Top edge: 12 tabs × 5 sts + 11 gaps × 11 sts = 60 + 121 = 181, so the two outer tabs sit flush with the side edges.
- Strand spacing: the strands are spaced 3 in (7.6 cm) apart. The first and last strands sit 1.5 in (3.8 cm) in from the side edges.
Joining the Strands
Before starting each strand, string the beads onto the cream ball: 13 beads for a D strand or 16 beads for an S strand. Each strand starts at a scallop marker and is worked downward as one continuous chain cord.
Diamond strand (D) – scallops 1, 3, 5, 7, 9 and 11:
- Sl st into the marked center dc.
- Make the lead: ch 4, PB, ch 4.
- Sl st into the top corner ch-2 sp of a diamond. Ch 11, letting the chain run behind the diamond, then sl st into the bottom corner ch-2 sp. Ch 8, PB, ch 8. Repeat from * 10 more times.
- Sl st into the top corner of the 12th diamond, ch 11 behind it, and sl st into its bottom corner.
- Make the tail: ch 6, PB, ch 1. Fasten off.
Each D strand uses 323 ch and 13 PB.
Snowflake strand (S) – scallops 2, 4, 6, 8, 10 and 12:
- Join and make the lead as for the D strand.
- Sl st into the picot ring of a snowflake’s top Point. Ch 18 behind the snowflake, then sl st into the picot ring of the opposite Point. Ch 8, PB, ch 6, PB, ch 8. Repeat from * 6 more times.
- Join the 8th snowflake in the same way.
- Make the tail: ch 12, PB, ch 1. Fasten off.
Each S strand uses 319 ch and 16 PB.
Stitch-to-stitch logic: each motif is held at exactly two points: the top tip and the bottom tip. The hidden back chain is about 0.2 in (0.5 cm) shorter than the motif, so the motif stays taut and flat instead of buckling.
Tension advice: keep the chains even and slightly relaxed, matching your gauge swatch. Tight chains will pucker the motifs, and loose ones will stretch under weight.
Size checkpoint: hang each strand from its scallop and measure it. The drop is about 72 in (182.9 cm):
- S strand: 1.9 + 32 + 35 + 2.9 = 71.8 in (182.4 cm)
- D strand: 1.9 + 30 + 38.5 + 1.7 = 72.1 in (183.1 cm)
Adjust only the tail chains if needed.
Final Blocking
- Weave in all ends first, hiding them inside solid rounds or along the cords.
- Mist the header and pin it flat to 36.2 in × 3.6 in (91.9 cm × 9.1 cm), pinning each scallop into a round curve.
- Pin the tabs flat and let everything dry fully.
- Hang the curtain on its rod.
- Mist the strands lightly and tug each snowflake Point and diamond corner into shape by hand.
- Let the curtain dry while hanging. Gravity evens out the cords.
- Re-measure the strands and trim any uneven ones by retying the tail at the right length.
Final Quality-Control Checklist
- 12 tabs, evenly spaced and securely sewn
- Header measures 36.2 in (91.9 cm) wide, with 12 even scallops
- Strands alternate D and S, starting with D at the left
- Each D strand has 12 diamonds and 13 pearls; each S strand has 8 snowflakes and 16 pearls
- No back chains show from the front
- Every Point and corner is crisp and symmetrical
- All strands hang within 0.5 in (1.3 cm) of each other
- No loose ends or slipping beads
Troubleshooting
- Header ruffles at the scallops: your S2 dc are too loose. Use a smaller hook for Row S2 only.
- Header pulls in at the scallops: work the S1 chains a little looser.
- Snowflakes cup: Rnd 3 is too tight. Block hard or go up a hook size.
- Motifs twist on the strand: check that you joined into the exact tip spaces that sit opposite each other.
- Beads slide along the cord: make sure you worked the ch 1 around each bead, not beside it.
- Strands are different lengths: count the gap chains again. A single missed ch-8 changes the length by 1.6 in (4.1 cm).
Care
Hand wash in cool water with mild soap, then roll the curtain in a towel to remove water. Rehang it to dry, and re-shape the motifs while damp.
Final Notes
The measurement chain runs like this:
- Each motif is gauged to 4 in (10.2 cm) or 2.5 in (6.4 cm).
- The 181-stitch header measures 36.2 in (91.9 cm).
- 12 scallops of 15 sts each place the strands 3 in (7.6 cm) apart.
- Measured chain gaps bring every strand to about 72 in (182.9 cm).
- The finished curtain is 75.6 in (192.0 cm) long.
Check each link in that chain and the curtain will hang straight.
Happy crocheting!