

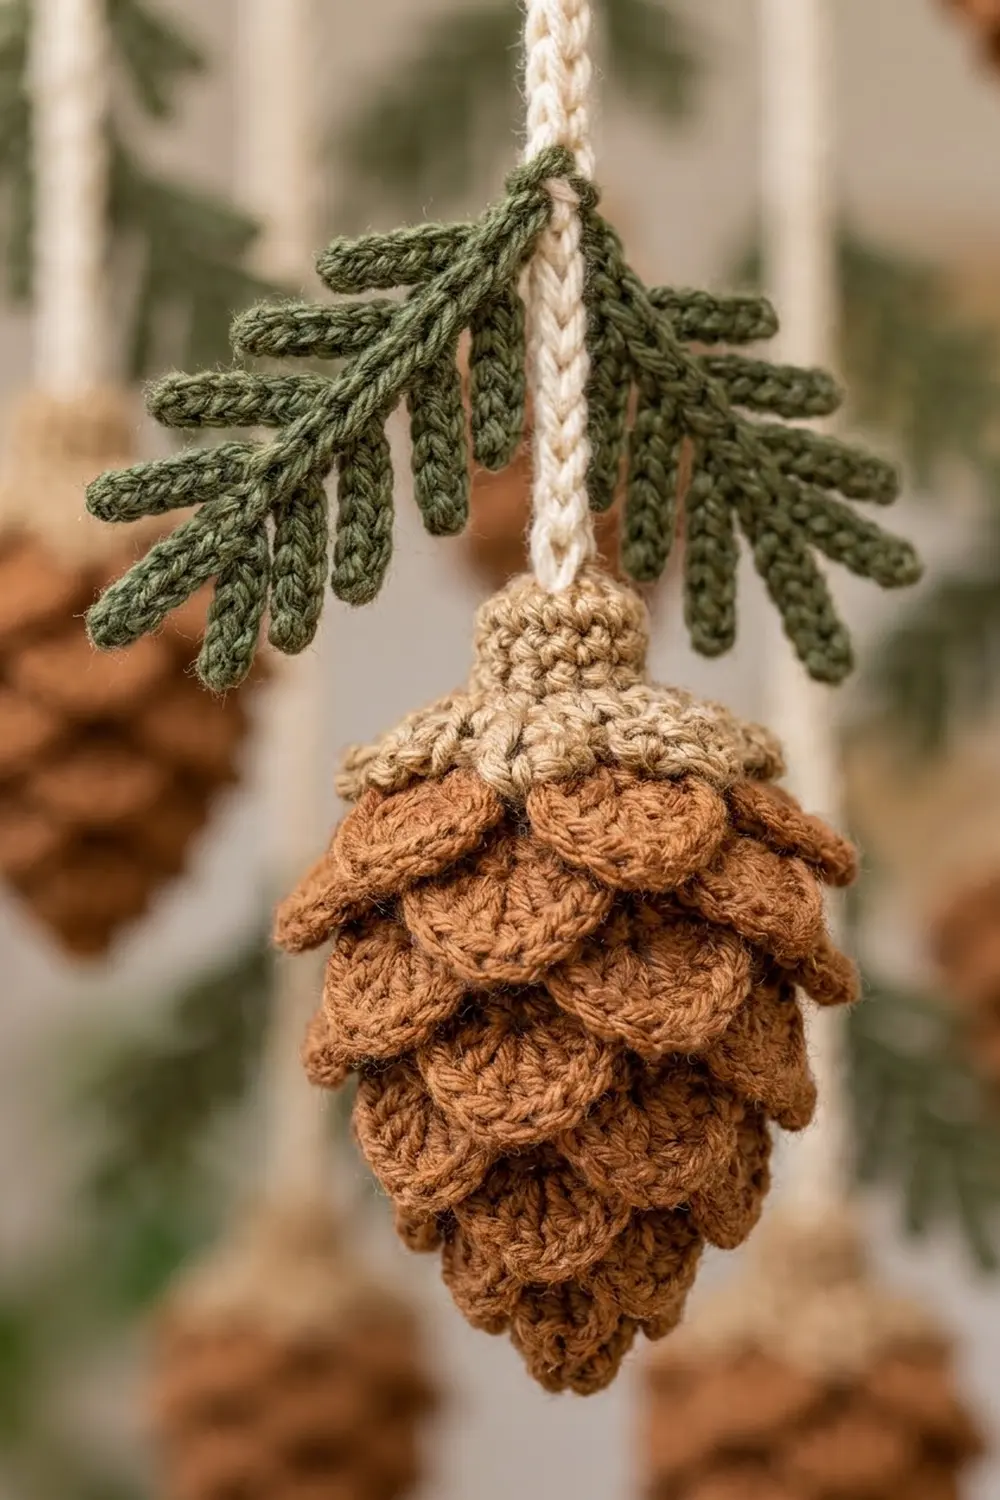
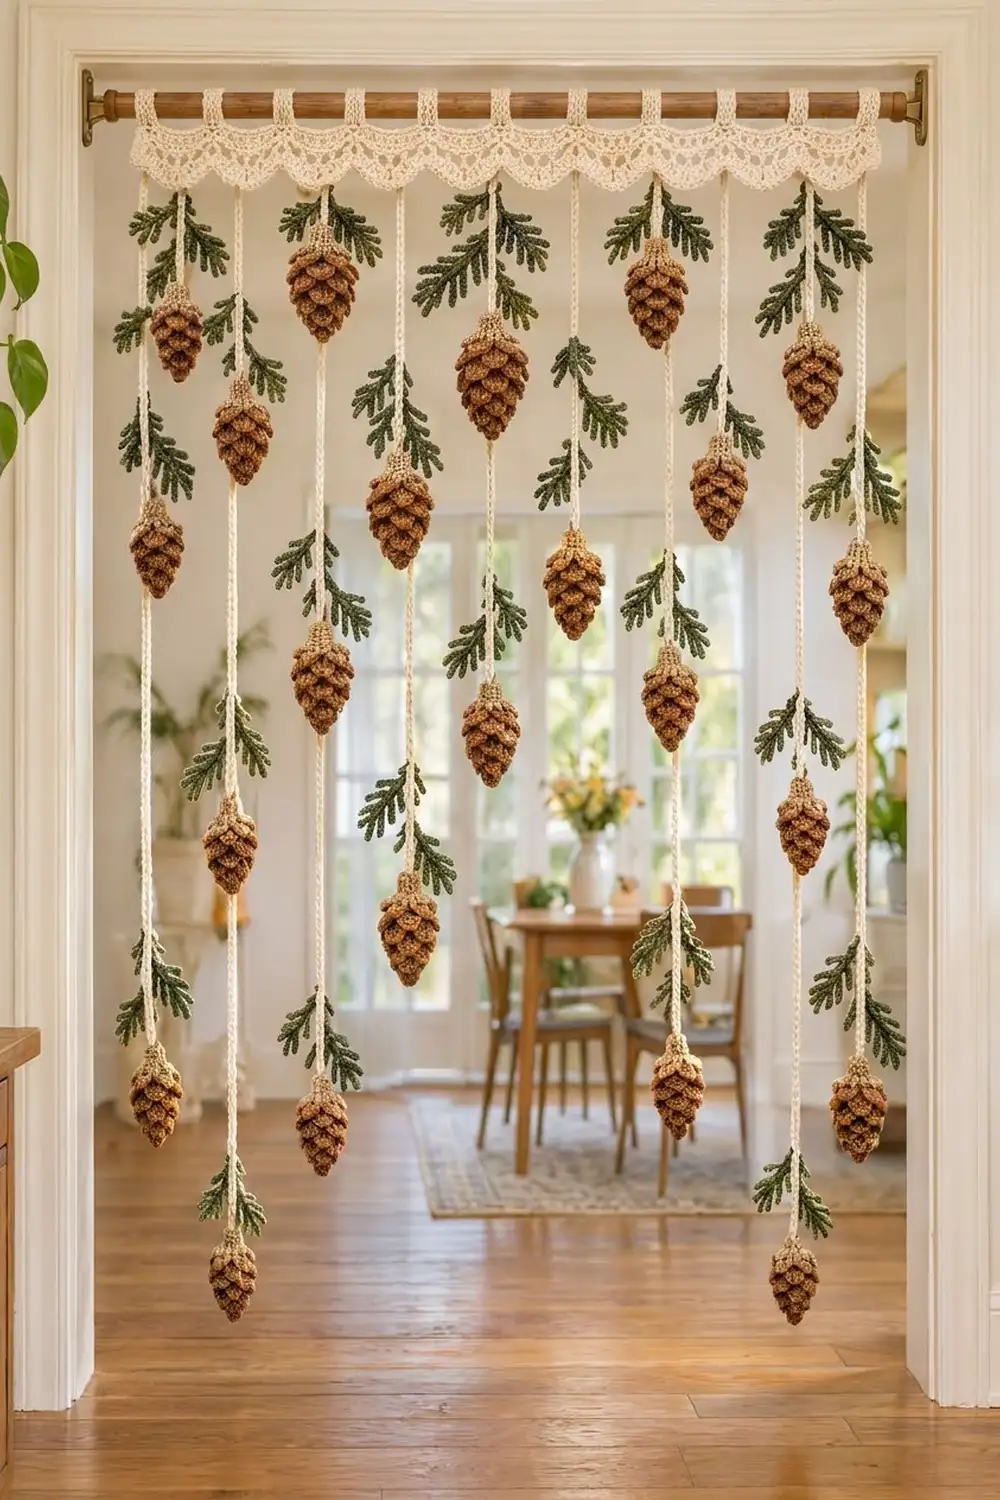
The Woodland Pinecone Doorway Curtain brings a quiet forest feel into a room. A cream scalloped valance hangs from a wooden rod, and nine slim cords drop from it. Brown pinecones and pairs of dark green pine sprigs are spaced along each cord.
The palette is natural and warm: cream cotton, a medium brown for the cones, a light tan for the cone crowns and top scale ring, and a deep olive green for the sprigs. The cones sit at staggered heights from cord to cord, so the curtain looks full but still lets light and people through.
This pattern uses US crochet terms. The finished valance measures 36.25 in (92.1 cm) wide and 3.75 in (9.5 cm) deep. The longest drop, from the top of the valance to the tip of the lowest cone, is 72.5 in (184.2 cm).
You will work the valance in rows from the top edge down and finish it with a scalloped border, then add tabs along the top. The cords are slip-stitch chains. Each pinecone is a small stuffed shape with scales worked into free front loops, and each sprig is a chain spine with slip-stitch needles.
Finished Size and Construction
- Finished size: 36.25 in (92.1 cm) wide; longest drop 72.5 in (184.2 cm), shorter drop 66.5 in (168.9 cm)
- Skill level: Intermediate
- Terminology: US crochet terms
- Yarn weight: Worsted (#4) cotton
- Hooks: 4.0 mm (G-6) for valance and cords; 3.5 mm (E-4) for cones and sprigs
- Number of pieces: 145 (1 valance, 9 cords, 45 pinecones, 90 sprigs)
- Layout: 9 cords hung 4.5 in (11.4 cm) apart, alternating long (A) and short (B)
- Piece sizes: pinecone 2.75 in (7.0 cm) long and 1.75 in (4.4 cm) wide; sprig 3.5 in (8.9 cm) long
- Valance before border: 36.25 in x 2.25 in (92.1 cm x 5.7 cm)
- Border depth: 1.5 in (3.8 cm) at scallop centers
Materials
Use a smooth, mercerized or matte worsted cotton. Cotton holds the scallops crisply and does not stretch much under the weight of the cones. Every quantity below assumes about 190 m per 100 g.
- Cream: 170 g (323 m) for valance, tabs, and cords
- Brown: 200 g (380 m) for pinecones
- Tan: 50 g (95 m) for cone crowns and top scale rings
- Olive green: 100 g (190 m) for sprigs
Tools:
- 4.0 mm (G-6) and 3.5 mm (E-4) hooks
- Tapestry needle
- Polyester fiberfill, about 60 g
- Stitch markers
- Measuring tape and rust-proof pins
- Curtain rod up to 1.25 in (3.2 cm) in diameter
All quantities include a margin of about 10 percent for swatching and tails.
Abbreviations (US Terms)
- ch: chain
- sl st: slip stitch
- sc: single crochet
- hdc: half double crochet
- dc: double crochet
- inc: 2 sc in the same stitch
- dec: sc2tog
- BLO / FLO: back loop only / front loop only
- MR: magic ring
- sp: space
- st(s): stitch(es)
Scale (special stitch): Sl st in next free front loop, (hdc, 3 dc, hdc) in next free front loop, sl st in next free front loop. Each scale uses 3 loops.
Slip-stitch cord: Chain the required length, then sl st into the back bump of each chain back to the start.
Gauge and Checkpoints
Valance (4.0 mm): 16 dc and 8 rows = 4 in (10.2 cm); 16 sc and 18 rows = 4 in (10.2 cm).
Cones (3.5 mm): 5 sc and 5 rounds = 1 in (2.5 cm).
Cords (4.0 mm): 5 sl st = 1 in (2.5 cm).
Make one pinecone and one sprig before anything else. The cone should measure 2.75 in (7.0 cm) long, and the sprig should measure 3.5 in (8.9 cm). If your cone is too big, go down 0.25 mm. If it is too small, go up 0.25 mm.
Checkpoints:
- After valance Row 1: 36.25 in (92.1 cm) wide
- After Row 6: 2.25 in (5.7 cm) deep
- After the border: each scallop 4.5 in (11.4 cm) junction to junction, total depth 3.75 in (9.5 cm)
- Cord: the first 50 sl st measure 10 in (25.4 cm)
If the valance is too wide, use a smaller hook. Adding or removing stitches would break the 18-stitch scallop repeat.
Valance Body
With cream and the 4.0 mm hook, ch 146.
Row 1: Sc in 2nd ch from hook and in each ch across, turn. (145 sc)
Row 2: Ch 1, sc in each st across, turn. (145 sc)
Row 3: Ch 3 (counts as dc), dc in each st across, turn. (145 dc)
Row 4 (mesh): Ch 4 (counts as dc + ch 1), skip next st, dc in next st, *ch 1, skip next st, dc in next st; repeat from * across, turn. (73 dc + 72 ch-1 sps = 145 sts)
Row 5: Ch 3 (counts as dc), dc in each ch-1 sp and each dc across, ending with dc in 3rd ch of turning ch. (145 dc)
Row 6: Ch 1, sc in each st across. (145 sc) Do not fasten off. Continue with the Border.
The body now measures 36.25 in x 2.25 in (92.1 cm x 5.7 cm).
Tabs (make 8)
Work these after the border is done. Turn the valance so the free loops of the foundation chain face up.
Count 145 free loops. The tabs sit on loops 7–13, 25–31, 43–49, 61–67, 79–85, 97–103, 115–121, and 133–139. Each tab is centered over a scallop. There are 6 loops free at each end and 11 free loops between tabs.
Row 1: Join cream in the first loop of the tab, ch 1, sc in the same loop and in the next 6 loops, turn. (7 sc)
Rows 2–20: Ch 1, sc in each st, turn. (7 sc)
Fasten off and leave a 10-in (25.4-cm) tail. Each tab is 1.75 in (4.4 cm) wide and 4.4 in (11.2 cm) long. Fold the tab to the back and whipstitch its last row along Row 2 of the valance.
Cords (make 9)
With cream and the 4.0 mm hook, leave an 8-in (20.3-cm) tail.
Cord A (make 5): Ch 331. Sl st in back bump of 2nd ch from hook and each ch across. (330 sl st; 66 in / 167.6 cm)
Cord B (make 4): Ch 301. Sl st in back bump of 2nd ch from hook and each ch across. (300 sl st; 60 in / 152.4 cm)
Fasten off. The starting tail marks the top end.
Pinecones (make 45)
Use the 3.5 mm hook. Work in continuous rounds and mark the first stitch of each round.
R1: Brown, 6 sc in MR. (6)
R2: Sc, inc; repeat from * 3 times. (9)
R3 (BLO): 2 sc, inc; repeat from * 3 times. (12)
R4: Sc in each st. (12)
R5 (BLO): Sc, inc; repeat from * 6 times. (18)
R6: Sc in each st. (18)
R7 (BLO): Sc in each st. (18)
R8: Sc in each st. (18)
R9 (BLO): Sc in each st. (18)
R10: Sc in each st. (18)
R11 (BLO): Sc, dec; repeat from * 6 times. (12)
Stuff firmly. Change to tan.
R12: Sc in each st. (12)
R13: Dec 6 times. (6)
Close the opening and leave a 10-in (25.4-cm) tan tail at the crown.
Scales: Hold the cone with the tip down. Each round worked in BLO leaves the front loops of the round below it free. Those free front-loop rings are R2, R4, R6, R8, and R10.
- R2 ring (9 loops): Join brown, 3 scales, sl st to first sl st.
- R4 ring (12 loops): 4 scales.
- R6 ring (18 loops): 6 scales.
- R8 ring (18 loops): 6 scales.
- R10 ring (18 loops): Tan, 6 scales.
That gives 25 scales in total. Let each ring fall toward the tip so it overlaps the ring below it.
Sprigs (make 90)
With olive green and the 3.5 mm hook, ch 18.
Sl st in 2nd ch from hook and next ch (tip). *Ch 5, sl st in 2nd ch from hook and next 3 ch (needle); repeat the needle once more; sl st in next 2 spine ch; repeat from * 5 more times. Sl st in last 3 ch (stem).
The spine count is 2 + 12 + 3 = 17 sl st. This gives 12 needles in 6 pairs. Fasten off and leave a 6-in (15.2-cm) tail.
Make All Pieces
- Cream: 1 valance, 8 tabs, 5 Cord A, 4 Cord B
- Brown with tan: 45 pinecones
- Olive green: 90 sprigs
Cone positions are measured down from the bottom edge of the valance. C marks a cone, and each cone has a sprig pair 2 in (5.1 cm) above it.
Cord:    1   2   3   4   5   6   7   8   9
Type:    A   B   A   B   A   B   A   B   A
12 in:   -   C   -   C   -   C   -   C   -
18 in:   C   -   C   -   C   -   C   -   C
24 in:   -   C   -   C   -   C   -   C   -
30 in:   C   -   C   -   C   -   C   -   C
36 in:   -   C   -   C   -   C   -   C   -
42 in:   C   -   C   -   C   -   C   -   C
48 in:   -   C   -   C   -   C   -   C   -
54 in:   C   -   C   -   C   -   C   -   C
60 in:   -   C   -   C   -   C   -   C   -
66 in:   C   -   C   -   C   -   C   -   C
In cm, the rows are 30.5, 45.7, 61.0, 76.2, 91.4, 106.7, 121.9, 137.2, 152.4, and 167.6. Every cord has 5 cones, for 45 in total. Neighboring cones are offset by 6 in (15.2 cm).
Joining
Finish the border before you start joining. The cords hang from the 9 junction sc of border Row 9: the first sc, the 7 sc between scallops, and the last sc. These are 4.5 in (11.4 cm) apart.
- Cords: Thread the top tail of each cord through its junction sc, front to back. Pull the cord up until its end touches the edge. Knot it on the back and weave in the tail. Hang Cord A at positions 1, 3, 5, 7, and 9, and Cord B at positions 2, 4, 6, and 8.
- Cones: Lay the curtain flat. Use the tan tail to sew the crown of each cone to the front of its cord at the grid mark, so the cone hangs centered on the cord. On each cord, sew the lowest cone to the cord’s final stitch.
- Sprigs: Sew two sprigs by their stems 2 in (5.1 cm) above each cone, one on each side of the cord. Angle them outward and slightly down in a V.
Keep each sewing stitch snug but not tight. A puckered cord will twist the cone. Hold the curtain up by the tabs after joining. The bottom of Cord A should measure 66 in (167.6 cm) below the valance edge, and Cord B should measure 60 in (152.4 cm). If a cord has stretched more than 1 in (2.5 cm), move its lowest cone up.
Border
Border gauge: One scallop is 18 body stitches, or 4.5 in (11.4 cm), from junction to junction. It is 1.5 in (3.8 cm) deep at its center.
Continue from Row 6, working along the bottom edge only.
Row 7 (arches): Ch 1, sc in first st, *ch 4, skip 2 sts, sc in next st; repeat from * across, turn. (49 sc + 48 ch-4 arches)
Row 8: Ch 1, sc in first sc, *3 sc in next arch, 4 hdc in next arch, 5 dc in next arch, 5 dc in next arch, 4 hdc in next arch, 3 sc in next arch, sc in next sc; repeat from * 7 more times, turn.
Each repeat has 24 stitches in the arches plus 1 junction sc, for 25 stitches. The row total is 1 + (8 x 25) = 201 sts. The Row 7 sc between arches inside a repeat are skipped.
Row 9: Ch 1, sc in first sc, *sc in next 3 sc, hdc in next 4 hdc, (dc in next dc, 2 dc in next dc) 5 times, hdc in next 4 hdc, sc in next 3 sc, sc in junction sc; repeat from * 7 more times.
Each repeat has 3 + 4 + 15 + 4 + 3 = 29 stitches plus 1 junction sc, for 30. The row total is 1 + (8 x 30) = 241 sts. Fasten off.
Why the math works: The body has 145 stitches, and 145 = 1 + (8 x 18). Each 18-stitch repeat makes exactly 6 arches (6 x 3 = 18). The single extra stitch becomes the first junction sc. The heights go sc, hdc, dc, then back down, which builds the curve. Extra stitches at the center of Row 9 push each scallop into a rounded shape.
Final Blocking
- Lay the valance flat before attaching any cords.
- Pin the top edge straight to 36.25 in (92.1 cm).
- Pin the 9 junction points 4.5 in (11.4 cm) apart along a straight line.
- Pin each scallop center 3.75 in (9.5 cm) below the top edge and shape the curves.
- Mist with water until damp and leave to dry fully.
- Steam the cords lightly while they hang so they relax and stay straight. Do not press the cones.
- Finish joining, then hang the curtain for a day to let it settle.
Final Quality-Control Checklist
- Valance is 36.25 in (92.1 cm) wide with 8 even scallops.
- All 8 tabs are the same length and centered over scallops.
- 9 cords hang in the order A, B, A, B, A, B, A, B, A.
- Each cord carries 5 cones and 5 sprig pairs.
- Cone crowns and top scale rings are tan, and the scales point toward the tip.
- No tails are visible from the front.
Troubleshooting
- Valance ruffles along Row 1: The foundation is too loose. Redo it with a smaller hook.
- Scallops are flat: Check the Row 9 increases. You need 15 dc across the center of each scallop.
- Scales stand straight out: Use a smaller hook for the scale rings only.
- Cords twist: Steam them while they hang, and sew the cones on with even tension.
- Tabs are too tight on the rod: Add 2 rows to each tab for every extra 0.5 in (1.3 cm) of rod diameter.
Care
Spot clean, or hand wash in cool water and dry flat. Re-pin the scallops while the valance is damp.
Final Notes
The measurements chain together. The body has 145 stitches, which makes 8 scallops of 4.5 in (11.4 cm), for a 36.25-in (92.1-cm) valance. The 9 junction points hold 5 long and 4 short cords, and 45 cones at 12-in (30.5-cm) spacing sit 6 in (15.2 cm) off from their neighbors. Check each checkpoint as you go, and the whole curtain will hang straight and even.
Happy crocheting!