

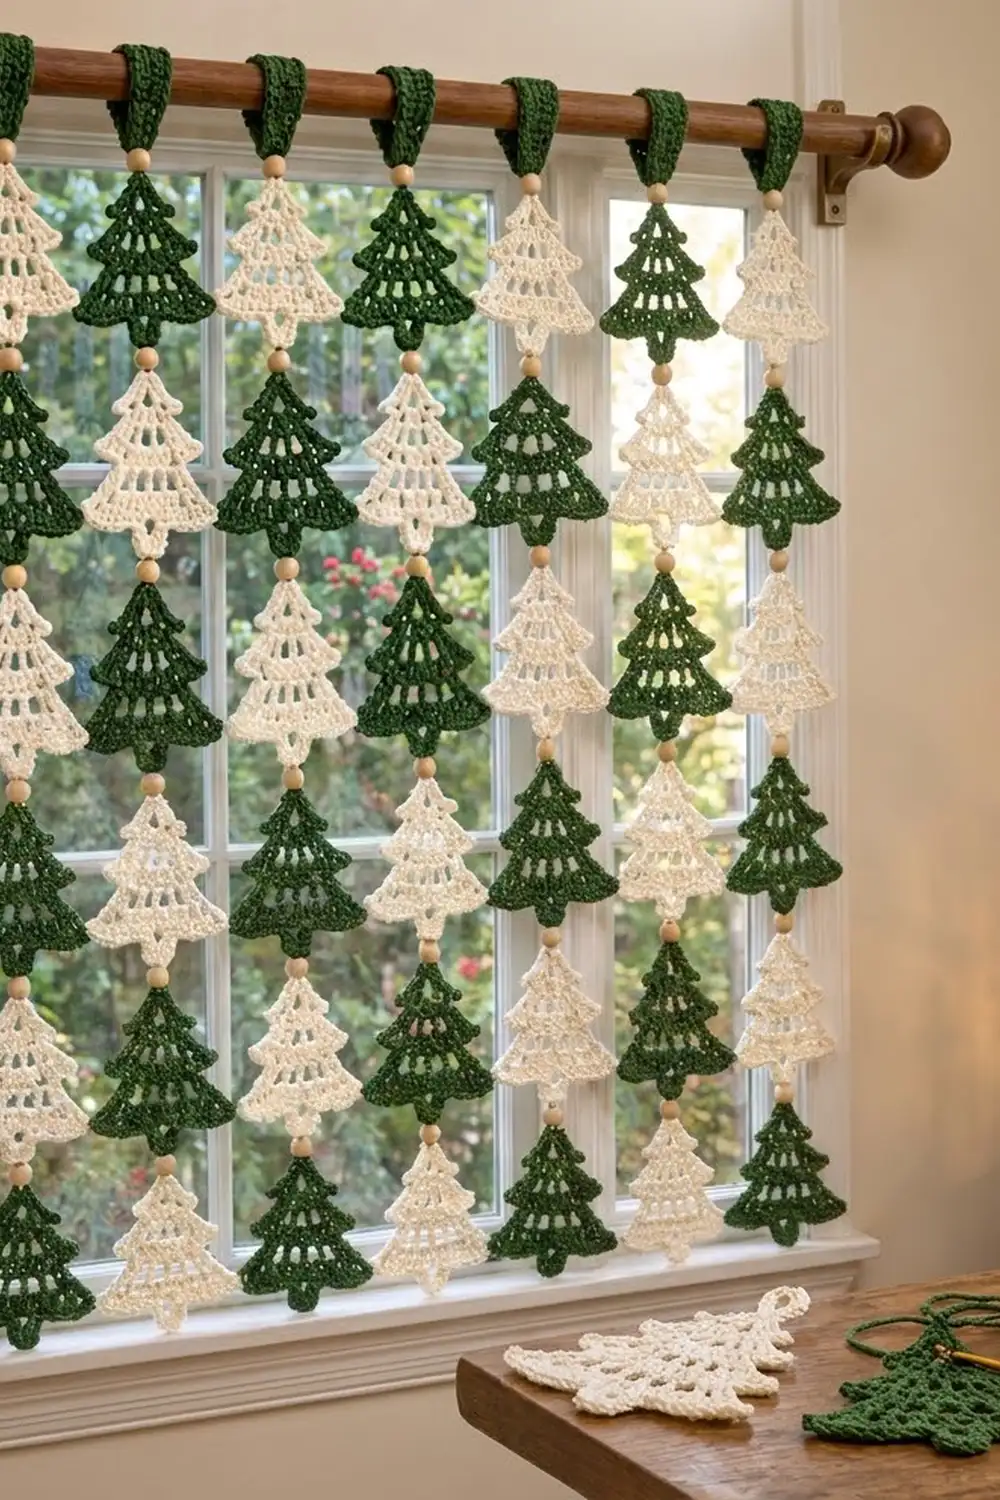
This curtain is made of rows of little stepped pine trees in forest green and cream. Wooden beads sit between the trees, and each strand hangs from a flat green tab looped over a curtain rod. Light comes through the mesh rows and the gaps between strands, so the window stays bright.
The colors alternate down every strand. Each strand starts with the opposite color from the one beside it, so the curtain reads as a soft checkerboard. The look is cozy and Scandinavian-inspired, a good fit for a holiday window or doorway.
All instructions use US crochet terms. One tree measures 5.5 in (14.0 cm) wide by 5.7 in (14.5 cm) tall. The finished curtain is 65.5 in (166.4 cm) wide and 70 in (177.8 cm) long, measured from the top of the rod.
Each tree is worked flat from the tip down. Rows of solid double crochet and mesh alternate, and slip stitches at the start of some rows create the steps between tiers. A single crochet edging finishes each tree. Then the trees are linked with beads into strands, and each strand gets a tab for the rod.
Finished Size and Construction
- Finished curtain: 65.5 in (166.4 cm) wide x 70 in (177.8 cm) long, from the top of the rod
- Skill level: Easy-intermediate
- Terminology: US
- Yarn weight: DK (#3) cotton
- Hook: 3.5 mm (E-4)
- Number of pieces: 110 trees and 11 tabs, linked by 110 bead connectors
- Layout: 11 strands x 10 trees, checkerboard colors
- Piece size: 5.5 in (14.0 cm) x 5.7 in (14.5 cm) per tree
- Size before border: 5 in (12.7 cm) x 5.2 in (13.2 cm)
- Border depth: 1 round of sc, 0.25 in (0.6 cm)
Materials
Use a smooth DK cotton. Cotton keeps the tier points crisp and barely stretches while hanging. The amounts below assume 50 g balls of about 115 m (126 yd).
- Color A, forest green: 550 g (about 1265 m / 1383 yd), for trees, tabs, and connectors
- Color B, cream: 450 g (about 1035 m / 1132 yd), for trees
All quantities include a margin of about 10%.
Tools:
– 3.5 mm (E-4) crochet hook
– 120 round natural wooden beads, 12 mm, with holes of at least 4 mm (110 needed, plus spares)
– Large-eye tapestry needle that fits through the bead holes
– Stitch markers and measuring tape
– Blocking mats and rustproof pins
– Spray bottle or steamer
– Scissors
Abbreviations (US Terms)
- ch – chain
- sl st – slip stitch
- sc – single crochet
- dc – double crochet
- sk – skip
- st(s) – stitch(es)
- sp – space
- rep – repeat
- RS – right side
Special stitches:
- Mesh Row (on a base of N sts): Ch 3 (counts as dc), 2 dc in first st. Ch 1, sk next st, dc in next st, rep from * until 2 sts remain. Ch 1, sk next st, 3 dc in last st. Total: N + 4 sts. Each ch-1 sp counts as 1 st.
- Solid Row (on a base of N sts): Ch 3 (counts as dc), 2 dc in first st, dc in each st and ch-1 sp across to the last st, 3 dc in last st. Total: N + 4 sts.
Gauge and Checkpoints
- Gauge: 20 dc x 10 rows = 4 in (10.2 cm)
- Sc gauge (tabs and edging): 20 sc x 22 rows = 4 in (10.2 cm)
Make one complete tree before anything else and measure it. Every later measurement in the pattern depends on it.
Checkpoints:
– After Row 3: 2.2 in (5.6 cm) wide, 1.2 in (3.0 cm) tall
– After Row 7: 3.8 in (9.7 cm) wide, 2.8 in (7.1 cm) tall
– After Row 11: 5 in (12.7 cm) wide, 4.4 in (11.2 cm) tall
– After Row 13: 5 in (12.7 cm) wide, 5.2 in (13.2 cm) tall
– After edging: 5.5 in (14.0 cm) x 5.7 in (14.5 cm)
If the tree is too big, go down 0.5 mm in hook size. If it is too small, go up 0.5 mm. If only the height is off, check your dc: pull the first loop up to full stitch height instead of tightening it.
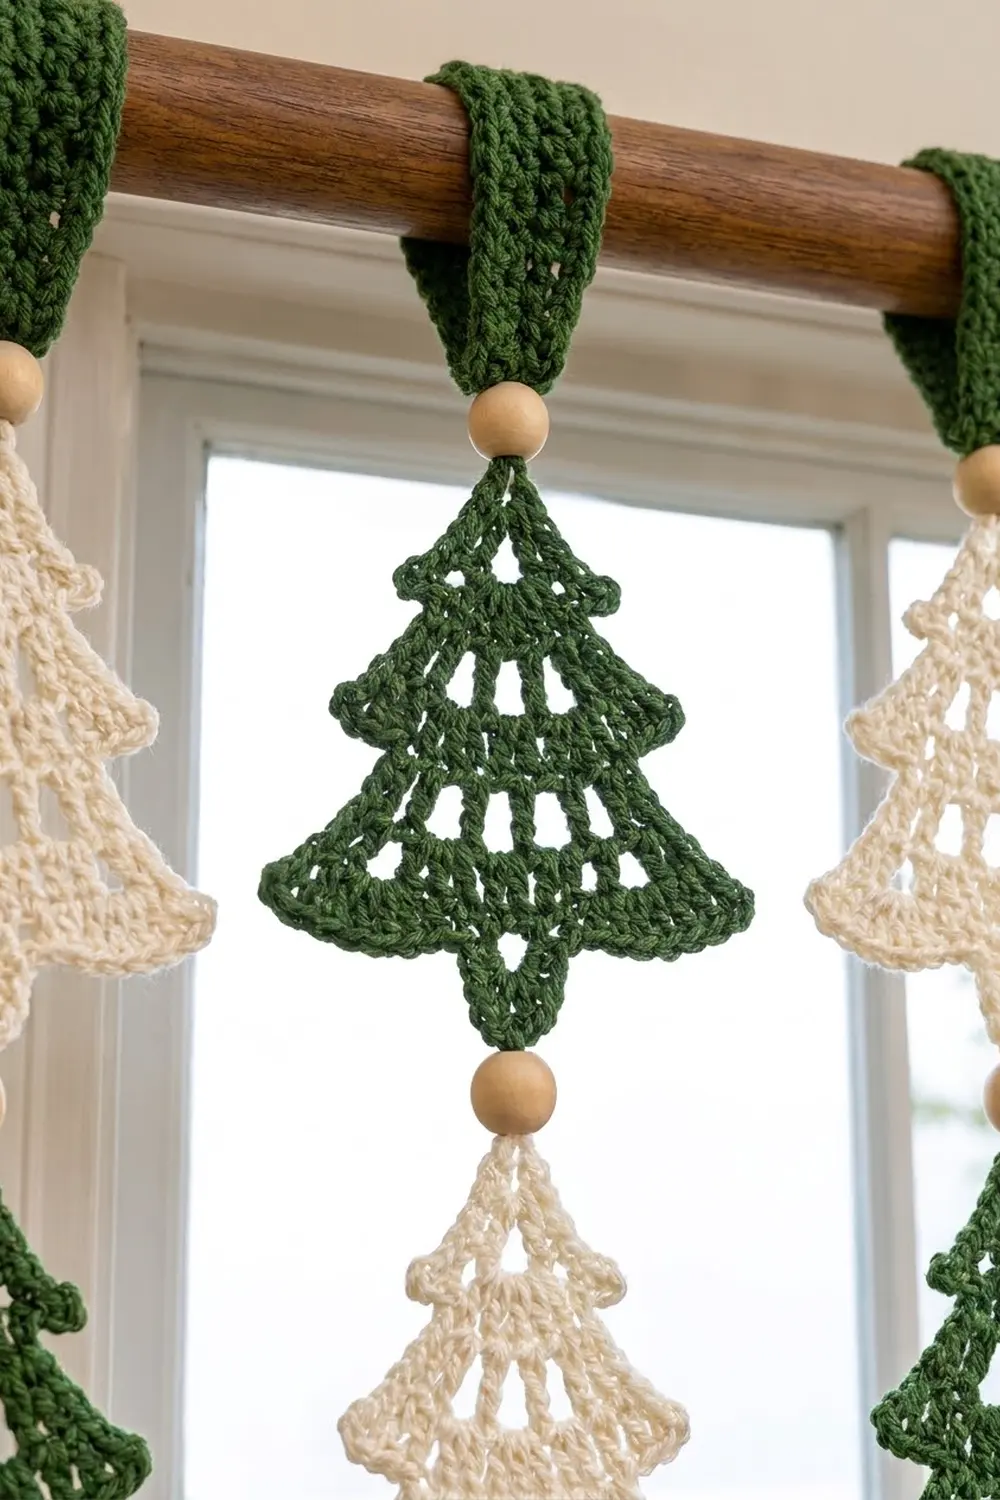
Tree Motif (Make 110)
Work in turned rows from the tip down to the trunk.
Tier 1
Row 1: Ch 4, 2 dc in 4th ch from hook (the skipped ch count as dc). Turn. (3 sts)
Row 2 (Mesh): Ch 3, 2 dc in first st, ch 1, sk next st, 3 dc in last st. Turn. (7 sts)
Row 3 (Solid): Ch 3, 2 dc in first st, dc in next 5 sts, 3 dc in last st. Turn. (11 sts)
Tier 2
Row 4 (Mesh, step in): Sl st in each of first 5 sts. Ch 3, 2 dc in same st as last sl st, ch 1, sk next st, 3 dc in next st. Leave the last 4 sts unworked. Turn. (7 sts)
That leaves 4 sts on each side of Row 3 that are not worked into. They form the bottom edge of Tier 1, which sticks out past Tier 2.
Row 5 (Solid): Work a Solid Row. Turn. (11 sts)
Row 6 (Mesh): Work a Mesh Row. Turn. (15 sts: 10 dc + 5 ch-1 sps)
Row 7 (Solid): Work a Solid Row. Turn. (19 sts)
Tier 3
Row 8 (Mesh, step in): Sl st in each of first 6 sts. Ch 3, 2 dc in same st as last sl st, ch 1, sk next st, dc in next st, rep from * 2 more times, ch 1, sk next st, 3 dc in next st. Leave the last 5 sts unworked. Turn. (13 sts)
Row 9 (Solid): Work a Solid Row. Turn. (17 sts)
Row 10 (Mesh): Work a Mesh Row. Turn. (21 sts: 13 dc + 8 ch-1 sps)
Row 11 (Solid): Work a Solid Row. Turn. (25 sts)
Trunk
Row 12: Sl st in each of first 12 sts. Ch 3 (counts as dc), dc in next 2 sts. Leave the last 11 sts unworked. Turn. (3 sts)
Row 13: Ch 3 (counts as dc), dc in next 2 sts. (3 sts) Do not fasten off.
The trunk sits on sts 12–14, the exact center of Row 11, with 11 sts left on each side. Go straight on to the edging round (see Border), using the same yarn. Finish the edging on every tree before joining.
Make All Pieces
- Color A trees: 55
- Color B trees: 55
- Color A tabs: 11
Tab (make 11, Color A): Ch 6. Sc in 2nd ch from hook and in each ch across. (5 sc) Then ch 1, turn, sc in each st across. (5 sc) Repeat that row until the tab measures 6 in (15.2 cm), about 33 rows in total. Fasten off, leaving a 12 in (30.5 cm) tail. Fold the tab in half and whipstitch the short ends together, 5 sts to 5 sts, to make a loop. The tab is 1 in (2.5 cm) wide and hangs 3 in (7.6 cm) from the fold to the seam. The loop fits rods up to 1.5 in (3.8 cm) across.
Layout (top to bottom, G = green, C = cream):
Strand:  1  2  3  4  5  6  7  8  9 10 11
Tree 1:  G  C  G  C  G  C  G  C  G  C  G
Tree 2:  C  G  C  G  C  G  C  G  C  G  C
Tree 3:  G  C  G  C  G  C  G  C  G  C  G
Tree 4:  C  G  C  G  C  G  C  G  C  G  C
Tree 5:  G  C  G  C  G  C  G  C  G  C  G
Tree 6:  C  G  C  G  C  G  C  G  C  G  C
Tree 7:  G  C  G  C  G  C  G  C  G  C  G
Tree 8:  C  G  C  G  C  G  C  G  C  G  C
Tree 9:  G  C  G  C  G  C  G  C  G  C  G
Tree 10: C  G  C  G  C  G  C  G  C  G  C
Each strand has 5 trees of each color, for 55 + 55 = 110 trees in total.
Joining
The strands are not joined to each other. Each strand hangs on its own, and the trees within a strand are linked by bead connectors.
Tree-to-tree connector: Thread a 20 in (50.8 cm) length of Color A on the tapestry needle. Pass it through the center trunk sc of the upper tree (the 2nd of the 3 sc along the trunk bottom), even out the ends, and knot once. Thread both ends through one bead. Then pass them through the ch-5 tip loop of the lower tree, back up through the bead, and through the trunk sc again.
Every connector runs from one center trunk sc to one tip loop, so each tree hangs straight below the one above it.
Tension: Before tying off, adjust the connector so the gap from trunk bottom to the next tree’s tip is exactly 1 in (2.5 cm), with the bead in the middle. Tie a square knot, weave the ends into the trunk, and trim. If you pull too tight, the trees tilt. If you leave slack, the gaps won’t match from strand to strand.
Top connector: Use the same method to link the center of the tab seam to the tip loop of Tree 1, again with a 1 in (2.5 cm) gap and one bead.
Each strand uses 10 beads (9 between trees, 1 at the top), for 110 beads in total.
Size checkpoint: One strand of trees measures 10 x 5.7 in + 9 x 1 in = 66 in (167.6 cm). Adding the 1 in (2.5 cm) top connector and the 3 in (7.6 cm) tab gives 70 in (177.8 cm) from the top of the rod. If two strands differ by more than 0.5 in (1.3 cm), adjust the connectors rather than the trees.
Border: Tree Edging Round
The edging is one round of sc in the same color as the tree, worked straight on from Row 13.
Border gauge: Work 2 sc into the end of each dc row, and 1 sc into each stitch along the steps. A dc row is 0.4 in (1.0 cm) tall and an sc is 0.2 in (0.5 cm) wide, so 2 sc fill each row end exactly. Along the steps, 1 sc sits on each 0.2 in (0.5 cm) dc, so the edge lies flat.
Edging Round: Ch 1, turn.
- Trunk bottom: sc in each of the 3 sts of Row 13. (3 sc)
- First side, going up:
- 2 sc in each row end of Rows 13 and 12 (4 sc)
- sc in each of the 11 unworked sts of Row 11 (11 sc)
- 2 sc in each row end of Rows 11–8 (8 sc)
- sc in each of the 5 unworked sts of Row 7 (5 sc)
- 2 sc in each row end of Rows 7–4 (8 sc)
- sc in each of the 4 unworked sts of Row 3 (4 sc)
- 2 sc in each row end of Rows 3–1 (6 sc)
- First side total: 46 sc
- Tip: (sc, ch 5, sc) in the foundation ch at the tip. (2 sc + one ch-5 loop)
- Second side, going down: work the same groups in reverse order: 6, 4, 8, 5, 8, 11, 4. (46 sc)
Sl st to the first sc and fasten off. Total: 3 + 46 + 2 + 46 = 97 sc, plus 1 ch-5 tip loop. On the side where the rows started with slip stitches, work the step sc into those sl sts. The count does not change.
Why the math works: Each side has 13 row ends (26 sc) and 20 step sts (20 sc), for 46 sc. Add 3 trunk sc and 2 tip sc and you get 97. One sc on each side adds 0.25 in (0.6 cm), so the tree grows from 5 in (12.7 cm) to 5.5 in (14.0 cm) wide. The trunk and tip sc take the height from 5.2 in (13.2 cm) to 5.7 in (14.5 cm).
Final Blocking
- Before joining, pin each tree RS up to 5.5 in (14.0 cm) x 5.7 in (14.5 cm).
- Pin out the 6 outer tier points so they look sharp.
- Pin the trunk straight and centered under the tip.
- Mist until damp and leave until completely dry.
- Block the tabs flat to 1 in (2.5 cm) x 6 in (15.2 cm) before folding.
- After joining, hang each strand for 24 hours so the connectors settle.
- If a strand twists, steam it lightly while it hangs, keeping the steam off the beads.
Final Quality-Control Checklist
- Every tree has 25 sts in Row 11 and 97 sc in the edging.
- Every trunk is centered on sts 12–14.
- All trees are 5.5 in (14.0 cm) x 5.7 in (14.5 cm), within 0.25 in (0.6 cm).
- Every connector gap is 1 in (2.5 cm).
- The colors match the layout grid.
- All strands are 70 in (177.8 cm) from the top of the rod.
- All knots are secure and all tails are woven in.
- Tabs are 6 in (15.2 cm) apart, center to center: 10 x 6 in + 5.5 in = 65.5 in (166.4 cm) total width.
Troubleshooting
- Tree cups or curls: The increases are too tight. Loosen the 3-dc groups or go up a hook size, then block.
- Tiers ruffle: Recount. Every row should be its base count + 4.
- Steps don’t show: Make sure you slip-stitched over the full 5, 6, or 12 sts at the start of Rows 4, 8, and 12.
- Trunk off center: Row 11 must have exactly 25 sts.
- Trees tilt: The connector isn’t in the center trunk sc. Re-tie it.
- Bead won’t pass: Thread one yarn end through at a time.
- Strands twist: Hang them with a light weight at the bottom overnight.
Care
Hand wash in cool water with mild soap, roll in a towel to press out the water, and dry the strands flat. Don’t let the wooden beads soak for long.
Final Notes
Here is the full measurement chain. A gauge of 20 dc x 10 rows = 4 in (10.2 cm) gives a tree of 5 in (12.7 cm) x 5.2 in (13.2 cm). The edging brings it to 5.5 in (14.0 cm) x 5.7 in (14.5 cm). Ten trees with 1 in (2.5 cm) bead gaps make a 66 in (167.6 cm) strand. With the tab and top connector, each strand hangs 70 in (177.8 cm). Eleven strands spaced 6 in (15.2 cm) apart give a curtain 65.5 in (166.4 cm) wide.
Get the first tree right and the rest will follow.
Happy crocheting!